OmniPod DASH User Manual
Insulin management system
Hide thumbs
Also See for DASH:
- Quick start manual (21 pages) ,
- Quick start manual ,
- User manual (104 pages)
Table of Contents
Advertisement
Quick Links
Advertisement
Table of Contents

Related Manuals for OmniPod DASH


Summary of Contents for OmniPod DASH
- Page 1 Podder’s handbook USER GUIDE...
- Page 2 Address: Insulet Corporation 100 Nagog Park, Acton MA 01720 Emergency Services: Dial 911 (USA only; not available in all communities) PDM Model PDM-USA1-D001-MG-USA1 Serial Number __________________________________________________ Omnipod DASH™ Insulin Management System Start Date _______________ Healthcare Provider Omnipod® System Trainer Name Name...
- Page 3 © 2018-2020 Insulet Corporation. Omnipod, the Omnipod logo, DASH, the DASH logo, and Podder are trademarks or registered trademarks of Insulet Corporation. All rights reserved. The Bluetooth® word mark and logos are registered trademarks owned by the Bluetooth SIG, Inc. and any use of such marks by Insulet Corporation is under license.
-
Page 4: Table Of Contents
Getting Started 1 Your Omnipod DASH™ Insulin Management System . . . . . 1 Welcome . . . . . . . . . . . . . . . . . . . . . . . . . . . . . . . . . . . . . . . . . . . . . . . . . . . . . . . . . . . . . . . . . . . . . . . 1 The Pod and PDM . - Page 5 Contents General PDM Settings . . . . . . . . . . . . . . . . . . . . . . . . . . . . . . . . . . . . . . . . . . . . . . . . . . . . . . . . . 2 3 Turning on and personalizing the PDM .
- Page 6 Contents 4 Entering Blood Glucose Readings . . . . . . . . . . . . . . . . . . . . . . .51 About Blood Glucose Testing .
- Page 7 Contents 8 Browsing Your PDM Records . . . . . . . . . . . . . . . . . . . . . . . . . . . .89 Notifications &...
- Page 8 Contents Reference 10 Alarms, Notifications, and Communication Errors . . . . 121 Overview . . . . . . . . . . . . . . . . . . . . . . . . . . . . . . . . . . . . . . . . . . . . . . . . . . . . . . . . . . . . . . . . . . . . 121 Responding to Alarms .
- Page 9 Contents Basal Insulin Delivery . . . . . . . . . . . . . . . . . . . . . . . . . . . . . . . . . . . . . . . . . . . . . . . . . . . . . . . . 149 Basal Programs .
- Page 10 Omnipod DASH™ System Label Symbols . . . . . . . . . . . . . . . . . . . . . . . . . . . . . . . . . . 193 Omnipod DASH™ System Notice Concerning Interference . . . . . . . . . . . . . . . . 194 Electromagnetic Compatibility .
- Page 11 This page intentionally left blank.
-
Page 12: Introduction
Introduction About This User Guide Caution: This User Guide is intended for use only with Personal Diabetes Manager (PDM) model PDM-USA1-D001-MG-USA1. To learn which version of the PDM you have, turn it over. If you see "PDM-USA1-D001-MG-USA1" on the back of the PDM, this is the correct User Guide. If you do not see it, call Customer Care. -
Page 13: Indications And Contraindications
(insulin lispro), and Apidra® (insulin glulisine). NovoLog, Fiasp, Humalog, and Admelog are compatible with the Omnipod DASH™ System for use up to 72 hours (3 days). Apidra is compatible with the Omnipod DASH™ System for use up to 48 hours (2 days). Before using a different insulin with the Omnipod DASH™... -
Page 14: Working With Your Healthcare Provider
Not recommended for individuals with hearing loss. Always verify your ability to hear Pod/PDM alarms and notifications. If you are unable to use the Omnipod DASH™ System according to instructions, you may be putting your health and safety at risk. Talk with your healthcare provider if you have questions or concerns about using the Omnipod DASH™... -
Page 15: Safety Features
Omnipod DASH™ System, especially during the first few weeks and months. When you have questions about diabetes management after starting on the Omnipod DASH™ System, do not hesitate to talk with your healthcare provider. For technical questions about your Omnipod DASH™ System setup or operation, or to order Omnipod DASH™... - Page 16 Introduction Alarms and notifications For your safety, the Omnipod DASH™ System provides a range of alarms and notifications to tell you that your attention is needed or to warn you of hazardous situations. For a description of the PDM's alarms and notifications, see "Alarms, Notifications, and Communication Errors"...
- Page 17 This page intentionally left blank.
-
Page 18: Your Omnipod Dash™ Insulin Management System
The Getting Started section of this book gives an overview of the basic operation and setup of the Omnipod DASH™ System. The User Guide section gives step-by- step instructions for using the Omnipod DASH™ System. The Reference section explains how the Omnipod DASH™... -
Page 19: The Pod And Pdm
The Pod is applied to your skin with an adhesive, similar to an adhesive bandage. The Pod that is used with the Omnipod DASH™ System has a blue needle cap. Bottom... - Page 20 Omnipod DASH™ Insulin Management System 1 The Personal Diabetes Manager (PDM) The PDM is a handheld device that controls and monitors the Pod's operations using wireless technology. Micro-B USB port: Used for charging the battery and exporting data Sound/vibrate button...
-
Page 21: Navigating Screens And Entering Information
1 Omnipod DASH™ Insulin Management System Navigating Screens and Entering Information This section explains how to use the touchscreen, how to enter numbers or text into the PDM, and how this User Guide describes moving between PDM screens. Touchscreen Basics The PDM displays messages and options for you on its touchscreen. -
Page 22: Entering Numbers And Text
Omnipod DASH™ Insulin Management System 1 Entering Numbers and Text Tapping fields to enter data Fields allow you to specify values to be used by the PDM. Tapping an editable field (which is either framed by a box or underlined) opens a keypad, number pad or scroll wheel. - Page 23 (.) to add a decimal point. Tap the backspace icon ( to delete the most recent entry from the entry field. The comma (,), dash (-), and underscore (_) are not used. Tap the green checkmark ( ) to accept the entered number.
-
Page 24: Navigation Icons And Navigation Shorthand
Omnipod DASH™ Insulin Management System 1 Checkboxes, radio buttons, and drop-down lists Checkboxes are squares. Tap a checkbox to check or uncheck it. You can check more than one checkbox in a list. Radio buttons are circles. Tap a radio button to select it. A dot appears inside the selected radio button. - Page 25 1 Omnipod DASH™ Insulin Management System Navigation shorthand The User Guide uses the ">" symbol to indicate navigating from one screen to another. For example, the following notation: • Menu icon ( ) > Pod > CHANGE POD tells you to: Tap the Menu icon ( ) in the upper left of the Home screen.
-
Page 26: The Status Bar
Omnipod DASH™ Insulin Management System 1 The Status Bar Most screens have a status bar that shows you: • The Pod status, including how much insulin is left in an active Pod • Whether a temp basal rate is running •... -
Page 27: The Pdm's Lock And Pin Screens
1 Omnipod DASH™ Insulin Management System For charging instructions, see"Charge the battery" on page 22. The PDM's Lock and PIN Screens After you set up your PDM, the Lock and PIN screens appear whenever you wake up your PDM. The Lock and PIN screens help confirm that you are using the correct PDM. - Page 28 Omnipod DASH™ Insulin Management System 1 Lock your PDM To lock your PDM when you are finished using it: 1. Press the Power button briefly. This locks the PDM by putting it to sleep. 2. Store your PDM in a safe, accessible location.
-
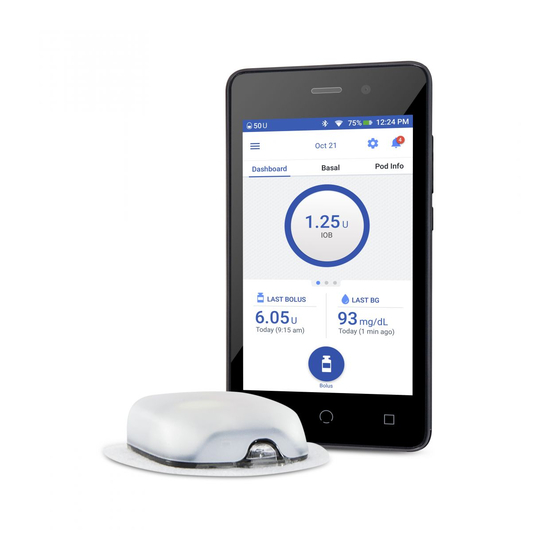
Page 29: The Pdm's Home Screen
1 Omnipod DASH™ Insulin Management System The PDM's Home Screen The Home screen provides information about recent boluses, blood glucose values, the active basal rate, and the active Pod. It also provides access to the PDM functions, alarm information, and settings. The Home screen also has a Bolus button to give quick access to the bolus screen. -
Page 30: Dashboard Tab
Omnipod DASH™ Insulin Management System 1 Dashboard tab The Dashboard tab is available if the Bolus Calculator is on and is usually not available if the Bolus Calculator is off. When the Bolus Calculator is on When the Bolus Calculator is on, the Dashboard tab displays: •... -
Page 31: Basal Tab / Temp Basal Tab
1 Omnipod DASH™ Insulin Management System Basal tab / Temp Basal tab This tab is labeled Basal or Temp Basal, depending on whether a Basal Program or temp basal is active. Basal Program By default, the Basal tab shows the name and graph of the active Basal Program. -
Page 32: Pod Info Tab
Omnipod DASH™ Insulin Management System 1 Pod Info tab The Pod Info tab shows whether there is an active Pod, and, if so, how much insulin is left in the Pod and when the Pod will expire. If the PDM cannot communicate with an active Pod, the Pod Info tab says "No... -
Page 33: Last Bg Section
1 Omnipod DASH™ Insulin Management System When your Pod will expire soon, a yellow Change Pod soon banner appears on the Pod Info tab. The yellow banner appears 12 hours before Pod expiration or at the time of your Pod expiration reminder, whichever is earlier. -
Page 34: Last Bolus Section
Omnipod DASH™ Insulin Management System 1 Last bolus section The lower left side of the Home screen displays bolus information. Between boluses When a bolus is not being delivered, the section is labeled LAST BOLUS and shows the amount and time of the most recent bolus. -
Page 35: The Home Page's Menu
1 Omnipod DASH™ Insulin Management System The Home Page's Menu The Menu on the Home page lets you access most of the PDM's functions. To display the Menu: • Tap the Menu icon ( ) in the upper left corner of the Home screen. - Page 36 Omnipod DASH™ Insulin Management System 1 Food library The Food Library option allows you to look up the carbohydrate content of various foods and to create food favorites (see "Using the Food Library" on page 66). History menu Tap the down arrow ( ∨ ) next to History to reveal the submenu: •...
-
Page 37: Pdm Messages To You
1 Omnipod DASH™ Insulin Management System PDM Messages to You The PDM can deliver alarm messages, notifications, and confirmation messages. Alarms Hazard alarms and advisory alarms require your immediate attention (see "Alarms, Notifications, and Communication Errors" on page 121). If you ignore an alarm, you could develop hypoglycemia or hyperglycemia. -
Page 38: Initial Pdm Setup
You can obtain Pods by contacting Customer Care (see the first page of this User Guide for contact information). Preparing for Your Training If you are a first-time Omnipod DASH™ System user, you need to meet with your Omnipod DASH™ System Trainer to set up your Personal Diabetes Manager (PDM) and first Pod. - Page 39 2 Initial PDM Setup Warnings: Do NOT use the Omnipod DASH™ System before you have been trained. Inadequate training could put your health and safety at risk. Follow your healthcare provider's instructions for initializing the PDM. Improper setup could put your health and safety at risk.
-
Page 40: General Pdm Settings
Omnipod DASH™ System alarms will also wake the PDM from sleep mode. 2. When a screen with the Omnipod DASH™ logo appears, use your finger to swipe from left to right across the screen. Note: If you see an unexpected screen instead of the Omnipod DASH™ logo screen, see "Troubleshooting PDM Startup"... -
Page 41: Enter A Pin
2 Initial PDM Setup b. Tap the box to add a checkmark. c. Tap CONTINUE. Note: If you are under 18, your parent or guardian must accept for you. 5. Tap BEGIN SETUP. 6. Tap letters on the keypad to enter a personalized screen message (see "Selecting, Adding, and Deleting Items"... -
Page 42: Set The Time Zone And Time
AM or PM. 8. Review the time and tap CONTINUE. Caution: Check that you have set the time correctly. The time setting affects the operation of several Omnipod DASH™ System features and can impact your insulin delivery. -
Page 43: Set The Date
2 Initial PDM Setup Set the date On the Set Current Date screen: 1. Tap MM/DD/YYYY to display a list of date formats. Tap the desired date format. 2. Set the Month, Day, and Year fields by scrolling their respective wheels one at a time. -
Page 44: Create A Basal Program
Initial PDM Setup 2 You can adjust your Maximum Basal Rate later, if your needs change. Create a Basal Program The next step is to define a Basal Program. For a description of basal rates, basal segments, and Basal Programs, see "Basal Insulin Delivery" on page 149. Name and tag the Basal Program 1. - Page 45 2 Initial PDM Setup Note: The two vertical blue lines on the graph near the top of the screen show the start and end time for the basal segment. The selected basal rate for the segment is shown between the two vertical lines. 3.
-
Page 46: Temp Basal Configuration
Initial PDM Setup 2 4. To add a new segment: a. Tap the row containing the start time of the new segment. b. Tap the End Time field, and enter the start time of the new segment as the end time of this segment. c. -
Page 47: Blood Glucose Settings
2 Initial PDM Setup Blood Glucose Settings The blood glucose settings define what blood glucose readings are considered in range and allow you to pair to a CONTOUR® NEXT ONE BG meter. Upper and lower limits for BG Goal Range You can set the upper and lower limits of your BG Goal Range by using the number pad or the slider:... -
Page 48: Pair To A Bg Meter
Initial PDM Setup 2 Pair to a BG meter If desired, you can pair your PDM to a CONTOUR® NEXT ONE BG meter (BG meter). Once paired, blood glucose readings can be transmitted via Bluetooth® wireless technology from your BG meter to your PDM. Note: If you do not want to pair to a BG meter, tap SKIP. -
Page 49: Bolus Calculator Settings
2 Initial PDM Setup 7. Optional: Rename your paired BG meter: a. Tap the Options icon ( ) next to the paired BG meter. Then tap Edit. b. Tap the Name field and use the keypad to enter a new name for your BG meter, then tap the checkmark. -
Page 50: Target Bg And Correct Above Values
Initial PDM Setup 2 Target BG and Correct Above values The Bolus Calculator aims to bring your blood glucose to the Target BG value if your current blood glucose level is above the Correct Above value. You can establish up to eight different blood glucose targets for different times of day. Define the segments Setting values for each segment follows the same pattern that you used to create your... -
Page 51: Minimum Bg For Calcs
2 Initial PDM Setup Minimum BG for Calcs If your blood glucose level is below the Minimum BG for Calcs that you specify, the Bolus Calculator is disabled (see "The Bolus Calculator" on page 156). 1. To enter your Minimum BG for Calcs, tap the Min BG for Calcs field and enter the number on the number pad. -
Page 52: Correction Factor
Initial PDM Setup 2 Correction Factor Your Correction Factor defines how much one unit of insulin lowers your blood glucose level. The Bolus Calculator uses the Correction Factor to calculate the correction portion of a suggested bolus. You can create up to eight Correction Factor segments per day. -
Page 53: Other Bolus Settings
2 Initial PDM Setup 1. Tap the Duration of Insulin Action field and use the scroll wheel to specify your Duration of Insulin Action. 2. Tap NEXT. Other Bolus Settings The remaining bolus settings are used whether the Bolus Calculator is on or off. Maximum Bolus The PDM will not let you request a bolus above the Maximum Bolus setting. -
Page 54: Changing Your Pod
CHAPTER 3 Changing Your Pod Beginning the Pod Change Process Changing your Pod consists of deactivating your current Pod and activating a new Pod. Your Pod should be changed at least once every 48 to 72 hours (2 to 3 days) or after delivering 200 units of insulin. -
Page 55: First Time Activating A Pod
3 Changing Your Pod First Time Activating a Pod Your Omnipod DASH™ System trainer will help you set up your first Pod. After completing the PDM setup flow, the Home screen displays "No Active Pod." 1. Tap SET UP NEW POD. -
Page 56: No Active Pod
Changing Your Pod 3 3. When the green banner tells you to remove your Pod, remove the deactivated Pod from your body: a. Gently lift the edges of the adhesive tape from your skin and remove the entire Pod. Tip: Remove the Pod slowly to help avoid possible skin irritation. b. -
Page 57: Preliminary Pod Change Steps
1. Gather the necessary supplies: • A vial of rapid-acting U-100 insulin cleared for use in the Omnipod DASH™ System • An unopened DASH™ Pod (look for the Omnipod DASH™ logo on the Pod tray lid) • Alcohol prep swabs •... -
Page 58: Fill The Syringe With Insulin
Changing Your Pod 3 Fill the Syringe with Insulin The next step is to fill the syringe that came with the Pod (the "fill syringe") with insulin: 1. Use an alcohol prep swab to clean the top of the insulin vial. 2. -
Page 59: Fill, Pair, And Apply The Pod
Pod. Do not insert the fill syringe more than once into the fill port. Only use the fill syringe and needle that came with your Pod. The fill syringe is intended for single use only and should only be used with the Omnipod DASH™ System. - Page 60 DASH Pod and tap TRY AGAIN. • If only one Pod is in range, the Omnipod DASH™ System performs a series of safety checks and primes the Pod. 3. Listen for the tone from the PDM that indicates that the Pod is paired to the PDM and is ready to be applied.
Need help?
Do you have a question about the DASH and is the answer not in the manual?
Questions and answers