
Related Manuals for OmniPod DASH SYSTEM PODDER


Summary of Contents for OmniPod DASH SYSTEM PODDER
- Page 1 OMNIPOD DASH SYSTEM ™ PODDER RESOURCE GUIDE ™ Insulin Delivery That’s Simple, Smart, and Discreet.
-
Page 3: Table Of Contents
This Resource Guide is intended to be used in conjunction with your Diabetes Management Plan, input from your healthcare provider, and the Omnipod DASH Insulin Management ™ System User Guide. Personal Diabetes Manager imagery is for illustrative purposes only and should not be considered suggestions for user settings. -
Page 4: Introduction
™ Preparing to Start on Omnipod DASH System. ™ This Resource Guide will lead you through some of the key functions you may need to perform with the Omnipod DASH System. ™ Have questions? We’re here to help with our 24/7 Customer Care... -
Page 5: Supply List And Reorder
Supply List and Reorder SUPPLIES/REORDER You Should Have the Following Supplies Reorder Tips: on Hand at All Times: It is a good idea to call your Omnipod DASH System ™ supplier (Insulet or other vendor) when you open your Omnipod DASH ™... -
Page 6: The Pod
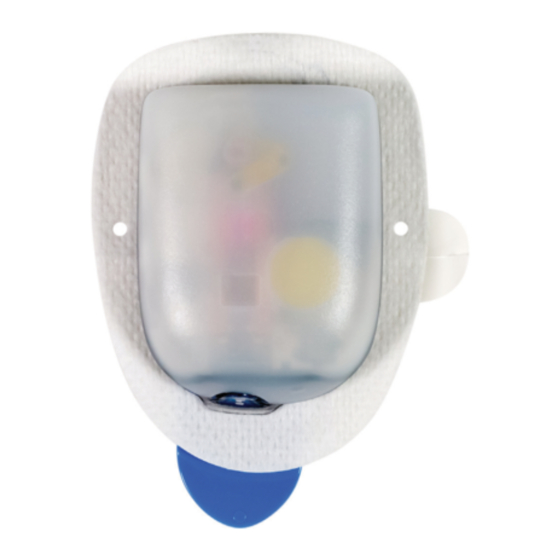
INTRODUCTION | The Pod THE OMNIPOD DASH SYSTEM POD ™ A Bluetooth -Enabled Pod that Delivers both Basal and Bolus Insulin. ™ Pink Slide Insert Viewing Window Fill Port BOTTOM Adhesive Backing Blue Needle Cap... -
Page 7: The Personal Diabetes Manager
INTRODUCTION | The Personal Diabetes Manager THE OMNIPOD DASH SYSTEM PERSONAL ™ DIABETES MANAGER A Bluetooth -Enabled Personal Diabetes Manager (PDM) that Controls ™ All Pod Functions. MICRO-B USB PORT You can find the following items when you tap on... - Page 8 * At start up the Personal Diabetes Manager and Pod should be adjacent and touching, either in or out of tray to ensure proper communication during priming. At least 5 feet (1.5 meters) during normal operation Caution: Consult User Guide. For more information on your Personal Diabetes Manager, refer to your Omnipod DASH Insulin Management System User Guide. ™...
- Page 9 Lock screen, so that anyone who may find it can easily return it to you. In update. Once all conditions are met, closer ranges you can also use the Find My PDM feature in the Omnipod tap “Check for Updates. ” If an update is DISPLAY app.
-
Page 10: Basal/Bolus
Caution: Consult User Guide. For more information about the Suggested Bolus Calculator, refer to your Omnipod DASH Insulin Management System User Guide. ™... -
Page 11: Your Personal Diabetes Manager Settings
INTRODUCTION | Your Personal Diabetes Manager Settings YOUR PERSONAL DIABETES MANAGER OMNIPOD DASH PuMP THerAPy OrDer FOrM ™ SETTINGS Date _______/______/_______ It is always a good idea to keep a copy of your Personal Diabetes Manager settings handy in the event you have to set up another Dear ______________________________________________________________ Personal Diabetes Manager. -
Page 12: Counting Carbohydrates
INTRODUCTION | Counting Carbohydrates WHY CARBOHYDRATES MATTER What are Carbohydrates? Features” will teach you more about bolusing for certain meals with the Omnipod DASH Insulin Management System. ™ + Starches Starchy vegetables like potatoes, corn and peas, dried beans How do I figure out the amount of carbohydrates... - Page 13 INTRODUCTION | Counting Carbohydrates Know Your Favorites Food Serving Carbohydrate Food Serving Carbohydrate Food Food Category Size Grams Category Size Grams 2 slices 1 small White or wheat bread 25 - 30 Apple (2 oz) (4 oz) Hotdog or hamburger 1 whole 1 small Banana...
-
Page 14: Omnipod Dash
OMNIPOD DASH SYSTEM INSTRUCTIONS | How to Change the Pod ™ HOW TO CHANGE THE POD You may need to change the Pod: When the reservoir is low or empty, or the Pod is nearing If you experience unexpected elevated blood glucose levels... -
Page 15: Activate A New Pod
™ • Vial of U-100, rapid acting insulin at room temperature. (See the Omnipod DASH System User Guide for ™ insulins tested and found to be safe with the Omnipod DASH Insulin Management System) ™ • Alcohol prep swab Wash your hands To set up a new Pod, Tap “SET UP NEW... - Page 16 OMNIPOD DASH SYSTEM INSTRUCTIONS | Activate a New Pod ™ 1. Fill the Pod Remove the fill syringe and Pull outward to remove the Draw air into the fill syringe needle from its sterile packaging. syringe’s protective cap equal to the amount of insulin...
- Page 17 Pod the PDM will beep placement tips The Pod will beep twice, indicating that the Omnipod DASH System is ready ™ to proceed Use Pod site map to help you track your current and recent Return to the PDM.
- Page 18 OMNIPOD DASH SYSTEM INSTRUCTIONS | Activate a New Pod ™ 2. Apply the Pod (continued) Remove Pod’s blue Carefully remove white Apply the Pod to the For optimal adhesion, needle cap paper backing from selected site always clean the the adhesive, ensuring...
- Page 19 OMNIPOD DASH SYSTEM INSTRUCTIONS | Activate a New Pod ™ 3. Press Start Tap “START” Verify that the The Pod Once the Your Pod is Pod is securely automatically cannula has now active! attached to inserts the inserted, verify The PDM will...
-
Page 20: Pod Placement/Prep/Tips
BACK FRONT BACK © 2017 Insulet Corporation. Omnipod, Podder and the Omnipod logo are trademarks or registered trademarks of www.myomnipod.co Insulet Corporation in the United States of America and other various jurisdictions. All rights reserved. U.S. Patent Information at www.insulet.com/patents. - Page 21 OMNIPOD DASH SYSTEM INSTRUCTIONS | Pod Placement/Prep/Tips ™ Prepping For Your Pod Remember to stay cool and be cool (dry and not sweating) when it’s time to change your Pod. Here are more potential sticking points: Trouble with… Problem Solutions...
-
Page 22: Blood Glucose Meter Pairing
OMNIPOD DASH SYSTEM INSTRUCTIONS | Blood Glucose Meter Pairing ™ CONTOUR NEXT ONE ® BLOOD GLUCOSE METER PAIRING Tap Menu icon on the Under “Settings” tap Tap “Pair BG Meter” Your PDM will Home screen “Blood Glucose” search for available... -
Page 23: Blood Glucose Meter Syncing
Use a fresh lancet for each test - reusing lancets causes them to dull and will hurt more WARNING: Measurements obtained from alternate site testing should not be used to calculate insulin doses with Omnipod DASH Insulin Management System. ™... -
Page 24: Delivering A Bolus
OMNIPOD DASH SYSTEM INSTRUCTIONS | Delivering a Bolus ™ DELIVERING A BOLUS Reminder The Home screen displays a progress bar and details while you are delivering a bolus. You cannot use your PDM during an immediate bolus. Tap Bolus Tap “Enter Tap “START”... -
Page 25: Suspend And Resume Insulin Delivery
OMNIPOD DASH SYSTEM INSTRUCTIONS | Suspend and Resume Insulin Delivery ™ SUSPEND AND RESUME INSULIN DELIVERY Tap Menu icon on the Tap “Suspend Insulin” Scroll to desired The Home screen Home screen duration of insulin displays a yellow suspension (min 0.5 banner stating “Insulin... -
Page 26: Important Tips And Reminders
OMNIPOD DASH SYSTEM INSTRUCTIONS | Important Tips and Reminders ™ IMPORTANT PDM TIPS AND REMINDERS These tips are intended for use only with the DASH Personal Diabetes Manager ™ model. The serial number and model can be found on the back of the PDM. - Page 27 OMNIPOD DASH SYSTEM INSTRUCTIONS | Important Tips and Reminders ™ How to Edit a Basal Program Tap “Basal” on the Tap “EDIT” on the Tap “SUSPEND Tap to edit program Home screen basal program you INSULIN” if you are name, choose...
- Page 28 OMNIPOD DASH SYSTEM INSTRUCTIONS | Important Tips and Reminders ™ How to View and Edit IC Ratio and Correction Factor Tap “Settings” to expand list. Tap on the setting you want Tap Menu icon on the to edit Home screen Tap “Bolus”...
-
Page 29: Additional Notes
ADDITIONAL NOTES... -
Page 30: Advanced Features
ADVANCED FEATURES | Bolus OMNIPOD DASH SYSTEM ™ ADVANCED FEATURES How to Use the Extended Bolus Feature When to use: This feature is most commonly used for high-fat and/or high-protein meals such as pizza, cheeseburgers, or fried chicken when the digestion of carbohydrates could be delayed. -
Page 31: Basal
ADVANCED FEATURES | Basal How to Set a Temporary (Temp) Basal Rate When to use: A temporary basal rate lets you adjust your background insulin for a predetermined period of time. This feature is best used to account for a temporary change in a daily routine, such as physical activity or times of illness. - Page 32 ADVANCED FEATURES | Basal How to Create and Use Additional Basal Programs When to use: Different basal programs are commonly used for entire days out of your common routine (e.g. weekends vs. work days.) Please consult with your healthcare provider prior to creating additional basal programs.
- Page 33 ADVANCED FEATURES | Basal In Basal Programs, you can activate, edit or delete the different basal programs you have saved by tapping on the Options icon (3 dots) Review your new Choose to activate Tap “CONTINUE” basal program your new basal to review your time program now or later segments and...
-
Page 34: Food Library
ADVANCED FEATURES | Food Library How to Use the Food Library When to use: Your DASH PDM contains a Food Library option that allows you to look up the ™ carbohydrate content of various foods and create custom foods. Tap Bolus button on the Home Tap “FOOD LIBRARY”... -
Page 35: Custom Foods
ADVANCED FEATURES | Custom Foods How to Create and Use Custom Foods When to use: Creating Custom Foods allows you to save your favorite food items, snacks or meals that you eat frequently. You will be able to view these Custom Foods in MY FOODS. Tap Menu icon on the Home Tap “Food Library”... -
Page 36: Presets
ADVANCED FEATURES | Presets How to Create and Use Temp Basal Presets When to use: Best used for “temporary” routine activities, such as an exercise class that occurs twice a week. The Personal Diabetes Manager can store up to 12 temporary basal presets. You will be able to access your temp basal presets when you select Temp Basal from your main menu. - Page 37 ADVANCED FEATURES | Presets If you have already created Temp Presets you can access them from Set Temp Basal Tap “SELECT FROM PRESETS” Tap on the Options icon (3 dots) to activate, edit or delete your Temp Basal Presets Tap “SAVE” “CONFIRM”...
- Page 38 ADVANCED FEATURES | Presets How to Create and Use Bolus Presets When to use: Bolus presets can only be used if your bolus calculator is OFF. This feature is best for those utilizing set bolus amounts at their meals. You will be able to access your bolus preset when you select Bolus from the home screen.
-
Page 39: Troubleshooting
TROUBLESHOOTING | Sick Day Management SICK DAY MANAGEMENT Reminder The symptoms of DKA (diabetic ketoacidosis) are much like those Action Plan of the flu. Before assuming you Discuss Sick Day Management with your healthcare provider. Always follow have the flu, check your BG to rule your healthcare provider’s guidelines for your individual needs. -
Page 40: Hypoglycemia
TROUBLESHOOTING | Hypoglycemia HYPOGLYCEMIA Blood Glucose (BG) < 70 mg/dL or ≤ 80 mg/dL with Symptoms Always follow your healthcare provider’s guidelines. The below guidelines are derived from The Joslin Diabetes Center’s recommendations and may differ from your own healthcare providers guidelines. Mild to Moderate Hypoglycemia Symptoms Shakiness Unexplained sweating... - Page 41 PDM. Did you bolus with food? Did you consume alcohol? Consult your Omnipod DASH Insulin Management System ™ User Guide for additional information. CAUTION: Consult User Guide. The above general guidelines are drawn from Joslin Diabetes Center. For further guidance please consult with your healthcare provider for individualized advice.
-
Page 42: Hyperglycemia
TROUBLESHOOTING | Hyperglycemia HYPERGLYCEMIA Reminder If you are experiencing persistent Blood Glucose (BG) Reading ≥ 250 mg/dL nausea and/or vomiting, or have diarrhea over two hours, Always follow your healthcare provider’s guidelines. The below guidelines are derived contact your healthcare provider from The Joslin Diabetes Center’s recomendations and may differ from your own immediately. - Page 43 TROUBLESHOOTING | Hyperglycemia Hyperglycemia Symptoms Fatigue Unusual thirst or hunger Blurred vision Frequent urination (i.e. at night) Unexplained weight loss Slow healing of cuts or sores Verify and Check BG Level If BG is Over 250 mg/dL Check Urine/Blood for Ketones Trace or Negative Small urine or 0.6-0.9 mmol/L Moderate –...
-
Page 44: Notifications, Alerts & Alarms
If you wait too long to address the alarm, it can escalate to a hazard alarm. For more information about advisory alarms, see Chapter 10, “Alarms, Notifications, and Communication Errors” in your Omnipod DASH Insulin Management User Guide ™... - Page 45 PDM to resolve the issue quickly. Caution: Consult User Guide. To learn more about alarms and how to handle them, see Chapter 10, Alarms, Notifications and Communication Errors, in your Omnipod DASH ™ Insulin Management System User Guide.
-
Page 46: Digital Resources
OMNIPOD DASH MOBILE APPS ™ Omnipod DISPLAY Omnipod VIEW ™ ™ The Omnipod DISPLAY App is for the The Omnipod VIEW app is ideal for the ™ ™ person who operates the PDM. It is a caregivers/care team of the Podder . -
Page 47: Additional Notes
ADDITIONAL NOTES... - Page 48 © 2018 Insulet Corporation. Omnipod, the Omnipod logo, DASH, the DASH logo, Omnipod DISPLAY, Omnipod VIEW, PodderCentral and Podder are trademarks or registered trademarks of Insulet Corporation. All rights reserved. Ascensia, the Ascensia Diabetes Care logo, and Contour are trademarks and/or registered trademarks of Ascensia Diabetes Care. Glooko is a trademark of Glooko, Inc.
Need help?
Do you have a question about the DASH SYSTEM PODDER and is the answer not in the manual?
Questions and answers