Samsung SR8980 User Manual (Windows 7) User Manual
Vacuum cleaning robot
Hide thumbs
Also See for SR8980 User Manual (Windows 7):
- Manuale dell'utente (220 pages) ,
- Instrukcja obs?ugi (272 pages) ,
- User manual (60 pages)
Table of Contents
Advertisement
Quick Links
Vacuum Cleaning Robot
This manual is made with 100% recycled paper.
✻ Before operating this unit, please read the instructions carefully.
✻ For indoor use only.
user manual
imagine
the possibilities
Thank you for purchasing a Samsung product.
To receive a more complete service,
please register your product at
www.samsung.com/register
SR8980
English
Advertisement
Table of Contents
Troubleshooting

Related Manuals for Samsung SR8980 User Manual (Windows 7)


Summary of Contents for Samsung SR8980 User Manual (Windows 7)
- Page 1 ✻ Before operating this unit, please read the instructions carefully. ✻ For indoor use only. user manual imagine the possibilities Thank you for purchasing a Samsung product. To receive a more complete service, please register your product at www.samsung.com/register SR8980...
- Page 2 safety information SAFETY INFORMATION • Before operating the appliance, please read this manual thoroughly and retain it for your reference. WARNING • Because these following operating instructions cover various models, the characteristics of your vacuum cleaner may differ slightly from those described in this manual. WARNING CAUTION/WARNING SYMBOLS USED Indicates that a danger of death or serious injury exists.
-
Page 3: Important Safety Instructions
IMPORTANT SAFETY INSTRUCTIONS When using an electrical appliance, basic precautions should be observed, including the following: READ ALL INSTRUCTIONS BEFORE USING YOUR VACUUM CLEANING ROBOT. Unplug from outlet when not in use and before conducting maintenance. WARNING: to reduce the risk of fi re, electric shock, or injury: GENERAL •... -
Page 4: Save These Instructions
safety information VACUUM CLEANING ROBOT • Do not pick up hard or sharp objects such as glass, nails, screws, coins, and etc. • Do not use without a fi lter in place. When servicing the unit, never put fi ngers or other objects into the fan chamber in case the unit accidentally turns on. -
Page 5: Table Of Contents
contents SAFETY INFORMATION PRODUCT FEATURES ASSEMBLING THE CLEANER OPERATING THE CLEANER MAINTAIN TOOLS AND FILTERS TROUBLESHOOTING PRODUCT SPECIFICATION 06 Power Related 07 Before Use 10 In Use 11 Cleaning and Maintenance 15 Components 16 Name of each part 20 Installing the vacuum cleaning robot Installation order Turning the Power Switch on or off Installing the charger... -
Page 6: Safety Information
safety information POWER RELATED Do not bend the power cord forcefully or place a heavy object on it that could break it. WARNING This may result in fi re or electric shock. Make sure to remove any dust or water from the power plug. WARNING Failing to do so may result in a malfunction or electric shock. -
Page 7: Before Use
BEFORE USE Before activating the vacuum cleaning robot, make sure that the dust bin is assembled. CAUTION If the dust bin is not inserted, vacuum cleaning robot will not operate. Never use vacuum cleaning robot in locations with combustible material such as. CAUTION Locations with candles or desk lamps on the fl... - Page 8 Remove small objects or brittle items from the area to be cleaned in advance. CAUTION Make sure to clear any objects before cleaning. Make sure to remove fragile items such as china, glass objects, fl owerpots, etc. Vacuum cleaning robot does not recognize coins, rings or other valuable items such as jewelry.
- Page 9 Install the charger in a location that can be easily accessed by the vacuum cleaning robot. CAUTION If the charger is installed in a corner, this may cause extra movements and may disturb the automatic recharging process. Objects in front of the charger will prevent the vacuum cleaning robot from auto-charging itself.
-
Page 10: In Use
IN USE You cannot use the vacuum cleaning robot on thick carpets. CAUTION This may result in problems with the vacuum cleaning robot. This may result in damage to carpets. Do not use the vacuum cleaning robot on a table or other high locations. -
Page 11: Cleaning And Maintenance
Do not move the robotic vacuum cleaner holding the dustbin part. CAUTION This may cause the dustbin to separate, resulting in injury or serious damage to the product. Vacuum cleaning robot may not be able to continue its operation if it is stuck at the entrance or veranda doorsill. NOTE To resume operating, turn the Power Switch off and then on again after moving it to a location where it can continue cleaning. - Page 12 Failing to do so may result in fi re or electric shock. Before cleaning the charger, make sure to disconnect the power cord for safety. WARNING Contact the Samsung Electronics customer care center to replace the battery. WARNING Failing to use original batteries will result in product failure.
-
Page 13: Product Features
product features CONVENIENT VIRTUAL GUARD FUNCTION You can confi ne the vacuum cleaning robot to a particular section by using the Fence (virtual wall) mode. DELICATE CLEANING OF EVERY CORNER Since the vacuum cleaning robot cleans the fl oor in a sequential way ( determined by the ceiling shape recognition function, it cleans every corner of the fl... - Page 14 AUTO CHARGING THE AUTO DUST EMPTYING FUNCTION OF THE VACUUM CLEANING ROBOT DOORSILL CROSSING About 1cm About 1cm Stair type Stair type Vertical type Vertical type AVOIDING OBSTACLES ANTI-FALLING SAFETY DEVICE stop stop 14_ product features When the battery is low, the vacuum cleaning robot is automatically guided to the charger to enable it to perform a quick auto charge.
-
Page 15: Assembling The Cleaner
assembling the cleaner COMPONENTS ■ Others Components (AAA-Type Batteries) (AAA-Type Batteries) User Manual / VIRTUAL GUARD 2 Battery Quick Start Guide Accessory for Carpet ■ Main Body ■ Remote Control ■ Charger (Station) Spare Filter Cleaning Brush assembling _15... -
Page 16: Name Of Each Part
NAME OF EACH PART ■ Main unit Display panel Display panel Virtual Guard Sensor Virtual Guard Sensor Remote Control Sensor Remote Control Sensor Obstacle Sensor Obstacle Sensor Bumper Sensor Bumper Sensor Remote Control Sensor Remote Control Sensor Cliff Sensor Cliff Sensor Rotating Side Brush Rotating Side Brush Charge Pin... -
Page 17: Installing The Batteries
■ Charger (Station) Auto Empty On/Off Select button Auto Empty On/Off Select button Power button Power button Dust inlet of the Dust inlet of the vacuum cleaning vacuum cleaning robot dustbin robot dustbin ■ VIRTUAL GUARD Lamp Lamp Distance Detection Sensor Distance Detection Sensor ■... -
Page 18: Remote Control
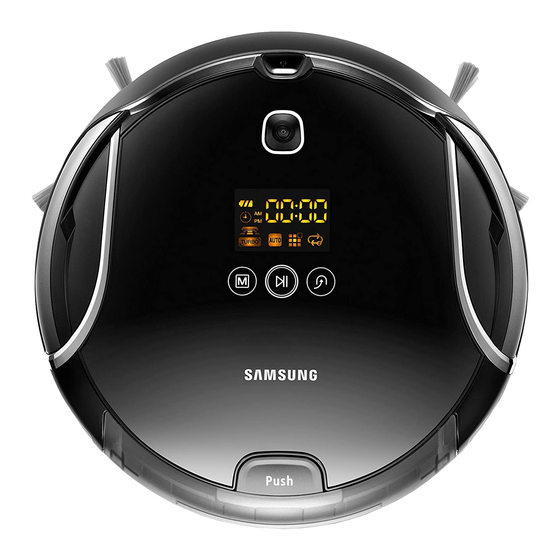
■ Remote Control Power Power Auto Auto Directional Directional Buttons Buttons (moving backwards is (moving backwards is not supported.) not supported.) Manual Manual Turbo Turbo ■ Installing the Remote Control Batterise Batteries are not installed in the remote control when purchasing the product. Install the batteries (type AAA) before use. - Page 19 ■ Display panel DISPLAY PART Number Display Shows the timer display, progress status, and error codes using numbers, letters and graphics. Weekly Reservation When you set a weekly reservation to start cleaning from the specifi ed time on the specifi ed day of the week, the icon for the selected day of the week is turned on.
-
Page 20: Operating The Cleaner
operating the cleaner INSTALLING THE VACUUM CLEANING ROBOT Installation order Turning the Power Switch on or off To use the vacuum cleaning robot, you must turn on the Power Switch at the bottom of the main unit. Installing the Charger To charge the vacuum cleaning robot, you must fi... - Page 21 Installing the charger Power lamp Power lamp Charging lamp Charging lamp Install the charger on a fl at surface. There should be no obstacles and cliffs 0.5m to the left and right and within 1 m of the front. Install the charger in a location where it can be easily accessed by the vacuum cleaning robot.
-
Page 22: Learn About How To Use The Auto Empty
Learn about how to use the Auto Empty function Turn on the Power button. Turn on the Auto Empty button. ❈ If the Auto Empty button is turned off, the cleaner does not carry out the Auto Empty function. ❈ If the dust bin was fi... -
Page 23: Charging
Charging When the product is initially purchased, the battery is fully discharged, and you must charge the vacuum cleaning robot manually. Turn on the Power Switch at the bottom of the product. After aligning the charge pins of the main unit with the charge pin of the charger station, press the main unit until you hear a Recharging power sound from the charger. -
Page 24: About The Battery
When purchasing a battery, ask the customer care center for the genuine part symbol ( before purchasing it. This battery is only for Samsung vacuum cleaning robot. It is strictly prohibited to use it for other appliances or for other purposes. Do not disassemble or modify the battery. -
Page 25: Setting The Time
Setting the Time The clock displays the current time. You can change the current time with the following steps. ■ You can only set the time using the remote control. Blinks Blinks Blinks Blinks Blinks Blinks Blinks Blinks Blinks Blinks Canceling the Settings Remote Control Remote Control... -
Page 26: Product View
Installing the VIRTUAL GUARD You can confi ne the vacuum cleaning robot to a particular section by using Fence (virtual wall) mode. Forming a Fence (virtual wall) VIRTUAL GUARD creates an invisible barrier that the vacuum cleaning robot cannot cross. E.g. - Page 27 About the IrDA sensor • The infrared signal transmission may not be smooth in locations exposed to halogen lamps or CAUTION in outdoor locations. • Vacuum cleaning robot uses 3 types of infrared devices and a device may not work in front of another device with a higher priority.
-
Page 28: Using The Vacuum Cleaning Robot
USING THE VACUUM CLEANING ROBOT Starting/Stopping Cleaning You can run or stop all vacuum cleaning robot functions. ■ Each vacuum cleaning robot function only runs when the Power Switch is turned on. ■ When the vacuum cleaning robot is operating, press the ( button to cancel the operation and select a function. -
Page 29: Recharging
Recharging You can have the vacuum cleaning robot return to the charger to charge the battery by using the Recharging button. ■ When the vacuum cleaning robot is operating, press the ( button to cancel the operation and press the Recharging button. Press the Recharging button. -
Page 30: Auto Cleaning
Auto Cleaning The vacuum cleaning robot will move by itself and automatically clean the house until cleaning is completed once. ■ If you press the Start/Stop button on the main unit or remote control without selecting a cleaning mode, an automatic cleaning run starts. ■... -
Page 31: Spot Cleaning
Spot Cleaning You can conveniently clean a specifi c area that has a a lot of cookie crumbs, dust, and etc. ■ Move the vacuum cleaning robot to the location where you want to perform a spot clean. Remote control Main unit button ▶... -
Page 32: Max Cleaning
Max Cleaning The vacuum cleaning robot automatically moves and cleans until the battery runs out and the battery level fl ashes only one level. ■ If cleaning begins when the vacuum cleaning robot is docked with the charger station, the time to return to the charger is decreased since the vacuum cleaning robot remembers its original position while moving. -
Page 33: Manual Cleaning
Manual Cleaning You can move the vacuum cleaning robot to clean a particular location directly by using the remote control. ■ Move the vacuum cleaning robot to the location where you want to perform manual cleaning. ■ You can manually clean using the remote control only. Remote control button •... -
Page 34: Timer Reservation
Timer Reservation In this mode, you can schedule the cleaner to start a once-off cleaning run from a particular time. ■ A scheduled cleaning run is only performed when the cleaner is docked to the charger station. Blinks Blinks Blinks Blinks Blinks Blinks... -
Page 35: Weekly Reservation
Weekly Reservation In this mode, you can schedule the cleaner to start a once-off cleaning run from the specifi ed time on the specifi ed days of the week. ■ A scheduled cleaning run is only performed when the cleaner is docked to the charging station. - Page 36 Blinks Blinks Blinks Blinks Blinks Blinks Blinks Blinks Canceling the Settings Timeout 36_ operating Remote Control Decrease Decrease Increase Increase If you press the Start/Stop button while you are making a weekly reservation, the reservation for the currently set day of the week is canceled.
-
Page 37: Additional Functions
ADDITIONAL FUNCTIONS Using additional functions You can use the cleaning robot more easily and conveniently using various additional functions. ■ You can only confi gure the additional functions with the remote control. Turbo Mode Each time you press the Turbo button, the Turbo icon on the display panel is turned on or off sequentially. -
Page 38: Maintain Tools And Filters
maintain tools and fi lters CLEANING THE VACUUM CLEANING ROBOT Please keep the cleaning and maintenance methods in mind ■ When the Power Switch is damaged, please contact the service agent so that it does not cause any accidents. ■ Do not use any means or mechanical devices not installed by the manufacturer that could accelerate the deformation of the vacuum cleaning robot. -
Page 39: Cleaning The Dust Bin And The Filters
Cleaning the Dust Bin and the Filters First, empty the dust bin before cleaning it. ■ When separating the dust bin, take care not to spill the dust out of the dust bin. ■ Empty the dust bin in the following cases. When dust has accumulated inside the dust bin. -
Page 40: Emptying The Auto-Emptier Dustbin
EMPTYING THE AUTO-EMPTIER DUSTBIN Remove the dustbin in the direction of the arrow. Slide the locking bar downward to open the dustbin cover. ❈ Open the cover after positioning the dustbin over a wastebasket. Slide the locking bar downward to open the dustbin cover. Shake the dust from the dustbin. -
Page 41: Cleaning The Fi Lter Of The Auto-Emptier Dustbin
CLEANING THE FILTER OF THE AUTO-EMPTIER DUSTBIN 1 1 1 Remove the dustbin in the direction of the arrow. After removing the dustbin, shake the dust from the fi lter. First assemble the top of the fi lter and then assemble the bottom holding part. -
Page 42: Cleaning The Bottom Of The Auto-Emptier
CLEANING THE BOTTOM OF THE AUTO-EMPTIER Turn the auto-emptier over so that its bottom is facing upward. Then open the 6 fi xing screws using a coin as shown in the fi gure. Remove the bottom cover from the auto-emptier using a coin, and then clean the bottom cover. -
Page 43: Cleaning The Vacuum Cleaning Robot
Cleaning the lower side of the Auto-Emptier periodically. CLEANING THE VACUUM CLEANING ROBOT Cleaning the Power Brush You must turn off the Power Switch at the bottom of the main unit before cleaning the vacuum cleaning robot. • Because the dust in the dust bin may come out, separate the dust bin fi... - Page 44 After a cleaning run, fi rst fi x the side of the power brush opposite to the Power Switch and then fi x the other side. Insert the side into the two grooves and assemble it by slightly sliding it down until it clicks into place. •...
-
Page 45: Cleaning The Edge-Cleaning Side Rotating Brush
Cleaning the Edge-Cleaning Side rotating Brush You must turn off the Power Switch at the bottom of the main unit before cleaning the vacuum cleaning robot. Check whether the side rotating brush is bent or whether there are any foreign substances stuck on the brush. Wearing rubber gloves, wrap the side rotating brush with a cloth using hot water for about 10 seconds and wipe it on the cloth. -
Page 46: Cleaning The Driving Wheel
Cleaning the Driving Wheel You must turn off the Power Switch at the bottom of the main unit before cleaning the robot. ■ If the vacuum cleaning robot suddenly starts to zigzag, there may be foreign substances stuck on the driving wheel. When cleaning the driving wheel, place a soft cloth on the fl... -
Page 47: Troubleshooting
troubleshooting CHECKLIST BEFORE SVC CALLS Symptom Vacuum cleaning • Is the dust bin assembled? robot does not • Is the Power Switch turned on? operate at all before cleaning. • Is cleaning mode panel turned on? • Is the battery level fl ashing only one level and is ‘Lo’... - Page 48 Symptom Vacuum cleaning • robot cannot fi nd the charger. • • • • Vacuum cleaning • robot passes through the VIRTUAL GUARD. • The battery usage • time of the VIRTUAL GUARD is too short. The vacuum cleaning • robot suddenly performs its cleaning operation in the...
- Page 49 Symptom The vacuum cleaning • Check whether the autoemptier robot frequently collides with the autoemptier. The auto-emptier • Check whether there is a foreign substance on the fi lter. does not empty the dustbin • Check whether there is a foreign automatically.
-
Page 50: Troubleshooting For Error Codes
TROUBLESHOOTING FOR ERROR CODES ERROR CODE • Vacuum cleaning robot is caught, stuck or trapped while navigating. • A foreign substance (string, paper, toy etc.) is caught in the power brush. • A foreign substance (string, paper, toy etc.) is caught in the left driving wheel. -
Page 51: Product Specification
product specifi cation 350 mm (Width) 350 mm (Width) Main Body Classifi cation Mechanical Specifi cations Power voltage Charge power consumption Electrical Main unit power consumption Specifi cations Auto emptying power consumption Battery specifi cations Charging type Cleaning mode Cleaning Specifi... - Page 52 OPEN SOURCE ANNOUNCEMENT Some software components of this product incorporate source code covered under the BSD. And this software is based in part on the work of the Independent JPEG Group. ■ OpenCV : IMPORTANT : READ BEFORE DOWNLOADING, COPYING, INSTALLING OR USING. By downloading, copying, installing or using the software you agree to this license.
- Page 53 memo...
- Page 54 memo...
- Page 55 memo...
- Page 56 If you have any questions or comments relating to Samsung products, please contact the SAMSUNG customer care center. Country SOUTH AFRICA Customer Care Center 0330 SAMSUNG (7267864) 0860 7267864 (SAMSUNG) Web Site www.samsung.com www.samsung.com DJ68-00632D REV(0.0)