Advertisement
Quick Links
Advertisement

Related Manuals for Covidien Endo Stitch


Summary of Contents for Covidien Endo Stitch
- Page 1 Endo Stitch ™ Suturing Instrument Intracorporeal Knot Tying Manual...
-
Page 2: Table Of Contents
Refer to the package insert for complete product details. Acknowledgments: Covidien wishes to acknowledge the contributions of Shelley D. Spray and J. Paul Nolan, ASME, IDSA, SAE for the editorial content of the Endo Stitch Suturing Instrument Intracorporeal Knot Tying Manual. In addition, we thank ™... -
Page 3: Introduction
A wide range of available suture materials makes the Endo Stitch instrument suitable ™... -
Page 4: Instructions For Use
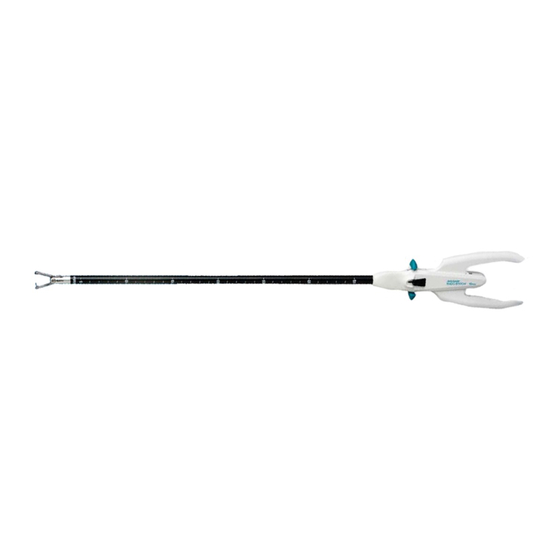
InstRUctIons FoR Use ReLoAdIng toggLe JAWs shAFt bUttons LeVeRs ARRoWs hAndLes Schematic View and Nomenclature Product description The handles of the instrument are designed to fit comfortably into the user’s hands. The handle section consists of two toggle levers, two black unloading buttons (one on the front and one on the back) and two handles. - Page 5 To pass the needle Once the needle has through tissue, the jaws been completely pulled of the Endo Stitch ™ through the tissue, the jaws instrument must first be of the instrument should placed in the open position be returned to the closed, (i.e., either toggle lever is...
- Page 6 InstRUctIons FoR Use (Continued) Neutral Position Open Position neutral Position The neutral position provides three important advantages. Third, the neutral position fully supports the needle. If the jaws are not in the neutral • position and you pull on the suture, you may run the risk of having the needle bend. First, it allows the jaws of the instrument to be easily inserted into the trocar.
-
Page 7: Loading The Instrument
LoAdIng the InstRUMent to Load MetAL bARs First ensure that the jaws are in the open position with the metal bars fully extended. The teal toggle levers should be in a forward position and the red indicator Red IndIcAtoR boxes should be fully exposed. teAL toggLes If the instrument is not in the ready to load position (i.e., the metal bars are not exposed), follow the instructions... - Page 8 LoAdIng the InstRUMent (Continued) STEP 2 Completely squeeze the handles together with one hand while using the other hand to pull both toggle levers back from the jaws until an audible click indicates that the needle is properly loaded. Note that the red indicator boxes are covered by the black button.
-
Page 9: Unloading The Instrument
STEP 3 Keeping the jaws of the instrument over a suitable needle disposal site, release the handles and remove the needle. The Endo Stitch instrument is now ready ™ to be reloaded. | 7 |... -
Page 10: Knot Tying Techniques
Knot tyIng technIqUes - sqUARe Knot STEP 1 STEP 3 Pass the sutured needle Grasp the suture tail with an through the tissue. Endo Grasp instrument. Bring ™ the suture tail in between the jaws of the instrument. Close the jaws and pass the needle. STEP 2 STEP 4A-4B Pull the jaw with the... - Page 11 STEP 8 STEP 5 Bring the suture tail in Cinch the knot with between the jaws of the the jaws in the closed neutral position. instrument. Close the jaws and pass the needle. STEP 6 STEP 9 Return the same toggle Pull the jaw with the lever back into the forward needle back through...
- Page 12 Knot tyIng technIqUes - sURgeon’s sqUARe Knot STEP 4 STEP 1 Pass the sutured needle Bring the suture tail through tissue. in between the jaws of the device. Close the jaws and pass the needle to the opposite jaw. STEP 5 STEP 2 Bring the suture tail Close the jaws and...
- Page 13 STEP 6 STEP 8 Place the empty jaw in the With the jaws in the loop adjacent to the tissue. closed neutral position, Close the jaws and pass the cinch the knot tight. needle to the opposite jaw. STEP 9 STEP 7 To complete the Pull the jaw with the...
- Page 14 Knot tyIng technIqUes - ModIFIed FIsheRMAn’s Knot STEP 1 STEP 4 Pass the sutured needle Insert the empty jaw into the loop adjacent through the tissue. to the tissue. STEP 2 STEP 5 Pick up the tail of suture Pass the needle to with the Endo Grasp the opposite jaw.
-
Page 15: Square Knot
STEP 7 STEP 10 Insert the empty jaw into the Tighten the knot with the loop adjacent to the tissue. jaws closed and the toggle levers in the neutral position. STEP 8 STEP 11 Pass the needle to To secure and tie off this the opposite jaw. - Page 16 Knot tyIng technIqUes - tAIL sPIn Knot: ALt . sqUARe Knot STEP 4 STEP 1 Pass the sutured needle Pass the needle to through the tissue. the opposite jaw. STEP 5 STEP 2 Bring the tail in Pull the jaw with the needle out of the tail suture loop.
- Page 17 STEP 7 STEP 10 Bring the tail in between Pull the jaw with the needle the open jaws (needle in out of the tail suture loop. the same jaw as in step 5). STEP 8 STEP 11 Wrap the suture once Cinch the knot with the around the empty jaw.
- Page 18 Knot tyIng technIqUes - secURIng A RUnnIng stItch STEP 1 STEP 4 Pass the sutured needle Holding the loop through the tissue. Pull with the Endo Grasp ™ enough suture material instrument, use this as through the tissue to a tail to terminate the ensure there is sufficient run with a Modified material to make the run...
-
Page 19: Order Codes
Bralon Ctd, Brd Nylon Black 48" 120cm ™ 170010 Bralon ™ Ctd, Brd Nylon Black 7" 18cm COVIDIEN Knot Tying Manual 170013 Bralon ™ Ctd, Brd Nylon Black 48" 120cm Richard R. Edlich, MD, PhD 170011 Bralon ™ Ctd, Brd Nylon Black 7"... - Page 20 COVIDIEN, COVIDIEN with Logo and ™ marked brands are trademarks of Covidien AG or its affiliate. © 2008 Covidien AG or its affiliate. All rights reserved. 385420 SS 4.5M 06.08 CBK00033M 150 Glover Avenue www.covidien.com Norwalk, CT 06856...
Need help?
Do you have a question about the Endo Stitch and is the answer not in the manual?
Questions and answers