
Related Manuals for Leica RM2125 RTS


Summary of Contents for Leica RM2125 RTS
- Page 1 Leica RM2125 RTS Rotary Microtome Instructions for Use English Order No.: 14 0457 80101 - Revision J Always keep these Instructions for Use with the instrument. Read carefully before working with the instrument.
- Page 3 Only in this way is it possible to continuously improve the technology and manufacturing techniques used in our products. This document is protected under copyright laws. All copyrights to this documentation are held by Leica Biosystems Nussloch GmbH.
-
Page 4: Table Of Contents
Table of Contents Important Information ..........................Symbols in the text and their meanings ....................... 6 Qualification of personnel ..........................8 Intended use of instrument ..........................8 Instrument type ..............................8 Safety ................................Safety Notes ..............................9 Warnings ................................9 Integrated safety devices..........................11 Instrument components and specifications .................. - Page 5 Table of Contents Cleaning and Maintenance ........................Cleaning the instrument..........................49 Maintenance instructions ..........................52 Optional Accessories ..........................Troubleshooting ............................Possible faults ..............................62 Instrument malfunctions..........................63 Warranty and Service ..........................Decontamination Confirmation ......................Leica RM2125 RTS...
-
Page 6: Important Information
Important Information Important Information Symbols in the text and their meanings Warning Symbol: Title of the symbol: Warnings appear in a white box and are marked by a Description: warning triangle. Symbol: Title of the symbol: Note Notes, i. e. important user information, appear in a Description: white box and are marked by an information symbol. - Page 7 Symbol: Title of the symbol: Humidity limitation for transport and storage Description: Indicates the range of humidity for transport and storage to which the medical device can be safely exposed. Leica RM2125 RTS...
-
Page 8: Qualification Of Personnel
Qualification of personnel • The Leica RM2125 RTS may be operated by trained laboratory personnel only. The instrument is intended for professional use only. • All laboratory personnel designated to operate the Leica instrument must read these Instructions for Use carefully and must be familiar with all technical features of the instrument before attempting to operate it. -
Page 9: Safety
Safety Warning The safety and caution notes in this chapter must be observed at all times. Be sure to read these notes even if you are already familiar with the operation and use of other Leica products. Safety Notes These Instructions for Use include important information related to the operating safety and maintenance of the instrument. - Page 10 Safety Warnings – Markings on the instrument itself Warning • Safety notes on the instrument itself, which are marked with a warning triangle, indicate that the correct operating instructions (as defined in these Instructions for Use) must be followed when operating or replacing the item marked.
-
Page 11: Integrated Safety Devices
(→ Fig. 1-1) Handwheel handle (→ Fig. 1-2) Lever in position = handwheel locked (→ Fig. 1-2) Lever in position = handwheel released The handwheel can be locked in the 12 o'clock position (→ Fig. 1-1). Leica RM2125 RTS... - Page 12 Safety As soon as the handwheel handle (→ Fig. 1-1) is pushed in to the left, the handwheel engages the next time it reaches the 12 o'clock position, which locks it mechanically. Functional test: • To activate the lock, press the handwheel handle (→...
- Page 13 Knife holder E Fig. 3 The knife guard on knife holder E consists of a foldaway handle (→ Fig. 3-1). To cover the cutting edge, fold the knife guard handle (→ Fig. 3-1) upwards as illustrated in (→ Fig. Leica RM2125 RTS...
-
Page 14: Instrument Components And Specifications
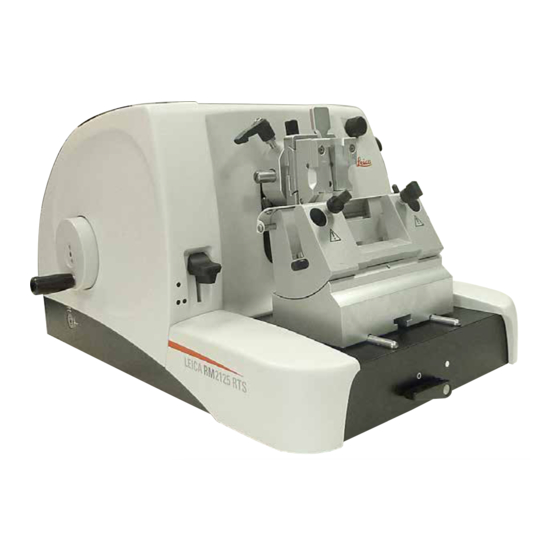
Instrument components and specifications Instrument components and specifications Overview — instrument components Leica RM2125 RTS (from the right) Fig. 4 (→ Fig. 4-1) Universal cassette clamp (→ Fig. 4-2) Knife holder E (→ Fig. 4-3) Knife holder base with lateral movement (→... -
Page 15: Instrument Specifications
Knife holder base, non-orientable Instrument specifications The Leica RM2125 RTS is a manually operated rotary microtome. • The specimen feed system and stroke mechanism are equipped with slack-free and maintenance- free cross roller bearings. They are housed in a polymer housing and protected against dust just like the coarse feed system. -
Page 16: Technical Data
Instrument components and specifications • Another additional function is the specimen retraction, which protects the knife and specimen. The user can switch the retraction function ON or OFF. When retracted, the specimen is drawn back 20 μm into the upper end position after the sectioning stroke during the return movement. - Page 17 Instrument components and specifications Trimming stages: 10 μm 50 μm Repositioning of knife holder base with lateral movement North-south: ± 24 mm East-west movement: ± 20 mm without lateral movement ± 25 mm North-south: Leica RM2125 RTS...
-
Page 18: Instrument Setup
You will find this, as well as other accessories you may have ordered, packed in the top of the carton (→ Fig. Note Compare the delivered components with the parts list and your order. Should you find any discrepancies, please contact your Leica sales office without delay. Version 2.6, Revision J... -
Page 19: Unpacking And Installation
Fig. 6 Warning Do not transport the instrument by holding it by the handwheel grip, coarse feed wheel, or rotary knob for setting the section thickness! Leica RM2125 RTS... - Page 20 Instrument Setup • Set the wooden pallet with the instrument on a stable table. • Slightly lift the wooden pallet in front from below. • Loosen the safety screw (→ Fig. 7-1) with washer under the wooden pallet using the provided Allen key No.
-
Page 21: Inserting The Specimen Clamp
(→ Fig. 8-1) to hold all available accessory specimen clamps (→ p. 33 – 5.9 Accessories). Note The basic instrument is equipped at the factory with a directional specimen holder fixture and a quick change system for specimen clamps. Leica RM2125 RTS... -
Page 22: Direct Mounting Of The Specimen Clamp On The Specimen Holder Fixture
Instrument Setup To do so, proceed as follows: 1. Move the specimen holder fixture (→ Fig. 8-1) to the upper end position by turning the handwheel (→ Fig. 8-6) and engage the handwheel lock. 2. To release the clamp, turn the Allen screw (→... -
Page 23: Attaching The Knife Holder Base, Non-Orientable
(→ Fig. 12-4) on the bottom into the T-piece (→ Fig. 12-1) of the microtome base plate (→ Fig. 12-5). • To secure the knife holder base, turn the clamping lever (→ Fig. 12-2) clockwise. (Position = locked) Leica RM2125 RTS... -
Page 24: Inserting The Knife Holder, Non-Orientable
Instrument Setup Inserting the knife holder, non-orientable Fig. 13 • Loosen the Allen screw (→ Fig. 13-2) by turning it counterclockwise. • Slide the notch of the knife holder (→ Fig. 13-3) onto the T-piece (→ Fig. 13-4) of the knife holder base (→... -
Page 25: Operation
A detailed description for inserting the blade or knife into the individual knife holders is provided in (→ p. 41 – 5.9.8 Knife holder E/E-TC), (→ p. 42 – 5.9.9 Knife holder E), (→ p. 47 – 5.9.10 Overview – accessories). Leica RM2125 RTS... -
Page 26: Adjusting The Clearance Angle
Operation Adjusting the clearance angle Fig. 14 (→ Fig. 14-1) Enlarged detail: Index marks for clearance angle adjustment • The index marks (0°, 5° and 10°) for adjustment of the clearance angle (→ Fig. 14-5) are located on the right side of the knife holder (→... -
Page 27: Specimen Retraction (Specimen Orientation)
The same applies to the "rocking mode", during which the specimen is trimmed by rocking motion (no complete rotation of the handwheel). Carry out "rocking mode" ONLY in the sectioning phase – NEVER in the retraction phase! Leica RM2125 RTS... -
Page 28: Orienting The Specimen (Only A Directional Specimen Holder Fixture)
Operation Orienting the specimen (only a directional specimen holder fixture) Fig. 16 The specimen orientation allows for simple position correction of the specimen surface when the specimen is clamped into place. • Run the specimen to the rear end position by turning the coarse feed wheel (→... -
Page 29: Cutting (Trimming) The Specimen
When the rear or front end position is reached, the coarse feed wheel will be difficult to rotate (if you continue turning it at this point anyway, the torque limitation will be exceeded – this is not a malfunction!). In the front end position, no more feed motion takes place. Leica RM2125 RTS... - Page 30 Operation Trimming the specimen with the coarse feed Fig. 18 • Release the handwheel lock. To do so, pull the handle (→ Fig. 18-5) of the handwheel out to the right and use the lever (→ Fig. 18-1) to release the brake. ...
- Page 31 Operation Trimming with the mechanical trimming function Fig. 19 The Leica RM2125 RTS is equipped with a mechanical trimming function that is activated via the trimming lever (→ Fig. 17-2). The trimming lever has 3 click stops: 0 μm, 10 μm, and 50 μm.
-
Page 32: Sectioning
Operation Warning The section thickness that has been set is not added to the selected trimming value. If the section thickness that has been set is greater than the selected trimming value, the section thickness is fed. • Bring the specimen closer to the knife by rotating the coarse feed wheel. •... -
Page 33: Changing Specimens
(→ Fig. 21-2) downward. • Mount the specimen (→ Fig. 21-3) as required. • Turn the knurled screw (→ Fig. 21-1) clockwise to move the lower jaw upward against the fixed jaw to clamp the specimen securely. Leica RM2125 RTS... -
Page 34: Vee Insert (Optional)
Operation Note When clamping cassettes, make sure that they are not clamped too tightly, since the cassette bodies can bend and result in sections that are too thick or thin, or the entire specimen may fall out and become damaged. 5.9.2 Vee insert (optional) Fig. - Page 35 (→ Fig. 24-4) provided with the foil clamp. • Unscrew the long setscrew (→ Fig. 24-3) to the left with an Allen key No. 4 (→ Fig. 23-5). • Screw the short setscrew (→ Fig. 24-4) in the hole. Leica RM2125 RTS...
-
Page 36: Universal Cassette Clamp (Optional)
Operation • Place the specimen (→ Fig. 24-5) between the movable jaw (→ Fig. 24-2) and the fixed jaw (→ Fig. 24-1). • To clamp the specimen, press the movable jaw (→ Fig. 24-2) against the fixed jaw (→ Fig. 24-3) screwing in the setscrew (→... -
Page 37: Round Specimen Holder (Optional)
Operation Warning Leica / Surgipath cassettes with minimum dimensions of 39.8 x 28 mm and maximum dimensions of 40.9 x 28.8 mm may be clamped in the universal cassette clamp (UCC) horizontally as well as vertically. When using other – particularly thin-walled – cassettes, the cassette may become deformed or other problems may arise with the clamping system. -
Page 38: 5.9.6 Knife Holder Base
Operation • To mount the required insert (→ Fig. 26-1), (→ Fig. 26-2), (→ Fig. 26-3) turn the clamping ring (→ Fig. 26-4) counterclockwise and remove it. • Place the required insert into the tension ring (→ Fig. 26-4) and screw the tension ring onto the thread (→... -
Page 39: 5.9.7 Knife Holder N/Nz
The knife holders N and NZ are appropriate for standard steel and tungsten carbide knives, profile c and d, up to 16 cm long. The integrated height adjustment feature allows you to also use knives that have been resharpened numerous times. Leica RM2125 RTS... - Page 40 Operation (→ Fig. 30) Knife holder N For holding conventional knives up to 16 cm in length. Enlarged detail: Knife inserted and height-adjusted Fig. 30 Mounting the knife support bar • Push knife guard (→ Fig. 30-1) to the center. •...
-
Page 41: 5.9.8 Knife Holder E/E-Tc
5.9.8 Knife holder E/E-TC Note The knife holder E-TC is designed for the Leica TC-65 tungsten carbide blades. Warning Prior to inserting the blade, both knife holder and knife holder base must have been installed on the instrument! -
Page 42: 5.9.9 Knife Holder E
Operation Inserting the blade, knife holder E and E-TC Fig. 32 (→ Fig. 32) Knife holder E-TC • Fold knife guard (→ Fig. 32-1) downward. • To insert the blade, flip the right clamping lever (→ Fig. 32-2) forward and down. •... - Page 43 (→ Fig. 34-1). • Fasten the new pressure plate using the 4 screws (→ Fig. 34-2). When doing so, tighten the screws only far enough that the height and parallelism of the pressure plate can then be adjusted. Leica RM2125 RTS...
- Page 44 Operation Adjusting the rear pressure plate Warning After each uninstallation or replacement, make sure the pressure plate sits correctly. If necessary, readjust it. The rear pressure plate (→ Fig. 35-3) rests on two stud screws (→ Fig. 34-3), which enable height and parallel adjustment.
- Page 45 (→ Fig. 36-4) that is accessible at an angle from inside through a bore on the bottom of the knife holder (→ Fig. 36). Fig. 37 (→ Fig. 37-2) approx. 0.05 mm (→ Fig. 38-1) 0.4 - 0.8 mm Leica RM2125 RTS...
- Page 46 Operation Fig. 38 • Insert a blade (→ Fig. 37-1) and clamp it lightly using the clamping lever (→ Fig. 36-3). • Use the screw (→ Fig. 36-4) to adjust the pressure plate (→ Fig. 36-2) so that only the upper edge of the pressure plate puts pressure on the blade.
-
Page 47: 5.9.10 Overview - Accessories
(→ Fig. 39-3) Standard specimen clamp (→ Fig. 39-4) Universal cassette clamp (→ Fig. 39-5) Standard cassette (→ Fig. 39-6) Specimen holder fixture, directional (→ Fig. 39-7) Round specimen holder (→ Fig. 39-8) Specimen holder fixture, non-orientable Leica RM2125 RTS... - Page 48 Operation (→ Fig. 39-9) Leica RM2125 RTS Basic instrument (→ Fig. 39-10) Knife holder N for steel and carbide metal knives (→ Fig. 39-11) Pressure plate, interchangeable (→ Fig. 39-12) Knife holder E for blades (→ Fig. 39-13) Knife holder base with lateral movement (→...
-
Page 49: Cleaning And Maintenance
• Remove specimen clamp and clean separately. Instrument and outside surfaces If necessary, the varnished outside surfaces can be cleaned with a mild commercial household cleaner or soap water and then be dried with a moist cloth. Leica RM2125 RTS... - Page 50 Cleaning and Maintenance Knife holder E Fig. 40 Take the knife holder apart for cleaning. The front pressure plate can be removed for cleaning. To do so, proceed as follows: • Fold knife guard (→ Fig. 40-1) downward. • Rotate the blade clamping lever (→...
- Page 51 65 °C, until the liquid wax escapes. Warning There is a burn hazard when removing the parts from the drying chamber (65 °C). Wearing safety gloves is recommended! Leica RM2125 RTS...
-
Page 52: Maintenance Instructions
• Have the instrument checked at least once a year by a qualified service technician authorized by Leica. • At the end of the warranty period, enter into a service contract. For more information, please contact your local Leica technical service center. • Clean the instrument every day. Version 2.6, Revision J... - Page 53 (→ Fig. 42-2) and knurled nuts (→ Fig. 42-11) on knife holder • The clamping lever (→ Fig. 42-12) on knife holder E. • Shaft (→ Fig. 41-3) of the clamping lever of the cassette clamp (→ Fig. 41). Leica RM2125 RTS...
-
Page 54: Optional Accessories
Disposable blades – high-profile, 1 pack of 50 14 0358 38926 Disposable blades – high-profile, 10 packs of 50 14 0358 38383 Disposable blades Leica TC-65 14 0216 26379 Knife 16 cm - profile c - steel 14 0216 07100... - Page 55 N, NZ, E, and E-TC Order No.: 14 0502 37962 Fig. 43 Knife holder base can be moved laterally for RM2125 RTS, silver for knife holders N, NZ, E, and E-TC, incl. clamping lever Order No.: 14 0502 37992 Fig. 44...
- Page 56 14 0502 37995 Fig. 47 Knife holder E for high-profile microtome blades (80 x 14 x 0.317 mm), RM2125 RTS, silver, quick clamp system clearance angle adjustment, movable knife guard Enclosed toolset: • Allen key with pin, No. 4.0 14 0222 33111 •...
- Page 57 Order No.: 14 0358 38383 Fig. 52 Disposable blades Leica TC-65 Leica TC-65 microtome, disposable blade system for sectioning hard specimen materials. The Leica TC-65 carbide metal disposable blades were specially developed for the requirements in labs where hard, blunt materials are routinely sectioned.
- Page 58 Optional Accessories Knife 16 cm - profile c - steel Knife, 16 cm long, profile c Note: Knife case 14 0213 11140 included Order No.: 14 0216 07100 (→ Fig. 54-1) Profile Fig. 54 Knife 16 cm, profile d - steel Knife, 16 cm long, profile d Note: Knife case 14 0213 11140 included Order No.:...
- Page 59 Specimen holder fixture non-orientable RM2125 RTS, silver Order No.: 14 0457 46996 Fig. 58 Note To modify your microtome with these accessories, please contact your Leica representative or the Technical Service department of Leica Biosystems Nussloch GmbH. Leica RM2125 RTS...
- Page 60 Order No.: 14 0502 38000 Fig. 60 Universal cassette clamp with adapter RM2125 RTS, silver For use with standard cassettes with dimensions that are 39.8 x 28 mm at minimum and 40.9 x 28.8 mm at maximum. Order No.: 14 0502 37999 Fig.
- Page 61 Section waste tray Order No.: 14 0402 13128 Fig. 64 Dust cover Order No.: 14 0212 53157 Fig. 65 Safety gloves cut-resistant, size S Order No.: 14 0340 40859 cut-resistant, size M Fig. 66 Order No.: 14 0340 29011 Leica RM2125 RTS...
-
Page 62: Troubleshooting
• When using cassettes, particularly thin-walled cassettes, from a company other than Leica or Surgipath, the cassette may become deformed or other clamping problems may arise. If while trying to clamp the cassette you realize that it... -
Page 63: Instrument Malfunctions
2. High blade consumption • Too great of a sectioning force • Adjust the sectioning speed was applied. and/or section thickness when trimming. Select a smaller section thickness, rotate the handwheel more slowly. Leica RM2125 RTS... -
Page 64: Warranty And Service
Leica sales organization or the organization from which you have purchased the contractual product shall apply exclusively. Service Information If you are in need of technical customer support or spare parts, please contact your Leica representative or the Leica dealer where you purchased the instrument. Please provide the following information: •... -
Page 65: Decontamination Confirmation
Decontamination Confirmation Decontamination Confirmation Every product that is returned to Leica Biosystems or that requires on-site maintenance must be properly cleaned and decontaminated. You can find the dedicated template of the decontamination confirmation on our website www.LeicaBiosystems.com within the product menu. This template has to be used for gathering all required data. - Page 66 Notes Version 2.6, Revision J...
- Page 68 Leica Biosystems Nussloch GmbH Heidelberger Str. 17 - 19 D-69226 Nussloch Germany Tel.: +49 - (0) 6224 - 143 0 Fax: +49 - (0) 6224 - 143 268 Web: www.LeicaBiosystems.com...
Need help?
Do you have a question about the RM2125 RTS and is the answer not in the manual?
Questions and answers