Huawei eA660 Series User Manual
Cpe
Hide thumbs
Also See for eA660 Series:
- Product description (19 pages) ,
- Configuration manual (22 pages)

Related Manuals for Huawei eA660 Series


Summary of Contents for Huawei eA660 Series
-
Page 1: User Guide
Series CPE V100R001C00 User Guide Issue Date 2019-04-03 HUAWEI TECHNOLOGIES CO., LTD. - Page 2 Notice The purchased products, services and features are stipulated by the contract made between Huawei and the customer. All or part of the products, services and features described in this document may not be within the purchase scope or the usage scope. Unless otherwise specified in the contract, all statements, information, and recommendations in this document are provided "AS IS"...
-
Page 3: About This Document
Series CPE User Guide About This Document About This Document Overview This document describes the hardware, functions, installation, configuration, operation and maintenance (OM) of the eA660 series customer premises equipment (CPE). Product Version Product Name Product Version eA660-118 V100R001C00... -
Page 4: Table Of Contents
4.1 Log in to the WebUI ..............................54 4.2 NAT /Routing Behind MS Settings ..........................55 4.3 Bridge Settings................................55 4.4 DHCP Relay ................................56 5 Maintenance ..........................62 Issue 06 (2019-04-03) Huawei Proprietary and Confidential Copyright © Huawei Technologies Co., Ltd. - Page 5 7 Privacy and Security ........................67 7.1 Privacy Policy ................................67 7.2 Security Maintenance ..............................67 7.3 Performing Default Security Configuration ........................ 67 8 Acronyms and Abbreviations ....................69 Issue 06 (2019-04-03) Huawei Proprietary and Confidential Copyright © Huawei Technologies Co., Ltd.
-
Page 6: Overview
This section describes the functions, applications, and specifications of the product. 1.1 Product Introduction HUAWEI eA660 is a piece of CPE that functions as the long term evolution (LTE) wireless gateway. It implements the conversion between LTE wireless data and wired Ethernet data and supports data backhaul. -
Page 7: Application Scenarios
The following example describes how to use the eA660 for video monitoring. Use a power adapter to supply power for the eA660 or video camera, as shown in Figure 1-2. Issue 06 (2019-04-03) Huawei Proprietary and Confidential Copyright © Huawei Technologies Co., Ltd. - Page 8 Hub or switch and then to the eA660, as shown in Figure 1-3. Figure 1-3 The eA660 connected to multiple devices Issue 06 (2019-04-03) Huawei Proprietary and Confidential Copyright © Huawei Technologies Co., Ltd.
-
Page 9: Hardware Specifications
≤ 3 kg (without power adapter) Weight Water and dust proof IP67 Temperature Working temperature: -40° C to +65° C Storage temperature: -40° C to +70° C Humidity 5% to 95% Issue 06 (2019-04-03) Huawei Proprietary and Confidential Copyright © Huawei Technologies Co., Ltd. -
Page 10: Antenna Specifications
14 ± 1 dBi 16 ± 1 dBi 16 ± 1 dBi 13 ± 1 dBi Input 50 ohm impedance < 2 Polarization Dual polarization Radiation Directional antenna pattern Issue 06 (2019-04-03) Huawei Proprietary and Confidential Copyright © Huawei Technologies Co., Ltd. -
Page 11: Device Ports
In normal cases, the USB port works in slave mode. In slave mode, the USB port will be mapped to a computer UI after the Huawei-provided chip driver is installed on the computer. This UI is locked by default. You can run other AT commands and write data to the SoftSim card only after running the unlock command. -
Page 12: Tr-069 Port
PC UI Interface prevails) To learn more about AT commands, contact your device vendor or the maintenance center. The chipset driver supporting the USB interface is the host driver that supports Huawei Balong V7R1. If you need it, contact Huawei. ... - Page 13 CPE and central office TR-069 management equipment from being cracked. The number of attempts is five. After five attempt failures, wait five minutes and receive new connection authentication requests. Issue 06 (2019-04-03) Huawei Proprietary and Confidential Copyright © Huawei Technologies Co., Ltd.
- Page 14 Series CPE User Guide 1 Overview The central office TR-069 management equipment will use the SN as the unique identifier for device management. Issue 06 (2019-04-03) Huawei Proprietary and Confidential Copyright © Huawei Technologies Co., Ltd.
-
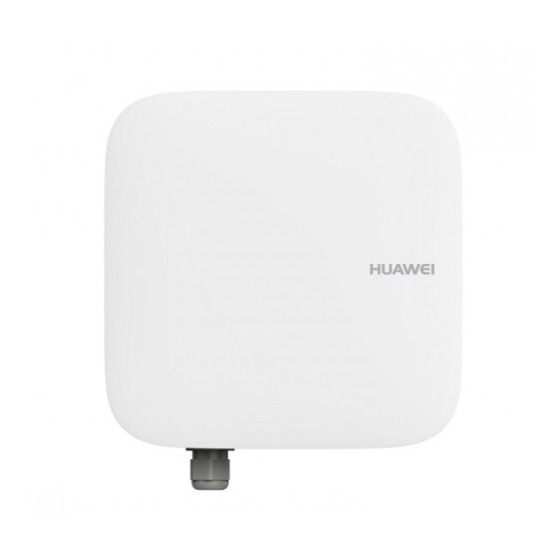
Page 15: Hardware
2.1 eA660 Hardware This section describes the appearance, ports, and indicators of the eA660. Appearance Figure 2-1 shows the appearance of the eA660. Figure 2-1 eA660 appearance Issue 06 (2019-04-03) Huawei Proprietary and Confidential Copyright © Huawei Technologies Co., Ltd. - Page 16 Consists of the SIM card slot and USB port. A SIM card is inserted into the SIM card slot. The USB port is used for internal commissioning. Grounding end Connects a ground cable Issue 06 (2019-04-03) Huawei Proprietary and Confidential Copyright © Huawei Technologies Co., Ltd.
- Page 17 Table 2-2 Indicators of the eA660 Identifier Status Description POWER The power supply is normal. No power is supplied. WLINK Steady on The eA660 is successfully registered to the network. Issue 06 (2019-04-03) Huawei Proprietary and Confidential Copyright © Huawei Technologies Co., Ltd.
-
Page 18: Ea660 Cables
Table 2-3 lists the technical specifications of the PoE network cable. Table 2-3 Technical specifications of the PoE network cable Name Description Color Black Outer diameter 6.8 mm –40° C to 75° C Working temperature range Issue 06 (2019-04-03) Huawei Proprietary and Confidential Copyright © Huawei Technologies Co., Ltd. -
Page 19: Ground Cable
Table 2-4 Technical specifications of the ground cable Name Description Color Yellow-green Cross-section 6 mm² Outer diameter 5.1 mm –10° C to 70° C Working temperature range Issue 06 (2019-04-03) Huawei Proprietary and Confidential Copyright © Huawei Technologies Co., Ltd. -
Page 20: Installation
Keep the site at least 2 km away from light pollution sources such as a food factory and a leather processing plant. Issue 06 (2019-04-03) Huawei Proprietary and Confidential Copyright © Huawei Technologies Co., Ltd. -
Page 21: Installation Preparation
Check whether the models and quantities are consistent with those specified on the Packing List. Record the serial number of the CPE. Issue 06 (2019-04-03) Huawei Proprietary and Confidential Copyright © Huawei Technologies Co., Ltd. -
Page 22: Installation Tools
Heat gun Utility knife Claw hammer Wire stripper Adjustable wrench (open end Power cable crimping tool Cable cutter ≥32 mm) Vise Hex key (M5,M6) Phillips torque screwdriver Issue 06 (2019-04-03) Huawei Proprietary and Confidential Copyright © Huawei Technologies Co., Ltd. -
Page 23: Installation Procedure
The eA660 and mounting components are ready, as shown in Figure 3-2 and Table 3-2. Figure 3-2 eA660 and mounting components Table 3-2 Mounting components Name Mounting frame Hose clamp Issue 06 (2019-04-03) Huawei Proprietary and Confidential Copyright © Huawei Technologies Co., Ltd. - Page 24 Procedure Open the SIM card maintenance window of the eA660 and insert the SIM card, as shown in Figure 3-4. Figure 3-4 Installing the SIM card Issue 06 (2019-04-03) Huawei Proprietary and Confidential Copyright © Huawei Technologies Co., Ltd.
- Page 25 SIM card maintenance window is waterproof. Do not fasten the screws until the SIM card maintenance window has been correctly installed. Step 2 Insert the hose clamp to the wall-mounting frame, as shown in Figure 3-6. Issue 06 (2019-04-03) Huawei Proprietary and Confidential Copyright © Huawei Technologies Co., Ltd.
- Page 26 If the hose clamp is too long, cut off the extra part. Apply anti-rust oil to the cut in case it gets rusty. Step 4 Fix the eA660 on the wall-mounting frame through the dovetail groove, as shown in Figure 3-8. Issue 06 (2019-04-03) Huawei Proprietary and Confidential Copyright © Huawei Technologies Co., Ltd.
- Page 27 Figure 3-8 Installing the eA660 on the wall-mounting frame Step 5 Tighten the wall-mounting frame's screw, as shown in Figure 3-9. Figure 3-9 Tightening the screw ----End Issue 06 (2019-04-03) Huawei Proprietary and Confidential Copyright © Huawei Technologies Co., Ltd.
-
Page 28: Mounting On A Utility Pole (With An Angle Adjusting Component)
Angle adjusting component Mounting frame Hose clamp Context Figure 3-11 shows the flowchart for mounting the eA660 to a utility pole equipped with an angle adjusting component. Issue 06 (2019-04-03) Huawei Proprietary and Confidential Copyright © Huawei Technologies Co., Ltd. - Page 29 Open the SIM card maintenance window of the eA660 and insert the SIM card, as shown in Figure 3-12. Figure 3-12 Installing the SIM card Figure 3-13 shows the correct installation method. Issue 06 (2019-04-03) Huawei Proprietary and Confidential Copyright © Huawei Technologies Co., Ltd.
- Page 30 SIM card maintenance window is waterproof. Do not fasten the screws until the SIM card maintenance window has been correctly installed. Step 2 Insert the hose clamp to the wall-mounting frame, as shown in Figure 3-14. Issue 06 (2019-04-03) Huawei Proprietary and Confidential Copyright © Huawei Technologies Co., Ltd.
- Page 31 If the hose clamp is too long, cut off the extra part. Apply anti-rust oil to the cut in case it gets rusty. Step 4 Fix the angel adjusting component onto the mounting frame using the dovetail groove, as shown in Figure 3-16. Issue 06 (2019-04-03) Huawei Proprietary and Confidential Copyright © Huawei Technologies Co., Ltd.
- Page 32 Use the M8 hex key to loosen the the hex screws on the left of the angle adjusting component, and adjust the vertical angle by rotating the front end of the angle adjusting component, as shown in Figure 3-18. Then tighten the hex screws. Issue 06 (2019-04-03) Huawei Proprietary and Confidential Copyright © Huawei Technologies Co., Ltd.
- Page 33 Step 6 Tighten the angle adjusting component's screw, as shown in Figure 3-19. Figure 3-19 Tightening the screw Issue 06 (2019-04-03) Huawei Proprietary and Confidential Copyright © Huawei Technologies Co., Ltd.
- Page 34 Figure 3-20 Installing the eA660 on the angle adjusting component Step 8 Tighten the wall-mounting frame's screw, as shown in Figure 3-21. Figure 3-21 Tightening the screw Issue 06 (2019-04-03) Huawei Proprietary and Confidential Copyright © Huawei Technologies Co., Ltd.
-
Page 35: Mounting On The Wall (Without An Angle Adjusting Component)
Figure 3-22 eA660 and wall-mounting components Table 3-4 Wall-mounting components Name Wall-mounting screw Mounting frame Context Figure 3-23 shows the flowchart for mounting the CPE on the wall. Issue 06 (2019-04-03) Huawei Proprietary and Confidential Copyright © Huawei Technologies Co., Ltd. - Page 36 Open the SIM card maintenance window of the eA660 and insert the SIM card, as shown in Figure 3-24. Figure 3-24 Installing the SIM card Figure 3-25 shows the correct installation method. Issue 06 (2019-04-03) Huawei Proprietary and Confidential Copyright © Huawei Technologies Co., Ltd.
- Page 37 Step 2 Hold the wall-mounting frame tightly against the wall, use a level to adjust the horizontal position, and mark the fixing points with a marker, as shown in Figure 3-26. Issue 06 (2019-04-03) Huawei Proprietary and Confidential Copyright © Huawei Technologies Co., Ltd.
- Page 38 Step 4 Align the two fixing points with the bolts on the wall and tighten the expansion bolt's screw nut to fix the wall-mounting frame, as shown in Figure 3-28. Issue 06 (2019-04-03) Huawei Proprietary and Confidential Copyright © Huawei Technologies Co., Ltd.
- Page 39 Step 6 Fix eA660 to the wall-mount frame using the dovetail groove, as shown in Figure 3-29. Figure 3-29 Fixing the CPE Step 7 Tighten the wall-mounting frame's screw, as shown in Figure 3-30. Issue 06 (2019-04-03) Huawei Proprietary and Confidential Copyright © Huawei Technologies Co., Ltd.
-
Page 40: Mounting On The Wall (With An Angle Adjusting Component)
----End 3.3.4 Mounting on the Wall (with an Angle Adjusting Component) Prerequisites The eA660 and mounting components are ready, as shown in Figure 3-31 and Table 3-5. Issue 06 (2019-04-03) Huawei Proprietary and Confidential Copyright © Huawei Technologies Co., Ltd. - Page 41 Figure 3-31 eA660 and wall-mounting components Table 3-5 Wall-mounting components Name Wall-mounting screw Mounting frame Angle adjusting component Context Figure 3-32 shows the flowchart for mounting the CPE on the wall. Issue 06 (2019-04-03) Huawei Proprietary and Confidential Copyright © Huawei Technologies Co., Ltd.
- Page 42 Open the SIM card maintenance window of the eA660 and insert the SIM card, as shown in Figure 3-33. Figure 3-33 Installing the SIM card Figure 3-34 shows the correct installation method. Issue 06 (2019-04-03) Huawei Proprietary and Confidential Copyright © Huawei Technologies Co., Ltd.
- Page 43 Step 2 Hold the wall-mounting frame tightly against the wall, use a level to adjust the horizontal position, and mark the fixing points with a marker, as shown in Figure 3-35. Issue 06 (2019-04-03) Huawei Proprietary and Confidential Copyright © Huawei Technologies Co., Ltd.
- Page 44 Step 4 Align the two fixing points with the bolts on the wall and tighten the expansion bolt's screw nut to fix the wall-mounting frame, as shown in Figure 3-37. Issue 06 (2019-04-03) Huawei Proprietary and Confidential Copyright © Huawei Technologies Co., Ltd.
- Page 45 Use the M8 hex key to loosen the the hex screws on the left of the angle adjusting component, and adjust the vertical angle by rotating the front end of the angle adjusting component, as shown in Figure 3-39. Then tighten the hex screws. Issue 06 (2019-04-03) Huawei Proprietary and Confidential Copyright © Huawei Technologies Co., Ltd.
- Page 46 Step 7 Tighten the angle adjusting component's screw, as shown in Figure 3-41. Issue 06 (2019-04-03) Huawei Proprietary and Confidential Copyright © Huawei Technologies Co., Ltd.
- Page 47 Step 8 Fix the eA660 on the angle adjusting component using the dovetail groove, as shown in Figure 3-42. Figure 3-42 Installing the eA660 on the angle adjusting component Step 9 Tighten the wall-mounting frame's screw, as shown in Figure 3-43. Issue 06 (2019-04-03) Huawei Proprietary and Confidential Copyright © Huawei Technologies Co., Ltd.
-
Page 48: Cable Connection
Figure 3-43 Tightening the screw ----End 3.3.5 Cable Connection This section describes the procedure for connecting the eA660 cables. Procedure Connect the ground cable, as shown in Figure 3-44. Issue 06 (2019-04-03) Huawei Proprietary and Confidential Copyright © Huawei Technologies Co., Ltd. - Page 49 Figure 3-44 Connecting the ground cable Tighten the ground screws and apply antirust paint to it. Step 2 Install the crystal connector to PoE network cable, as shown in Figure 3-45. Issue 06 (2019-04-03) Huawei Proprietary and Confidential Copyright © Huawei Technologies Co., Ltd.
- Page 50 Step 3 Connect the PoE network cable. Diassemble the PG-head screw cap and air-proof block on the PoE port, and pass the network cable through them, as shown in Figure 3-46. Issue 06 (2019-04-03) Huawei Proprietary and Confidential Copyright © Huawei Technologies Co., Ltd.
- Page 51 Figure 3-47. Figure 3-47 Installing the PG-head screw cap and air-proof block Step 4 Connect the PoE adapter. Issue 06 (2019-04-03) Huawei Proprietary and Confidential Copyright © Huawei Technologies Co., Ltd.
-
Page 52: Installation Check
The eA660 hardware has been installed. Procedure Check whether the eA660 hardware is correctly installed. When performing the hardware check for the eA660, check the items listed in Table 3-6 in order. Issue 06 (2019-04-03) Huawei Proprietary and Confidential Copyright © Huawei Technologies Co., Ltd. - Page 53 Power cables or PGND cables with connectors are not used. The connector of the PoE network cable must be appropriately connected. Step 2 Perform the power-on check, as shown in Figure 3-49. Issue 06 (2019-04-03) Huawei Proprietary and Confidential Copyright © Huawei Technologies Co., Ltd.
- Page 54 If the RSSI indicator is off when the eA660 powers on, the signal strength is too weak. Check the power supply and the angle of the angle adjusting component. For details about the indicator status, see 2.1 eA660 Hardware. ----End Issue 06 (2019-04-03) Huawei Proprietary and Confidential Copyright © Huawei Technologies Co., Ltd.
-
Page 55: Configuration Introduction
Access Password Modification and modify New Password. Use the default values of other parameters. To change the default settings, please refer to the《LTE CPE Online help》. ----End Issue 06 (2019-04-03) Huawei Proprietary and Confidential Copyright © Huawei Technologies Co., Ltd. -
Page 56: Nat /Routing Behind Ms Settings
----End 4.3 Bridge Settings Prerequisites Install EPC and CPE and commission them so that they are ready to be connected. Configure the L2GRE tunnel settings on EPC. Issue 06 (2019-04-03) Huawei Proprietary and Confidential Copyright © Huawei Technologies Co., Ltd. -
Page 57: Dhcp Relay
L2GRE Remote IP. This IP address must be the local tunnel IP address for the NE that has the Generic Routing Encapsulation (GRE) tunnel function. Click Submit Figure 4-2 Bridge Settings ----End 4.4 DHCP Relay Prerequisites The DHCP server and CPE are installed. Issue 06 (2019-04-03) Huawei Proprietary and Confidential Copyright © Huawei Technologies Co., Ltd. - Page 58 From the left panel, right-click Server Options, and choose New Scope Wizard. Figure 4-3 Server Options > New Scope Wizard Add a scope name. Figure 4-4 Adding a scope name Set the IP address range. Issue 06 (2019-04-03) Huawei Proprietary and Confidential Copyright © Huawei Technologies Co., Ltd.
- Page 59 User Guide 4 Configuration Introduction Figure 4-5 Setting the IP address range Click Next. Figure 4-6 Click Next Set the lease duration. Figure 4-7 Setting the lease duration Issue 06 (2019-04-03) Huawei Proprietary and Confidential Copyright © Huawei Technologies Co., Ltd.
- Page 60 Figure 4-9 Next hop Add a route from the DHCP server to LAN devices connected to the CPE. The next hop is the EPC's IF IP address. Issue 06 (2019-04-03) Huawei Proprietary and Confidential Copyright © Huawei Technologies Co., Ltd.
- Page 61 Submit. Figure 4-11 Setting the DHCP server address 11 Go to Security > NAT Settings, deselect Enable under NAT, and click Submit to enable Routing Behind MS. Issue 06 (2019-04-03) Huawei Proprietary and Confidential Copyright © Huawei Technologies Co., Ltd.
- Page 62 Series CPE User Guide 4 Configuration Introduction Figure 1-1 Enabling Routing Behind MS ----End Issue 06 (2019-04-03) Huawei Proprietary and Confidential Copyright © Huawei Technologies Co., Ltd.
-
Page 63: Maintenance
Power and grounding systems of the eA660 eA660 5.2 Fault Diagnosis When the CPE does not run properly, use the tools on the Web management page to perform initial diagnosis. Issue 06 (2019-04-03) Huawei Proprietary and Confidential Copyright © Huawei Technologies Co., Ltd. - Page 64 Wait until the system check is performed. The possible causes will be displayed on the page. Click Export to export the detailed information to the computer. If necessary, send the detailed information to maintenance personnel. ----End Issue 06 (2019-04-03) Huawei Proprietary and Confidential Copyright © Huawei Technologies Co., Ltd.
-
Page 65: Faq
Step 2 Check wheather the IP address is entered correctly. Step 3 If there is no problem after the above checks, try to restart the CPE from the near end. Step 4 If the problem persists, please contact Huawei technical engineer. ----End 6.2 What Do I Do When Power Indicator Is Not Working? -
Page 66: What Do I Do When The Data Service Is Not Provided
Step 1 Click Settings in the upper right corner of the browser to open the Compatibility View Settings dialog box. Step 2 Add the CPE login address (Default: 192.168.1.1). Step 3 Click Add to close the window. Issue 06 (2019-04-03) Huawei Proprietary and Confidential Copyright © Huawei Technologies Co., Ltd. - Page 67 Series CPE User Guide 6 FAQ Step 4 If the problem persists, contact local service provider. ----End Issue 06 (2019-04-03) Huawei Proprietary and Confidential Copyright © Huawei Technologies Co., Ltd.
-
Page 68: Privacy And Security
HTTPS and ICMP access requests on the WAN side do not exist, disable WAN access. Change the USB port password, keep it secure (before installation), and regularly change it subsequently (optional). Issue 06 (2019-04-03) Huawei Proprietary and Confidential Copyright © Huawei Technologies Co., Ltd. - Page 69 The USB port provides maintenance and repair functions and allows you to set device parameters. Please keep the password secure to prevent device parameters from being modified or exposed. Issue 06 (2019-04-03) Huawei Proprietary and Confidential Copyright © Huawei Technologies Co., Ltd.
-
Page 70: Acronyms And Abbreviations
Generic Routing Encapsulation Long Term Evolution Media Access Control Network Address Translation Power over Ethernet Subscriber Identity Module TR069 Technical Report 069 Uniform Resource Location Wide Area Network Issue 06 (2019-04-03) Huawei Proprietary and Confidential Copyright © Huawei Technologies Co., Ltd.