Samsung SR8845 User Manual
Robotic vacuum cleaner
Hide thumbs
Also See for SR8845:
- User manual (232 pages) ,
- User manual (140 pages) ,
- User manual (232 pages)
Table of Contents
Advertisement
Robotic Vacuum Cleaner
✻ Before operating this unit, please read the instructions carefully.
✻ For indoor use only.
User Manual
imagine
the possibilities
Thank you for purchasing a Samsung product.
To receive a more complete service,
please register your product at
www.samsung.com/register
SR8845
English
Advertisement
Table of Contents
Troubleshooting

Related Manuals for Samsung SR8845


Summary of Contents for Samsung SR8845
- Page 1 Robotic Vacuum Cleaner User Manual ✻ Before operating this unit, please read the instructions carefully. ✻ For indoor use only. imagine Thank you for purchasing a Samsung product. To receive a more complete service, please register your product at www.samsung.com/register the possibilities...
-
Page 2: Safety Information
• Before operating the appliance, please read this manual thoroughly and retain it for your reference. WARNING • Because these following operating instructions cover various models, the characteristics of your vacuum cleaner may differ slightly from those described WARNING in this manual. CAUTION/WARNING SYMBOLS USED Indicates that a danger of death or serious injury exists. -
Page 3: Important Safety Instructions
Use only as described in this manual. • Do not operate the robotic vacuum cleaner or charger if it has been damaged in any way. • If the cleaner is not working as it should, has been dropped, damaged, left outdoors, or dropped in water, return it to a customer care center. -
Page 4: Save These Instructions
Do not use to pick up flammable or combustible liquids such as gasoline, nor use on areas where they may be present. • Do not use robotic vacuum cleaner in an enclosed space filled with vapours given off by oil based paint, paint thinner, moth proofing substances, flammable dust, or other explosive or toxic vapours. -
Page 5: Table Of Contents
Before use In use Cleaning and maintenance Product Features Components Name of each part Installing robotic vacuum cleaner 20 Installation order 20 Turning the power switch on or off 21 Installing the charger 22 Charging 23 About the battery 24 Installing the VIRTUAL GUARD... -
Page 6: Safety Information
Safety information POWER RELATEd do not bend the power cord forcefully or place a heavy object on it that could break it. WARNING - This may result in fire or electric shock. Make sure to remove any dust or water from the power plug. -
Page 7: Before Use
(abnormal operation and breakage) may occur when used in these locations. Open all doors to clean all rooms. - When a door is closed, the robotic vacuum cleaner will not be able to enter that room. CAUTION - However, make sure to close the doors to the main entrance, the veranda and the bathroom, and any other rooms where the robotic vacuum cleaner may fall to a lower floor. - Page 8 - When the rotating wheel or brush catches fingers, feet, clothing or hair, this may result in injury. - If a child or pet is in the way of the robotic vacuum cleaner, it may be identified as an obstacle and the area may not cleaned.
- Page 9 WARNING - Failing to do so may result in fire or electric shock. Make sure the robotic vacuum cleaner does not vacuum or move over liquids such as water, oil or pet litter. WARNING - This may result in critical damage to the product.
-
Page 10: In Use
- This may result in problems with the robotic vacuum cleaner. CAUTION - This may result in damage to carpets. do not use the robotic vacuum cleaner on a table or other high locations. CAUTION - This may result in damage when the unit accidentally drops. -
Page 11: Cleaning And Maintenance
NOTE spaces between sofas and walls. - Please clean these locations occasionally. dust clusters may remain after cleaning, when the robotic vacuum cleaner fails to pick up dust clusters that were formed while cleaning. NOTE - In this case, sweep up the dust with another cleaning tool. - Page 12 - Failing to do so may result in fire or electric shock. Before cleaning the charger, make sure to disconnect the power cord for safety. WARNING Contact the Samsung Electronics customer care center to replace the battery. WARNING - Failing to use original batteries will result in product failure.
-
Page 13: Product Features
Product Features CONVENIENT VIRTUAL GUARd FUNCTION You can confine the robotic vacuum cleaner to a particular section by using the Fence (virtual wall) mode or by cleaning several sections one by one using the Guard (virtual door) mode. dELICATE CLEANING OF EVERY CORNER Since the robotic vacuum cleaner cleans the floor in a sequential way ( determined by the ceiling shape recognition function, it cleans every corner of the floor. -
Page 14: Product Features
The robotic vacuum cleaner detects and avoids obstacles in 2 stages. First, the 7 obstacle sensors detect obstacles in stage 1 and if the robotic vacuum cleaner does crash into an obstacle, the 2 bumper sensors absorb the impact. When the robotic vacuum cleaner is lifted up while cleaning, the driving wheels, power brush, suction motor, and side rotating brush are stopped autonati(all) by sensor. -
Page 15: Assembling The Cleaner
Assembling the cleaner COMPONENTS Main Body ■ Remote Control ■ Charger (Station) ■ Others Components ■ User Manual / Remote Control VIRTUAL GUARD Cleaning Brush Spare Filter 2 Batteries Holder Assembling the cleaner _15... -
Page 16: Name Of Each Part
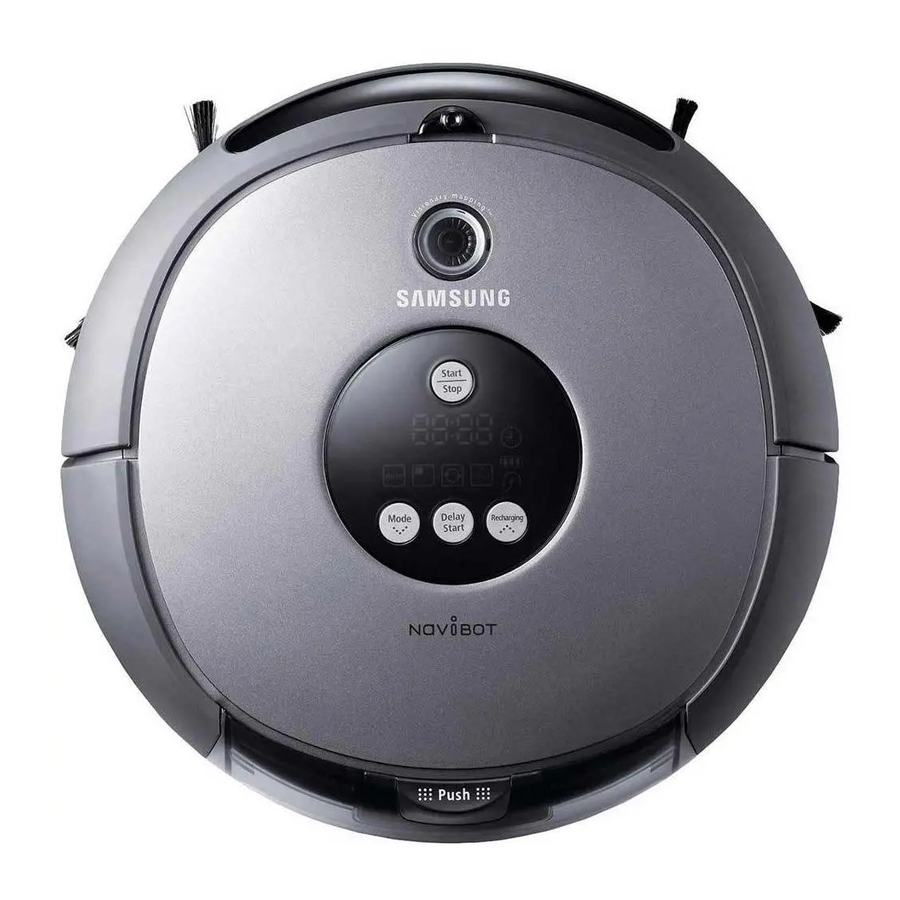
Assembling the cleaner NAME OF EACH PART Display Panel Remote Control Sensor Obstacle Sensor Bumper Sensor Dust Bin Eject Button Dust Bin Cliff Sensor Side Brush Charge Pin Cliff Sensor Charge Pin Roller Cliff Sensor 16_ Assembling the cleaner [ Main unit ] Front Side Bottom... -
Page 17: Installing The Batteries
Assembling the cleaner NAME OF EACH PART Charging Lamp Charge Pin Mode Lamp Mode/Power Button Distance Control Switch Installing the batteries ■ Batteries are not supplied with the product. You have to purchase the batteries separately. Install the alkaline batteries (type D) before use. Lift the cover of the VIRTUAL GUARD while pressing the locking tab. -
Page 18: Remote Control
Assembling the cleaner NAME OF EACH PART Power Auto Directional Buttons Manual Edge Installing the Remote Control Batterise ■ Batteries are not installed in the remote control when purchasing the product. Install the alkaline batteries (type AAA) before use. Lift the battery compartment cover at the back of the remote control, while pressing... -
Page 19: Display Part
- When cleaning is scheduled, the Scheduled Cleaning icon is lit. 4. Recharging - This icon turns on when the robotic vacuum cleaner returns to the charger station to charge its battery. 5. Cleaning Mode display - Each time the cleaning mode button is pressed, the corresponding cleaning mode is displayed. -
Page 20: Operating The Cleaner
INSTALLING THE ROBOTIC VACUUM CLEANER INSTALLATION ORDER 1. Turning the Power Switch on or off To use the robotic vacuum cleaner, you must turn on the Power Switch at the bottom of the main unit. 2. Installing the Charger To charge the robotic vacuum cleaner, you must first install the charger. -
Page 21: Installing The Charger
- If no power is supplied to the charger, the robotic vacuum will not be able to find the charger and will not be able to charge automatically. - If the robotic vacuum cleaner is separated from the charger, the battery is automatically discharged. Charging Lamp... -
Page 22: Charging
• Measures to take when charging is not smooth. When the robotic vacuum cleaner cannot be automatically charged, check the following: - Turn the Power Switch at the bottom of the robotic vacuum cleaner off and on (Reset). - Re-plug the power of the charger (Reset). -
Page 23: About The Battery
✽ Battery information : AA Size Ni-MH, UNION SUPPO, Model HPY, 12 (EA). - This battery is only for Samsung robotic vacuums. It is strictly prohibited to use it for other appliances or for other purposes. - Do not disassemble or modify the battery. -
Page 24: Installing The Virtual Guard
3. Install the VIRTUAL GUARD in front of the area you want to block access from the robotic vacuum cleaner. - Install the VIRTUAL GUARD so that the distance detection sensor can form an invisible barrier that the robotic vacuum cleaner cannot cross. 24_ Operating the cleaner Button operations 1. -
Page 25: Power Button
VIRTUAL GUARD signal. • When using the robotic vacuum cleaner in a small location or at a close distance, it may malfunction due to interference of the infrared signals. -
Page 26: Turning Power On/Off
- Main unit: Select Auto / Spot / Max / Manual / Edge mode by using the ( the ( ) button. - When cleaning begins, the robotic vacuum cleaner starts to move. ✽ Pressing the ( mode starts to perform the Auto mode cleaning. -
Page 27: Recharging
1. Press the Recharging button. - The main unit icon ( vacuum cleaner will return to the charger. 2. To stop the robotic vacuum cleaner while it is returning to the charger, press the ( 3. To test the auto charge function, press the Recharging button when the robotic vacuum cleaner is less than 1.5 m from the charger. -
Page 28: Auto Cleaning
Do not move the robotic vacuum cleaner when it is cleaning or press a button while it is cleaning. Otherwise, the robotic vacuum cleaner judges cleaning to be CAUTION complete and starts cleaning again from the beginning. -
Page 29: Spot Cleaning
SPOT CLEANING You can conveniently clean a specific area that has a a lot of cookie crumbs, dust, and etc. Move the robotic vacuum cleaner to the location where you ■ want to perform a spot clean. Main unit button Remote control button Configuration Sequence ... -
Page 30: Max Cleaning
NOTE not performed. • If you move the robotic vacuum cleaner while it is being charged or press a button, robotic vacuum cleaner judges cleaning to be complete (cleaning is not resumed). Do not move the robotic vacuum cleaner while it is cleaning or press a button while cleaning. -
Page 31: Manual Cleaning
You can move the robotic vacuum cleaner to clean a particular location directly by using the remote control. Move the robotic vacuum cleaner to the location where you ■ want to perform manual cleaning. You can manually clean using the remote control only. -
Page 32: Edge Cleaning
Do not move the robotic vacuum cleaner when it is cleaning or press a button while it is cleaning. Otherwise, the robotic vacuum cleaner judges cleaning to be CAUTION complete and starts cleaning again from the beginning. -
Page 33: Scheduled Cleaning
When setting is complete, and you press the ( button, the scheduled cleaning time is canceled. NOTE After completing the setting, if you manually move the robotic vacuum cleaner from the charger station, the scheduled cleaning time is cancelled. (Example) To clean 5 hours... -
Page 34: Maintain Tools And Filter
Do not use any means or mechanical devices not ■ installed by the manufacturer that could accelerate the deformation of the robotic vacuum cleaner. CLEANING THE SENSOR WINDOW AND THE CAMERA You must turn off the Power Switch at the bottom of the main unit before cleaning the robotic vacuum. -
Page 35: Cleaning The Dust Bin And The Filter
Maintain tools and filter CLEANING THE ROBOTIC VACUUM CLEANER CLEANING THE DUST BIN AND THE FILTER First, empty the dust bin before cleaning it. When separating the dust bin, take care not to spill the ■ dust out of the dust bin. -
Page 36: Cleaning The Power Brush
4. Remove any foreign substances such as long hairs or strings wrapped around the power brush using a cleaning brush or a vacuum cleaner. 5. When cleaning is complete, fix the Power Switch side of the power brush first and then fix the other side of the brush in the same way. - Page 37 6. After inserting the 3 tips at the top of the cover, push the other end in until it “clicks” into place. • To prevent the robotic vacuum cleaner from becoming clogged, be careful not to vacuum tooth picks or cotton swabs.
-
Page 38: Cleaning The Edge-Cleaning Side Rotating Brush
Maintain tools and filter CLEANING THE ROBOTIC VACUUM CLEANER CLEANING THE EDGE-CLEANING SIDE ROTATING BRUSH You must turn off the Power Switch at the bottom of the main unit before cleaning the robotic vacuum. 1. Check whether the side rotating brush is bent or whether there are any foreign substances stuck on the brush. -
Page 39: Cleaning The Driving Wheel
CLEANING THE DRIVING WHEEL You must turn off the Power Switch at the bottom of the main unit before cleaning the robotic. If the robotic vacuum cleaner suddenly starts to zigzag, there ■ may be foreign substances stuck on the driving wheel. -
Page 40: Troubleshooting
• Is the battery level flashing only one level and is ‘LO’ displayed in the display panel? • Robotic vacuum cleaner will not operate when the battery in the remote control is depleted. • Is the battery level flashing only Robotic vacuum one level and is ‘LO’... - Page 41 VIRTUAL GUARd is too short. MEASURE TO TAkE • Move the VIRTUAL GUARD to another place so that the robotic vacuum cleaner can charge automatically. • Change the direction of the VIRTUAL GUARD or set the distance to an appropriate value.
-
Page 42: Troubleshooting For Error Codes
✽ If you press the Start/Stop button or turn off the Power Switch, the error code is cleared. 42_ Troubleshooting SOLUTION • Turn off the Power Switch at the bottom and move the robotic vacuum cleaner to a different location. • Turn off the Power Switch at the bottom and remove the foreign substance from the power brush. -
Page 43: Product Specification
Product specification 93 mm (Height) 355 mm (Length) 355 mm (Width) Main Body 122 mm (Height) 275 mm (Width) 161 mm (Length) Charger(Station) Product specification _43... - Page 44 CLASSIFICATION Mechanical Specifications Electrical Specifications Cleaning Specifications Cleaning method Main unit button type This Vacuum cleaner is approved the following. Electromagnetic Compatibility Directive : 2004/108/EEC Low Voltage Directive : 2006/95/EC 44_ Product specification ITEM Diameter Height Weight Power voltage Charge power consumption...
- Page 45 memo...
- Page 46 memo...
- Page 47 memo...
- Page 48 If you have any connects or questions, regarding a Samsung Products. Contact the SAMSUNG Customer Care Center. Country SOUTH AFRICA Customer Care Center 0845 SAMSUNG (7267864) 0860-SAMSUNG (726-7864) Web Site www. samsung.com www. samsung.com Code No. DJ68-00518G REV(0.0)
Need help?
Do you have a question about the SR8845 and is the answer not in the manual?
Questions and answers