Table of Contents
Advertisement
Quick Links
Advertisement
Table of Contents

Related Manuals for ABB H8137xPx-S


Summary of Contents for ABB H8137xPx-S
- Page 1 Pos: 2 /CNDEX/00 Title/00_Title -- H8137xPx-S_H8137xK-S @ 63\mod_1500620160705_0.docx @ 801123 @ @ 1 2TMD041700D0042 │ 01.08.2017 Operating Instructions ABB-Welcome IP Video outdoor station H8137xPx-S H8137xK-S === Ende der Liste für Textmarke Titel ===...
-
Page 2: Table Of Contents
Table of contents Notes on the instruction manual ........................3 Safety ................................3 Intended use ..............................3 Environment ..............................4 ABB devices ............................. 4 Product description ............................5 Control elements ..........................5 Feature ............................. 6 Terminal description ......................... 7 Lock type and connection ......................10 Technical data ............................ -
Page 3: Notes On The Instruction Manual
If you pass the device on, also pass on this manual along with it. ABB accepts no liability for any failure to observe the instructions in this manual. Pos: 10 /CNDEX/01 Heading/1. Heading/Heading_Safety @ 56\mod_1487743565314_15.docx @ 749894 @ 1 @ 1 Safety Pos: 11 /CNDEX/00 Warning/Warning_Electric voltage_Dangerous currents @ 56\mod_1487741007782_15.docx @ 749637 @ @ 1... -
Page 4: Environment
Pos: 20 /CNDEX/00 Warning/Txt_ABB devices_Environment @ 56\mod_1487743585555_15.docx @ 749915 @ 12 @ 1 All packaging materials and devices from ABB bear the markings and test seals for proper disposal. Always dispose of the packing materials and electric devices and their components via an authorized collection facility or disposal company. -
Page 5: Product Description
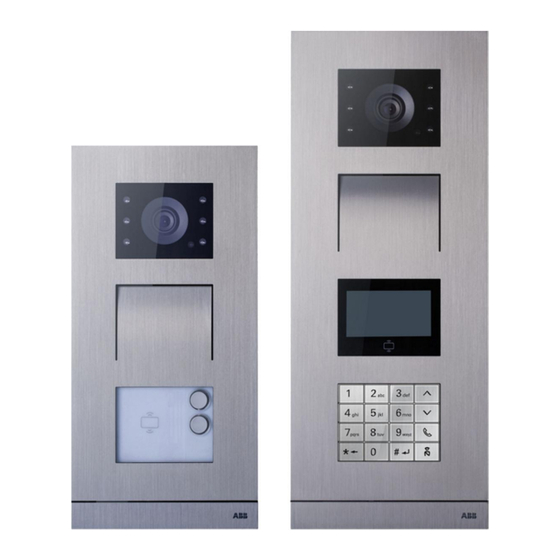
Product description Pos: 23 /CNDEX/01 Heading/1. Heading/Heading_Product description @ 56\mod_1487644182664_15.docx @ 747986 @ 1 @ 1 Product description Pos: 24 /CNDEX/01 Heading/1.1 Heading/Heading_Control elements @ 56\mod_1487747434664_15.docx @ 750030 @ 2 @ 1 Control elements Pos: 25 /CNDEX/03 Front overview/Control elem ents_H8137xPx-S_H8137xK-S_OS @ 57\mod_1488952981678_15.docx @ 759737 @ @ 1 Fig. -
Page 6: Feature
Product description Pos: 27 /CNDEX/01 Heading/1.1 Heading/Heading_Feature @ 56\mod_1487747498194_15.docx @ 750051 @ 2 @ 1 Feature Pos: 28 /CNDEX/04 Feature/Feature_H8137xPx-S_H8137xK-S_OS @ 57\mod_1488953233070_15.docx @ 759757 @ @ 1 3 mm stainless steel frame ■ ■ Scratch and fire resistant finish ■ 1m pixel high definition camera with wide detection angle (H 86°,V 67°, D 130°) Anti-fog design camera with built-in heater ■... -
Page 7: Terminal Description
Product description Pos: 30 /CNDEX/01 Heading/1.1 Heading/Heading_Terminal description @ 56\mod_1487747555712_15.docx @ 750072 @ 2 @ 1 Terminal description Pos: 31 /CNDEX/05 Terminal description/Terminal description_H8137xPx-S_H8137xK-S_OS @ 57\mod_1488953435060_15.docx @ 759777 @ @ 1 H8137xK-S H8137xPx-S SET BOOT Connector Connector Connector Upgrade Prog. - Page 8 Product description H8137xPx-S Fig. 3: Terminal description of pushbutton module Function Program button Connector for previous module Connector for software updating of this module Connector for Wiegand output It supports 26 bits (default) and 34 bits. Connector for next module Tab.3:...
- Page 9 Product description H8137xK-S SE T BOO T Fig. 4: Terminal description of display and keypad module Function Program button Connector for previous module Connector for software updating of this module USB connector (reserved) Connector for next module Connector for Wiegand output It supports 26 bits (default) and 34 bits.
-
Page 10: Lock Type And Connection
Product description Pos: 33 /CNDEX/01 Heading/1.1 Heading/Heading_Lock type and connection @ 56\mod_1487747624072_15.docx @ 750093 @ 2 @ 1 Lock type and connection Pos: 34 /CNDEX/05 Terminal description/Lock type_OS @ 56\mod_1487645786193_15.docx @ 748070 @ @ 1 Lock type Operation type Voltage Wiring type Type A Electrical strike lock, 12... -
Page 11: Technical Data
18 V 4 A impulsive, 250 mA holding Floating supply, door opener (COM-NC-NO) 30 VAC/DC 1A Working voltage 27 VDC H8137xPx-S: 273.8 mm x 135 mm x 48.5 mm Dimension H8137xK-S: 346.8 mm x 135 mm x 48.5 mm Tab.6: Technical data Pos: 40 /CNDEX/99 Auxiliary tools/++++++++++++++ page break +++++++++++++++ @ 57\mod_1487814735946_0.docx @ 750979 @ @ 1... -
Page 12: Mounting/Installation
Mounting/Installation Pos: 42 /CNDEX/01 Heading/1. Heading/Heading_Mounting/Installation @ 56\mod_1487743369641_15.docx @ 749852 @ 1 @ 1 Mounting/Installation Pos: 43 /CNDEX/00 Warning/Warning_Electric voltage_Dangerous currents @ 56\mod_1487741007782_15.docx @ 749637 @ @ 1 Warning Electric voltage! Dangerous currents flow through the body when coming into direct or indirect contact with live components. -
Page 13: Mounting
Mounting/Installation Pos: 47 /CNDEX/01 Heading/1.1 Heading/Heading_Mounting @ 56\mod_1487742836665_15.docx @ 749745 @ 2 @ 1 Mounting Pos: 48 /CNDEX/07 Mounting/Installation/Preparation_OS @ 56\mod_1487742936063_15.docx @ 749767 @ @ 1 Use gloves to protect yourself from being cut. Fig. 6: Preparation Pos: 49 /CNDEX/07 Mounting/Installation/Wiring_H8137xPx-S_H8137xK-S_OS @ 58\mod_1489113964205_15.docx @ 765047 @ @ 1 SET BOOT DC+ GND LOCK COM NC NO... -
Page 14: Flush-Mounted Installation
Flush-mounted installation Pos: 52 /CNDEX/07 Mounting/Installation/Product dimension_H8137xPx-S_H8137xK-S_OS @ 57\mod_1488957202224_15.docx @ 759900 @ @ 1 H8137xK-S 41.5 mm 110 mm 48.5 mm 135 mm H8137xPx-S 110 mm 41.5 mm 135 mm 48.5 mm Fig. 8: Product dimension Pos: 53 /CNDEX/99 Auxiliary tools/++++++++++++++ page break +++++++++++++++ @ 57\mod_1487814735946_0.docx @ 750979 @ @ 1 │14... - Page 15 Mounting/Installation Pos: 54 /CNDEX/07 Mounting/Installation/Flush-mounted installation_H8137xPx-S_H8137xK-S_OS @ 57\mod_1488957107080_15.docx @ 759940 @ @ 1 H8137xK-S H8137xPx-S Fig. 9: Flush-mounted installation Pos: 55 /CNDEX/99 Auxiliary tools/++++++++++++++ page break +++++++++++++++ @ 57\mod_1487814735946_0.docx @ 750979 @ @ 1 │15 Operating Instructions VER:1.0...
-
Page 16: Replacing The Nameplate
Pos: 56 /CNDEX/01 Heading/1.1.1 Heading/Heading_Replace the nameplate @ 56\mod_1487748988144_15.docx @ 750237 @ 3 @ 1 7.2.2 Replacing the nameplate Pos: 57 /CNDEX/07 Mounting/Installation/Replace the nameplate_H8137xPx-S_Villa OS @ 57\mod_1488958428077_15.docx @ 759960 @ @ 1 H8137xPx-S Fig. 10: Replace the nameplate Pos: 58 /CNDEX/99 Auxiliary tools/++++++++++++++ page break +++++++++++++++ @ 57\mod_1487814735946_0.docx @ 750979 @ @ 1 │16... -
Page 17: Installation Situations
Mounting/Installation Pos: 59 /CNDEX/01 Heading/1.1.1 Heading/Heading_Installation situations @ 56\mod_1487749033946_15.docx @ 750258 @ 3 @ 1 7.2.3 Installation situations Pos: 60 /CNDEX/00 Warning/Note_Installation situations @ 56\mod_1487743694622_15.docx @ 749937 @ @ 1 Note The following installation situations must be avoided without fail to ensure picture quality. -
Page 18: Commissioning
Commissioning Pos: 63 /CNDEX/01 Heading/1. Heading/Heading_Commissioning @ 57\mod_1487828936105_15.docx @ 751257 @ 1 @ 1 Commissioning Pos: 64 /CNDEX/01 Heading/1.1 Heading/Heading_Building outdoor station @ 57\mod_1488958895114_15.docx @ 760010 @ 2 @ 1 Building outdoor station Pos: 65 /CNDEX/01 Heading/1.1.1 Heading/Heading_Enter system setting of building OS @ 62\mod_1496805537569_15.docx @ 786317 @ 3 @ 1 8.1.1 Enter system setting of building OS Pos: 66 /CNDEX/08 Commissioning/Enter system setting_H8137xK-S_Building OS @ 62\mod_1496805652119_15.docx @ 786338 @ @ 1... -
Page 19: Engineering Setting
Commissioning Pos: 68 /CNDEX/01 Heading/1.1.1 Heading/Heading_Engineering setting @ 62\mod_1496805803238_15.docx @ 786358 @ 3 @ 1 8.1.2 Engineering setting Pos: 69 /CNDEX/08 Commissioning/Engineering setting_H8137xK-S_Building OS @ 62\mod_1496805869896_15.docx @ 786379 @ @ 1 Set device type OS = outdoor station, GS = gate station Menu Engineering Device attr. - Page 20 Commissioning Set default GU Menu Engineering System attr. Guard type: 0 OS/GS Engineering 0:GU 1:PC Default GU System attr. Guard No.: 01 Fig. 16: Set default GU Set system password Menu Engineering System attr. OS/GS Engineering System pwd. System attr. (Default pwd.
-
Page 21: Access Control Setting
Commissioning Pos: 71 /CNDEX/01 Heading/1.1.1 Heading/Heading_Access control setting @ 62\mod_1496806038922_15.docx @ 786399 @ 3 @ 1 8.1.3 Access control setting Pos: 72 /CNDEX/08 Commissioning/Access control setting_H8137xK-S_Building OS @ 62\mod_1496806114114_15.docx @ 786420 @ @ 1 Access control password setting New pwd: Menu Access control Pwd. - Page 22 Commissioning Patrol card management Menu Access control Card setting Patrol card Card No. Access control Card setting Patrol card Del. one card Press # confirm Patrol card Unlock setting Unlock setting Patrol card Delete one Delete Del. one card Press # confirm Patrol card Delete all cards Confirm?
-
Page 23: System Setting
Commissioning Pos: 74 /CNDEX/01 Heading/1.1.1 Heading/Heading_System setting @ 57\mod_1488959631505_15.docx @ 760166 @ 3 @ 1 8.1.4 System setting Pos: 75 /CNDEX/08 Commissioning/System setting_H8137xK-S_Building OS @ 62\mod_1496806271172_15.docx @ 786440 @ @ 1 Set volume Menu System setting Volume Voice volume System setting Volume Voice volume Medium... - Page 24 Commissioning Set unlock time Unlock time Menu System setting Unlock time 1st (LOCK-GND) System setting Unlock time Choose door 2nd (NC-NO-C) Press # confirm Fig. 28: Set unlock time Set door alarm Menu Door alarm System setting System setting Unlock time Door alarm Choose door Fig.
- Page 25 Commissioning Restore system setting Menu System setting Restore System setting Restore Anti-flicker Press # confirm Fig. 33: Restore system setting Guide and version System setting Help Menu Guide 1. Input Indoor System setting Help Station no. Eg.: 0101 Help I. Mx_1.14_161227 Version Ext_1.05_160905 LCD_1.12_161205...
-
Page 26: Villa Outdoor Station
Commissioning Pos: 77 /CNDEX/01 Heading/1.1 Heading/Heading_Villa outdoor station @ 58\mod_1489108711728_15.docx @ 764767 @ 2 @ 1 Villa outdoor station Pos: 78 /CNDEX/08 Commissioning/Find details in the system manual @ 62\mod_1497234325447_15.docx @ 788858 @ @ 1 Please find details in the system manual. Pos: 79 /CNDEX/99 Auxiliary tools/++++++++++++++ page break +++++++++++++++ @ 57\mod_1487814735946_0.docx @ 750979 @ @ 1 │26 Operating Instructions VER:1.0... -
Page 27: Operation
H8137xK-S Fig. 36: Calling a resident Villa outdoor station H8137xPx-s Press the first button to start a call. Press again to end the call. If there is no answer from the resident within 30 s, the call ends automatically. Building outdoor station H8137xK-S If the device is set as OS (outdoor station), enter the room number and press the call button. - Page 28 Operation Forward to GU (only available for H8137xK-S) Menu System setting Forward to GU System setting Forward to GU Fig. 37: Forward to GU If the device enables the function "Forward to GU", all the calls from the visitors will be transferred to the guard unit.
-
Page 29: Calling A Guard Unit
Fig. 38: Calling a guard unit Villa outdoor station H8137xPx-S Press the second button to call the guard unit. Press again to end the call. If there is no answer from the guard unit within 30 s, the call ends automatically. -
Page 30: Unlocking
Operation Pos: 88 /CNDEX/01 Heading/1.1 Heading/Heading_Unlock @ 57\mod_1488959574522_15.docx @ 760125 @ 2 @ 1 Unlocking Pos: 89 /CNDEX/09 Operation/Unlock_H8137xK-S_Building OS @ 57\mod_1488960772354_15.docx @ 760401 @ @ 1 Door open Unlocking... Fig. 39: Unlocking Unlock by swiping a card Swiping a registered ID/IC card near the card zone to unlock. Unlock by pushing the button Press an exit button to unlock if "Exit"... -
Page 31: Manage Id/Ic Cards On Indoor Station
Operation Pos: 91 /CNDEX/01 Heading/1.1 Heading/Heading_Manage ID/IC cards on indoor station @ 58\mod_1489111024283_15.docx @ 764931 @ 3 @ 1 Manage ID/IC cards on indoor station Pos: 92 /CNDEX/09 Operation/Manage cards by indoor station_H8137xPx-S_Villa OS @ 58\mod_1489111576489_15.docx @ 764952 @ @ 1 Note Please assign the outdoor station to a specific apartment first before configuring the ID/IC card. - Page 32 Operation Fig. 41 Register new ID/IC cards During the process, the push-button module lights up yellow, swipe the ID/IC cards to register; if successful, the pushbutton module lights up green. Delete existing ID/IC cards During the process, the push-button module flashes yellow, swipe the ID/IC cards to delete; if successful, the push-button module lights up green.
-
Page 33: Use Of App To Open Door
Additional devices are not required for commissioning. To the play store (https://play.goole.com/store/apps/details?id=com.abb.allegro3_nfcdooropener&hl=en) [1] Download and install the ABB door opener app from the Google Play Store. [2] Turn on the NFC function of your mobile device. [3] Enter the setting mode of the round push-button module. -
Page 34: Notice
We reserve the right to at all times make technical changes as well as changes to the contents of this document without prior notice. The detailed specifications agreed to at the time of ordering apply to all orders. ABB accepts no responsibility for possible errors or incompleteness in this document. - Page 35 Km 9 National Highway 1A , The detailed specifications agreed P.O.Box 11070 Dubai-UAE Hoang Liet, Hoang Mai, Hanoi, upon apply for orders. ABB accepts T : +971 4 3147 586 Vietnam no responsibility for possible errors F : +971 4 3401 541 T : +84 4 3861 1010 or incompleteness in this document.