
Related Manuals for GE D25


Summary of Contents for GE D25
- Page 1 Grid Solutions Substation Controller User's Manual 994-0081 Version 3.00 Revision 21 GE Information...
- Page 2 Other company or product names mentioned in this document may be trademarks or registered trademarks of their respective companies. The circuit boards in the D25 contain many electrostatically sensitive electronic components. To prevent damage when handling these products use approved static control procedures.
-
Page 3: Table Of Contents
Control Outputs ......................... 41 DC Analog Inputs ......................65 AC Analog Inputs ......................67 Communications Ports ...................... 68 Configuring the D25 to work with a DNP3 I/O Module ..........78 Chapter 3: Powering-up and Testing ....................80 Testing Utilities ......................... 80 Boot Up .......................... - Page 4 DDSP Modules ....................... 122 Memory Expansion Board ....................123 Shelf Plate ........................123 Configuring Radio Keying Option.................. 126 D25 Ethernet Card 100Base (10/100Base-T and 100Base-FX) ........127 Power Supply Card ......................129 Digital Input Cards ......................131 Digital Output Card ......................132 DC Analog Input Card ....................
- Page 5 GE Grid Solutions User's Manual Appendix C: Ordering Information ....................161 Appendix D: Installing and Connecting DNP3 I/O Modules .............. 162 Overall Procedure to Install and Connect DNP3 I/O Modules ........162 Installing DNP3 I/O Modules in a Rack ................. 163 Connecting DNP3 I/O Modules (Low Voltage) .............
-
Page 6: About This Document
Purpose The purpose of this document is to provide users with information on how to install and commission a D25* IED. This guide also provides details on the operation and maintenance of D25 IEDs. This document is intended for readers who are installing or maintaining a D25... - Page 7 504-0010 D25 WESDAC Type II, 2MB Flash Power Supplies 521-0118 D25 HV Power Supply, 140 - 300 VDC / 240 VAC, 24V Wetting 521-0119 D25 Power Supply, 20 - 60 VDC, 48V Wetting 521-0124 D25 Power Supply, 70 - 150 VDC, 24V Wetting...
- Page 8 D25 Analog Interface Card (Gen 1) 504-0009 D25 Analog Interface Card (Gen 2 and Gen 3). This card is obsolete. 504-0009 is the Gen 3 Plant I/O DSP Card and does not work with the Gen 4 Plant I/O (P097-0 v4xx or 5xx). In addition, the 504-0015LF does not work with the Gen 3 Plant I/O (P097-0 v3xx).
-
Page 9: Product Support
GE Grid Solutions Technical Support GE Grid Solutions Technical Support is open 24 hours a day, seven days a week for you to talk directly to a GE representative. In the U.S. and Canada, call toll-free: 1 800 547 8629. -
Page 10: Product Returns
A Return Merchandise Authorization (RMA) number must accompany all equipment being returned for repair, servicing, or for any other reason. Before you return a product, please contact GE Grid Solutions to obtain a Return Merchandise Authorization number and complete instructions for return shipments. -
Page 11: Chapter 1: Before You Start
(PCBs). Always use the puller that is provided to remove Modules that hold potentially • hazardous voltages. This is located inside the D25 front cover on the edge of the Indicator Switch Card. • The CONTROLS switch on the front panel of the D25 has a mechanical protector to prevent accidental operation of the switch. - Page 12 Voltages • Short all current transformer primaries before servicing. A label similar to the one shown below on the rear panel of the D25 Patent Protection enclosure. It is a formal notification of the US patents that protect the product Label and the technology developed by GE Grid Solutions.
- Page 13 − performance specifications, and result in component damage from debris. Operation in The D25 generates radio frequency energy. If it is not operated and used in Residential accordance with the instructions provided in this guide, it may cause harmful Areas interference to radio communications in a residential area.
-
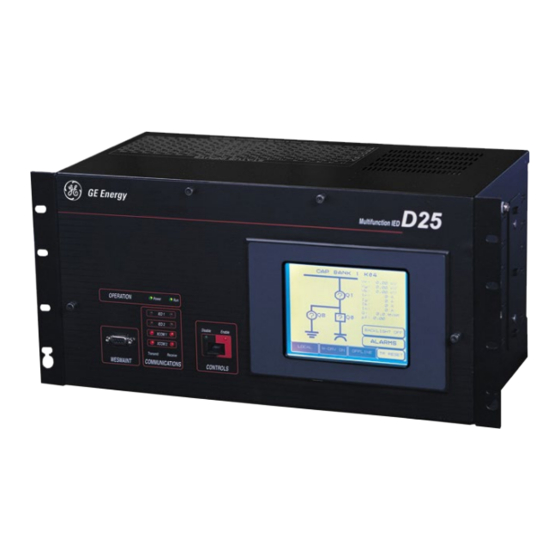
Page 14: Product Overview
GE Grid Solutions User's Manual Product Overview What is the The D25 is a standalone intelligent electronic device that can operate as: D25? • Programmable logic controller (PLC) • Substation LAN node • IED gateway • Bay level controller •... -
Page 15: Restriction Of Hazardous Substances (Rohs)
Restriction of Hazardous Substances (RoHS) The environmental protection use period (EPUP), as defined in PRC SJ/T11363-2006, for the D25 hardware assemblies listed in the table below is in excess of 20 years. The following table shows the RoHS Material Declaration Data Content by... - Page 16 D25 CT Module - 400 Ohms Burden 517-0443 D25KE Control Module FACE 40 517-0447 D25KE Control Module DB25 517-0449 D25 KE Control Module, DB25, 16 Channel X 517-0452 D25 KE Control Module, FACE40, 16 Channel 517-0456 D25 X42 CT 517-0469...
- Page 17 Graphics LCD Assembly 540-0256 D25 Data Display Assembly 540-0412 D25 IND Switch Card 580-0894 D25 IEDRTC Card 580-0991 D25 SERIAL XCOM Card STD 580-0993 D25 10BASE-FL XCOM Card 580-0994 D25 10BASE-T XCOM Card 580-3429 Multii-language touch screen LCD 512KB 580-3570 Graphic Display, Color, 5.7 inch, 640 x 480 X...
-
Page 18: Chapter 2: Installing The D25
Follow these steps to install the D25: Step Action Unpack the D25. Using the First Look at the D25 section of this guide, inspect the D25 for damage. Note: Report any damage immediately to GE Grid Solutions. See: Product Safety for contact details. -
Page 19: First Look At The D25
If you have to download code and configuration files, then go back to step 5 and verify that the D25 is now operating correctly. If you are replacing a component that is already installed on the D25 or Note upgrading a specific component, then see Chapter 7: Upgrading and Replacing D25 Modules. - Page 20 10 12 14 16 18 20 22 24 26 28 30 32 34 36 38 40 AC ANALOG INPUTS Part Number The part number label on the rear of the enclosure identifies the D25 options at the time of delivery (See Appendix C: Ordering Information): •...
-
Page 21: Physical Mounting
2. Holding the D25 firmly in place in the rails of the mounting rack, install and tighten the four rack screws. You are now ready to connect all power and field wiring to the back of the D25, see 0 Connecting Field Wiring. -
Page 22: Lcd Panel Overview
Menu WESMAINT COMMUNICATIONS CONTROLS This diagram shows a D25 front panel with the LCD option installed. Detailed The touch-sensitive keypad below the LCD display can be used to navigate Description through the display to show a set of select analog and digital input points. - Page 23 LCD Panel Overview, Continued Configuring A D25 fitted with an LCD panel must be equipped with the Data Display The Software DTA (B062) application software to communicate with the panel. Using SGConfig, specific D25 database input points are mapped into this software.
-
Page 24: Graphic Display Panel (Gdp) And Color Gdp (Cgdp) Overview
Diagrams option has been made available for applications where graphic front-panel display and control of system inputs and outputs is desired. This diagram shows a D25 front panel with the GDP option installed. GE Energy Services M ultifunction IED Power... - Page 25 GE Grid Solutions User's Manual Graphic Display Panel (GDP) and Color GDP (CGDP) Overview, Continued Components of A D25 must have these components to support a GDP system: a GDP/CGDP Hardware: Part # − D25 Front Panel 953-3136 − GDP module 580-1186 −...
- Page 26 There are jumper settings at the back of the GDP/CGDP unit that are set at the factory. These settings shall not be changed and any modification to them may cause damage to the GDP/CGDP or other modules of the D25. A D25 equipped with a GDP/CGDP has these limitations: •...
-
Page 27: Configuration Of A Gdp
When installed, the PSA module (part # 521-0131) is mounted over the right- Connections hand side of the D25’s DAC board, where it plugs onto the three sets of digital input wetting jumpers (see Low-Voltage Digital Input Card Wetting on p. -
Page 28: Set Up Of A Color Gdp (Cgdp)
(SB Viewer 3 00). The SB Viewer 300 and D25 communicate with each other using the DNP protocol over RS-485. The SB Viewer 300 is configured using the SBC Tool 300 running on the PC. The D25 is configured using SGConfig which also run on the PC. - Page 29 GE Grid Solutions User's Manual Set Up of a Color GDP (CGDP), Continued Set Up Setting up the CGDP requires the following tasks: Procedure Register the SBC Tool 300. Create the configuration file using the SBC Tool 300. Load the configuration file onto the CGDP.
- Page 30 3. Navigate to Substation Automation Products > D25 > GDP 300 – Color > GDP 300 Operation and Configuration Manual.pdf. A D25 fitted with the CGDP must be running DNP 3.0 DPA application software and will use COM1 (D25 MAINT port) to communicate with the CGDP (refer to the DNP V3.00 DPA Configuration Guide (B021-0CG)).
- Page 31 9. Power down the D25 and open the front panel. 10. Insert the USB flash drive into the CGDP. 11. Power on the D25 and copy the project folder from the USB flash drive to the CGDP’s path. 12. Power down the D25, unplug the USB flash drive, and close the D25 front panel.
- Page 32 Set Up of a Color GDP (CGDP), Continued Additional • GDP 300 Operation and Configuration Manual (document number Documentation 16300-MOC-13-4) • DNP V3.00 DPA Configuration Guide (GE document number B021- 0CG). The CGDP software package makes the following software components available for Software use: License...
-
Page 33: Connecting Field Wiring
-/N Input • Neutral if AC power supply Connect the protective ground stud before operating the D25. Tighten the ground stud to a torque value between 4.2 to 5.0 in-lb [0.475 to 0.565 Nm] Use the ground stud for shielding. -
Page 34: Digital Inputs
Module are bipolar, and are isolated from the D25’s internal power supply. Digital Inputs The D25 can have up to 96 digital inputs in three banks of 32: • Digital Inputs 1 to 32 are on connectors A and B Digital Inputs 33 to 64 are on connectors C and D •... - Page 35 If fuse F1 opens or the wetting voltage is removed from the digital input module for any reason, the pseudo DI for that module will change state and set an alarm. If a D25 digital input module is not present, the pseudo DI point will remain in the Off state.
- Page 36 Supplied Wetting is when the voltage applied to the inputs originates from the Supplied power supply internal to the D25, routed externally to the DI Cards. The Wetting digital input is “turned on” simply by closing a contact across the two input (Externally termination points.
- Page 37 Contacts Voltage Detect In this type of input, the D25 does not provide the wetting power source, from either its own power supply, or from an external battery. Note: Pins 1 and 2 of Connector(s) A, C or E are jumpered for each board using this configuration.
- Page 38 GE Grid Solutions User's Manual Digital Inputs, Continued Table: Digital Pinouts for Digital Inputs 1 through 32: Inputs Pinouts 1-32 Connector A Connector B Wetting Voltage Reserved Wetting Voltage Reserved DI 1A DI 17A DI 1B DI 17B DI 2A...
- Page 39 GE Grid Solutions User's Manual Digital Inputs, Continued Table: Digital Pinouts for Digital Inputs 33 through 64: Inputs Pinouts 33-64 Connector C Connector D Wetting Voltage Reserved Wetting Voltage Reserved DI 33A DI 49A DI 33B DI 49B DI 34A...
- Page 40 GE Grid Solutions User's Manual Digital Inputs, Continued Table: Digital Pinouts for Digital Inputs 65 through 96. Inputs Pinouts 65-96 Connector E Connector F Wetting Voltage Reserved Wetting Voltage Reserved DI 65A DI 81A DI 65B DI 81B DI 66A...
-
Page 41: Control Outputs
DC control voltages. Versions greater than 2.30 support AC control voltage monitoring. Note 4: The D25 High Current Control Card does not have a fuse and a fuse monitoring circuit. The fuse monitoring circuitry has been engineered to detect control voltages up to the supported maximum specifications of the module. - Page 42 • with up to 2 FACE-40 connectors for field wiring and optioning All DB-25 type D25KE modules are installed in a D25 enclosure that has six About D25 KE Rear Panels DB-25 connectors on the backplane, regardless of how many channels the KE board has.
- Page 43 GE Grid Solutions User's Manual Control Outputs, Continued Table: D25KE The DB-25 connector pinouts for D25KE outputs 1 through 16. DB-25 Note: TRPx = Trip output point x Connector CLSx = Close output point x Pinouts J1 to J3 = Not Connected...
- Page 44 GE Grid Solutions User's Manual Control Outputs, Continued Table: D25KE The DB-25 connector pinouts for D25KE outputs 17 through 32. DB-25 Connector Pinouts J4 to J6 J4 DB- Signal J5 DB- Signal J6 DB- Signal 25 Pin 25 Pin 25 Pin...
- Page 45 GE Grid Solutions User's Manual Control Outputs, Continued Table: D25KE Phoenix 8-pin terminal block – P1 Pinout: DB-25 Control Function 1 2 3 4 5 6 7 8 Terminal Block – P1 Signal Function Comments COIL_SUP Control Voltage Interposer Relay Coil Power Supply...
- Page 46 D25KE DB-25 Control voltage can be supplied by either an external power supply, or the Control Voltage D25’s own power supply. In either case, connect the control voltage to P1 Connections pins 1 and 2. To provide control voltage using the D25 internal supply, connect as shown:...
- Page 47 GE Grid Solutions User's Manual Control Outputs, Continued D25KE DB-25 Through the use of “Master” relays, the 32 digital outputs can be configured Trip/Close as four groups of eight Trip/Close pairs, that is, 64 output connections. Configuration Note: The Control Voltage can be up to 75 Vdc or 50 Vac. See page 152 for specifications of control outputs.
- Page 48 Pin 17 of the D25KE DB-25 connector is not connected internally, and therefore, cannot be used as a drain connection. For Trip/Close operation, the cables used to connect the D25 control outputs Note to the D20 KI panels must have all DB-25 pins connected end-to-end.
- Page 49 Shows the connections used when configuring a D25KE module for Trip/Close Trip/Close operation using up to four-D20 KI interposing relay panels. Connection Diagram GROUNDING POINT for D25 D25 MAINT IED / HOST 1 POWER RADIO FAIL IED / HOST 2 XCOM 2 XCOM 1...
- Page 50 GE Grid Solutions User's Manual Control Outputs, Continued The 32 digital outputs can be configured as four groups of four Raise/Lower D25KE DB-25 pairs. Raise/Lower Note: The (external) control voltage can be up to 75 Vdc or 50 Vac, at 2 A Configuration maximum.
- Page 51 Shows the connections used when configuring for Raise/Lower operation Raise/Lower using two D20 KI interposing relay panels. Connection Diagram GROUNDING POINT for D25 D25 MAINT IED / HOST 1 POWER RADIO FAIL IED / HOST 2 XCOM 2 XCOM 1...
- Page 52 GE Grid Solutions User's Manual Control Outputs, Continued D25KE DB-25 Trip/Close and Raise/Lower digital outputs can be used on the same D25KE Combined R/L DB-25 module. and T/C The three examples shown below are the only recommended configuration Note options for combining trip/close and raise/lower in one D25KE.
- Page 53 GE Grid Solutions User's Manual Control Outputs, Continued Combined T/C This example shows the P1 jumpers when the first 16 digital outputs are and R/L configured as trip/close, and the second 16 outputs are configured as 8 Example #2 raise/lower pairs.
- Page 54 GE Grid Solutions User's Manual Control Outputs, Continued Table: D25KE Digital Output Connections: Pinouts for FACE-40 Connector G1, Connector G1 outputs 1 to 16. Pinouts G1 Pin Signal G1 Pin Signal G1 Pin Signal COIL_SUP CLS7 CLS14 COIL_RTN TRP7 TRP14...
- Page 55 GE Grid Solutions User's Manual Control Outputs, Continued Table: D25KE Specific pins of both FACE-40 Connectors, G1 and G2, are used to configure FACE-40 the D25KE module for trip/close or raise/lower operation: as listed below: Board Control Optioning Signal Function...
- Page 56 Continued D25KE FACE- Control voltage can be supplied by either an external power supply, or the 40 Module D25’s own power supply. Connect the control voltage to G1 pins 1 and 2. Control Voltage Connections Note: The (external) control voltage can be up to 120 Vdc. See page 152 for specifications of control outputs.
- Page 57 GE Grid Solutions User's Manual Control Outputs, Continued D25KE FACE- Through the use of “Master” relays, the 32 digital outputs can be configured 40 Trip/Close as four groups of eight Trip/Close pairs: 64 output connections. Configuration Note: The control voltage can be up to 120 Vdc. See page 152 for specifications of control outputs.
- Page 58 GE Grid Solutions User's Manual Control Outputs, Continued D25KE FACE- The 32 digital outputs can be configured as four groups of four Raise/Lower pairs. Raise/Lower Configuration Note: The control voltage can be up to 120 Vdc. See page 152 for specifications of control outputs.
- Page 59 GE Grid Solutions User's Manual Control Outputs, Continued D25KE FACE- Trip/Close and Raise/Lower digital outputs can be used on the same D25KE 40 Combined FACE-40 unit. R/L and T/C When assigning raise/lower groups, always start with group 4, then group 3, and lastly group 2.
- Page 60 P1/5-P1/7 P1/5-P1/8 P1/3-P1/5 P1/4-P1/5 P1/5-P1/7 P1/5-P1/8 517-0449 D25KE Control Module P2/3-P1/6 P2/4-P2/6 DB25 16 Channel P2/3-P1/6 P2/4-P2/5 P2/3-P1/5 P2/4-P2/5 Note: Use GE part number 970-0264 Quad-Wire Jumper or plain wire of appropriate gauge to configure D25KE card. 994-0081-3.00-21 GE Information...
- Page 61 The software does not support the use of only the current monitoring input for other purposes. The high voltage area of the D25 High Current KE Digital Output Module is in close proximity to the D25 chassis. Ensure that relay contacts are de-energized before removing the D25 HCKE DO Module.
- Page 62 • When current supervision is required, the load must be wired to terminal C and NO >I of channels 25 to 32. D25 High Current KE Digital Output Connections: Pinouts for FACE-40 Table: Connector G1 Connector G1 and G2, outputs 1 to 32.
- Page 63 GE Grid Solutions User's Manual Connector G1 Connector G2 Signal Description Signal Description G1-8 Channel # 3 Common terminal G2-8 Channel # 20 NO B terminal G1-9 Channel # 3 NC terminal G2-9 Channel # 21 NO A terminal G1-10...
- Page 64 GE Grid Solutions User's Manual Connector G1 Connector G2 Signal Description Signal Description G1-39 Channel # 16 NO A terminal G2-39 Channel # 32 Common terminal G1-40 Channel # 16 NO B terminal G2-40 32NO Channel # 32 NO terminal...
-
Page 65: Dc Analog Inputs
D25 power supply terminal block. DO NOT ground at both ends of cable. Shielding Table of typical digital counts stored in the D25 System Point Database Table: Digital Counts representing inputs at several input levels, and scaling settings, for each DC... - Page 66 GE Grid Solutions User's Manual DC Analog Inputs, Continued Table: DC 1 3 5 7 9 11 13 15 17 19 21 23 25 27 29 31 33 35 37 39 Analog Input Connector Pinout 2 4 6 8 10 12 14 16 18 20 22 24 26 28 30 32 34 36 38 40 Location of adapters on the module’s PCB for each input:...
-
Page 67: Ac Analog Inputs
GE Grid Solutions User's Manual AC Analog Inputs AC Analog The D25 accepts up to 15 AC analog inputs, which are grouped into five sets Inputs of three each. The D25 can support virtually any combination of CTs and PTs. -
Page 68: Communications Ports
Use extreme caution when connecting field wiring to the AC inputs. A D25 can have a wide variety of input options, and there are no obvious indications on the rear of the D25 enclosure to identify the type of inputs installed. - Page 69 User's Manual Communications Ports, Continued Serial To connect a PC to the D25, use a WESMAINT II+ cable (GE part number WESMAINT 977-0048/96), or equivalent. Attach the 9-pin female jack of the Cable WESMAINT II+ cable to the D25, and the other end of the WESMAINT II+...
- Page 70 GE Grid Solutions User's Manual Communications Ports, Continued Table: D25 Pinout of the D25 MAINT DB-9 connector. MAINT Port Pinout DB-9 Pin RS-485 Com GND EARTH GND Schematic of the cable wiring necessary for 2-Wire RS-485 connection. 2-Wire RS-485 Cable...
- Page 71 Both IED ports RS-232 and RS-485 (for multi-drop applications) are supported on the same physical connector. Note: The input resistance 12 KΩ is used for all serial ports in D25 (UTC/IED/XCOM) when configured as RS485. The typical resistance is 24 KΩ, but use 12 KΩ as maximum burden. This is very important for daisy chaining D25s, especially for IRIG-B signals.
- Page 72 GE Grid Solutions User's Manual Communications Ports, Continued Table: Serial Pinouts for COM3 and COM4 serial ports for both RS-232 to RS-485 Port Pinouts configurations: DB-9 Pin RS-232 RS-485 Com GND EARTH GND EARTH GND Schematic of the cable wiring necessary for 2-Wire RS-485 operation.
- Page 73 User's Manual Communications Ports, Continued Configuring In RS-485 two-wire mode, the RTS line internal to the D25 controls the transmitter RS-485 2-Wire (the RTS signal is not propagated on to the serial cable, but is present inside the hardware). While RTS is active, the transceiver is in transmit mode. The “preamble” and “postamble”...
- Page 74 For the Electrical Specifications for Auxiliary Digital Outputs see page 154. Contact wetting must be supplied from a source external to the D25 When operating the Auxiliary Digital Output using WESMAINT, Only On or Note Off (latch) commands are supported.
- Page 75 GE Grid Solutions User's Manual Communications Ports, Continued Table: Serial Pinouts for COM5 and COM6 serial ports for both RS-232 and RS-485 XCOM Port configurations: Pinouts DB-9 Pin RS-232 RS-485 (+12V) (+12V) Com GND (-12V) (-12V) EARTH GND EARTH GND Schematic for the cable wiring necessary for 2-Wire RS-485 operation.
- Page 76 The 580-0933 type of serial XCOM is available only through special order. It provides power for external communication devices, such as modems, from the D25 internal power supply. This violates the isolation specifications of Caution the card, and can lead to two problems, if not accounted for: 580-0933 •...
- Page 77 GE Grid Solutions User's Manual Communications Ports, Continued • Unshielded Twisted-Pair (UTP) wire 10BASE-T Card • RJ-type connectors used Connections & • Either a point-to-point or star network topology using multi-port repeater, or Indicators Hub. The 10BASE-T module has six LEDs on the back panel.
-
Page 78: Configuring The D25 To Work With A Dnp3 I/O Module
Refer to 0 Appendix D: Installing and Connecting DNP3 I/O Modules for installation and connection instructions. Use SGConfig to configure the DNP3 DCA in the D25 so that it communicates with your DNP3 I/O module. There are three tables to configure: •... - Page 79 User's Manual Configuring the D25 to work with a DNP3 I/O Module , continued For example, when configuring your D25 RTU Master to work with a DNP Example Digital Input Module, assume that you have a DNP Digital Input Module: Configuration •...
-
Page 80: Chapter 3: Powering-Up And Testing
Before any of the tests and procedures in this section can be performed, a valid configuration file must be loaded into the D25’s NVRAM. If you have replaced the main board of the D25, then you need to restore the configuration file so that verification tests can be performed. - Page 81 The SGConfig configuration system’s Terminal Emulator • If your PC (or similar platform) has a TELNET terminal emulation software package, it can be used to connect to the D25 through an Ethernet network link. Note: For further information about using WESMAINT II+ software to perform any of the test procedures in this section, refer to the WESMAINT II+ User’s Guide.
-
Page 82: Boot Up
Verify that power cable is properly connected to the D25, and the proper power is available. See Power Supply for power connection details. Locate the power switch on the back of the D25, and toggle it to the ON position. Results: The POWER indicator, a green LED on the front panel lights when power to the D25 is turned on. -
Page 83: Using Wesmaint
User's Manual Using WESMAINT On-Line Start- When the D25 is powered-up or restarted, internal processes perform a series up Test of routines, starting with self-tests, followed by the spawning of all the software applications that reside in the unit’s memory. - Page 84 Verify that power cable is properly connected to the D25, and the proper power is available. See Power Supply above. Locate the power switch on the back of the D25, and toggle it to the ON position. Results: The POWER indicator, a green LED on the front panel lights when power to the D25 is turned on.
-
Page 85: Testing Hardware I/O Points
• Follow the instructions given below for testing specific types of points The Plant I/O software application version in the D25’s firmware determines the quantity and relative position of data points in the System Point Database The actual point number that you want to test can be determined by: Data Points •... - Page 86 Procedure: the D25’s FLASH memory. Verify Digital Input Note: The following procedure assumes that the digital inputs for the D25 are configured to use supplied wetting. Refer to page 36 for configuration information. From the WESMAINT II+ Main Menu: Step Action On the Main Menu, type 1 —...
- Page 87 Caution! reclosers, and may injure personnel. Procedure: To conduct this test the code and configuration file must be downloaded to Verify Digital the D25’s FLASH memory. Output From the WESMAINT II+ Main Menu: Step Action On the Main Menu, type 1 — System Data Display.
- Page 88 No error message appears in WESMAINT if the test fails. If relays do not Test Failure operate: 1. Ensure that the CONTROLS switch is in the REMOTE position. 2. Reboot the D25, and repeat the procedure. 3. Call GE Grid Solutions for assistance. To repeat the test sequence, press . Press...
- Page 89 Results: The point numbers and (optionally) point descriptions appear on the WESMAINT II+ display. Use the arrow keys to move up or down to highlight a D25 Plant I/O Analog Reference point. Verify that the points display a value close to the values shown in this table: Use this table to verify the DC analog reference values.
- Page 90 GE Grid Solutions User's Manual Testing Hardware I/O Points, Continued Procedure: On the Analog Input Display: Verify Analog Input (cont’d) Step Action Press and type the number of the first input point (if CTRL known), or use the up and down arrow keys to scroll to the desired analog input point.
- Page 91 Test To conduct this test, the code and configuration file must be downloaded to Procedure: Test AC Voltage and the D25’s FLASH memory. Current Input Note: The actual point descriptions displayed in WESMAINT depend on the circuit configuration (i.e., line-to-line or line-to-neutral, etc.) and any changes made to the point descriptions in the running configuration file.
- Page 92 32767 (15-bit plus sign value). • Full-scale of voltage measurements is 2.5 times the nominal value. • Full-scale of current measurements is 16 times the nominal value. • For more detailed information, refer to the D25 Plant I/O Subsystem Configuration Guide. 994-0081-3.00-21 GE Information...
-
Page 93: Chapter 4: Configuring The D25 Software
An overview of the software and software tools you will use • Information and procedures for maintaining code and configuration files • How to test the functionality of the inputs and outputs controlled by the D25 Plant I/O A discussion of code and configuration files •... - Page 94 A stand-alone system for low-level maintenance and troubleshooting. − All of the code in the D25 BootROM is duplicated in the standard Base application load. When the D25 is operating the BootROM applications, it does not refer to the applications in the FLASH code, and vice versa.
- Page 95 GE Grid Solutions User's Manual Front Pane A D25 fitted with a GDP must be equipped with Modbus DPA (A059) or Graphic DNP 3.0 DPA application software to communicate with the GDP. Using Display Panel SGConfig, some or all of the D25’s database points are mapped into this Software communication software.
-
Page 96: Downloading A Configuration
(Flash memory): • When operating from BootROM, the prompt that appears is D25S> − This mode is accessed only while the D25 is in a maintenance state − Forcing a D25 into this monitor will terminate any applications that are running When operating from Flash, the prompt that appears is D25A>. - Page 97 Files GE Grid Solutions − This file is created using ’ Software Development System, and is used to define the applications that can be used in a D25 system. • Configuration File − This file is generated using the SGConfig configuration tool, and is used to enable and configure the operational characteristics of the applications defined by the code file.
- Page 98 This type of Error? 2. If the D25 runs for 2 minutes without a reboot, this counter is cleared. 3. If the counter ever reaches 20, the base system invalidates the configuration by writing "KILL" into the configuration file without recalculating the file’s CRC.
- Page 99 WESDAC board for at least 15 minutes. Refer to page 113, Battery Replacement for a detailed procedure for removing and replacing batteries. Use the Third Way to unlock a D25 that has been locked up through a Locked-up? code/configuration file mismatch.
- Page 100 “Base” region, may not be large enough. If this occurs, then the D25 locks-up and a message similar to this will be displayed: The configuration’s data region overlaps the current Configuration Header (NVHEADER).
- Page 101 − Xon/Xoff (software) flow control enabled Note If the D25 has no code file loaded, or it has detected a corrupt FLASH file, you will have to go directly to Step 8 and log directly into the monitor. GE Information...
- Page 102 GE Grid Solutions User's Manual Downloading a Configuration, Continued Procedure: Download Files (continued) Step Action Launch System Monitor Log into WESMAINT. Select option 2, System Functions Select option 3, 68K Monitor Result: The D25A> prompt appears, indicating that the Application Monitor is running.
- Page 103 GE Grid Solutions User's Manual Downloading a Configuration, Continued Procedure: Download Files (continued) Step Action Type Y and press at the Do you wish to proceed? prompt ENTER (not case-sensitive) Result: The system automatically verifies that Flash EPROM memory has been cleared.
- Page 104 If the transfer is incomplete or stalls, the transfer must be halted and restarted. Complete Reboot the D25, watching the display on the PC monitor. Note that the D25’s monitor speed will return to 9600 bps, if it was changed during the procedure.
-
Page 105: Chapter 5: Operating The D25
REMOTE LED lights after a momentary delay, and the LOCAL LED turns off. Local/Remote LEDs flashing indicate one or more active sealed-in outputs (only if a D25 High Current KE Control Output Module is present in the D25) GE Information... -
Page 106: Controls Switch
Only) D25 IED power supply. Seal-in is in effect and breaking the current can damage the control card. Ensure there is no current present on the D25 HCKE (e.g. through an external current interruption in the respective circuit such as an auxiliary breaker contacts) 994-0081-3.00-21... - Page 107 Controls Switch, Continued Moving the CONTROLS switch into the REMOTE position will not turn on Notes the REMOTE LED and allow the D25 to function remotely if the: • D25 does not have a digital output card installed, or •...
-
Page 108: Using Current-Monitored Digital Outputs
The alarm points are placed at digital inputs 148 to 155 in the D25 Plant I/O DCA (actual point number may be offset if there are DCAs placed before Plant I/O in the configuration). - Page 109 GE Grid Solutions User's Manual Using Current-Monitored Digital Outputs, Continued Disabling Current seal-in may be disabled in the configuration on a point-by-point basis. Current Seal-In Disabling seal-in should only be done if the associated relay has also been disabled for current monitoring in the hardware. A current-monitored point...
-
Page 110: Chapter 6: Servicing The D25
GE Grid Solutions User's Manual Chapter 6: Servicing the D25 The expected service life of a D25 is 20 years when the environment and D25 Service Life electrical conditions are within stated specifications. The D25 does not require any scheduled maintenance. Periodic inspection is... -
Page 111: Fuse Replacement
Fuse Locations In addition to the main power supply fuses, all Digital Input and Digital output modules are equipped with field replaceable fuses. Fuse locations for a typical D25 with 3 S-boards and a DB-25 terminated K-board: POWER WETTING POWER... - Page 112 GE Grid Solutions User's Manual Fuse Replacement, Continued Standard replaceable fuses that are used by the various hardware options. Table: Replaceable Fuses Fuse Board Type Rating Where used Fuse Part # 521-0119 F 0.75A L 250V 48V Field Supply 940-0010 521-0143 T 1.0A L 250V...
-
Page 113: Battery Replacement
− Battery If the battery is disconnected, or if the D25 is never powered down, the life of Replacement the battery should exceed five years. The life of the battery will be severely shortened if the battery is left connected while the D25 is powered down for extended periods or stored. - Page 114 GE Grid Solutions User's Manual Battery Replacement, Continued • Removing the battery when the D25 is powered down results in loss of the configuration data and any other database information stored in NVRAM. • Download the configuration file to restore operation. •...
- Page 115 GE Grid Solutions User's Manual Battery Replacement, Continued Lithium Totally discharged lithium batteries can be appropriately disposed of as non- Battery hazardous. Refer to Recycling of Batteries above. Disposal Disposal of a fully or partially charged lithium battery as a hazardous waste can be done after it has been first neutralized through an approved secondary treatment.
-
Page 116: Chapter 7: Upgrading And Replacing D25 Modules
GE Grid Solutions User's Manual Chapter 7: Upgrading and Replacing D25 Modules If a board has failed on your D25 or you need to upgrade a specific Remedial Maintenance component, use this section of the guide, which explains: • How to remove and replace the main boards •... - Page 117 Switch Card) to remove and replace modules. Always use the puller provided for removing and replacing all modules. The high voltage area of the D25 High Current KE Digital Output Module is in close proximity to the D25 chassis. Ensure that relay contacts are de-energized before removing the D25 HCKE Digital Output Module.
-
Page 118: Main Board
Main Board Procedure: How to remove the WESDAC board. WESDAC Before starting this procedure, see above: Disassembling the D25. Board Removal Step Action Locate and loosen the captive screws that hold the metal mounting plate in the D25 housing. - Page 119 (The wetting voltage must be routed externally for the CE Mark cards.) Wetting for Low Voltage DI Pin 3 – 5 and 4 – 6 shorted: External or card #1 D25 power supply Pins 3 – 4 shorted: Voltage Sense Wetting for Low Voltage DI card #2 Note:...
- Page 120 GE Grid Solutions User's Manual Main Board, Continued Low-Voltage Jumpers for wetting selection are located on the right edge of the D25 Type Digital Input III Main Board. Card Wetting Type III When using low voltage digital input cards, the choice of external wetting WESDAC: supply source or voltage-detect input may be made using jumpers JP3 to JP5.
- Page 121 GE Grid Solutions User's Manual Main Board, Continued Type III Jumpers shown are for the first (top) 32-point module. Jumpers (J4 and J3) WESDAC for the other two modules work in the same way. Wetting Jumper Detail (Backward Compatibility) No Wetting...
-
Page 122: Ddsp Modules
GE Grid Solutions User's Manual DDSP Modules DDSP Modules Dual DSP (DDSP) modules contain the analog-to-digital conversion and digital signal processing (DSP) circuitry required for processing analog signals from the AC analog input cards. The following DDSP variants are available: •... -
Page 123: Memory Expansion Board
D25. The module is a removable daughter card of the D25 WESDAC module. Memory Expansion module is mounted on top of the WESDAC (Main) Location Board. - Page 124 After removing all connections from the IED/RTC and XCOM cards: Shelf Plate Step Action Locate the two levers that secure the metal Shelf Plate in the D25 housing. Two labels, one on each side panel inside the enclosure, identify the Locking Bracket locations.
- Page 125 GE Grid Solutions User's Manual Shelf Plate, Continued Procedure: How to replace the Shelf Plate: Replacing the Shelf Plate Step Action Before inserting the Shelf Plate into the enclosure, lift the front end of the locking bracket levers until they click into the up position.
-
Page 126: Configuring Radio Keying Option
Jumper JP1 pins 1 – 2 to enable radio keying Jumper JP1 pins 2 – 3 to disable radio keying Push the jumper straight down onto the two pins Replace the shelf plate into the D25 enclosure. IED/RTC Card Layout Diagram JP1 –... -
Page 127: D25 Ethernet Card 100Base (10/100Base-T And 100Base-Fx)
The D25 100Base card (GE part number 504-0305LF) is a dual-channel 10/100BaseT and 100Base-FX (1300 nm) network card that plugs into the XCOM slot on the D25. It provides local area network connections for two RJ-45 connectors and two ST connectors on the rear panel. The RJ-45 data rate is automatically detected and set to either 10 Mbps or 100 Mbps. - Page 128 GE Grid Solutions User's Manual D25 Ethernet Card 100Base (10/100Base-T and 100Base-FX), Continued Ethernet Card Diagram 994-0081-3.00-21 GE Information...
-
Page 129: Power Supply Card
GE Grid Solutions User's Manual Power Supply Card Optional power supplies equipped with a selection jumper to Table: Changing switch the field voltage output to or from 24 V or 48 Vdc. Power Supply Field Voltage Output Part # Default Field O/P... - Page 130 Push the jumper straight down onto the two pins Replace the shelf plate into the D25 enclosure. Remove the fuse F1 from its holder at the rear of the D25 enclosure Replace the fuse with one of the correct value, as seen in this list:...
-
Page 131: Digital Input Cards
DI Card #2 DI Card #3 DI Card #3 Removing the 1. Use two PCB pullers to slide the S Card toward the front of the D25. S Card 2. Use firm but gentle pressure to disconnect the card. Replacing the 1. -
Page 132: Digital Output Card
Always use the pullers shipped with the D25 to remove and replace KE Card. Use Pullers The high voltage area of the D25 High Current KE Digital Output Module is in close proximity to the D25 chassis. Ensure that relay contacts are de-energized before removing the D25 HCKE Digital Output Module. -
Page 133: Dc Analog Input Card
Position the ADC Card on the lowest (sixth) slide guide from the top of the DC Analog D25, and carefully push the card into the D25 housing. Use firm but gentle Input Card pressure to push the card into place. -
Page 134: Ct/Pt Modules
Action Move the card into position and lower it onto the Snap-On PEM studs. Push it into the D25 until the card snaps firmly in place on the PEM studs. Plug the transformer secondaries into connectors, observing proper orientation and arrangement. Transformer secondary wires should not cross each other. - Page 135 Due to the stiffness of the wires on the primary of the standard 5 A CTs, the transformers are manufactured with wires of two different lengths, to facilitate easier assembly into the bottom of the D25 enclosure. The part numbers are as follows: 450-0087 •...
- Page 136 Lead CT Enclosure Note: The transformer’s leads are omitted from the diagram for clarity. Procedure: How to remove the CT or PT transformers from the D25 enclosure: Removal Step Action Disconnect the quick fasteners on the primary and secondary windings of the transformers.
- Page 137 Use your measurements to calculate the calibration factors to compensate for the gain error. Note: The label inside the D25 box stating the compensation factors should be removed or corrected by the technician. A new label will not be supplied with the CT/PT modules.
- Page 138 (0% - 195%) (continued) Step Action Using the D25 AC Input Engineering Value Displays (available through the B050-0 WESMAINT application), record the raw magnitude values for each input you are calibrating. Verify that the reported values are within the following tolerances:...
- Page 139 Step Action Inject the test currents (see the following table) into the inputs, and use the D25 AC Input Engineering Value Displays to verify that the reported raw magnitudes are within the tolerances stated in the following tables: CT Type: 1A Part Number: 450-0107 For Test Current…...
- Page 140 To set the calibration factors, go to D25 AC Configuration>Calibration tab>Internal Calibration tab − To set the correction factors, go to D25 AC Configuration >Calibration tab>External Correction tab. • Set the configured frequency to match the test signal’s frequency (either 50 or 60 Hz).
- Page 141 Procedure: Over-current Range Calibration (195% - F.S.) (continued) Step Action Using the D25 AC Input Engineering Value Displays (available through the B050-0 WESMAINT application), record the raw magnitude values for each input you are calibrating. Verify that the reported values are within the following tolerances:...
- Page 142 Procedure: Over-current Range Calibration (195% - F.S.) (continued) Inject the test currents (see the following table) into the inputs, and use the D25 AC Input Engineering Value Displays to verify that the reported raw magnitudes are within the tolerances stated in the...
-
Page 143: Reconnecting Power
Make sure that the metal case is grounded at the protective ground stud located at the top-left corner of the rear of the enclosure. Connection must be provided with separate green/yellow wire connected between the D25 and the protective earth system of the facility. Grounding GE Information... -
Page 144: Chapter 8: Troubleshooting
EL /P and press ENTER display a low-level error log. If you fail to solve a problem, then contact GE Grid Solutions for assistance. Run-time and Startup Problems Table: Use the following table to diagnose problems with the D25:... - Page 145 D25 Does Not Operate The Local/Remote switch is in the Verify that a Digital output Remotely Remote position, but the D25 does Card is installed. not contain a Digital output Card, or Verify that the Digital the Digital output Card malfunctions.
-
Page 146: Initialization Errors
Code and launch System Monitor Note: When using a D25 with a High Current Control Card (P/N 517-0492) installed, also consult the ‘Using the Current-Monitoring Digital Outputs’ for further details on rules regarding current monitoring and current seal-in. Initialization Errors... -
Page 147: Lan-Based Problems
GE Grid Solutions User's Manual LAN-Based Problems Overview Several failure cases are possible in the BootP initialization sequence. Under fault conditions such as loss of one or more devices, the system will continue to operate at whatever level of service is possible — even without LAN address, code, and configuration servers. -
Page 148: Reporting Problems
We would like the history of the D25 that has crashed. Questions that you should be prepared to answer are: 1. Is the D25 in service? If so, how long has the D25 been installed in the field? 2. Has the D25 configuration changed recently? 3. - Page 149 User's Manual Reporting Problems, Continued We require the exact D25 configuration. It is very important for us to use Configuration exactly the same configuration. A different configuration causes the software to function in very different ways. We use the configuration extensively when tracing through the software execution.
- Page 150 When investigating the repeatability of the crash, it is very important to gather information on the D25’s resources. We can look for trends in the resources to see if it could be related. In the 68K Monitor, type the following commands prior to the crash: QR /V –...
- Page 151 6. What applications have you tried disabling in the configuration and what were the results? If the D25 crash can be isolated, it is likely that it can continue to function, albeit with reduced functionality. Typically, D25 crashes are the result of one particular software application.
-
Page 152: Appendix A: Product Specifications
Output Options: 24V unregulated output with minimum load (internal 8.2K Ohm), output is 21.6 to 26.8VDC, <50mV ripple (Power Supply with GE part number 521-0143 or 521-0144) with maximum loads (32 Ohm) is 21.6 to 26.8, <50mV ripple 48V unregulated output with minimum load (internal 8.2K Ohm) is 43.2 to... - Page 153 GE Grid Solutions User's Manual Electrical Specifications, Continued Digital Inputs Up to 96 optically isolated digital inputs, organized in groups of 32 units “On” threshold options, per card 12, 24, 48, 120, 250 V ±20%, bipolar inputs Burden From 0.75 mA to 10 mA max. power dissipation is 0.5W...
- Page 154 GE Grid Solutions User's Manual Electrical Specifications, Continued Auxiliary Digital Outputs Three single digital outputs for System Fail indication, Radio Keying and Auxiliary Digital output System Fail Relay Contacts 1 Form B (Normally Closed) Relay Radio keying, and auxiliary relay...
- Page 155 GE Grid Solutions User's Manual Electrical Specifications, Continued AC Voltage Inputs Nominal PT input options 63.5 V 69.3 V 110 V 120 V 220 V Measurement Range 0% to 250% of nominal Overload Voltage 250% of nominal continuous 350% of nominal for one (1) minute Burden Less than 0.1 VA...
-
Page 156: Testing And Certification
EAC Item Country of origin Assembled in Canada; see label on rear of D20/D200 / D25 / D400 Date of manufacture See label on rear of D20/D200/D25/D400 Declaration of Conformity and/or Certificate of Available upon request Conformity 994-0081-3.00-21 GE Information... -
Page 157: Physical Specifications
High Current Control Card at 4 Amp current through 16 relay contacts including 4 with current supervision in a fully populated D25 enclosure with 48 V digital input cards using internal wetting with every other status input activated (48 out of 96). -
Page 158: Storage And Battery
4 months, powered OFF • 10 years, powered ON Note: If the D25 is to be stored for extended periods, you may wish to disconnect the battery. The Battery status is provided during the D25 start-up sequence. 994-0081-3.00-21 GE Information... -
Page 159: Appendix B: Engineering Value Calculations
GE Grid Solutions User's Manual Appendix B: Engineering Value Calculations Conversion Formulas Interpreting This appendix provides information to assist the user in interpreting the data Data Values point values seen in WESMAINT. • DC Analog Input Engineering value Calculation Formulas AC Analog and Accumulator Input Engineering value Calculation •... - Page 160 GE Grid Solutions User's Manual Conversion Formulas, Continued Table: AC Formulas for converting AC analog and accumulator input values from raw Analog & system database counts to engineering units: Accumulator Formulas Input Type Engineering Value Calculation Engineering Unit Voltage: ∗...
-
Page 161: Appendix C: Ordering Information
GE Grid Solutions User's Manual Appendix C: Ordering Information The latest D25 ordering guide, which includes a spare parts list and accessories, is available for download from the GE Grid Solutions website: http://www.gegridsolutions.com/ GE Information 994-0081-3.00-21... -
Page 162: Appendix D: Installing And Connecting Dnp3 I/O Modules
DNP3 I/O module. Refer to section: Configuring the D25 to work with a DNP3 I/O Module on page 78. 2. Physically locate and mount DNP3 I/O module in a 19 inch rack or cabinet. -
Page 163: Installing Dnp3 I/O Modules In A Rack
GE Grid Solutions User's Manual Installing DNP3 I/O Modules in a Rack Rack Spacing When mounting multiple DNP3 I/O modules in a rack, or when mounting DNP3 I/O modules in a rack with other equipment , verify that there is at least one rack unit (RU) of space above and below the DNP03 I/O module to allow for cooling air flow and cable routing (1 RU = 1.75 inches or 44.5 mm). - Page 164 GE Grid Solutions User's Manual Connecting to Protective Ground Connect your DNP3 I/O module to site ground, using a separate 2.05 mm (12 AWG) Yellow/ Green wire. Each type of DNP I/O Module has a different ground point, as shown in the examples below.
-
Page 165: Connecting Dnp3 I/O Modules (Low Voltage)
Connect the power supply to the last DNP3 I/O module in the chain. The cable from J2 on the last DNP3 I/O module to the power source (GE part number 977-0500) provides the connections shown in the following wiring diagram. - Page 166 TB2 to an External Power Supply (40 to 150 VDC) as shown below: To D25 ( RTU Master ) To Ext Power Cable : D25 ( RTU Master ) External DNP 3 GE Part Number : 977 - 0502 I / O Module...
- Page 167 User's Manual Connecting to a D25 The cable from an RTU Master to the first DNP I/O Module (GE Part Number 977-0502) has the following connections and jumpers: Note: Make sure the RTU Master is configured for RS-485, 2W mode.
- Page 168 Jan 22, 2014 Added information on the Color Graphic Display Panel: GDP 300 May 29, 2014 Added note in the AC Analog Inputs sections on configuring a D25 device with all AC inputs configured as PT inputs. Added Testing and Certification specifications.
- Page 169 Added D25HC KE with WESDAC Type III DAC entries to control section (p. 52 – 55) Added description related to D25 HCKE card (chapter 6 p. 94 – 96) Added "Using Current-Monitored Digital Outputs" section (chapter 6, p. 97 – 98) Added procedure "Recycling of Batteries"...