WaterLogic WL350 Operating, Installation And Service Manual
Hide thumbs
Also See for WL350:
- Manual (31 pages) ,
- Troubleshooting manual (16 pages) ,
- Installation procedures manual (9 pages)

Related Manuals for WaterLogic WL350


Summary of Contents for WaterLogic WL350
- Page 1 WL350 OPERATING, INSTALLATION, AND SERVICE MANUAL Waterlogic Commercial Products, LLC 11710 Stonegate Circle Omaha, NE 68164 (800) 288-1891 www.waterlogic.us Tech Portal Website: www.techportal.waterlogic.com...
- Page 2 The Waterlogic WL350 Water Treatment System provides exceptional quality and great tasting water with every use. INTRODUCTION Carefully read and follow all instructions to ensure proper and efficient operation of your WL350 Water Treatment Systems. Contact Waterlogic or an Authorized Waterlogic Dealer if you have any questions.
-
Page 3: Table Of Contents
Installation Instructions ............48 TROUBLESHOOTING GUIDE Fault Codes ................50 Power Troubleshooting............53 Dispense Troubleshooting ............. 56 Cold Water Troubleshooting ..........68 Hot Water Troubleshooting ........... 69 WL350 Operating, Installation, and Service Manual Page 3 – Revision 8-30-2016... -
Page 4: Safety Alert Symbols
Unit should be protected by ground-fault circuit interrupter (GFCI) or residual current device (RCD) having a rated residual operating current not exceeding 30mA. Use only Waterlogic supplied power cord. Never use extension cords or power strips to connect unit. Do not use if the power supply cord is damaged. - Page 5 TIP HAZARD. Dispenser could tip or fall causing serious injury. Always install unit on a firm, flat, and level surface and secure the WL350 Water Treatment System to the base cabinet with the screw provided to lock the components together. Secure unit to cabinet, wall, or floor if needed.
- Page 6 TIP HAZARD. Dispenser could tip or fall causing serious injury. Always install unit on a firm, flat, and level surface and secure the WL350 Water Treatment System to the base cabinet with the screw provided to lock the components together. Secure unit to cabinet, wall, or floor if needed.
-
Page 7: Features And Benefits
8.5 inch dispense height with BioCote® recessed faucet to protect from cross-contamination. Leak Detection WL350 Water Treatment Systems are supplied with a Sensor in the Leak Tray that halts water supply to prevent overflow and sounds alarm to reduce accident potential. -
Page 8: Certifications
Intertek Labs (ETL) Certified the WL350 Water Treatment System to ANSI/UL 399 Standard for Drinking Water Coolers. BPA Free - Waterlogic tests for BPA and declares that all of its products are Bisphenol-A FREE and contain no harmful BPA plastics. -
Page 9: Model Designations And General Specifications
MODEL/PART DESIGNATIONS BRAND NAME DESCRIPTION MODEL – PART NUMBER Waterlogic WL350 Counter Top - Cold and Hot 12-CHCMFW3 WL350 Counter Top F-2FW-M-HC-TT-CS-INN Waterlogic WL350 Tower - Cold and Hot 12-CHCFW3 WL350 Tower F-2FW-FS-HC-TT-CS-INN SPECIFICATIONS ITEM WL350 Counter Top WL350 Tower Water Connection ¼”... -
Page 10: Electrical And Shipping Specifications
UV Lamp System 0.15 Amps WL350 TOTAL 6.15 Amps #WL350 Counter Top is 17.75 in. tall and may not fit between countertops and cabinets - Check installation to ensure adequate clearance. WL350 Operating, Installation, and Service Manual Page 10 – Revision 8-30-2016... -
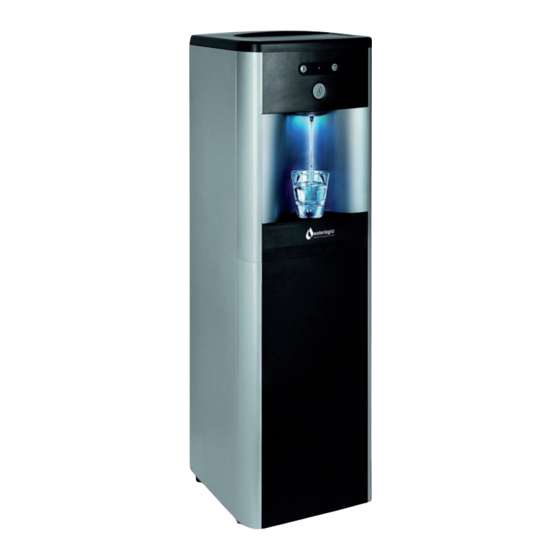
Page 11: Operating Instructions
Cold Water Hot Water Select Select Dispensing Button The above picture shows front LCD display and control panel for the Waterlogic WL350 Water Treatment System. For Cold Water: Press Cold Water Select Button followed by the Dispensing Button (within 3 seconds). -
Page 12: Warranty
Waterlogic will, at its sole discretion, determine whether to correct the defect or replace the unit, free of charge to you. If Waterlogic determines that the unit should be returned for warranty service, Waterlogic will approve of return in writing and will issue a Return Authorization which you must obtain prior to shipping the product. -
Page 13: Service Requirements
WARNING! Read and understand the contents of this manual before attempting to service WL350 Water Treatment System. Failure to follow the instructions in this manual could result in death, serious personal injury, or severe property damage. Only trained and qualified technicians should attempt to install, maintain, or service Waterlogic Equipment. -
Page 14: Hot Tank Principles Of Operation
HOT TANK PRINCIPLES OF OPERATION All Waterlogic Hot Tanks have a built in Vent or Expansion Chamber in the top of the tank except for WL270 (GF) units. The Vent Chamber allows for expansion of the water when it is heated. -
Page 15: Heater Circuit - Hot Tank Wiring
HEATER CIRCUIT – HOT TANK WIRING WL350 Operating, Installation, and Service Manual Page 15 – Revision 8-30-2016... -
Page 16: Resetting The Hot Tank Overload (High Limit Safety)
RESETTING THE HOT TANK OVERLOAD OR HIGH LIMIT SAFETY Red Compressor/Heater Switch must be in the O=OFF position Unplug the Power Cord from rear of WL350 Water Treatment System. Tower Model: Remove the Lower Front Panel by removing the Phillips Head Screws underneath the Lower Front Panel. - Page 17 The Hot and Cold tanks must be filled with water BEFORE turning on the Red Heater and Compressor Switch. Verify the cooler is fully operational before installing it at the customers’ site. WL350 Operating, Installation, and Service Manual Page 17 – Revision 8-30-2016...
-
Page 18: Hot Tank Descaling
2. Connect descaling cartridge to the inlet water supply and connect to Inlet Bulkhead Fitting on the back of the WL350 Water Treatment System. Turn on Water Supply. 3. Select Hot Water and depress the Main Dispensing Button on the Front Control Panel until descaling solution (colored water) comes out of the faucet. - Page 19 5. Allow descaling solution to remain in the Hot Tank for 15 minutes (length of time may vary depending on water conditions). 6. Place a pitcher, catch basin or other container under the faucet of the WL350 Water Treatment System.
-
Page 20: Firewall Outlet Solenoid - Reverse Flow Orientation
FIREWALL OUTLET SOLENOID – REVERSE FLOW ORIENTATION WL350 Operating, Installation, and Service Manual Page 20 – Revision 8-30-2016... -
Page 21: Adjusting Cold Water Set Point
Each unit will vary slightly. Try not to go much past the “3:00 position” to avoid freezing the cold tank as shown above. Future Production Changes Cold Thermostat Cover Label to LP-0326-L00/ WLCP PN LP-0326. WL350 Operating, Installation, and Service Manual Page 21 – Revision 8-30-2016... -
Page 22: Programming - Disabling Energy Saving Sleep Mode
PROGRAMMING INSTRUCTIONS DISABLING ENERGY SAVING SLEEP MODE All WL350 Water Treatment Systems come from the factory with Energy Saving Sleep Mode engaged to meet the Energy Star Certification requirements. Energy Saving Sleep Mode disables the heater circuit if the unit has not been used for a continuous 3 hour or longer period. -
Page 23: Programming - Changing Hot Water Mode To Ambient
PROGRAMMING INSTRUCTIONS CHANGING HOT WATER MODE TO AMBIENT WATER WL350 Water Treatment Systems comes with set to Hot / Cold, which can be changed to Ambient / Cold settings. On the Move the Jumper on JP9 from Pins 1 and 2 to Energy Saver PCB, Pins 2 and 3. -
Page 24: Replacement Components (Consumables)
WLCP Part No FT-0063 * One pre-installed. One required for NSF-53 and NSF P231 Certification. Replacement parts can be obtained from Waterlogic or an Authorized Waterlogic Dealer. See Parts Layouts, Drawings, and Parts Lists for additional repair parts. -
Page 25: Countertop Drawings And Parts List
WL350 COUNTER TOP DRAWING AND PARTS LIST Wetted Parts WL350 Operating, Installation, and Service Manual Page 25 – Revision 8-30-2016... - Page 26 10-3067 Guest P/N PI1208S JG Stem Elbow Connector 1/4" * Purchase from PU-4066 1/4" - Acetyl PI220808S) – John Guest Counter Top Only Compressor (R134a 1/8HP) CO-9001-A 10-2200 120V/60Hz WL350 Operating, Installation, and Service Manual Page 26 – Revision 8-30-2016...
- Page 27 16.1 CU-0001 Solenoid Cushion CU-0001 ¼” Union Tee John Guest P/N Purchase from PU-4011-A P10208S John Guest 1/4” Union Elbow John Guest Purchase from PU-4008-A P/N P10308S John Guest WL350 Operating, Installation, and Service Manual Page 27 – Revision 8-30-2016...
- Page 28 Drip Tray - Charcoal with PL-1156 12-8055 Waterlogic Logo UVC Sensor Wire - 2FW AK-0063 *Includes: UVC Sensor wire 12-8300 with CT-2089 and PL-1358. Sensor Fixing Rubber (is 30.1 PL-1358 included with AK-0063) WL350 Operating, Installation, and Service Manual Page 28 – Revision 8-30-2016...
- Page 29 Firewall Bracket - is included in FW-0010-L00-00 FU-0008-A Firewall Assembly JG 3/8" x 1/4" Reducing Purchase from PU-4137 Fitting(PI211208S) John Guest EN-6127 Firewall UV Relay PCB 12-8365 ST-0049-L00-00 Metal Cover – Counter Top Only WL350 Operating, Installation, and Service Manual Page 29 – Revision 8-30-2016...
- Page 30 Tank and Thermostat Order EN-6131 Energy Saver PCB 20-0075 ST-8150 Upper Shelf - Counter Top Only 12-3165 UV 15 W 120V/60Hz Electronic EN-0008-L01-00 12-8315 Ballast 48.1 ST-0059-L00-00 Electric Ballast Bracket WL350 Operating, Installation, and Service Manual Page 30 – Revision 8-30-2016...
- Page 31 Wire Condenser – Counter Top Special CO-9031 12-3100 Only Order EL-5001-A Power Cord 120V – 1825 mm 11-2005 shown EN-6059 PCB Stand-off Pin 10-3017 shown EN-5057-CN Wire Harness Set 12-5252 shown WL350 Operating, Installation, and Service Manual Page 31 – Revision 8-30-2016...
-
Page 32: Tower Drawings And Parts List
WL350 TOWER LAYOUT DRAWING AND PARTS LIST Wetted Parts WL350 Operating, Installation, and Service Manual Page 32 – Revision 8-30-2016... - Page 33 WL350 TOWER LAYOUT DRAWING AND PARTS LIST Part No Description WLCP Part No. Stocked? PL-1250 Top Cover – Tower Only 12-8054 Socket - Power Line Noise Filter, EL-5016 Electromagnetic Interference 10-4013 filter (EMI) Fuse Holder and Fuse 120V / EL-5053...
- Page 34 16.1 CU-0001 Solenoid Cushion CU-0001 ¼” Union Tee John Guest P/N Purchase from PU-4011-A P10208S John Guest 1/4” Union Elbow John Guest Purchase from PU-4008-A P/N P10308S John Guest WL350 Operating, Installation, and Service Manual Page 34 – Revision 8-30-2016...
- Page 35 Assembly (No internal FU-0008-A 12-8330 components) *includes FL-0010- L00-00 Firewall Bracket UVC Sensor Fixing Metal Bracket 28.1 FU-0010 12-8380 Front (with tube) UVC Sensor Fixing Metal Bracket 28.2 FU-0011 12-8385 Back WL350 Operating, Installation, and Service Manual Page 35 – Revision 8-30-2016...
- Page 36 Silicon Button Key Mat 12-8056 PL-1359 Firewall Front upper insert panel 12-8360 LP-7084 Button Label 12-8057 4L (1G) Cold Tank Assembly (No CT-2017-A UV holder, No sub-tank) – Tower Only WL350 Operating, Installation, and Service Manual Page 36 – Revision 8-30-2016...
- Page 37 Tank and Thermostat Order PL-1152 Drip Tray Grill - Charcoal 12-8150 Drip Tray - Charcoal with PL-1156 12-8055 Waterlogic Logo JG Equal Straight Connector Purchase from PU-4010 1/4"(PI0408S) John Guest WL350 Operating, Installation, and Service Manual Page 37 – Revision 8-30-2016...
- Page 38 CO-9027 Wire Condenser – Tower Only 12-8102 Order EL-5001-A Power Cord 120V – 1825 mm 11-2005 shown EN-6059 PCB Stand-off Pin 10-3017 shown EN-5057-CN Wire Harness Set 12-5252 shown WL350 Operating, Installation, and Service Manual Page 38 – Revision 8-30-2016...
-
Page 39: Counter Top Flow Diagram
WL350 COUNTER TOP WATER FLOW DIAGRAM Water In Auxiliary Port Solenoid Valves Solenoid Valve Solenoid Valve Condenser Water Out Cold Cold Tank Tank Filter Dryer Compressor WL350 Operating, Installation, and Service Manual Page 39 – Revision 8-30-2016... -
Page 40: Tower Flow Diagram
WL350 TOWER WATER FLOW DIAGRAM Water In Solenoid Valves Inlet – Leak Detection Valve Reverse Flow Cold Out Solenoid Valve Water Out Condenser Cold Tank Filter Dryer Compressor WL350 Operating, Installation, and Service Manual Page 40 – Revision 8-30-2016... -
Page 41: Electrical Schematic
WL350 ELECTRICAL DIAGRAM DANGER! HIGH VOLTAGE ELECTRICAL HAZARD. PCB (Printed Circuit Board) contains High Voltage. Only trained and qualified technicians should attempt live testing. WL350 Operating, Installation, and Service Manual Page 41 – Revision 8-30-2016... -
Page 42: Pre-Installation Procedures
TDS Meter and Test Strips for measuring chlorine – Optional Sanitizing Cartridge 1. Unpack the Waterlogic WL350 Water Treatment Systems and check exterior for damage. Sanitizing Sanitize using a Household Bleach (5.25% Sodium Hypochlorite solution) or other approved cleaner throughout the cold and sparkling water circuits. - Page 43 CAUTION! FILTER FLUSH REQUIRED. WL350 Water Treatment Systems are not supplied with filters. Filters should be configured to optimize your system. Filters need to be configured and specified to do the job given the local water conditions, usage, maintenance schedule, and placement restrictions.
- Page 44 Flushing the Sanitizer from the Machine 10. Place a pitcher, catch basin, or other container under the faucet of the WL350 Water Treatment System. 11. Flush the Cold Tank. Run several liters (gallons) of water through the faucet by dispensing cold water to dilute and remove the sanitizer from the cold circuit.
- Page 45 If the wire condenser at back of the unit is warm, the refrigeration system is working. I=ON 21. Once the WL350 Water Treatment System reaches its target temperature, the compressor will shut off. Draw a glass of cold water and verify it is has chilled to proper temperature.
-
Page 46: Countertop Draining Procedure
WL350 Water Treatment System. Water Supply Line 6. Depress Cold Water Dispense Button until all Cold Water has drained from the WL350 Water Treatment System. 7. Depress Hot Water Dispense Button until all Hot Water has drained from the WL350 Water Treatment Machine. -
Page 47: Tower Draining Procedure
Turn off Water Supply and Bleed Water Pressure 10. Isolate the WL350 Water Treatment System from incoming feed water by turning off the supply. 11. Dispense cold still water to relieve any pressure built up in the system. -
Page 48: Installation Instructions
CAUTION! USE A WATER PRESSURE REGULATOR. Waterlogic will not be responsible for injury or damage caused by excessive water pressure. Operating pressure must be 40 psi to 60 psi. Be aware any of potential pressure surges caused by building/municipal pumping stations. - Page 49 NOTE: Switch has internal LED that illuminates when placed in I=ON position. 3. Connect the power cord to the back of the Waterlogic WL350 Water Treatment System and to a 120 Volt supply. 4. Fill the Cold Tank. Hold a container under the dispensing faucet, press and hold the main dispensing button until a continuous flow of water is obtained.
-
Page 50: Troubleshooting Guide Fault Codes
Bottom Tray completely. *Leak Detection is on the Counter Top Model only. Water is in the bottom of the WL350 Water Treatment System. Clear Leak Detection Tray to ensure inside of unit is Leak in WL350 Water dry. - Page 51 Wiring Harness to UV Lamp Ballast Indication Light 1 = White Wire N = Black Wire L = White Wire (Live) 2 = White Wire 3 = Yellow Wire 4 = Yellow Wire WL350 Operating, Installation, and Service Manual Page 51 – Revision 8-30-2016...
- Page 52 FAULT CODE: Possible Reason Solution Power Problem Check for power disruption. Check that the PCB LED is operational – replace PCB as LED Light is out necessary. No LED Light WL350 Operating, Installation, and Service Manual Page 52 – Revision 8-30-2016...
-
Page 53: Power Troubleshooting
Replace Socket - Power Line Noise Filter, ElectroMagnetic Noise Filter, ElectroMagnetic Interference filter (EMI) Interference filter (EMI) Defective Red Heater & Replace Red Heater & Compressor Switch Compressor Switch WL350 Operating, Installation, and Service Manual Page 53 – Revision 8-30-2016... - Page 54 4 inches). Low or lost refrigerant. Compressor is running very Counter Top should be 40 grams (1.41 ounces) hot. Tower should be 65 grams (2.29 ounces) Refrigerant recharge as necessary. WL350 Operating, Installation, and Service Manual Page 54 – Revision 8-30-2016...
- Page 55 Compressor Starting Circuit Inspect the starter and overload relay for any defects. Replace components(s) as needed. Turn Red Heater & Compressor Switch on I = ON and retest compressor operation. WL350 Operating, Installation, and Service Manual Page 55 – Revision 8-30-2016...
-
Page 56: Dispense Troubleshooting
16. Water Stream is at an Angle 17. Run-On - Water continues to dispense out of faucet after releasing the dispense button Also includes related instruction for Hot Tank Descaling WL350 Operating, Installation, and Service Manual Page 56 – Revision 8-30-2016... - Page 57 See Hot Tank Descaling Instructions that are included further tank vent chamber which below in this Troubleshooting Section. blocks the normal path of water to expand. WL350 Operating, Installation, and Service Manual Page 57 – Revision 8-30-2016...
- Page 58 Check that the tubing is connected from Hot Tank Outlets to from the Hot Tank to Faucet or correct Faucet attachments. Connect tubing to outlets as vice versa. needed. WL350 Operating, Installation, and Service Manual Page 58 – Revision 8-30-2016...
- Page 59 Exhausted Filter Replace the Filter Turn power off; unplug the WL350 Water Treatment System and visually inspect solenoid connections into the Solenoid connection to the Display Display PCB. Verify the soldering points on connections are secure into the board.
- Page 60 See instructional video on the Partner Area of the Waterlogic.com website for more information. All Waterlogic Hot Tanks have a built in Vent or Expansion Chamber in the top of the tank except for WL270 (GF) units. The Vent Chamber allows for expansion of the water when it is heated.
- Page 61 Turn Red Heater & Compressor Switch on. Switch on unit is off. I =ON Turn power off; unplug the WL350 Water Treatment System and visually inspect solenoid connections into the Display PCB. Verify Loose connection(s) on the the soldering points on connections are secure into the board.
- Page 62 Remove the Top Cover and Front Panel. Tip the unit slightly to Tray, causing the Leak drain, dry Bottom Tray completely. Detection to trigger Turn power off; unplug the WL350 Water Treatment System and Hot and Cold Solenoid visually inspect Solenoid connections into the Display PCB. Verify connections into the Displace the soldering points on connections are secure into the board.
- Page 63 Remove Cold Water Outlet Tube from Cold Tank to Faucet. Pour Tank outlet tube. some scale remover into Cold Tank. Expansion chamber in Cold Replace Cold Tank. Tank is not sealed properly. WL350 Operating, Installation, and Service Manual Page 63 – Revision 8-30-2016...
- Page 64 Solution Dirt or Foreign material is Inspect the Dispense Buttons and clean surrounding area. Inspect filling the gap around the Faucet Assembly inside the WL350 Water Treatment System and Dispense Buttons. clean as necessary. Water Streams at an Angle Solution Rotate the Bung (Blue Silicone) and the JG fittings a few degrees.
- Page 65 Run On exists because the tanks pressurize as water is being dispensed. Every Waterlogic tank has an outlet restrictor to ensure the tanks remain full of water and water is controlled as it is released to the faucet.
- Page 66 10. Connect descaling cartridge to the inlet water supply and connect to inlet bulkhead fitting on the back of the WL350 Water Treatment System. Turn on Water Supply. 11. Select Hot Water and depress the Main Dispensing Button on the Front Control Panel until descaling solution (colored water) comes out of the faucet.
- Page 67 13. Allow descaling solution to remain in the Hot Tank for 15 minutes (length of time may vary depending on water conditions). 14. Place a pitcher, catch basin or other container under the faucet of the WL350 Water Treatment System.
-
Page 68: Cold Water Troubleshooting
Compressor problem needed. Note: The Waterlogic Firewall reduces 7-log of waterborne bacteria, 5-log of viruses, and 4-log of parasites potentially found in the drinking water. A small amount (about 2-ounces) of water remains in the Firewall device after dispensing. This water does not remain permanently chilled, and will eventually become room temperature after several hours. -
Page 69: Hot Water Troubleshooting
Hot Tank is dry heated (turned on without water in it). The WL350 Water Treatment System does NOT have Extra Hot capability and the maximum hot temperature is 87°C (189°F). - Page 70 Hot tank life is 3-5 years, depending on usage. the Heating Element *Typically dealers swap out the Hot Tank at site, take back to the shop to / Hot Tank. repair. WL350 Operating, Installation, and Service Manual Page 70 – Revision 8-30-2016...
- Page 71 DISABLING ENERGY SAVING SLEEP MODE All WL350 Water Treatment Systems come from the factory with Energy Saving Sleep Mode engaged to meet the Energy Star Certification requirements. Energy Saving Sleep Mode disables the heater circuit if the unit has not been used for a continuous 3 hour or longer period.
- Page 72 RESETTING THE HOT TANK OVERLOAD OR HIGH LIMIT SAFETY Red Compressor/Heater Switch must be in the O=OFF position Unplug the Power Cord from rear of WL350 Water Treatment System. Tower Model: Remove the Lower Front Panel by removing the Phillips Head Screws underneath the Lower Front Panel.
- Page 73 The Hot and Cold tanks must be filled with water BEFORE turning on the Red Heater and Compressor Switch. Verify the cooler is fully operational before installing it at the customers’ site. WL350 Operating, Installation, and Service Manual Page 73 – Revision 8-30-2016...
Need help?
Do you have a question about the WL350 and is the answer not in the manual?
Questions and answers