
Related Manuals for Bpt TH 350


Summary of Contents for Bpt TH 350
- Page 1 THERMOPROGRAM DIGITAL PROGRAMMABLE THERMOSTAT TH 350 INSTRUCTIONS FOR USE TH350E 24806610 13-03-13...
- Page 2 THERMOPROGRAM TH350 Congratulations on the purchase of this TH350 thermostat. For best performance and to enable the best use of this programmable thermostat's characteristics and functions The TH350 programmable thermostat has been designed please read this manual carefully and keep it available for to ensure perfect temperatures any time of day, any day future reference.
- Page 3 +3°C –3°C • the use of a GSM relay interface which makes it possible Thermal differential is programmable from to remotely activate a manual or timer controlled pro- 0°C to 0.9°C. gramme thus ensuring a welcoming return home. Suitable for systems with differing thermal inertias Wall mounting the installation takes only minutes.
- Page 4 Calibration of temperature measurement The TH350 programmable thermostat is made up of: +3°C If the TH350 is not properly installed (e.g. installed main unit –3°C near a heat source), temperature measurement may be incorrect or may not correspond to the actual temperature.
- Page 5 Adapter blanking fittings Front cover (2 white, 2 anthracite grey and 2 aluminium grey) (1 white, 1 anthracite grey and 2 aluminium grey) Back-box Fixing screws...
- Page 6 8 9 11 13 14 15...
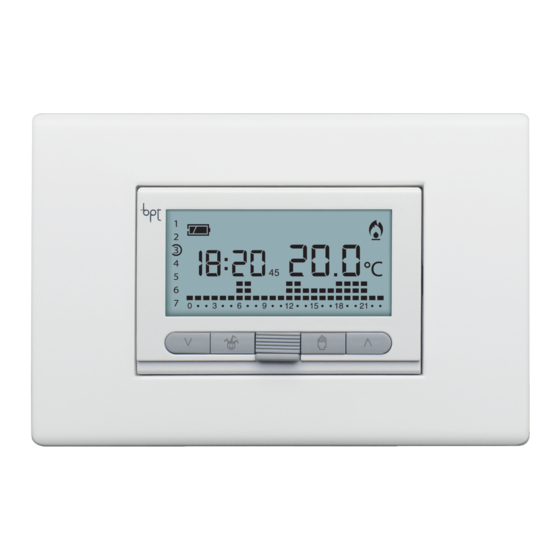
- Page 7 SYMBOLS AND EXTERNAL CONTROLS (see fig. 1) COOLING programme. When the cooling system is in operation this icon is ATTENTION. To turn on the backlight simply press any animated. key. To enter one of the selected functions (e.g. setting the HEATING programme.
- Page 8 24 25 26 27 28 29 30 31...
- Page 9 INTERNAL CONTROLS To access the internal control buttons extract the tab L and pull the main unit of the thermostat forwards until it is blocked as indicated in fig 2. Reset. Setting the clock and the start-up and shut-down delay period. Temperature programming in the three ranges T1, T2, T3.
-
Page 10: Table Of Contents
CONTENTS Chapter ......... Page 1 - Installation . -
Page 11: Installation
1 - INSTALLATION Install the unit in a position which is suitable for correct room temperature measurement for example on an internal wall. Avoid installation in niches, behind doors or curtains, or near heat sources. The TH350 is designed to be installed within a 3 module recessed back-box having a depth of 50mm. - Page 12 ATTENTION. Inserting the batteries the wrong way round Choose the support (A, B, C or D) and front facing cover could damage the unit. Once these steps have been as a function of the surround to be fitted. carried out correctly the symbols shown in figure 6 will To remove the front cover proceed as indicated in figure 7.
- Page 13 Support A Support A BTICINO GEWISS (Light Series, Light Playbus Series Tech Series, Living (Playbus, Playbus International Series) Young) VIMAR (Plana Series, Eikon Series) LEGRAND Vela Series (Vela Quadra, Vela Tonda), Cross Series Support B Support B VIMAR (Banquise Series, Idea Series (Idea, Idea Rondò) SISTEMA 45)
- Page 14 Support B Support B GEWISS (Elos Series) (SYSTEM Series) BTICINO (Axolute Series, Luna Series) Support C Support C BTICINO (Livinglight Quadre) VIMAR (ARCHÉ Series) BTICINO (Livinglight Tonde) GEWISS (CHORUS Series)
- Page 15 The trade names Playbus, Playbus Young, System e Support D Chorus are the property of GEWISS S.p.A (44 Series) The trade names Light, Light Tech Livinglight, Axolute, Luna e Living International are the property of BTICINO BTICINO S.p.A; (Livinglight AIR) The trade names Plana, Idea, Eikon, Idea Rondò...
- Page 16 Main unit Support Adaptors 3 module Support Back-box recessed back-box...
-
Page 17: Electrical Connections
TH350 NCNA C LOAD • Electrical connections are to made within the back-box 2 - ELECTRICAL CONNECTIONS terminal block as indicated in either diagram 20 or 21. The wiring will depend on the type of equipment to be • Paying attention to the UP direction indication use the controlled by the thermostat: refer to the diagram in fig. - Page 18 TH350 NCNA C LOAD OPEN CLOSED Remote control inputs 1 input 2 input Loads U1 = boiler, circulation pump, solenoid valve, etc. U2 = motorised valve NOTE. For connection details, refer to the technical docu- mentation of the device to be controlled.
-
Page 20: Setting The Clock
3- SETTING THE CLOCK 3.1- Remove the main unit of the unit. 3.2- Press the button twice (fig. 22). The first press of the button simply activates the back- light. The minutes digits flash. 3.3- Press button until the correct value for the minutes is reached (fig. - Page 21 the operation is complete. If no button is pressed for 15 seconds, the unit automati- cally exits this procedure, saving the last setting. 3.9- Reinsert the main unit of the thermostat. Note. Each time buttons are pressed the numbers on the display decrease or increase by one. When pressed and held down the numbers on the display will scroll slowly for the first five seconds, and then more quickly.
-
Page 22: Heating, Cooling And System Off Programming
4 - HEATING, COOLING AND SYSTEM OFF PROGRAMMING Press button once to activate the cooling pro- gramme (fig. 29) press the button twice to turn the system OFF (fig. 30). Whenever the icon is visible it confirms that TH350 system control has been bypassed. -
Page 23: Daily Programme Temperature Personalisation
5.2 - COOLING PROGRAMME The memorised cooling programme includes the tem- perature trend shown in figure 33, where the fixed tem- perature levels are: Range T1 24 °C Range T2 26 °C Range T3 28 °C If the pre-memorised programmes correspond to your needs then the TH350 will not require further programming and will ready tor immediate operation. - Page 24 6.4- Use button (fig. 36) to select the desired temperature range. Then press button 0÷23 to go to the next hour and select the desired temperature in the same way (fig. 37). Continue in this fashion until hour 23 is reached. Programming for Monday is now complete.
- Page 25 To reset the default parameters, see chapter 21 (Reset). 6.8- Reinsert the main unit of the thermostat. 7 - TEMPERATURE LEVEL PERSONALISATION FOR THE HEATING PROGRAMME 7.1- Remove the main unit of the unit. 7.2- Make sure that the unit is in AUTOMATIC mode. 7.3- Check to see that the heating symbol is displayed.
- Page 26 7.5- Use buttons (fig. 43) to set the desired tem- 10 seconds after the last action the unit exits the proce- perature for T1. dure and accepts as valid the data inserted up to that 7.6- Press button P to confirm the temperature shown moment.
-
Page 27: Cooling Program
8 - TEMPERATURE LEVEL PERSONALISATION FOR 9.2- Press button (fig. 45). THE COOLING PROGRAMME The symbol confirms that the programme has started. Extract the main unit of the thermostat. Select cooling 9.3- Complete the personalisation of the system as out- mode . -
Page 28: Manual Operation
9.8- Press button (fig. 47). symbols appears confirming that the programme for that day has been saved. 9.9- Complete the personalisation of the system as out- lined in paragraphs 6.3 and 6.4. 9.10- Press button or wait 10 seconds for the thermo- stat to return to AUTOMATIC mode. -
Page 29: System Bypass
After about 5 seconds from the last operation, the room temperature appears. In MANUAL operating mode, any temperature can be chosen between 2°C and 35°C. The newly set temper- ature will be maintained until further adjustments are made or until a different operating mode is selected. 11 - SYSTEM BYPASS System bypass is useful during cleaning, maintenance work or when absent, etc. -
Page 30: Frost Protection Function
12 - FROST PROTECTION FUNCTION Even if proportional-integral operating mode has been selected, in Frost Protection mode the temperature set for heating mode will be maintained but with differential control only. 12.1- Remove the main unit of the unit. 12.2- Press the button twice and check that the symbol is displayed (fig. -
Page 31: Manual Timed Program
By pressing button (fig. 58) it is possible to switch from FROST PROTECTION to AUTOMATIC heating mode. A reset in FROST PROTECTION or SYSTEM BYPASS mode will cause the system to restart in automatic heating mode. 12.5- Reinsert the main unit of the thermostat. 13 - TIMED MANUAL PROGRAM If a fixed temperature is to be maintained for a few hours or a few days (for example, to maintain a comfortable... -
Page 32: Adjustment
13.4- Press buttons until the desired number of hours or days from 1 to 99 is reached (fig. 61). The count of hours and days includes those when pro- gramming is performed. The remaining part of the hour and day when the operation is performed is therefore counted as one hour or as one day. - Page 33 14.3- Press buttons 1÷7 (fig. 64). The display will show the value of the temperature set for the indicated time on the various days of the week. 14.4- Press button (fig. 65) once, twice or three times within 10 seconds to set a delay time of 15, 30 or 45 min- utes and press it again to cancel the setting.
-
Page 34: Temperature Measurement Calibration
+3°C –3°C 15 - ALIBRATION OF TEMPERATURE 16 - AUTOMATIC ADVANCE +3°C MEASUREMENT –3°C This function (only in heating mode) allows the If the TH350 is not properly situated (e.g. installed near a thermostat to automatically adapt the system start-up heat source), temperature measurement may be incor- time such that the desired temperature is arrived at in a rect or may not correspond to the actual room temper-... -
Page 35: Thermal Differential
Automatic advance selection. 16.1- Make sure that the unit is in MANUAL operating mode. 16.2- Press button P twice (fig. 68). On the display, in place of the hour, will be displayed and, in place of the indication for the temperature, there will appear 16.3 - To set the automatic advance press buttons (forward) or (backwards) -
Page 36: Proportional-Integral Programming
17.4- Press button (forward) or (backwards) (fig. 72) Integral proportional adjustment has the advantage of to modify this value as desired. permitting the management of a wider variety of systems During operation, setting the differential to 0°C provides with respect to the setting of the thermal differential. It compliance with a minimum start-up/shutdown time of is especially suitable for underfloor and radiant systems. - Page 37 Programme Cycle duration Minimum ON time Proportional Range Type of system 10 minutes 1 minute 1.5°C Base for gas burner, convector heaters, zone valves, aluminium radiators 5 minutes 1 minute 1.5°C Electric radiators 20 minutes 2 minutes 1.5°C Radiant or underfloor systems, cooling 5-10-15-20-25-30-35-40 minutes from 1 to 5 minutes from 1°C to 3°C...
- Page 38 If programme P4 has been selected then press button P and in place of the hour the display will show . In place of the temperature will appear (fig. 76). 18.7- Press buttons (forward) or (backwards) select the desired cycle time from between 5, 10, 15, 20, 25, 30, 35 or 40 minutes (fig.
-
Page 39: Overall Number Of System Operating Hours
18.12- Press button P to exit programming. All parameters for the proportional-integral setting are saved to permanent memory. See chapter 21. 19 - ACCUMULATED SYSTEM OPERATING TIME The TH350 features an hour-counter (up to 9,999), which records the system's accumulated number of operating hours for each temperature level. - Page 40 This temperature will be maintained until the unit program reaches its conclusion the TH350 will go back to remotely receives a deactivation command at which the status it was in prior to activation. point the TH350 will return to the state it was in before activation.
- Page 41 20.3- Press button once to set the hour (fig. 87), twice to set the days applicable (fig. 89). If the hours are being set then instead of the current time will appear on the display. If the days are being set then will appear.
-
Page 42: Reset
ed remotely press button This setting cannot be verified by telephone. 21 - RESET Operating anomalies, repairs and other technical reasons may make it necessary to reset the unit. To reset the unit proceed as follows: 21.1- Remove the main unit of the unit. 21.2- Press button R (fig. - Page 43 Data saved after a reset Data not saved after a reset - Calibration temperature - Minutes, hours, days of week - Automatic advance selection - Automatic, manual, Frost Protection or OFF mode ( - Differential or proportional integral mode - Manual temperature - Differential temperature - Frost Protection temperature - Integral proportional programme...
-
Page 44: Battery Replacement
- simultaneously press buttons and 1÷7; - reset the unit. The TH350 will restart in AUTOMATIC HEATING mode (or COOLING, if reset in this mode). 22 - BATTERY REPLACEMENT When the indicator flashes on the display, it means Use only ALKALINE batteries that there is around 1 month left to replace the batteries (fig. -
Page 45: Technical Characteristics
tabs (fig. 94). Press the lateral tabs and extract the main unit of the thermostat completely (fig. 95). All symbols on the display will disappear. 22.2- Insert 3 alkaline LR03 penlight AAA 1.5V batteries within the housing. Make sure the poles face the right way as shown on the bottom of the housing (fig. - Page 46 • Three operating modes: MANUAL, AUTOMATIC, SYSTEM • Operating temperature: from 0°C to +40°C BYPASS • Dimensions: see figure 98. • Daily programming of both heating and cooling. • Dual mode functionality: DIFFERENTIAL PROPORTIONAL INTEGRAL • Calibration of measured temperature. •...
- Page 47 DISPOSAL Do not litter the environment with packaging materials: make sure it is disposed of according to the regulations in force in the country where the product is to be used. When the equipment reaches the end of its life cycle, avoid discarding it within the environment.
- Page 48 BPT S.p.A. a Socio Unico Via Cornia, 1 33079 Sesto al Reghena-PN-Italy www.bpt.it-info@bpt.it...
Need help?
Do you have a question about the TH 350 and is the answer not in the manual?
Questions and answers