PARKZONE P-51D Mustang BNF Instruction Manual
Charge-and-fly park flyer
Hide thumbs
Also See for P-51D Mustang BNF:
- Instruction manual (48 pages) ,
- Instruction manual (13 pages) ,
- Instruction manual (22 pages)
Table of Contents
Advertisement
Quick Links
Download this manual
See also:
Instruction Manual
ParkZone
products are distributed exclusively by
®
Horizon Hobby, Inc.
4105 Fieldstone Road
Champaign, IL 61822
© 2009 Horizon Hobby, Inc.
Horizon Hobby UK
Units 1-4, Ployters Road
Staple Tye
Harlow, Essex
CM18 7NS
United Kingdom
Horizon Hobby Deutschland GmbH
Hamburger Strasse 10
25335 Elmshorn
Germany
DSM and DSM2 are trademarks or registered trademarks of Horizon Hobby, Inc.
The Spektrum trademark is used with permission of Bachmann Industries, Inc.
Spektrum radios and accessories are exclusively available from Horizon Hobby, Inc.
Futaba is a registered trademark of Futaba Denshi Kogyo Kabushiki Kaisha Corporation of Japan.
14598 Printed 4/09
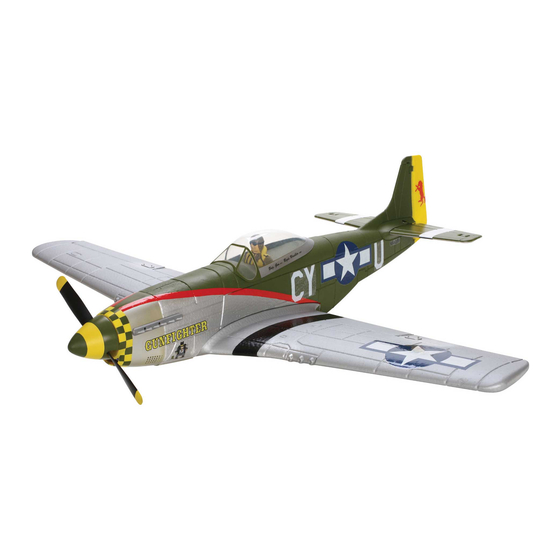
P-51D Mustang BNF
Instruction Manual
Charge-and-Fly
Park Flyer
™
Wingspan: 39.0 in (990mm)
Length: 33.5 in (850mm)
Weight: 25.0 oz (710 g)
Motor: 480-size 960Kv brushless outrunner
ESC: ParkZone 18A brushless
Receiver: AR500 DSM2 5-channel sport
Battery: 3S 11.1V 1300mAh LiPo
Charger: 3-cell LiPo balancing
Advertisement
Table of Contents

Related Manuals for PARKZONE P-51D Mustang BNF


Summary of Contents for PARKZONE P-51D Mustang BNF
-
Page 1: Instruction Manual
Hamburger Strasse 10 25335 Elmshorn Germany DSM and DSM2 are trademarks or registered trademarks of Horizon Hobby, Inc. The Spektrum trademark is used with permission of Bachmann Industries, Inc. Wingspan: 39.0 in (990mm) Spektrum radios and accessories are exclusively available from Horizon Hobby, Inc. - Page 2 Lithium Polymer battery from the using the included charger. dangers of overcharging. This charger continually Congratulations on your purchase of the ParkZone Your ParkZone P-51D Mustang BNF purchase includes ® monitors the battery and automatically stops charging P-51D Mustang. The North American P-51D Mustang everything needed to get you in the air—all in one box.
- Page 3 Step 2 Step 3 DX7 (includes DX7se): Transmitter and Receiver Binding The following steps outline the binding process: Transmitter Specific Binding Instructions A. To bind your P-51D Mustang to the DX7, plug the Binding is the process of programming the receiver of bind plug into the Batt/Bind port on the AR500 the control unit to recognize the GUID (Globally Unique •...
- Page 4 Step 4 Step 7 Transmitter Control Identification Attaching the Horizontal Stabilizer Note: Each time before you fly you should ALWAYS 1. Locate the horizontal stab of the tail. turn the transmitter on before connecting the flight battery to the receiver unit. After each flight, be sure 2.
- Page 5 Step 9 Step 10 Motor Test 6. When finished with the motor test, be sure to Control Test Note: Transmitter below reflects Mode 2 only disconnect the battery first, and then turn off the transmitter. Follow this step each time you need Warning: Keep everything clear of the propeller be- Warning: Keep everything clear of the propeller to turn the airplane off.
- Page 6 Reattach the clevis to the aileron control horn and throttle) position and then turn on the transmitter. The P-51D Mustang BNF has the option to make the slide the silicon keeper back over the clevis to prevent the clevis from opening in flight.
- Page 7 7. Turn on the airplane and center the rudder servo. 4. Place the control horn so that the holes that the clevis attaches to is over the hingline of the rudder. Slide the servo horn onto the “Z” bend of the Using a small drill bit or sharpned peice of wire, pushrod in the outermost hole and attach the servo horn to the servo making sure the servo...
- Page 8 Step 15 Step 18 Range Test 5. Advance the throttle. When the throttle stick is Hand Launching the P-51D Mustang 5. Take a couple of steps and FIRMLY launch directly advanced, the propeller should spin quickly. You will need two people to perform the range test—one into the wind while keeping the wings level.
-
Page 9: Warnings And Safety
Warnings and Safety Success Tips 1. Don’t fly in winds over 10 mph! If you are a less does not occur to the battery, charger or any other 1. Read and follow this manual completely, experienced pilot, this is especially important. 5. -
Page 10: Repairing Minor Damage
Repairing Minor Damage Troubleshooting Guide If you happen to crash, and part of the tail or wing Aircraft will not “throttle up” but all • User did not lower throttle trim and • Lower throttle stick and throttle trim breaks, you can repair the damage by using regular other controls seem to function throttle stick prior to initializing the to their lowest settings... -
Page 11: Warranty
Warranty Warranty Period assumed nor accepted for any resulting damage or Replacement Parts Exclusive Warranty- Horizon Hobby, Inc., (Horizon) injury. By the act of use, setup or assembly, the user PKZ1019 Propeller: 9 x 6 warranties that the Products purchased (the “Product”) accepts all resulting liability. -
Page 12: Ce Compliance Information For The European Union
Repair or replacement decisions are at the sole time of disposal will help to conserve natural resources and ensure that it is recycled in a manner that discretion of Horizon Hobby. Horizon Product Support protects human health and the environment. For more information about where you can drop off your waste...