
Related Manuals for NETGEAR ReadyDATA 516


Summary of Contents for NETGEAR ReadyDATA 516
- Page 1 ReadyDATA Desktop Storage Systems Ha rd wa re Manual Models: R e a d yDATA 516 May 2013 202-11286-01 350 East Plumeria Drive San Jose, CA 95134...
- Page 2 Trademarks NETGEAR, the NETGEAR logo, and Connect with Innovation are trademarks and/or registered trademarks of NETGEAR, Inc. and/or its subsidiaries in the United States and/or other countries. Information is subject to change without notice. © NETGEAR All rights reserved.
-
Page 3: Table Of Contents
Factory Default Settings ........32 ReadyDATA 516 Technical Specifications ......33 Safety Warnings . -
Page 4: Chapter 1 Getting Started
Getting Started Congratulations on your purchase of a NETGEAR ReadyDATA storage system. This manual ® describes the physical features of the ReadyDATA desktop storage systems. This chapter contains the following sections: • Additional Documentation • Setup Location • Supported Operating Systems •... -
Page 5: Additional Documentation
ReadyDATA Desktop Storage Systems Additional Documentation NETGEAR maintains a website that supports ReadyDATA products. For reviews, tutorials, comparison charts, software updates, documentation, an active user forum, and more, visit www.netgear.com/readydata. For detailed information about configuring, managing, and using your ReadyDATA storage system, see the ReadyDATA OS Software Manual, which is available at www.netgear.com/readydata. -
Page 6: Supported Browsers
16. ReadyDATA storage systems do not recognize non-NETGEAR disks. They can recognize only disks that you obtain through NETGEAR or a NETGEAR authorized reseller. If you use disks that are not supported, NETGEAR technical support will not provide assistance. In addition, if you use non-NETGEAR disks, Dashboard might display an error. -
Page 7: Chapter 2 Netgear Readydata 516
NETGEAR ReadyDATA 516 This chapter provides an overview of the physical features of the ReadyDATA 516 and includes the following sections: • Front and Side Panels • Drive Bays • Rear Panel • Status Information • Power On and Shut Down •... -
Page 8: Front And Side Panels
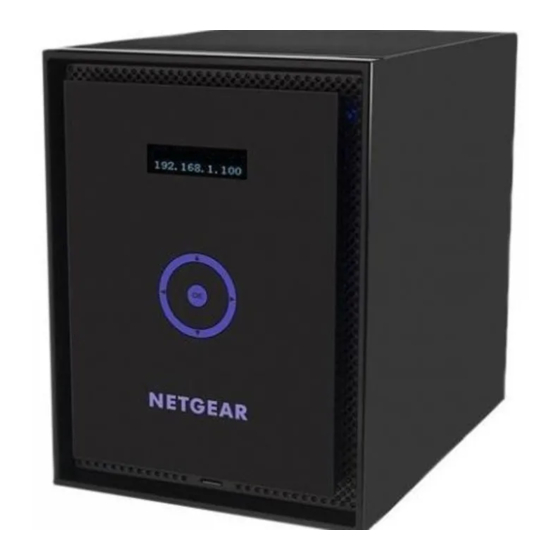
ReadyDATA Desktop Storage Systems Front and Side Panels The following figure shows the front and side panels of ReadyDATA 516. Figure 1. ReadyDATA 516 front and side panels 1. Status display screen 2. Infrared remote receiver 3. Drive bay door 4. -
Page 9: Drive Bays
ReadyDATA Desktop Storage Systems Drive Bays The following figure shows the drive bays of ReadyDATA 516. Figure 2. ReadyDATA 516 drive bays 1. Drive bay door 2. Disk tray release latch 3. Recessed disk tray handle lock 4. USB 2.0 port 5. -
Page 10: Rear Panel
ReadyDATA Desktop Storage Systems Rear Panel The following figure shows the rear panel of ReadyDATA 516. Figure 3. ReadyDATA 516 rear panel 1. Exhaust fan 6. LAN ports with LED status indicators 2. Power cable socket 7. HDMI port 3. Power switch 8. -
Page 11: Status Information
ReadyDATA Desktop Storage Systems Status Information You can obtain information about the status of your storage system by reviewing the indicators listed in the following table. Table 1. ReadyDATA 516 indicator descriptions Indicator Description Disk LEDs A Disk LED next to each drive bay indicates the status of the disk inside. The disk LEDs have these states: •... -
Page 12: Forced Shutdown
OS reinstall. Reinstalls the firmware from the internal flash to the disks. Use the OS reinstall boot mode when the system crashes and corrupts some configuration files. OS reinstall boot mode also resets some settings on your storage system, such as Internet protocol settings and the administrator password, to defaults. NETGEAR ReadyDATA 516... - Page 13 • Tech support. Boots into a low-level diagnostic mode. Use the tech support boot mode only when instructed to do so by a NETGEAR technical support representative. Note: The system’s IP address is not displayed on the status display screen when in Tech Support mode.
-
Page 14: Chapter 3 Disks
This chapter describes how to add and replace disks in your ReadyDATA desktop storage system. For information about configuring disks on your storage system, see the ReadyDATA OS Software Manual, which is available at www.netgear.com/readydata. This chapter includes the following topics: •... -
Page 15: Disk Trays
ReadyDATA Desktop Storage Systems Disk Trays The following figure shows the features of the disk tray. Figure 4. Disk tray 1. Disk tray 2. Disk tray release latch 3. Recessed disk tray handle lock 4. Disk tray handle 5. Disk screw holes 6. -
Page 16: Supported Disks
ReadyDATA Desktop Storage Systems Supported Disks ReadyDATA storage systems do not recognize non-NETGEAR disks. They can recognize only disks that you obtain through NETGEAR or a NETGEAR authorized reseller. If you use non-NETGEAR disks, Dashboard might display an error. WARNING: NETGEAR recommends that you do not reformat NETGEAR disks for use with operating systems other than ReadyDATA OS. -
Page 17: Add A Disk
ReadyDATA Desktop Storage Systems Add a Disk You can add a 3.5-inch hard disk drive, 2.5-inch hard disk drive, or a 2.5-inch solid-state drive to an empty drive bay. You can add a disk while the system is powered on. It is not necessary to shut down your system before adding a disk. - Page 18 ReadyDATA Desktop Storage Systems b. While holding the disk tray release latch, use your other hand to pull out one end of the mounting bracket and then the other until the ends extend slightly past the disk tray. Mounting bracket Make sure that the ends of the mounting bracket are even with each other.
- Page 19 ReadyDATA Desktop Storage Systems Attach the new HDD to the mounting bracket. Make sure that the HDD mounting holes are aligned with the bracket’s mounting posts, and that the HDD connectors face the interior of the disk tray. Push the mounting bracket and HDD back into the disk tray. Disks...
- Page 20 The disk tray is secured in the drive bay. The disk becomes available for use. You use ReadyDATA Dashboard to manually configure the new disk. For more information about using ReadyDATA Dashboard to configure your disks, see the ReadyDATA OS Software Manual, which is available at www.netgear.com/readydata. Disks...
- Page 21 ReadyDATA Desktop Storage Systems To add a 2.5-inch hard disk drive (HDD) or 2.5-inch solid-state drive (SSD): If necessary, slide the recessed disk tray handle lock to the unlocked position. Press the disk tray release latch. The disk tray handle pops out. Pull out the disk tray.
- Page 22 ReadyDATA Desktop Storage Systems b. While holding the disk tray release latch, use your other hand to pull out one end of the mounting bracket and then the other until the ends extend slightly past the disk tray. Mounting bracket Make sure that the ends of the mounting bracket are even with each other.
- Page 23 ReadyDATA Desktop Storage Systems d. Push the mounting bracket out of each bracket lock using a pointed object, such as a pen. The mounting bracket is released from the bracket lock. e. Slide the mounting bracket out of the disk tray. The mounting bracket is not used to secure 2.5-inch HDDs or SSDs.
- Page 24 The disk tray is secured in the drive bay. The disk becomes available for use. You use ReadyDATA Dashboard to manually configure the new disk. For more information about using ReadyDATA Dashboard to configure your disks, see the ReadyDATA OS Software Manual, which is available at www.netgear.com/readydata. Disks...
-
Page 25: Replace A Disk
For information about RAID configurations, setting up email alerts, and using Dashboard, see the ReadyDATA OS Software Manual, which is available at www.netgear.com/readydata. ReadyDATA supports hot-swap drive bays, so you do not need to power down your storage system when replacing a disk. - Page 26 ReadyDATA Desktop Storage Systems The disk tray handle pops out. Pull out the disk tray. Press and hold the disk tray release latch. While holding the disk tray release latch, pull out the mounting bracket and slide the bracket down the tray. The mounting bracket stops when it hits the bracket lock.
- Page 27 ReadyDATA Desktop Storage Systems Remove the old HDD from the mounting bracket. Attach the new HDD to the mounting bracket. Disks...
- Page 28 For more information about RAID configurations, see the ReadyDATA OS Software Manual, which is available at www.netgear.com/readydata. To replace a 2.5-inch hard disk drive (HDD) or 2.5-inch solid-state drive (SSD): If necessary, slide the disk tray handle lock to the unlocked position.
- Page 29 ReadyDATA Desktop Storage Systems The tray handle pops out. Pull out the disk tray and replace the 2.5-inch HDD or SSD: a. Remove the screws and the old 2.5-inch HDD or SSD. b. Place the new 2.5-inch HDD or SSD in the disk tray. c.
- Page 30 You can continue to use your storage system, although access is slower until the volume resynchronization finishes. For more information about RAID configurations, see the ReadyDATA OS Software Manual, which is available at www.netgear.com/readydata. Disks...
-
Page 31: Appendix A Defaults And Technical Specifications
Defaults and Technical Specifications This appendix includes the following sections: • Factory Default Settings • ReadyDATA 516 Technical Specifications • Safety Warnings... -
Page 32: Factory Default Settings
ReadyDATA Desktop Storage Systems Factory Default Settings The following table lists factory default settings for your ReadyDATA desktop storage system. Table 2. ReadyDATA factory default settings Feature Default Login Default IP address The default IP address for the ReadyDATA is assigned by the local router (DHCP server). -
Page 33: Readydata 516 Technical Specifications
ReadyDATA Desktop Storage Systems ReadyDATA 516 Technical Specifications The ReadyDATA 516 storage system meets the following technical specifications: General: • Intel Core i3 3.3 GHz Dual Core CPU • 16 GB ECC memory • Six-bay storage • Three E-SATA ports (disabled) •... -
Page 34: Safety Warnings
ReadyDATA Desktop Storage Systems Certifications: • FCC Class B, CE Class B, RoHS, VCCI Class B Safety Warnings • The equipment contains no operator access areas and is certified for installation only by trained personnel, according to the installation instructions provided with each storage system. -
Page 35: General Safety Precautions
ReadyDATA Desktop Storage Systems General Safety Precautions Follow these rules to ensure general safety: • Keep the area around the ReadyDATA clean and free of clutter. • See the technical specifications in this manual for details about your specific ReadyDATA storage system. -
Page 36: Appendix B Notification Of Compliance
Notification of Compliance Regulatory Compliance Information This section includes user requirements for operating this product in accordance with National laws for usage of radio spectrum and operation of radio devices. Failure of the end-user to comply with the applicable requirements may result in unlawful operation and adverse action against the end-user by the applicable National regulatory authority. - Page 37 This transmitter must not be co-located or operating in conjunction with any other antenna or transmitter. FCC Declaration Of Conformity We, NETGEAR, Inc., 350 East Plumeria Drive, San Jose, CA 95134, declare under our sole responsibility that the NETGEAR ReadyDATA desktop storage systems comply with Part 15 of FCC Rules.