
Related Manuals for NETGEAR RND44751G - ReadyNAS NV+ NAS Server


Summary of Contents for NETGEAR RND44751G - ReadyNAS NV+ NAS Server
- Page 1 ReadyNAS Duo v2 and NV+ v2 Hardware Manual 350 East Plumeria Drive San Jose, CA 95134 September 2011 202-10895-03...
-
Page 2: Technical Support
NETGEAR, Inc. Technical Support Thank you for choosing NETGEAR. To register your product, get the latest product updates, or get support online, visit us at http://support.netgear.com. -
Page 3: Table Of Contents
Table of Contents Chapter 1 Getting Started Additional Documentation........6 Setup Location . - Page 4 ReadyNAS Duo v2 and NV+ v2 Appendix B Compliance Notification Index...
-
Page 5: Chapter 1 Getting Started
Getting Started Congratulations on your purchase of a NETGEAR ReadyNAS storage system. This ReadyNAS ® Duo v2 and NV+ v2 Hardware Manual describes the physical features of the Duo v2 and NV+ v2 storage systems. This chapter contains the following sections: •... -
Page 6: Additional Documentation
For detailed information about configuring, managing, and using your ReadyNAS Duo v2 or NV+ v2 storage system, see the ReadyNAS RAIDiator 5.3 for Home Software Manual, which is available at http://www.readynas.com/documentation. NETGEAR maintains a community website that supports ReadyNAS products. Visit http://readynas.com for reviews, tutorials, a comparison chart, software updates, documentation, an active user forum, and much more. -
Page 7: Setup Location
Microsoft Windows 7, Vista, XP, 2000, Mac OS, UNIX, or Linux operating system • Microsoft Internet Explorer 7.0+, Apple Safari, 2.0+, Mozilla Firefox 2.0+, Opera 9.5+, or Google Chrome 10+ browser • Hard disk drive or drives from the NETGEAR Hardware Compatibility List; see http://www.readynas.com/hard_disk_hcl. Getting Started... -
Page 8: Diskless Units
Duo v2, but the same steps apply for an NV+ v2. To prepare a diskless unit for first use: Obtain at least one hard disk drive that appears on the NETGEAR Hardware Compatibility List. See http://www.readynas.com/hard_disk_hcl. - Page 9 ReadyNAS Duo v2 and NV+ v2 b. Pull out the disk tray, place the new disk on the tray, and assemble the disk and tray with the screws that came with your unit. Make sure that the hard disk connectors face the interior of the disk bay. c.
-
Page 10: Chapter 2 Readynas Duo V2
ReadyNAS Duo v2 This chapter provides an overview of the physical features of the ReadyNAS Duo v2 and includes the following sections: • Front and Side Panels • Drive Bays • Rear Panel • Status Information • System Shutdown • Boot Menu... -
Page 11: Front And Side Panels
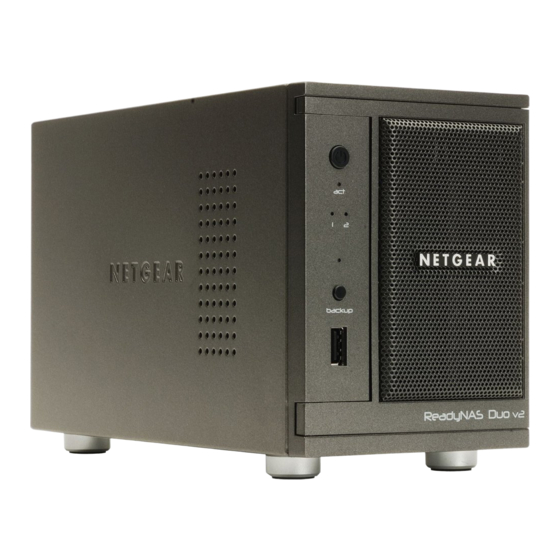
ReadyNAS Duo v2 and NV+ v2 Front and Side Panels The following figure shows the front and side panels of ReadyNAS Duo v2. Figure 1. ReadyNAS Duo v2 front and side panels 1. Power button and LED 2. Disk activity LED 3. -
Page 12: Drive Bays
ReadyNAS Duo v2 and NV+ v2 Drive Bays The following figure shows the drive bays of ReadyNAS Duo v2. Figure 2. ReadyNAS Duo v2 drive bay 1. Drive bay door 2. Disk tray handle 3. Recessed drive tray locking mechanism 4. - Page 13 ReadyNAS Duo v2 and NV+ v2 The following figure shows a ReadyNAS Duo v2 disk tray. Figure 3. ReadyNAS Duo v2 disk tray 1. Hard drive 2. Disk tray 3. Disk tray handle 4. Recessed disk tray locking mechanism 5. Disk tray release latch ReadyNAS Duo v2...
-
Page 14: Rear Panel
ReadyNAS Duo v2 and NV+ v2 Rear Panel The following figure shows the rear panel of ReadyNAS Duo v2. Figure 4. ReadyNAS Duo v2 rear panel 1. Exhaust fan 2. Kensington lock 3. Reset button 4. USB 3.0 ports 5. 1-gigabit Ethernet port with LED status indicators 6. -
Page 15: Status Information
ReadyNAS Duo v2 and NV+ v2 Status Information You can obtain information about the status of your unit by reviewing the indicators listed in the following table. Indicator Description Power button and LED Press this button to turn on the ReadyNAS. The LED has these states: •... -
Page 16: Boot Menu
• Tech support. Boots into a low-level diagnostic mode. Use the tech support boot mode only when instructed to do so by a NETGEAR Technical Support representative. • Skip volume check. After a system crash, the system tries to scan and fix the volume using a file system check. - Page 17 ReadyNAS Duo v2 and NV+ v2 To access the boot menu: Power off your unit. Using a straightened paper clip, press and hold the Reset button. Press the Power button to power on the unit. Continue to press the Reset button until the Power button LED, USB and backup status LED, disk 1 LED, and disk 2 LED illuminate.
-
Page 18: Chapter 3 Readynas Nv+ V2
ReadyNAS NV+ v2 This chapter provides an overview of the physical features of the ReadyNAS NV+ v2 and includes the following sections: • Front and Side Panels • Drive Bays • Rear Panel • Status Information • System Shutdown • Boot Menu... -
Page 19: Front And Side Panels
ReadyNAS Duo v2 and NV+ v2 Front and Side Panels The following figure shows the front and side panels of ReadyNAS NV+ v2. Figure 5. ReadyNAS NV+ v2 front and side panels 1. Exhaust vents 2. USB 2.0 port 3. Backup button and backup LED 4. -
Page 20: Drive Bays
ReadyNAS Duo v2 and NV+ v2 Drive Bays The following figure shows the drive bays of ReadyNAS NV+ v2. Figure 6. ReadyNAS NV+ v2 drive bay 1. Drive bay door 2. Disk tray handle 3. Recessed drive tray locking mechanism 4. - Page 21 ReadyNAS Duo v2 and NV+ v2 The following figure shows a ReadyNAS NV+ v2 disk tray. Figure 7. ReadyNAS NV+ v2 disk tray 1. Hard drive 2. Disk tray 3. Disk tray handle 4. Recessed disk tray locking mechanism 5. Disk tray release latch ReadyNAS NV+ v2...
-
Page 22: Rear Panel
ReadyNAS Duo v2 and NV+ v2 Rear Panel The following figure shows the rear panel of ReadyNAS NV+ v2. Figure 8. ReadyNAS NV+ v2 rear panel 1. Reset button 2. USB 3.0 ports 3. Power cable socket 4. 1-gigabit Ethernet port with LED status indicators 5. -
Page 23: Status Information
ReadyNAS Duo v2 and NV+ v2 Status Information You can obtain information about the status of your unit by reviewing the indicators listed in the following table. Indicator Description Power button and LED Press this button to turn on the ReadyNAS. The LED has these states: •... -
Page 24: Boot Menu
• Tech support. Boots into a low-level diagnostic mode. Use the tech support boot mode only when instructed to do so by a NETGEAR Technical Support representative. • Skip volume check. After a system crash, the system tries to scan and fix the volume using a file system check. - Page 25 ReadyNAS Duo v2 and NV+ v2 To access the boot menu: Power off your unit. Using a straightened paper clip, press and hold the Reset button. Press the Power button to power on the unit. Continue to press the Reset button until the status display screen shows a boot menu message.
-
Page 26: Chapter 4 Disks
Disks Use only supported disks in your ReadyNAS storage system. If you use non-supported disks, NETGEAR Technical Support will not provide assistance. For a list of supported disks, see theNETGEAR Hardware Compatibility List at http://www.readynas.com/hard_disk_hcl. For information about configuring disks on your ReadyNAS storage system, see the ReadyNAS RAIDiator 5.3 for Home Software Manual, which is available at... -
Page 27: Previously Formatted Disks
ReadyNAS unit. Previously formatted disks must appear on the NETGEAR Hardware Compatibility List, which is available at http://www.readynas.com/hard_disk_hcl. -
Page 28: Adding A Disk
ReadyNAS Duo v2 and NV+ v2 Adding a Disk You can add a hard disk to an empty disk bay. You do not need to shut down your unit before adding a disk. If you are adding a previously formatted disk to your Duo v2, NV+ v2, see the precautions in Previously Formatted Disks on page 27. -
Page 29: Failed Disk Notification
If a disk fails, you are notified by email. Email alerts must be set up for notifications to be sent. In addition, the ReadyNAS Dashboard provides information about the failed disk. NETGEAR recommends replacing a failed disk with the same disk model. Use the ReadyNAS Dashboard to determine the disk vendor and model used in your unit. -
Page 30: Replacing A Disk
ReadyNAS Duo v2 and NV+ v2 Replacing a Disk In the case of a failed disk, the unit provides email alerts and status messages about the need to replace a disk. ReadyNAS supports hot-swap bays, so you do not need to power down your unit when replacing a disk. - Page 31 ReadyNAS Duo v2 and NV+ v2 Pull out the disk tray and replace the disk. 1. Hard drive 2. Empty disk tray 3. Assembled disk tray Make sure that the hard disk connectors face the interior of the disk bay. Slide the disk tray back into the unit and press the handle to secure the disk.
-
Page 32: Appendix A Defaults And Technical Specifications
Defaults and Technical Specifications This appendix includes the following sections: • Factory Default Settings • Duo v2 Technical Specifications • NV+ v2 Technical Specifications... -
Page 33: Factory Default Settings
ReadyNAS Duo v2 and NV+ v2 Factory Default Settings The following table lists factory default settings for ReadyNAS Duo v2 and NV+ v2. Feature Default Login User login URL when the ReadyNAS is https://192.168.168.168/admin not connected to a DHCP server Admin user name (case-sensitive) admin Admin login password (case-sensitive) -
Page 34: Duo V2 Technical Specifications
ReadyNAS Duo v2 and NV+ v2 Duo v2 Technical Specifications The ReadyNAS Duo v2 storage system meets the following technical specifications: General: • 2-bay storage • Marvell single-core processor • 256MB DDR3 • One 1-gigabit Ethernet port • One USB 2.0 port (front) •... -
Page 35: Nv+ V2 Technical Specifications
ReadyNAS Duo v2 and NV+ v2 NV+ v2 Technical Specifications The ReadyNAS NV+ v2 storage system meets the following technical specifications: General: • 4-bay storage • Marvell single-core processor • 256MB DDR3 • One 1-gigabit Ethernet port • One USB 2.0 port (front) •... -
Page 36: Safety Warnings
ReadyNAS Duo v2 and NV+ v2 Safety Warnings Install the socket outlet near the equipment in an easily accessible location. Observe the on-board battery precautions. DANGER: RISK OF EXPLOSION IF BATTERY IS REPLACED BY AN INCORRECT TYPE. DISPOSE OF USED BATTERIES ACCORDING TO THEIR INSTRUCTIONS. -
Page 37: Electrostatic Discharge (Esd) Precautions
ReadyNAS Duo v2 and NV+ v2 • Replace the on-board battery only with the same battery or an equivalent type of battery recommended by the manufacturer. Dispose of used batteries according to the manufacturer's instructions. DANGER: Installing the battery upside down reverses its polarities and creates a danger of explosion. - Page 38 Compliance Notification Regulatory Compliance Information This section includes user requirements for operating this product in accordance with National laws for usage of radio spectrum and operation of radio devices. Failure of the end-user to comply with the applicable requirements may result in unlawful operation and adverse action against the end-user by the applicable National regulatory authority.
- Page 39 FCC Declaration Of Conformity We, NETGEAR, Inc., 350 East Plumeria Drive, San Jose, CA 95134, declare under our sole responsibility that the NETGEAR ReadyNAS Duo v2 and NV+ v2 comply with Part 15 of FCC Rules. Operation is subject to the following two conditions: •...
- Page 40 ReadyNAS Duo v2 and NV+ v2 European Union The NETGEAR ReadyNAS Duo v2 and NV+ v2 comply with essential requirements of EU EMC Directive 2004/108/EC and Low Voltage Directive 2006/95/EC as supported by applying the following test methods and standards: •...
- Page 41 Index battery general safety boot menu Duo v2 NV+ v2 Hardware Compatibility List compliance LEDs Duo v2 NV+ v2 Declaration Of Conformity location, unit disk adding failure previously formatted NV+ v2 replacing supported disk tray Duo v2 previously formatted disks NV+ v2 diskless units drive bay...
- Page 42 ReadyNAS Duo v2 and NV+ v2 socket outlet status information Duo v2 NV+ v2 status, system Duo v2 NV+ v2 supported disks system requirements system shutdown Duo v2 NV+ v2 system status Duo v2 NV+ v2 technical specifications Duo v2 NV+ v2 technical support trademarks...