Table of Contents
Advertisement
Quick Links
Advertisement
Table of Contents

Related Manuals for Cisco 6400


Summary of Contents for Cisco 6400
- Page 1 Cisco Video Surveillance 6400 IP Camera Installation Guide Americas Headquarters Cisco Systems, Inc. 170 West Tasman Drive San Jose, CA 95134-1706 http://www.cisco.com Tel: 408 526-4000 800 553-NETS (6387) Fax: 408 527-0883 Text Part Number: OL-28494-01...
- Page 2 Cisco StadiumVision, Cisco TelePresence, Cisco Unified Computing System, Cisco WebEx, DCE, Flip Channels, Flip for Good, Flip Mino, Flip Video, Flip Video (Design), Flipshare (Design), Flip Ultra, and Welcome to the Human Network are trademarks; Changing the Way We Work, Live, Play, and Learn, Cisco Store, and Flip Gift Card are service marks;...
-
Page 3: Table Of Contents
Understanding the IP Camera User Interface IP Camera Window Links IP Camera Windows Adjusting the IP Camera Focus and Zoom Powering the IP Camera On or Off Resetting the IP Camera Viewing Live Video Cisco Video Surveillance 6400 IP Camera Installation Guide OL-28494-01... - Page 4 Contents N D E X Cisco Video Surveillance 6400 IP Camera Installation Guide OL-28494-01...
- Page 5 Obtaining Documentation, Obtaining Support, and Security Guidelines For information about obtaining documentation, submitting a service request, and gathering additional information, see the monthly What’s New in Cisco Product Documentation, which also lists all new and revised Cisco technical documentation, at: http://www.cisco.com/en/US/docs/general/whatsnew/whatsnew.html Subscribe to the What’s New in Cisco Product Documentation as a Really Simple Syndication (RSS) feed...
- Page 6 Preface Cisco Video Surveillance 6400 IP Camera Installation Guide OL-28494-01...
-
Page 7: Introduction
For easy management and protection against tempering and vandalism, the 6400 is also equipped with a mounting bracket that conceals all cables within the bracket. With other advanced features such as 802.3af compliant PoE and micro SD/SDHC card for onboard storage, the 6400 is a full-fledged surveillance solution for outdoor environments. -
Page 8: Chapter 1 Overview
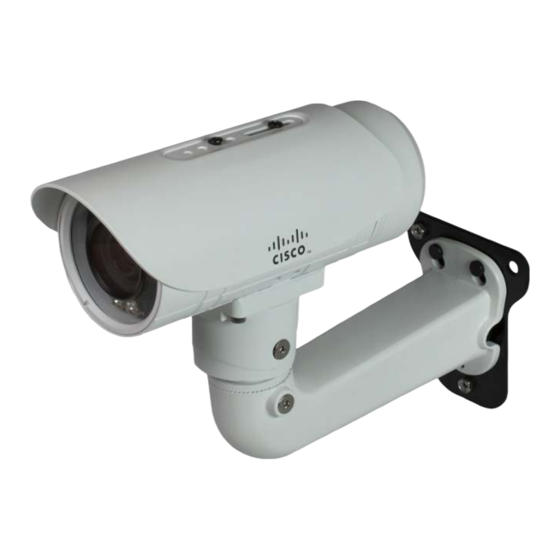
RoHS Document (1) • IP Camera Physical Details Front View Figure 1-1 and the table that follows describe the front view of the 6400 IP camera. Figure 1-1 Front View of IP Camera Cisco Video Surveillance 6400 IP Camera Installation Guide OL-28494-01... -
Page 9: Back View
Senses the level of ambient light to determine when to switch day/night mode. Back View Figure 1-2 and the table that follows describe the back view of the 6400 IP camera. Figure 1-2 Back View of IP Camera General Purpose I/O (GPIO) -
Page 10: General Purpose I/O Terminal Block
GPIO terminal block pin locations and descriptions. Figure 1-3 GPIO Terminal Block Pin Locations and Descriptions Description 12 VDC- 12 VDC+ 24 VAC 24 VAC The maximum output load from pins 7 and 8 is 400mA. Note Cisco Video Surveillance 6400 IP Camera Installation Guide OL-28494-01... -
Page 11: Installation Guidelines
• additional settings after installing and performing the initial set up of the IP camera before the external device can fully operate. For detailed information about these settings, see the Cisco Video Surveillance 6000 Series IP Camera Configuration Guide. If you do not connect an external device (input, output, or pan/tilt control) when you perform the •... -
Page 12: Warnings Before Installation
Installation of the equipment must comply with local and national electrical codes. Statement 1074 Warning The power supply must be placed indoors. Statement 331 If you use the IP camera outdoors, place the camera and the power supply in a suitable NEMA Note enclosure. Cisco Video Surveillance 6400 IP Camera Installation Guide OL-28494-01... -
Page 13: Chapter 2 Camera Installation
Attach the camera anchor bracket to the side of the IP camera with the two included screws. Step 2 (Optional) If you want to use an external power source for the 6400 IP camera, or use external devices Step 3 such as sensors and alarms, complete the steps in the “Connecting External Power and I/O Cables”... - Page 14 What to do next After you install the IP camera, follow the instructions in Chapter 3, “Performing the Initial Setup of the IP Camera” to access and configure the IP camera. Cisco Video Surveillance 6400 IP Camera Installation Guide OL-28494-01...
-
Page 15: Connecting External Power And I/O Cables
Connecting External Power and I/O Cables The 6400 IP camera can be powered using Power over Ethernet (PoE), or by using an external power source. If an external power source is used, a power cable must be connected to the General Purpose I/O (GPIO) terminal block on the IP camera. - Page 16 The recommended I/O cable gauge is 2.0 ~ 2.8 mm. Push the seal (B) into the housing (D), and to avoid moisture, insert the seals (C) into the empty holes Step 5 on the seal (B). Cisco Video Surveillance 6400 IP Camera Installation Guide OL-28494-01...
- Page 17 Connect the external power and I/O cables to the GPIO terminal block. The pin locations and Step 7 descriptions are as follows: Description 12 VDC- 12 VDC+ 24 VAC 24 VAC Step 8 Replace the back cover back onto the camera. Cisco Video Surveillance 6400 IP Camera Installation Guide OL-28494-01...
-
Page 18: Connecting A Waterproof Ethernet Cable
Camera Installation Connecting a Waterproof Ethernet Cable Connecting a Waterproof Ethernet Cable To connect the 6400 IP camera to an Ethernet cable with a waterproof connection, perform the following steps. Procedure Disassemble the components of the waterproof connector into its individual components as shown Step 1 below. -
Page 19: Installing The Sun Shield
Connect the Ethernet cable to the RJ45 jack and tighten the waterproof connector. Installing the Sun Shield To install the sun shield, perform the following steps. Procedure Step 1 Attach the two included standoff screws to the top of the 6400 IP camera. Cisco Video Surveillance 6400 IP Camera Installation Guide OL-28494-01... - Page 20 Ensure that the holes in the top of the standoff screws are visible through the holes in the sun shield. Use the two included screws to secure the sun shield to the two standoff screws. Step 3 Cisco Video Surveillance 6400 IP Camera Installation Guide 2-10 OL-28494-01...
-
Page 21: Performing The Initial Setup Of The Ip Camera
To connect to the IP camera for the first time and make initial configuration settings, perform the following steps. You can change these configuration settings in the future as described in the Cisco Video Surveillance 6000 Series IP Camera Configuration Guide. -
Page 22: Chapter 3 Performing The Initial Setup Of The Ip Camera
If you are prompted to install ActiveX controls, which are required to view video from the IP camera, Step 8 follow the on-screen prompts to do so. The Home (System Information) window appears. Cisco Video Surveillance 6400 IP Camera Installation Guide OL-28494-01... -
Page 23: Camera Management
C H A P T E R Camera Management This chapter provides information and instructions for managing the Cisco Video Surveillance 2620 IP Camera, and includes the following topics: Understanding the IP Camera User Interface, page 4-1 • Adjusting the IP Camera Focus and Zoom, page 4-4 •... -
Page 24: Chapter 4 Camera Management
Setup window—Provides access to the IP camera configuration windows. • Camera Video & Control window—Displays live video from the camera and lets you control a • variety of camera and display functions. Cisco Video Surveillance 6400 IP Camera Installation Guide OL-28494-01... - Page 25 IP address of the client device. Start Time Time and date that the client accessed the video stream for this session. Elapsed Time Length of time that the client has been accessing the video stream. Cisco Video Surveillance 6400 IP Camera Installation Guide OL-28494-01...
-
Page 26: Adjusting The Ip Camera Focus And Zoom
Resetting the IP Camera You reset the IP camera by pressing the Reset button on the IP Camera (see Figure 1-1 on page 1-2). There are various reset types, as described in Table 4-3. Cisco Video Surveillance 6400 IP Camera Installation Guide OL-28494-01... -
Page 27: Resetting The Ip Camera
3-1. Viewing Live Video After you install and set up the Cisco Video Surveillance IP Camera, you can connect to the IP camera through Internet Explorer and access the Camera Video & Control window to view live video. The Camera Video & Control window also provides for controlling the video display, configuring preset positions, and controlling certain IP camera functions. -
Page 28: Viewing Live Video
High saturation provides a vivid, intense color for a video image. With less saturation, the video image appears more muted and gray. The default value is 50. Restore button Resets white balance, brightness, contrast, sharpness, saturation, and hue to their default values. Cisco Video Surveillance 6400 IP Camera Installation Guide OL-28494-01... - Page 29 Click the Up Arrow to display the motion detection controls. The button button changes to the Down Arrow button. Click the Down Arrow button to hide the motion detection controls. The button changes to the Up Arrow button. Down Arrow toggle button Cisco Video Surveillance 6400 IP Camera Installation Guide OL-28494-01...
- Page 30 Alternatively, enter a value from 1 through 100 for an option and press the Enter key. To reset the sensitivity and threshold to their default values of 50, click Restore. Cisco Video Surveillance 6400 IP Camera Installation Guide OL-28494-01...
- Page 31 Camera Video & Control Window Controls (continued) Control Description Restore button Deselects all areas in the video field that you have selected for motion detection monitoring. Save Settings button Save the current motion detection configuration. Cisco Video Surveillance 6400 IP Camera Installation Guide OL-28494-01...
- Page 32 Chapter 4 Camera Management Viewing Live Video Cisco Video Surveillance 6400 IP Camera Installation Guide 4-10 OL-28494-01...
- Page 33 DHCP, obtaining IP address through live video viewing through home window factory reset through third-party device or software See also video log out, of IP camera help, for IP camera windows Cisco Video Surveillance 6400 IP Camera Installation Guide IN-1 OL-28494-01...
- Page 34 View Video link supported Power over Ethernet (PoE) rebooting, IP camera Refresh link reset factory default values reboot saturation sensitivity, for motion detection Setup window description displaying sharpness Cisco Video Surveillance 6400 IP Camera Installation Guide IN-2 OL-28494-01...