Grizzly G0442 Instruction Manual
5 hp cyclone dust collector
Hide thumbs
Also See for G0442:
- Parts breakdown (3 pages) ,
- Machine data sheet (2 pages) ,
- Owner's manual (60 pages)
Table of Contents
Advertisement
Quick Links
Download this manual
See also:
Owner's Manual
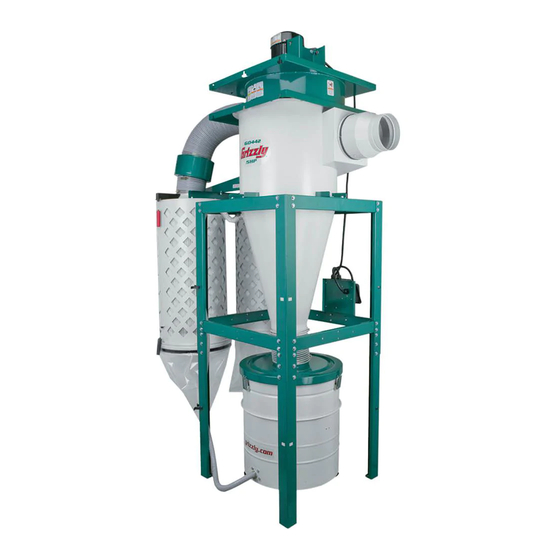
MODEL G0442
5 HP CYCLONE
WIRING UPDATE
We improved the remote controlled magnetic switch since the manual was originally printed. This sheet
shows the new magnetic switch assembly and the new wiring diagram. Keep this sheet with your Owner's
Manual in case you ever need to refer to it.
If you have questions, contact Tech Support at (570) 546-9663 or by email at techsupport@grizzly.com.
The new switch features an overload device that
requires the cyclone to be restarted after it has
been overloaded. The new features of the switch
are described below:
POWER
This light is on when there is power to the
machine.
RUN
This light is on when the machine is running.
SWITCH
OVER
This light indicates that the machine has been
overloaded and it will not start again until it is reset
at the main switch.
ON/OFF
2H
8H
4H
To reset the machine from the overload state, turn
the main switch OFF, then ON.
OVER
RUN
POWER
TIMER
MAIN
SWITCH
220 VOLT
COPYRIGHT © FEBRUARY, 2006 BY GRIZZLY INDUSTRIAL, INC.
WARNING: NO PORTION OF THIS MANUAL MAY BE REPRODUCED IN ANY SHAPE
OR FORM WITHOUT THE WRITTEN APPROVAL OF GRIZZLY INDUSTRIAL, INC.
#TR8040 PRINTED IN TAIWAN
Advertisement
Table of Contents

Related Manuals for Grizzly G0442


Summary of Contents for Grizzly G0442
-
Page 1: Remote Control
Keep this sheet with your Owner's Manual in case you ever need to refer to it. If you have questions, contact Tech Support at (570) 546-9663 or by email at techsupport@grizzly.com. The new switch features an overload device that requires the cyclone to be restarted after it has been overloaded. - Page 2 G0442 New Switch and Wiring Diagram ������������ ������������ ����� �� �� ��� ��� ��� ���� �� ��� ��� ��� ���� ��� �� � � � ������� �� �� �� �� ��� �� �� ��� �� �� �� �� ����� G0442 5HP CYCLONE DUST COLLECTOR...
-
Page 3: Getting Started
Filter Support Brace Gaskets ..... 2 COPYRIGHT © OCTOBER, 2005 BY GRIZZLY INDUSTRIAL, INC. WARNING: NO PORTION OF THIS MANUAL MAY BE REPRODUCED IN ANY SHAPE OR FORM WITHOUT THE WRITTEN APPROVAL OF GRIZZLY INDUSTRIAL, INC. #TR7649 PRINTED IN TAIWAN... - Page 4 Use a razor or putty knife to cut the silicone Separate the intake port from the black box, around the filter intake port. and completely clean off all remaining sili- cone. Cut the silicone around the black box. Pull or cut off the existing handle covers, loosen the screw above the handles, and remove the handles from the cable.
- Page 5 . Unfasten the screws at the bottom of the fil- Unfasten the bolt at the bottom of the filter. ter. Remove the original brush handle holder. . Remove the original brush. . Install the handle holder so it is directly below .
- Page 6 . Fasten the square pipe to the top of the fil- . Feed the new cable up through the brush, ter. over the pulley, and back down through the brush, making sure the brush screw is facing the pulley. 15. Insert the new brush and base on the square pipe.
- Page 7 . Feed the cable over the pulleys in the black . Secure the stop bead on the right side of the box. cable, approximately 12" from the end. . Pull the left side of the cable down until it . Fasten the black box to the top of the filter. stops, and secure the stop bead up against the handle holder.
- Page 8 . Fasten the screw on the handle, and install . Make sure that when the red handle is up the the other handle on the left side of the cable. filter brush is at the bottom of the filter. . Insert the covers on the handles so the red .
- Page 9 . Fasten the filter intake with the screws. 32. Use the two filter support gaskets between the filter support braces and the filter when reinstalling the filter on the cyclone. Filter Support Brace Gasket . Put silicone around the edges of the black box and filter intake to seal them to the filter.