Advertisement
- 1 Your Subwoofer
-
2
Connect
- 2.1 Connect to power
- 2.2 Manual pairing with FB1 soundbar / Initial set up to RF link
- 2.3 Connect to Wi-Fi (Wireless Operation)
- 2.4 Connect the subwoofer with Philips Sound app
- 2.5 Automatic pairing (Reconnection)
- 2.6 Connect the subwoofer to Philips Play-fi enabled TV
- 2.7 Wired connection (Sub-in)
- 2.8 Upgrade firmware
- 2.9 Factory reset
- 3 Product specifications
- 4 Troubleshooting
- 5 Important safety instructions
- 6 Documents / Resources
Your Subwoofer
To fully benefit from the support that Philips offers, register your subwoofer at www.philips.com/support.
What's in the box
Check and identify the items in the package:


- Power cord quantity and plug type vary by regions.
CCC
![]()
for ChinaBSMI
![]()
for TaiwanUL
![]()
for US/Canada![]()
for Europe/UK![]()
for AsiaFW1/93 FW1/96 FW1/37 FW1/10 FW1/98


- Images, illustrations and drawings shown on this User Manual are for reference only, actual product may vary in appearance.
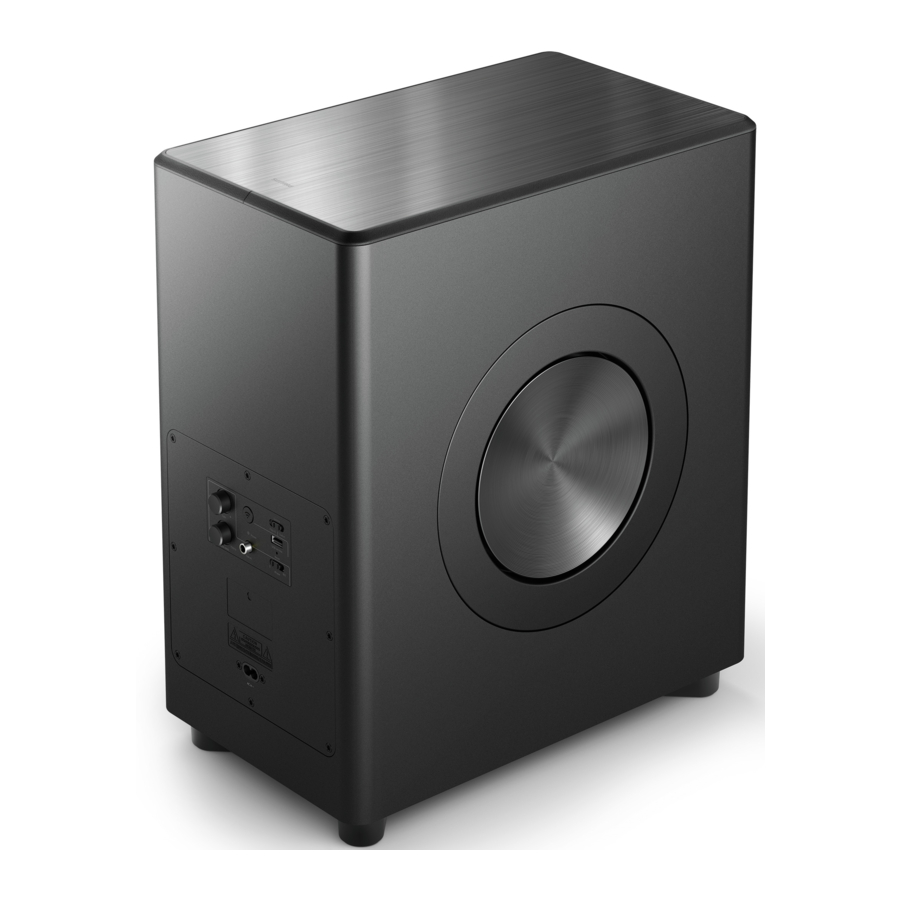
Subwoofer
This section includes an overview of the wireless subwoofer.

![]() (Wi-Fi Setup) button / indicator
(Wi-Fi Setup) button / indicator
 (Wi-Fi Setup) button / indicator
- Trigger Wi-Fi setup for Play-fi.
- Press and hold the button for 8 seconds to active the AP mode.
- Press and hold the button for 4 seconds to active the WPS mode.
Action LED State Status Constant on Connected / Paired successful Press and hold ![]() 8 seconds
8 secondsBlink Wi-Fi Access Point (AP) mode Press and hold ![]() 4 seconds
4 secondsDouble blink Wi-Fi Protected Setup (WPS) mode
- Power/RF link indicator
- Source (switch Play-fi/FR link/Sub in mode)
- When FW1 is used as a wired subwoofer, source switch must be at Sub in position.
> All network audio functionality will stop working.
> Wi-Fi is disconnected but Wi-Fi credentials shall be retained if it is setup previously.
> Play-fi module can be turned off. - To upgrade firmware for Play-fi module and MCU via USB service port, MCU source switch must be at Sub in position. Play-fi module source switch must be at Play-fi position.
- When FW1 is used as a wired subwoofer, source switch must be at Sub in position.
- USB service socket
The USB socket is for service only. - Reset button (Pin hole)
Reset device to default setting. - Phase 0° - 180° (switch)
- Sub in (socket)
Use the subwoofer cable to connect the subwoofer to other equipments (not supplied). - Crossover 25Hz-150Hz (knob)
- Gain +/- (knob)
Functional Settings Default Gain -6 dB to +6 dB 0 dB Crossover 25 to 150 Hz - Phase 0 or 180 degree 0 degree - When FW1 as Sub in subwoofer, above controls and functions are applicable (When FW1 as Play-fi subwoofer or RF link mode, above controls and functions are not applicable).
- AC in ~ socket
Connect to the power supply.
Connect
This section helps you connect your subwoofer to a TV and other devices, and then set it up.
Note
- For identification and supply ratings, see the type plate at the back or bottom of the product.
- Before you make or change any connections, make sure that all devices are disconnected from the power outlet. Fidelio FW1 Fidelio FW1
Connection


- Manual pairing with FB1 soundbar / Initial set up to RF link
- Connect to Wi-Fi (Wireless Operation)
- Connect the subwoofer to Philips Play-fi enabled TV
- Wired connection (Sub-in)
Connect to power

- Risk of product damage! Make sure that the power supply voltage corresponds to the voltage printed on the back or the underside of B C the product.
- Risk of electric shock! When you unplug the power cord, always pull the plug from the socket. Never pull the cord.
- Before connecting the AC power cord, ensure you have completed all other connections.

Connect the mains cable to the AC in~ socket of the subwoofer and then into a mains socket.
* Power cord quantity and plug type vary by regions.
Manual pairing with FB1 soundbar / Initial set up to RF link
FW1 Play-Fi wireless subwoofer can pair with FB1 (not supplied) soundbar.
- The source switch must be at Play-fi/ RF Link position.

- The Power/RF link indicator will (Green) fast blink on the Subwoofer.
![]()
- Press the
![]() button to turn your FB1 soundbar on (Purchase separately).
button to turn your FB1 soundbar on (Purchase separately).
![]()
- On FB1 soundbar remote control, enter setting menu:
> Press![]() > select "SUB PAIR" > Then press
> select "SUB PAIR" > Then press ![]() (Enter) to confirm the subwoofer pairing mode.
(Enter) to confirm the subwoofer pairing mode.
![]()
- Wait until the Power/RF link indicator will light up solid on the subwoofer.
![]()
- Soundbar and subwoofer shall discover each other and pair.
![]()


 > select "SUB PAIR" > Then press
  (Enter) to confirm the subwoofer pairing mode.


Connect to Wi-Fi (Wireless Operation)
(For iOS and Android version)
By connecting this unit and mobile phones, tablets (such as iPad, iPhone, iPod touch, Android phones, etc.) to the same Wi-Fi network, you can then use the Philips Sound app powered by DTS Play-fi to control the subwoofer to listen to audio files.
- Download and install the Philips Sound app powered by DTS Play-fi on a phone or tablet.
![]()
![]()
- Make sure your router is turned on and working properly.
- Connect your phone or tablet to the same Wi-Fi network that you want to connect your subwoofer.
![]()
- When FW1 is used as a Play-fi subwoofer, source switch must be at Play-fi/RF Link position.
 - Step 1")
- When FW1 is used as a Play-fi subwoofer, source switch must be at Play-fi/RF Link position.
- Press and hold
![]() (Wi-Fi) button located at the back cabinet for 8 sec to trigger the Wi-Fi connection.
(Wi-Fi) button located at the back cabinet for 8 sec to trigger the Wi-Fi connection.
> Until the speaker make a second tone and then release the button.
 - Step 2")
- Wait until the Wi-Fi light indicator on the back cabinet goes from a fast blink to a slow pulse. When it begins pulsing slowly, it indicates that the speaker is entering the Wi-Fi setup mode.
 - Step 3")
- Launch the Philips Sound app powered by DTS Play-fi. Follow the instructions in the app to connect this product to your Wi-Fi network.
 - Step 4")
- After successful Wi-Fi connection, the Wi-Fi light indicator will stop pulsing and turn solid. Once you set up this product on your Wi-Fi network, you can control it from any smartphone or tablet on the same network
- After connection, you can change the device name. There are several names to choose from or create your own by choosing Custom Name at the end of the name list. Otherwise, it follows the default name.
- After connection, this product may perform a software update. Upgrade to the latest software when it is your first time set up. The software upgrade may take several minutes. Do not unplug your speaker, turn off your device, or leave the network during the update.


 - Step 1")
 - Step 2")
 - Step 3")
 - Step 4")
Note
- After connection, the product may perform a software update. Upgrade is required after 2 initial set up. Without the upgrade, not all Double blink product features can be available.
- When the first time set up is not successful, hold down the Wi-Fi button on the subwoofer for 8 seconds until the second tone can be heard and the Wi-Fi light is changed to a slow pulse. Reset the Wi-Fi connection, restart the app and start the set up again.
- If you want to change from one network to another, you need to set up the connection again. Press hold down the
![]() (Wi-Fi) button on the subwoofer for 8 seconds to reset the Wi-Fi 3 connection.
(Wi-Fi) button on the subwoofer for 8 seconds to reset the Wi-Fi 3 connection.
Wi-Fi Protected Setup (WPS)
If your router has Wi-Fi Protected Setup (WPS), you can set up the connection without entering a password.
- Press and hold the
![]() (Wi-Fi) button for 4 seconds.
(Wi-Fi) button for 4 seconds.
 - Step 1")
> You will hear a tone and the Wi-Fi light will begin double blink.
 - Step 2")
- Press the WPS button on your router. The button is normally marked with this WPS logo.
![]()
- Follow the instruction in Philips Sound app powered by DTS Play-fi to start the pairing.
![]()
 - Step 1")
 - Step 2")


Note
- WPS is not a standard feature on all routers. If your router does not have WPS then use Standard Wi-Fi Setup.
- Press the
![]() (Wi-Fi) button once if you want to exit the WPS mode or it will automatically exit after 2 minutes.
(Wi-Fi) button once if you want to exit the WPS mode or it will automatically exit after 2 minutes.
Connect the subwoofer with Philips Sound app
- After successful Wi-Fi connection, the Wi-Fi light indicator will stop pulsing and turn solid.
![]()
- Launch the Philips Sound app powered by DTS Play-fi.

- Select the Primary Speaker [FW1].
![]()


Automatic pairing (Reconnection)
(Play-Fi > RF link)
- Connect the subwoofer to power and the source switch at Play-fi/RF Link position.
![]()
- Press the
![]() button to turn your FB1 soundbar on.
button to turn your FB1 soundbar on.
![]()
- Press and hold
![]() (Wi-Fi) button located at the back cabinet for 15 sec.
(Wi-Fi) button located at the back cabinet for 15 sec.
» The Power/RF link indicator on the subwoofer will (Green) fast blink.
 - Step 1")
- Soundbar and subwoofer shall discover each other and start pairing. Power/RF link indicator on subwoofer will light up solid Green after RF connection is successful.
 - Step 2")


 - Step 1")
 - Step 2")
(RF link > Play-Fi)
- Press and hold
![]() (Wi-Fi) button located at the back cabinet for 8 sec to trigger the Wi-Fi connection.
(Wi-Fi) button located at the back cabinet for 8 sec to trigger the Wi-Fi connection.
» Until the speaker make a second tone and then release the button.
 - Step 1")
- Wait until the Wi-Fi light indicator on the back cabinet goes from a fast blink to a slow pulse. When it begins pulsing slowly, it indicates that the speaker is entering the Wi-Fi setup mode.
 - Step 4")
- Go to Settings on your phone and follow the instructions to connect this product to your Wi-Fi network.
![]()
 - Step 1")
 - Step 4")

Connect the subwoofer to Philips Play-fi enabled TV

- Power up your DTS Play-fi TV connected to the internet.
» TV sound is muted. - Enter the Settings menu on TV.
» Settings > Sound > DTS Play-fi
Surround sound Setup
Follow the on-screen setup.

TV Audio Setup
You can also stream the TV's audio to your home speakers wirelessly. Follow the on-screen setup.

Wired connection (Sub-in)
When source switch is at Sub-in source, FW1 shall behave as wired subwoofer. It shall render the subwoofer signal via analog input.
- Use a subwoofer cable to connect the other device or TV's audio output sockets to the Sub in socket on the unit.
![]()
- When FW1 is used as a wired subwoofer, source switch must be at Sub in position.
![]()
- The available controls and functions (at the back of the subwoofer) are as below:
![]()


| Functional Settings | Default | ||
| Gain -6 dB to +6 dB | 0 dB | ||
| Crossover 25 to 150 Hz | - | ||
| Phase 0 or 180 degree | 0 degree | ||
Upgrade firmware
To get the best features and support, update your product with the latest firmware version.
Update firmware via Philips Sound (Settings > Fine Tune / Update Firmware)
The firmware for MCU and DSP can be upgraded to the latest version via Philips Sound powered by DTS Play-fi. Please go to settings menu and select PS Fine Tune / Update Firmware option to check it out. If the upgrade is released, the upgraded icon can be pressed to proceed automatically.
Once this product is connected to Wi-Fi, it can receive over-the-air firmware update. Always upgrade with the latest firmware version to improve the performance of this product.
Factory reset
Reset device to default setting.
- Connect the subwoofer to power, use a needle to push the Reset button on rear of subwoofer for 5 seconds.
» You will hear a tone and then the subwoofer will automatically restart.
» The subwoofer is restored to factory defaults.


Product specifications
Note
- Specifications and design are subject to change without notice.
Wireless
| 5.8G Wireless frequency range / Transmitter power (EIRP) | 5742 ~ 5852 MHz ≤ 10dBm |
Network supported
WiFi IEEE 802.11a/b/g/n/ac Wireless frequency band (Wi-Fi) /Radio frequency power transmitted (EIRP)
| 2.4G Wi-Fi | 2400 ~ 2483.5 MHz / ≤ 20dBm |
| 5G Wi-Fi | 5150 ~ 5350 MHz / ≤ 20dBm 5470 ~ 5725 MHz / ≤ 27dBm 5725 ~ 5850 MHz / ≤ 14dBm |
Subwoofer
| Power supply | 100-240V~ 50/60Hz |
| RMS Output power MAX Output power | 210W 420W (1% THD) |
| Power consumption | 50 W |
| Standby consumption | < 0.5 W |
| USB | 5V 500mA 500mA |
| Frequency Response | 25Hz - 150Hz |
| Impedance | 3 Ω |
| Dimensions (W x H x D) | 240 x 472 x 400 mm |
| Weight | 13.4 kg |
| Operating Temperature | 0°C - 45°C |
Troubleshooting

- Risk of electric shock. Never remove the casing of the product.
To keep the warranty valid, never try to repair the product yourself. If you have problems using this product, check the following points before you request service. If you still have a problem, get support at www.philips.com/support.
No power
- Ensure that the AC cord is properly connected.
- Ensure that there is power at the AC outlet.
Sound
- When the playback freezes and there is no sound in Wi-Fi mode, please check whether your home network is normal.
Distorted sound or echo
- If you play audio from TV through this product, make sure that the TV is muted.
Wi-Fi
Wi-Fi Connection cannot be established
- Check the availability of WLAN network on the router.
- Place the Wi-Fi router closer to the unit.
- Make sure the password is correct.
- Check the WLAN function or reboot the modem and Wi-Fi router.
Play-fi
Cannot discover the play-fi supported devices from the app.
- Make sure the device is connected to the Wi-Fi.
Cannot play play-fi music
- Certain network service or contents available through the device may not be accessible in case the service provider terminates its service.
- When the first time set up is not successful, close the Philips Sound app powered by DTS Play-fi. Restart the app.
- When the speaker was set as Stereo Pairs or Surround Sound, the speaker need to be disconnected in the app before use separately.
Important safety instructions
Read and understand all instructions before you use your product. If damage is caused by failure to follow instructions, the warranty does not apply.
Safety
Know these safety symbols

RISK OF ELECTRIC SHOCK DO NOT OPEN
TO REDUCE THE RISK OF ELECTRIC SHOCK, DO NOT REMOVE COVER (OR BACK). NO USER-SERVICEABLE PARTS INSIDE. REFER SERVICING TO QUALIFIED SERVICE PERSONNEL.
 | This is CLASS II apparatus with double insulation, and no protective earth provided. |
 | AC voltage |
 | Follow the instructions in the user manual! |
 | Risk of electric shock! |
 | The exclamatory mark is intended to alert the user to the presence of important operating instructions. |
Risk of electric shock or fire!
- Before you make or change any connections, make sure that all devices are disconnected from the power outlet.
- Never expose the product and accessories to rain or water. Never place liquid containers, such as vases, near the product. If liquids are spilt on or into the product, disconnect it from the power outlet immediately. Contact Consumer Care to have the product checked before use.
- Never place the product and accessories near naked flames or other heat sources, including direct sunlight.
- Never insert objects into the ventilation slots or other openings on the product.
- Where the mains plug or an appliance coupler is used as the disconnect device, the disconnect device shall remain readily operable.
- Disconnect the product from the power outlet before lightning storms.
- When you disconnect the power cord, always pull the plug, never the cable.
- Use the product in tropical and/or moderate climates.
Risk of short circuit or fire!
- For identification and supply ratings, see the type plate at the back or bottom of the product.
- Before you connect the product to the power outlet, ensure that the power voltage matches the value printed on the back or bottom of the product. Never connect the product to the power outlet if the voltage is different.
Risk of injury or damage to this product!
- For wall mounting, this product must be securely attached to the wall in accordance with the installation instructions. Use only the supplied wall mount bracket (if available). Improper wall mounting may result in accident, injury or damage. If you have any query, contact Consumer Care in your country.
- Never place the product or any objects on power cords or on other electrical equipment.
- If the product is transported in temperatures below 5°C, unpack the product and wait until its temperature matches room temperature before connecting it to the power outlet.
- Parts of this product can be made of glass. Handle with care to avoid injury and damage.
Risk of overheating!
- Never install this product in a confined space. Always leave a space of at least four inches around the product for ventilation. Ensure curtains or other objects never cover the ventilation slots on the product.
Note
- The rating label is pasted on the bottom or back of the equipment.
Care for your product
Use only microfiber cloth to clean the product.
Help and support
For extensive online support, visit www.philips.com/support to:
- watch video tutorials (available only for selected models)
- find answers to frequently answered questions (FAQs)
- email us a question
- chat with our support representative. Follow the instructions on the website to select your language, and then enter your product model number.
Alternatively, you can contact Consumer Care in your country. Before you contact, note down the model number and serial number of your product. You can find this information on the back or bottom of your product.
Specifications are subject to change without notice. Please visit www.Philips.com/support for the latest updates and documents.
Philips and the Philips Shield Emblem are registered trademarks of Koninklijke Philips N.V. and are used under license.
This product has been manufactured by and is sold under the responsibility of MMD Hong Kong Holding Limited. or one of its affiliates, and MMD Hong Kong Holding Limited. is the warrantor in relation to this product.
Register your product and get support at www.philips.com/support
Documents / Resources
References
Download manual
Here you can download full pdf version of manual, it may contain additional safety instructions, warranty information, FCC rules, etc.
Advertisement
Thank you! Your question has been received!


Need Assistance?
Do you have a question about the Fidelio FW1 that isn't answered in the manual? Leave your question here.