Table of Contents
Advertisement
Available languages
Available languages
Quick Links
Owner's Manual
SmartRack
(Series Numbers: AG-039A, AGAC7006, AGAC7761,
AG-0324, AG-00BE, AG-0325, AGAC7454, AG-0534, AG-0535, AG-0536)
WARRANTY REGISTRATION
Register your product today and be
automatically entered to win an ISOBAR
surge protector in our monthly drawing!
tripplite.com/warranty
1111 W. 35th Street, Chicago, IL 60609 USA • tripplite.com/support
Enclosures
®
®
Copyright © 2022 Tripp Lite. All rights reserved.
1
2
2
3
4
4
4
5
6
6
7
7
7
9
9
10
11
11
12
12
14
14
15
29
43
Advertisement
Chapters
Table of Contents

Related Manuals for Tripp Lite SmartRack AGAC7006


Summary of Contents for Tripp Lite SmartRack AGAC7006
-
Page 1: Table Of Contents
WARRANTY REGISTRATION Register your product today and be automatically entered to win an ISOBAR ® surge protector in our monthly drawing! tripplite.com/warranty 1111 W. 35th Street, Chicago, IL 60609 USA • tripplite.com/support Copyright © 2022 Tripp Lite. All rights reserved. -
Page 2: Important Safety Instructions
• Do not re-ship the enclosure with additional equipment unless the enclosure was shipped with a special shock pallet (“SP1” models only). The combined weight of the enclosure and installed equipment must not exceed the load capacity of the pallet. Tripp Lite is not responsible for any damage that occurs during re-shipment. -
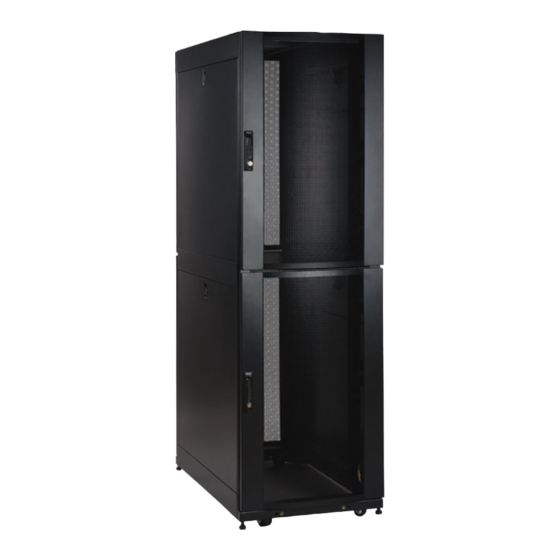
Page 3: Feature Identification
Feature Identification Model SR42UB is shown. The other models have similar features, with the differences noted. Roof Panel Locking Split Rear Doors Locking Side Panels (24U enclosures use 2 side panels instead of 4. Side panels are not included with “EXP” models.) Cable Management Rails Casters and Levelers... -
Page 4: Enclosure Installation
Remove the heavy plastic bag surrounding the enclosure. Examine the enclosure for any damage or loose parts. Confirm that all parts are present. If anything is missing or damaged, contact Tripp Lite for assistance. Do not attempt to use the enclosure if it has been damaged. -
Page 5: Placement
Enclosure Installation Unpacking (continued) Use the key to open the enclosure's doors and locate the 2 shipping brackets that attach the enclosure to the shipping pallet. The brackets are located inside the enclosure. Note: The keys are attached to the front of the enclosure. Use a 13 mm open-end wrench to remove the shipping brackets. -
Page 6: Leveling
Attach the brackets to secure mounting points in the floor using user-supplied hardware or Tripp Lite's SmartRack Bolt-Down Kit (Model: SRBOLTDOWN). Ground Connection All the parts of the enclosure are grounded to the frame of the enclosure. Use the enclosure's front or... -
Page 7: Enclosure Configuration
Enclosure Configuration Adding or Removing Front and Rear Doors WARNING: Do not attempt to add or remove doors without assistance. Removing Door Disconnect the door's ground wire. Open the door until it is perpendicular (90 degrees) to the front of the enclosure. 90°... - Page 8 Enclosure Configuration Reversing Front Door (continued) Remove the screw and washer from the rear of the door handle and remove the latching mechanism. Rotate the latch washer counter-clockwise 90 degrees and reverse the latch so it points in the opposite direction, then use the screw and washer to re-attach the latch to the rear of the door handle.
-
Page 9: Adding Or Removing Roof Panel
Enclosure Configuration Adding or Removing Roof Panel WARNING: Do not attempt to use the roof panel for weight-bearing purposes other than those explicitly described and approved by Tripp Lite. Do not attempt to add or remove the roof panel without assistance. -
Page 10: Adjusting Mounting Rails And Cable Management Rails
Enclosure Configuration Adding or Removing Side Panels (continued) Lift the panel away from the brace that supports it. To Reinstall Side Panel, Reverse Steps 1-3 Adjusting Mounting Rails and Cable Management Rails WARNING: Do not attempt to adjust rails without assistance. Do not attempt to adjust rails while equipment is installed in the enclosure. Do not attempt to use rails without screws installed (6 per rail). -
Page 11: Combining (Baying) Enclosures
Enclosure Configuration Combining (Baying) Enclosures WARNING: Combining enclosures is not a substitute for stabilizing the enclosures. Each enclosure in a bay of combined enclosures requires the same stabilizing measures as a standalone enclosure. Arrange the enclosures in the correct position for baying. Each enclosure includes 4 baying brackets that correspond to baying connection points the adjoining enclosure. -
Page 12: Installing Or Removing Cage Nuts
Equipment Installation Installing or Removing Cage Nuts WARNING: The flanges of the cage nuts should engage the sides of the square opening in the rail, not the top and bottom. Follow the instructions in your equipment documentation to ensure proper installation of your equipment. Installing Cage Nuts Locate the numbered square openings in the mounting rails where you plan to install your equipment. - Page 13 Specifications Load Capacity* Unit Dimensions Shipping Dimensions Model Static Rolling Height Width Depth Weight Height Width Depth Weight SRX42UB** 3000 lb. 2250 lb. 78.5 in. 23.63 in. 41.25 in. 298.98 lb. 83.43 in. 25.75 in. 42.85 in. 331.06 lb. (1363 kg) (1022 kg) (1994 mm) (600 mm)
-
Page 14: Storage And Service
Product Registration Visit tripplite.com/warranty today to register your new Tripp Lite product. You'll be automatically entered into a drawing for a chance to win a FREE Tripp Lite product!* * No purchase necessary. Void where prohibited. Some restrictions apply. See Web site for details. -
Page 15: Español
Combinando [Baying] Estantes Instalación del Equipo Instalar o Remover las Tuercas de Jaula Especificaciones Almacenaje y Servicio Garantía English Français Русский 1111 W. 35th Street, Chicago, IL 60609 USA • tripplite.com/support Copyright © 2022 Tripp Lite. Todos los derechos reservados. -
Page 16: Instrucciones De Seguridad Importantes
• No envíe el estante con equipo adicional al menos que el estante haya sido enviado con un shock pallet especial [Tarima de uso pesado] (Modelos “SP1” únicamente). El peso combinado del estante y el equipo instalado no debe exceder la capacidad de la tarima. Tripp Lite no es responsable de ningún daño que ocurra durante el reenvío. -
Page 17: Identificación De Características
Identificación de Características Se muestra el modelo SR42UB. Los otros modelos cuentan con características similares con las diferencias indicadas. Panel Superior/Techo Puertas Traseras de Dos Hojas con Cerradura Paneles laterales con Cerradura (Los estantes 24U usan 2 paneles laterales en lugar de 4. No se incluyen paneles laterales con los modelos “EXP”.) Rieles para el Manejo de Cables Ruedas y Niveladores/Puntales... -
Page 18: Instalación Del Estante
Remueva la bolsa de plástico de uso pesado que cubre el estante. Examine el estante buscando cualquier daño o partes sueltas. Confirme que están todas las partes y piezas. Si cualquier parte está dañada o falta, comuníquese con Tripp Lite por ayuda. No trate de usar el estante si éste está dañado. -
Page 19: Colocación
Instalación del Estante Desempaque (continuación) Use la llave para abrir las puertas del estante y localice dos soportes de embarque que fijan el estante a la tarima de embarque. Los soportes están localizados en el interior del estante. Nota: Las llaves están pegadas al frente del estante. Use una llave de tuercas de boca abierta de 13 mm para quitar los soportes de embarque. -
Page 20: Nivelación
A continuación fije los soportes a los puntos de anclaje en el piso utilizando tornillos suministrados por el usuario o con el juego SmartRack Bolt- Down de Tripp Lite (Modelo: SRBOLTDOWN). Conexión a Tierra Todas las partes del estante están conectadas a tierra al marco del estante. Use los puntos con cuerda de conexión a tierra al frente o atrás del estante... -
Page 21: Configuración Del Estante
Configuración del Estante Añadiendo o Removiendo las Puertas del Frente y Traseras ADVERTENCIA: No intente añadir o remover las puertas sin ayuda. Removiendo la Puerta Desconecte el cable de conexión a tierra de la puerta. Abra la puerta hasta que este perpendicular (90 grados) al frente del estante. 90°... - Page 22 Configuración del Estante Invirtiendo la Puerta Frontal (continuación) Remueva el tornillo y la arandela de atrás de la manija de la puerta y remueva el mecanismo de cierre. Gire el pestillo en contra del sentido de las manecillas del reloj 90 grados e invierta el pestillo de modo que apunte a la dirección contraria, a continuación use el tornillo y la arandela par volver a fijar el pestillo a la parte posterior de la manija de al puerta.
-
Page 23: Añadiendo O Removiendo El Panel Superior/Techo
Configuración del Estante Añadiendo o Removiendo el Panel Superior/Techo ADVERTENCIA: No intente usar el panel superior para soportar pesos que no sean los explícitamente descritos y aprobados por Tripp Lite. No intente poner o quitar el panel superior sin asistencia. -
Page 24: Ajustando Los Rieles De Montaje Y Los Rieles Para
Configuración del Estante Añadiendo o Removiendo los Paneles Laterales (continuación) Retire el panel de la abrazadera que lo soporta. Para Reinstalar el Panel Lateral, Revierta los Pasos 1 a 3 Ajustando los Rieles de Montaje y los Rieles para el Manejo de los Cables ADVERTENCIA: No intente ajustar los rieles sin asistencia. -
Page 25: Combinando [Baying] Estantes
Configuración del Estante Combinando [Baying] Estantes ADVERTENCIA: Combinar estantes no es un sustituto para estabilizar los estantes. Cada estante en una bahía de estantes combinados requiere las mismas medidas de estabilización que un solo estante en forma independiente. Coloque los estantes en la posición correcta para combinarlos [baying]. Cada estante incluye cuatro tirantes que corresponden a los puntos de conexión para combinar [Baying]... -
Page 26: Instalar O Remover Las Tuercas De Jaula
Instalación del Equipo Instalar o Remover las Tuercas de Jaula ADVERTENCIA: Las pestañas de las turcas de jaula deben encajar en ambos lados de las aperturas cuadradas en el riel, no arriba y abajo. Siga las instrucciones en la documentación de su equipo para asegurarse de una instalación correcta de su equipo. Instalando las Tuercas de Jaula Localice las aperturas cuadradas numeradas en los rieles de montaje en donde planea instalar su equipo. - Page 27 Especificaciones Capacidad de Carga* Dimensiones de la Unidad Dimensiones de Embarque Modelo Estático Rodando Alto Ancho Fondo Peso Alto Ancho Fondo Peso SR42UBCL 3000 lb. 2250 lb. 78.5 pulg. 23.63 pulg. 43 pulg. 305 lb. 85 pulg. 26 pulg. 45 pulg. 347 lb.
-
Page 28: Almacenaje Y Servicio
La presente garantía no cubre ningún daño (directo, indirecto, especial o consecuencial) del producto que ocurra durante el envío a Tripp Lite o a un centro de servicio técnico de Tripp Lite autorizado. Los productos enviados a Tripp Lite o a un centro de servicio técnico de Tripp Lite autorizado deben tener prepagos los cargos de transporte. -
Page 29: Français
Installation de l’équipement Installation ou enlèvement des écrous à cage Caractéristiques techniques Entreposage et entretien Garantie English Español Русский 1111 W. 35th Street, Chicago, IL 60609 USA • tripplite.com/support Droits d’auteur © 2022 Tripp Lite. Tous droits réservés. -
Page 30: Importantes Consignes De Sécurité
• Ne pas réexpédier l’armoire avec de l’équipement supplémentaire sauf si elle a été expédiée avec une palette antichoc spéciale (Modèle « SP1 » uniquement). Le poids combiné de l’armoire et de l’équipement installé ne doit pas dépasser la capacité de charge de la palette. Tripp Lite n’est pas responsable des dommages ayant lieu durant une réexpédition. -
Page 31: Identification Des Caractéristiques
Identification des caractéristiques Le modèle SR42UB est illustré. Les autres modèles ont des caractéristiques semblables; les différences sont notées. Panneau supérieur Deux portes arrière verrouillables Panneaux latéraux verrouillables (Les armoires de 24U ont 2 panneaux latéraux au lieu de 4. Les panneaux latéraux ne sont pas compris avec les modèles « EXP ».) Profilés pour les chemins de câbles Roulettes et vérins de calage... -
Page 32: Installation De L'armoire
Retirer le lourd sac de plastique entourant l’armoire. Examiner l’armoire pour vérifier si elle est endommagée ou s’il manque des pièces. Vérifier la présence de toutes les pièces. Si quoi que ce soit manque ou est endommagé, communiquer avec Tripp Lite pour de l’aide. Ne pas essayer d’utiliser l’armoire si elle a été endommagée. -
Page 33: Mise En Place
Installation de l’armoire Déballage (suite) Utiliser la clé pour ouvrir les portes de l’armoire et repérer les deux pattes de fixation retiennent l’armoire à la palette d’expédition. Les pattes de fixation sont à l’intérieur de l’armoire. Remarque : Les clés sont attachées à l’avant de l’armoire. Utiliser la clé... -
Page 34: Mise À Niveau
Puis utiliser les pattes de fixation pour fixer ces points dans le plancher à l’aide de quincaillerie fournie par l’utilisateur ou du kit de boulonnage au sol SmartRack de Tripp Lite (modèle : SRBOLTDOWN). Mise à la terre Toutes les pièces de l’armoire sont mises à... -
Page 35: Configuration De L'armoire
Configuration de l’armoire Poser ou enlever les portes avant et arrière MISE EN GARDE : Ne pas essayer de poser ou d’enlever les portes sans aide. Enlèvement d’une porte Déconnecter le fil de mise à la terre de la porte. Ouvrir la porte perpendiculairement (90 degrés) à... - Page 36 Configuration de l’armoire Inversion de la porte avant (suite) Retirer la vis et la rondelle de l’arrière de la poignée et retirer le mécanisme de verrouillage. Faire pivoter la rondelle du loquet à 90 degrés dans le sens antihoraire et inverser le loquet pour qu’il pointe dans la direction opposée;...
-
Page 37: Pose Et Enlèvement Du Panneau Supérieur
MISE EN GARDE : Ne pas essayer d’utiliser le panneau supérieur à des fins de support de poids autre que ceux explicitement décrits et approuvés par Tripp Lite. Ne pas essayer de poser ou d’enlever le panneau supérieur sans aide. -
Page 38: Ajustement Des Profilés De Montage Et Des Profilés
Configuration de l’armoire Pose et enlèvement des panneaux latéraux (suite) Soulever le panneau hors de l’entretoise qui le supporte. Pour reposer le panneau latéral, inverser les étapes 1 à 3 Ajustement des profilés de montage et des profilés pour les chemins de câbles MISE EN GARDE : Ne pas essayer d’ajuster les profilés sans aide. -
Page 39: Combinaison (Assemblage En Baie)
Configuration de l’armoire Combinaison (Assemblage en baie) d’armoires de stockage MISE EN GARDE : La combinaison d’armoires n’est pas un substitut à leur stabilisation. Chaque armoire dans une baie d’armoires combinées exige les mêmes mesures de stabilisation qu’une armoire autonome. Disposer les armoires dans la bonne position pour l’assemblage en baie. -
Page 40: Installation Ou Enlèvement Des Écrous À Cage
Installation de l’équipement Installation ou enlèvement des écrous à cage MISE EN GARDE : Les brides des écrous à cage doivent s’encastrer dans les côtés de l’ouverture carrée dans le rail, pas au sommet ni à la base. Suivre les instructions de la documentation de votre équipement pour garantir sa bonne installation. Installation des écrous à... - Page 41 Caractéristiques techniques Capacité de charge* Dimensions de l’appareil Dimensions à l’expédition Modèle Statique Sur roue Hauteur Largeur Profondeur Poids Hauteur Largeur Profondeur Poids SR42UBDP 3000 lb. 2250 lb. 78.5 po 23.63 po 47.3 po 315 lb. 85 po 26 po 50.72 po 367 lb.
-
Page 42: Entreposage Et Entretien
RMA, ainsi que les instructions concernant le transport vous seront acheminées par courriel. Tout dommage (direct, indirect, spécial ou fortuit) survenu au produit pendant le transport à Tripp Lite ou à un centre de service autorisé Tripp Lite est exclu de la garanti. Les produits expédiés à Tripp Lite ou à un centre de service autorisé... -
Page 43: Русский
Установка оборудования Установка или снятие закладных гаек Технические характеристики Хранение и техническое обслуживание Гарантия и регистрация изделия English Español Français 1111 W. 35th Street, Chicago, IL 60609 USA • tripplite.com/support Охраняется авторским правом © 2022 Tripp Lite. Все права защищены. -
Page 44: Важные Указания По Технике Безопасности
• Не допускается последующая транспортировка шкафа с дополнительным оборудованием за исключением случаев первоначальной поставки шкафа со специальным ударозащищенным поддоном (только для моделей SP1). Суммарный вес шкафа и установленного в нем оборудования не должен превышать грузоподъемность поддона. Компания Tripp Lite не несет ответственности за какой-либо ущерб, причиненный... -
Page 45: Схема Расположения Функциональных Элементов
Схема расположения функциональных элементов На рисунке представлена модель SR42UB. Другие модели имеют аналогичные функциональные элементы с указанными различиями. Верхняя панель Запирающиеся задние дверцы разрезной конструкции Запирающиеся боковые панели (в шкафах высотой 24U используются две боковые панели вместо четырех. Модели “EXP” боковыми панелями не комплектуются). Направляющие... -
Page 46: Порядок Установки Шкафа
Снимите со шкафа плотный полиэтиленовый мешок. Осмотрите шкаф на предмет наличия каких-либо повреждений или незакрепленных деталей. Убедитесь в наличии всех деталей. В случае отсутствия или повреждения каких-либо деталей обратитесь за помощью в компанию Tripp Lite. Не пользуйтесь шкафом в случае его повреждения. -
Page 47: Размещение
Порядок установки шкафа Распаковка (продолжение) 4 Откройте ключом дверцы шкафа и найдите 2 транспортировочных кронштейна , с помощью которых он прикреплен к транспортировочному поддону. Указанные кронштейны располагаются внутри шкафа. Примечание. Ключи прикреплены к передней поверхности шкафа. Снимите транспортировочные кронштейны с помощью рожкового гаечного ключа на 13 мм. Соблюдайте предельную осторожность, поскольку... -
Page 48: Выравнивание
или внутренних точках крепления кронштейнов к шкафу. Закрепите кронштейны в точках монтажного крепления к полу при помощи оснастки (в комплект не входит) или предлагаемого компанией Tripp Lite комплекта для крепления шкафов SmartRack к полу (модель: SRBOLTDOWN) Заземление Все детали шкафа заземляются через его каркас. Для прямого соединения каркаса шкафа с шиной заземления вашего объекта с... -
Page 49: Компоновка Шкафа
Компоновка шкафа Установка/снятие передней и задней дверец ВНИМАНИЕ! Не пытайтесь навешивать и снимать дверцы шкафа в одиночку Снятие дверцы Отсоедините провод заземления дверцы. Откройте дверцу до того положения, в котором она окажется перпендикулярной (под углом 90 градусов к) передней плоскости шкафа. - Page 50 Компоновка шкафа Перестановка передней дверцы (продолжение) Выверните винт и снимите шайбу с тыльной стороны дверной ручки, после чего выньте запорный механизм. Поверните шайбу запорного механизма на 90 градусов против часовой стрелки и разверните защелку таким образом, чтобы она была обращена в противоположную сторону, а затем с помощью винта и шайбы прикрепите защелку обратно к тыльной стороне дверной...
-
Page 51: Установка/Снятие Верхней Панели
Установка/снятие верхней панели ВНИМАНИЕ! Не пытайтесь использовать верхнюю панель шкафа для размещения тяжелых предметов за исключением случаев, явным образом описанных и одобренных компанией Tripp Lite. Не пытайтесь устанавливать и снимать верхнюю панель шкафа в одиночку. Снятие верхней панели Потяните на себя 2 штифта, расположенные в задней части верхней панели. Удерживая штифты, вытолкните верхнюю панель по... -
Page 52: Регулировка Монтажных И Кабельных Направляющих
Компоновка шкафа Установка/снятие боковых панелей (продолжение) Выньте панель из фиксатора. Для установки боковой панели на место следует повторить шаги 1-3 в обратном порядке Регулировка монтажных и кабельных направляющих ВНИМАНИЕ! Не пытайтесь регулировать направляющие в одиночку. Не пытайтесь регулировать направляющие при установленном в шкаф оборудовании. Не пытайтесь использовать... -
Page 53: Совмещение Шкафов (Установка В Ряд)
Компоновка шкафа Совмещение шкафов (установка в ряд) ВНИМАНИЕ! Объединение шкафов не может служить заменой обеспечению их устойчивости. Каждый шкаф, установленный в ряд с объединенными с ним шкафами, требует тех же действий по обеспечению устойчивости, что и отдельно стоящий шкаф. Расположите шкафы таким образом, чтобы они могли быть установлены в ряд. Каждый... -
Page 54: Установка Или Снятие Закладных Гаек
Установка оборудования Установка или снятие закладных гаек ВНИМАНИЕ! Отгибы кромок закладных гаек должны зацепляться за боковые, а не верхний и нижний края квадратного отверстия в направляющей. Для обеспечения правильности установки оборудования следуйте указаниям, изложенным в сопроводительной документации к нему. Установка закладных гаек Найдите... -
Page 55: Технические Характеристики
Технические характеристики Допустимая нагрузка* Габаритные размеры Транспортные габариты Модель Стационарная Роликовая Высота Ширина Глубина Масса Высота Ширина Глубина Масса SR24UB 1363 кг 1022 кг 1200 мм 600 мм 1092 мм 86 кг 1306 мм 660 мм 1140 мм 105 кг SR24UBEXP 1363 кг... -
Page 56: Хранение И Техническое Обслуживание
Техническое обслуживание На приобретенное вами изделие марки Tripp Lite распространяется действие гарантии, условия которой изложены в настоящем руководстве. Кроме того, компания Tripp Lite предлагает ряд Программ расширенной гарантии и обслуживания на объекте. Более подробная информация о техническом обслуживании изложена на странице tripplite.com/support. Перед возвратом своего изделия в целях...