Smeg CGF01 - Coffee Grinder Manual
- User manual (16 pages) ,
- Manual (15 pages) ,
- User manual (146 pages)
Advertisement
- 1 DESCRIPTION OF THE APPLIANCE (Fig. A)
- 2 IDENTIFICATION PLATE
- 3 BEFORE FIRST USE (Fig. A)
- 4 ASSEMBLY OF COMPONENTS (Fig. B-C-D)
- 5 DESCRIPTION OF CONTROLS (Fig. E-F)
- 6 USE (Fig. A-E-F-H-H)
- 7 GRINDING TIMES (Fig. E-F)
- 8 CLEANING AND MAINTENANCE (Fig. A-H-I-L)
- 9 Troubleshooting
- 10 Documents / Resources
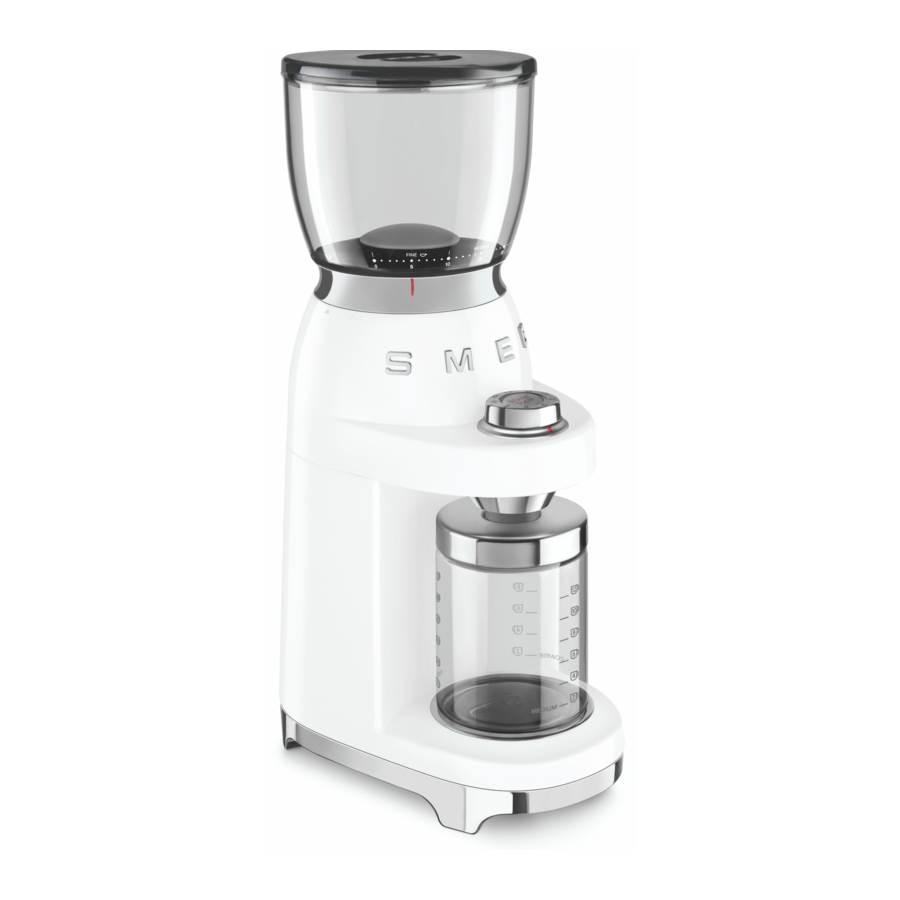
DESCRIPTION OF THE APPLIANCE (Fig. A)

- Motor base
- Coffee bean container (350 g)
- Coffee bean container lid
- Ground coffee container with lid
- Container support plate
- START/STOP button
- Grinding functions selection knob
- Grinding level adjustment lever
- Grinder
- Cleaning brush
- Portafilter centering device
IDENTIFICATION PLATE
The identification plate states the technical data, serial number, and marking. The identification plate must never be removed.
BEFORE FIRST USE (Fig. A)
- Unpack the appliance carefully and remove all packaging materials and promotional labels.
- Wash all components, except for the motor base (1) and the grinder (9), with hot water and normal dish-washing liquid. Rinse all components thoroughly and dry them before using them.

The grinder must never bewashed and must always be kept dry. Clean the grinder with the cleaning brush provided or with a hard-bristle brush.

Before use, check that all components are integral and have no cracks.
ASSEMBLY OF COMPONENTS (Fig. B-C-D)


- Position the container (2) on the motor base (1) making the two reference notches "
![]() " "
" "![]() " correspond, and then turn it clockwise until the two indications "
" correspond, and then turn it clockwise until the two indications "![]() " "
" " ![]() " match.
" match. - Position the lid (3) on the container (2) and press it down.
- Position the plate (5) on the motor base (1) in a way to secure it.
- Open the silicone cap of the ground coffee container (4) and position it on the plate (5).
- Make sure that the rubber dispenser cone is centered in the hole of the container lid (4) as shown in Fig. D.
 " correspond, and then turn it clockwise until the two indications "
DESCRIPTION OF CONTROLS (Fig. E-F)

Grinding adjustment lever (8)
The appliance has a lever (8), which allows to adjust the level of grinding appropriate to your use:
| FINE | Fine grinding |
| MEDIUM | Medium grinding |
| COARSE | Coarse grinding |
Move the lever to make the indicator (12) correspond with the desired grinding level.
The appliance has 8 pre-set functions and a manual function, which can be selected using the knob (7).
Each function corresponds to a set amount of ground coffee.
Knob icon | Quantity |
| 1 | Grinding for single espresso |
| 2 | Grinding for double espresso |
| 2 | Grinding for 2 cups |
| 4 | Grinding for 4 cups |
| 6 | Grinding for 6 cups |
| 8 | Grinding for 8 cups |
| 10 | Grinding for 10 cups |
| 12 | Grinding for 12 cups |
| M | Manual function |
In relation to the quantity selected, we recommend adjusting coffee grain by moving the indicator (12) as indicated in the following table.
| Use | Level of Grinding indicator (12) | Functions knob (7) |
| Espresso coffee machine | FINE | 1 - 2 |
| Moka | ||
| Filter coffee machine | MEDIUM | 2 4 6 |
| French Press | COARSE | 8 10 12 |
The Manual function (M) can be used at will with any level of grinding.
USE (Fig. A-E-F-H-H)

Make sure the upper grinder (9A) is inserted and secured in its seat.
- Insert the plug into the power outlet.
- Lift the lid (3) and introduce the coffee beans into the container (2).
A flashing LED on the knob means that the appliance is reporting an error: missing or incorrectly inserted bean container.
Grinding the coffee into the container (4)
- Position the powder container (4) on the plate (5), making sure the silicone cap is open.
- Select the desired level of grinding by positioning the indicator (12) on the gradation desired.
- Select the desired program by turning the knob (7) and making the red lock-nut indicator correspond with the desired program from "2" to "12".
- Press the START/STOP button (6) to start grinding. For all pre-set programs, grinding will end automatically (excluding the manual function (M)).
- When grinding has been completed, remove the container (4) from the appliance.
- To withdraw the ground coffee from the container (4), open it by turning the lid (13) counter-clockwise and remove it.
Grind an adequate amount of coffee, make sure that the coffee powder is less than the maximum level mark on the powder container.
During manual operation mode (M) stay near the coffee grinder: press START/STOP again to finish grinding. Stop grinding before the coffee powder passes the maximum level mark on the powder container.
Once ground, the coffee can quickly lose its aroma. For best results, use the coffee powder immediately after grinding. Store the powder container in a dark, cool and dry place. Make sure that the level of the coffee powder is lower than the maximum marking of the container and make sure that the lid of the container is tightly closed and screwed.
Grinding the coffee into the espresso coffee portafilter
- Use the relevant accessory (11) supplied and fix it as indicated in Figure 7 to facilitate centering of the portafilter. Position any portafilter under the dispensing cone.
- Select the FINE grinding level
- Select the "1
![]() " or "2
" or "2 ![]() " program according to the capacity of its portafilter.
" program according to the capacity of its portafilter. - Press the START/STOP button (6) to start grinding. For all pre-set programs, the grinding will end automatically.
- When grinding has been completed, remove the portafilter.
 " or "2
Portafilter not supplied.
If the manual grinding operating time exceeds the safety time set (90 seconds), the motor stops automatically.
During the grinding phase, do not rotate the knob (7) from one program to another and do not move the grain selection lever (8).
If a finer level of grinding than that currently used is to be set, it is highly recommended to remove the grinder and clean it, removing any residual beans, before proceeding with a new grinding operation. See the CLEANING AND MAINTENANCE section to remove the grinder.

A bean blocking system allows the container (2) to be lifted from the motor base (1) in a safe manner, preventing the beans from escaping.
The coffee grinder has an autoswitch-off button (stand-by) if it is not used after 90 seconds. Press the START/STOP button to re-activate the product.
GRINDING TIMES (Fig. E-F)
The functions envision pre-set supply settings of ground coffee. However, depending on personal taste, the pre-set amount of ground coffee can be increased or decreased, thus customizing the different functions.
Customize the amount of grinding for espresso coffee.
- Make sure that the grinding indicator (12) is positioned at an adequate grinding level for espresso coffee (FINE).
- Turn the knob (7) to "1
![]() ".
". - Press the START/STOP button (6) to start grinding and hold it down for the desired time; the lock nut (14) flashes during the programming phase.
- On releasing the button, grinding stops, the lock-nut stops flashing and the new setting is memorized.
By modifying the amount of single espresso coffee ground, the amount of double espresso coffee is also modified automatically.
Customizing the amount of ground coffee for American/French press coffee.
- Make sure that the grinding indicator (12) is positioned at an adequate grinding level for Americano/French Press coffee (MEDIUM/ COARSE).
- Turn the knob (7) to "2".
- Press the START/STOP button (6) to start grinding and hold it down for the desired time; the lock nut (14) flashes during the programming phase.
- On releasing the button, grinding stops, the lock-nut stops flashing and the new setting is saved.
By modifying the amount of American/French press coffee ground, for the 2-cup selection, the amount of espresso coffee for the other pre-set functions present on the knob is modified automatically (from 2 to 12).
Resetting factory values
To reset the factory values:
- Turn the knob (7) onto program "12".
- Press the START/STOP button (6) and hold it down for 5 seconds. The lock-nut (14) flashes 5 times indicating that all factoryset values have been reset (for Espresso functions and Filter Coffee/French Press functions).
CLEANING AND MAINTENANCE (Fig. A-H-I-L)

- Make sure the coffee bean container (2) is empty and then run in manual mode (M) to remove any coffee residue from the grinder.
Before carrying out any cleaning operation, ALWAYS disconnect the plug from the power outlet. Never immerse the motor base (1) in water or other liquids.
- Remove the container (2) by turning it counter-clockwise.
- Remove any coffee beans present in the machine using the cleaning brush (10) supplied.
- Lift the handle (15) and turn the upper grinder (9a) counter-clockwise to release it and then remove it.
- Clean the upper grinder (9a) and the lower grinder (9b) and the coffee outlet cavity using a hard bristle brush or the supplied cleaning brush (10).
- Re-mount the upper grinder (9a) making the two notches "
![]() " "
" " ![]() " correspond and rotating clockwise to fix it "
" correspond and rotating clockwise to fix it "![]() " "
" "![]() "
" - The ground coffee bean container (2,4), the lid (3), and the plate (5) can be washed using warm water and neutral detergent.
- The motor base (1) can be cleaned using a damp cloth, avoiding the use of detergents or abrasive materials.
 " "
" "  " correspond and rotating clockwise to fix it "
 "
"Troubleshooting
| Problem | Possible causes | Solution |
| The appliance does not work | Plug not connected | Connect the plug |
| The coffee bean container is not inserted correctly | Check that the coffee bean container is inserted in the relative plate (5). | |
| The motor thermal protection is activated automatically after 90 seconds of continuous operation. | Wait (approx. 15 minutes) for the thermal protection to reset. | |
| The LED on the knob flashes | The coffee bean container is not inserted correctly | Check that the coffee bean container is inserted on the motor base. See the section "Assembly of Components" for directions on how to mount the bean container. |
| The appliance stops during operation | The motor thermal protection is activated automatically after 90 seconds of continuous operation | Wait (approx. 15 minutes) for the thermal protection to reset. |
| The appliance works but ground coffee does not escape. | No coffee beans in the relative container. | Load the coffee beans. |
| Grinder blocked. | Remove the grinder and check there are no objects blocking rotation. | |
| It is difficult to set the grinding level of the coffee or there is a low amount of coffee. | The upper part of the grinder (9a) is missing | Insert and secure the upper grinder (9a) in its seat |
| Grinders worn. | Replace the grinders by taking the appliance to an authorized after-sales center. |
Contact local technical support if the problem is not solved or in case of other types of faults.

Documents / ResourcesDownload manual
Here you can download full pdf version of manual, it may contain additional safety instructions, warranty information, FCC rules, etc.
Advertisement
Thank you! Your question has been received!


Need Assistance?
Do you have a question about the CGF01 that isn't answered in the manual? Leave your question here.