Table of Contents
Advertisement
Advertisement
Table of Contents

Related Manuals for Cisco Network Storage System NSS3000 Series


Summary of Contents for Cisco Network Storage System NSS3000 Series
- Page 1 GETTING STARTED GUIDE Cisco Small Business NSS3000 Series Network Storage System...
- Page 2 © 2008 Cisco Systems, Inc. All rights reserved. OL-18629-01...
-
Page 3: Table Of Contents
Chapter 1: Introduction Chapter 2: Setting up the Hardware Chapter 3: Configuring the NSS Chapter 4: Accessing the Network Storage NSS3000 Series Network Storage System Getting Started Guide Benefits About this Guide Approved Vendor List for Drives Installing the Disk Drives Connecting the NSS to the Network Connecting the Power Connecting the Chassis to a Standard Power Outlet... - Page 4 Chapter A: NSS LEDs Appendix B: Specifications Appendix C: Additional Information Appendix D: Support Contacts NSS3000 Series Network Storage System Getting Started Guide Mac Users Accessing Storage through CIFS/SMB Accessing Storage through FTP Power Button LED System LED LAN LED Hard Disk Drive LEDs ACT LED ERR LED...
-
Page 5: Chapter 1: Introduction
Introduction Thank you for choosing the Cisco Small Business Network Storage System (NSS). Administering a network can be a difficult job. Finding low-cost ways to simplify your data-management tasks means that you have more resources to dedicate elsewhere. The NSS is a Network Attached Storage (NAS) unit that appears as a native file server for the various clients within your network, including Windows, Apple Macintosh, UNIX, and Linux platforms. -
Page 6: About This Guide
Introduction About this Guide About this Guide This guide provides instructions on how to initially configure your NSS3000. It describes how to set up the hardware, configure the NSS, and how users can access the network storage. Approved Vendor List for Drives If you are purchasing disk drives to install in the NSS, see the Cisco Approved Vendor List at When you select a disk drive, consider the type of RAID levels required to service... -
Page 7: Chapter 2: Setting Up The Hardware
Setting up the Hardware This chapter provides instructions for installing the NSS hardware. It describes how to physically install the NSS and how to use the LCD panel of the front of the chassis to view the NSS status. It includes the following topics: •... - Page 8 Setting up the Hardware Installing the Disk Drives Open the front door of the chassis. STEP 4 From disk bay 1, remove the disk tray. STEP 5 To remove the tray, push in the tab on the latch on the front of the tray, and then open the latch.
- Page 9 Setting up the Hardware Installing the Disk Drives Repeat steps 5 through 9 to install additional disk drives. STEP 9 Close the front door of the chassis. STEP 10 Continue to the next section, STEP 11 NSS3000 Series Network Storage System Getting Started Guide Connecting the NSS to the Network.
-
Page 10: Connecting The Nss To The Network
Setting up the Hardware Connecting the NSS to the Network Connecting the NSS to the Network Follow these steps to connect the NSS to the network. Connect the supplied Ethernet cable to the Ethernet port on the back of STEP 1 the chassis. -
Page 11: Connecting The Power
Setting up the Hardware Connecting the Power Connecting the Power You can connect the NSS chassis to a standard power outlet or connect it to an Uninterruptible Power Supply (UPS). We recommend that you use an UPS since a sudden loss of power can cause RAID NOTE corruption and possible data loss. -
Page 12: Connecting The Chassis To An Uninterruptible Power Supply
Setting up the Hardware Connecting the Power Connecting the Chassis to an Uninterruptible Power Supply To protect data against a sudden loss of power, follow these steps to connect the chassis to an Uninterruptible Power Supply (UPS). Connect one end of the supplied power cable to the Power port on the STEP 1 NSS3000 chassis. -
Page 13: Starting The Nss
Setting up the Hardware Starting the NSS Starting the NSS Follow these steps to start the NSS. Press the Power button on the front of the chassis. STEP 1 Verify that the Power LED on the front of the NSS chassis turns yellow. If the LED is STEP 2 not yellow, see the Confirm that the LCD display on the front of the chassis displays the IP address... -
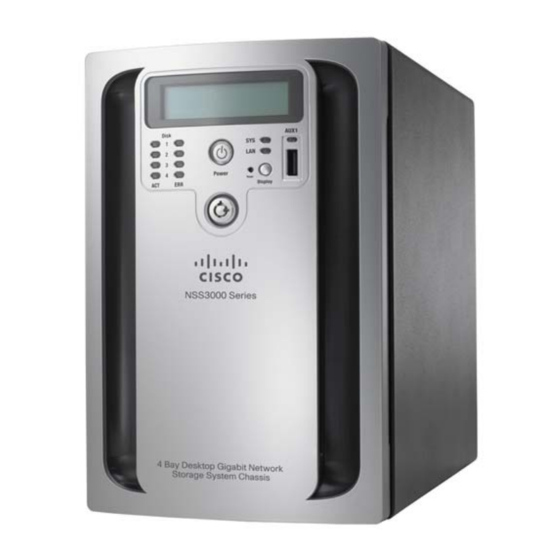
Page 14: Using The Nss3000 Lcd Panel
Setting up the Hardware Using the NSS3000 LCD Panel Using the NSS3000 LCD Panel The LCD panel on the front of the chassis let you view various aspects of the system such as the status of the configured RAIDs, volumes, the status of the bootup, and so on. - Page 15 Setting up the Hardware Using the NSS3000 LCD Panel • • • • • NSS3000 Series Network Storage System Getting Started Guide Short: If the pair has a short, the message appears as "pair a-b short@ Xm" (where "a" and "b" are the numbers of the pair, "X" is the location in the cable where the short was found, and "m"...
-
Page 16: Chapter 3: Configuring The Nss
Configuring the NSS This chapter describes the steps you need to follow to configure the NSS, and includes the following topics: • • • • For a detailed description of the configuration options available, see the NSS3000 Series Network Storage System Administration Guide available on Cisco.com at www.cisco.com/go/smallbiz, or refer to the online help on the NSS configuration interface. -
Page 17: Logging Into The Configuration Interface
Configuring the NSS Logging into the Configuration Interface The configuration for your computer is only temporary. After you initially open the NOTE configuration interface, you can configure the static IP address for the NSS and then restore your computer’s network settings to their previous values. For help setting the IP configuration on the NSS, refer to the online help available from NSS configuration interface.: Logging into the Configuration Interface... - Page 18 Configuring the NSS Logging into the Configuration Interface 3. Run the Discovery Tool from the CD that shipped with your NSS. Insert it into your PC to automatically run the installation tool. (You can also download the NSS Discovery application from Cisco.com at: www.cisco.com/go/smallbiz) The Welcome screen appears.
- Page 19 Configuring the NSS Logging into the Configuration Interface Click Run Discovery Tool. STEP 1 From the Cisco NSS Discovery Tool window, select the device from the list of STEP 2 NSS devices, and then click Connect to GUI. The NSS Login window appears. Enter admin in the User Name and Password fields, then click OK.
-
Page 20: Running The Quick Setup Wizards To Configure The Nss
Configuring the NSS Running the Quick Setup Wizards to Configure the NSS Running the Quick Setup Wizards to Configure the NSS When you log into the configuration interface for the first time, the Initial Setup wizard appears. The setup wizard steps you through the basic configuration to create a RAID, volume, share, user, to set the Home Directory location, set the time, and so on. -
Page 21: Saving The Nss Configuration
Configuring the NSS Saving the NSS Configuration Saving the NSS Configuration You can save a copy of the NSS configuration to use if you need to restore the settings at a later time. When you save the configuration file, it saves a date- stamped version of the current configuration settings to the specified volume on the NSS. - Page 22 Configuring the NSS Saving the NSS Configuration Click Update. STEP 4 Click Save to save the configuration settings. If you have problems saving the STEP 5 configuration file to the specified volume, check the volume and make sure that it is not locked.
-
Page 23: Chapter 4: Accessing The Network Storage
Accessing the Network Storage The NSS allows end users running a Windows, UNIX, Linux, or Mac computer to easily access the NSS storage on the network. Once they log into the NSS using their username and password, they can access all the shares to which they have read or read-write privileges. -
Page 24: Windows Users
Accessing the Network Storage Windows Users The Login window appears. If your user profile is set up locally (through the NSS configuration interface) and STEP 2 the NSS is part of a Windows domain, in the User name field, enter the following: <NSS hostname>\<username>... -
Page 25: Unix And Linux Users
Accessing the Network Storage UNIX and Linux Users Depending on your share privileges, you can begin using the NSS storage. STEP 3 UNIX and Linux Users UNIX and Linux users who have a user profile set up can access any shares to which they have privileges on the NSS storage using NFS or FTP. -
Page 26: Accessing The Storage Through Ftp
Accessing the Network Storage Mac Users Accessing the Storage through FTP Before an end user can access the shares on the NSS using FTP, the NSS network NOTE filters must be set up to allow FTP access. The individual share must be also be set up to allow FTP access. -
Page 27: Mac Users
Accessing the Network Storage Mac Users When the Login window appears, enter your username and password. If your user STEP 5 profile is set up locally (through the NSS configuration interface and not through the ADS or NTv4 domain) and the NSS is joined to a domain, enter the following: <NSS hostname>\<user name>... -
Page 28: Nss Leds
NSS LEDs You can use the NSS LEDs on the front of the NSS chassis to monitor NSS activity and performance. The LEDs also help you troubleshoot a variety of conditions on the NSS, from normal operating conditions, alerts, to serious error conditions. Power Button LED The Power Button LED shows whether the NSS is receiving power and is functioning properly. -
Page 29: Power Button Led
NSS LEDs System LED You can also use the Power button LED to perform a graceful shutdown or hard shutdown of the NSS: • • System LED The System (SYS) LED indicates that a system error has occurred on the NSS. These are the LED colors and their meanings: •... -
Page 30: Hard Disk Drive Leds
NSS LEDs LAN LED LAN LED The LAN LED shows the status of the Ethernet link. These are the LED colors and their meanings: • • • • • Hard Disk Drive LEDs The ACT and Error LEDs show the status of the installed disk drives. ACT LED The ACT LED states indicates drive activity. -
Page 31: Reset Button
NSS LEDs Reset Button ERR LED The ERR LED states indicates that the disk drive is in an error condition. These are the LED colors and their meanings • • • Off: There is either no UPS attached to the NSS or the UPS function has been disabled in the System Power page in the configuration interface. -
Page 32: Specifications
Specifications NSS3000 Device Dimensions Unit Weight Power Certification Operating Temp Storage Temp Operating Humidity Storage Humidity NSS3000 Series Network Storage System Getting Started Guide 3.23 x 11.38” x 9.21” (82 x 289 x 234 mm) 7.28 lb. (3.3 kg) 60W, 100 to 240VAC FCC Class B °... -
Page 33: Regulatory Compliance And Safety Information
Additional Information This appendix includes Regulatory Compliance and Safety information, warranty, and licensing information for your product. These documents are also available as PDFs on the CD-ROM that shipped with your product. Regulatory Compliance and Safety Information Regulatory Compliance and Safety Information for this product is available on the CD that ships with your product and is also available on Cisco.com at the following location: www.cisco.com/go/smallbiz... - Page 34 Support Contacts Support contact information for this product is available on Cisco.com at the following location: www.cisco.com/go/smallbiz NSS3000 Series Network Storage System Getting Started Guide...