
Related Manuals for Canon VarioPrint 6000 Series


Summary of Contents for Canon VarioPrint 6000 Series
- Page 1 VarioPrint 6000 line Operation guide VarioPrint 6180, 6220, 6270, 6330 © 2020 Canon Production Printing...
- Page 2 No part of this publication may be copied, modified, reproduced or transmitted in any form or by any means, electronic, manual or otherwise, without the prior written permission of Canon Production Printing. Illustrations and printer output images are simulated and do not necessarily apply to products and services offered in each local market.
-
Page 3: Table Of Contents
Contents Contents Chapter 1 Introduction.........................9 Notes for the reader............................10 Users of the print system..........................12 Information in this operation guide......................13 Chapter 2 Explore the print system....................15 Introduction to the VarioPrint 6000 line......................16 Introduction to the main system components.....................17 The paper modules............................19 The output locations............................ - Page 4 Contents Eject the stack after the system is idle for a certain time................73 Reprint the set after an error......................... 74 Work with automated workflows........................75 Learn about automated workflows......................75 Define a new automated workflow......................77 Define the attributes of an automated workflow...................78 Restore the default automated workflow....................82 Apply an automated workflow in job destination.................
- Page 5 Contents Unlock a Job in a DocBox....................... 161 Move a Job from One DocBox to Another DocBox..............162 Print the Jobs in a DocBox........................163 Print a Non-Urgent Job from the DocBox..................163 Print an Urgent Job from the DocBox Immediately..............164 Chapter 9 Carry out print jobs......................165 Change the print job settings on the control panel...................
- Page 6 Contents Chapter 10 Keep the system printing....................233 Use the Schedule............................234 Introduction to the [Schedule] view..................... 234 Load media via the [Schedule] view....................237 The dashboard..............................239 The operator attention light.........................241 Status indicators............................242 Chapter 11 Media handling....................... 247 Introduction..............................248 Introduction to the media handling......................248 Introduction to the Trays view......................
- Page 7 Contents Software updates............................304 Remote Service (ORS) (optional)........................ 305 Remote Service............................305 Keeping the printer running........................307 Introduction to the [Printer] section..................... 307 Check the status of the toner reservoirs....................308 Add toner..............................309 Check the status of the staple cartridges..................... 310 Finisher: Add staples..........................
- Page 8 Contents VarioPrint 6000 line...
-
Page 9: Chapter 1 Introduction
Chapter 1 Introduction... -
Page 10: Notes For The Reader
Names of options to be used in a fixed order Safety symbols Before you use this product, make sure you read and understand the safety information that "http://downloads.cpp.canon" belongs to the product. Find the safety information on . Also be sure to follow all warnings and instructions marked on the product. - Page 11 Notes for the reader Symbol Type of symbol Indicates CAUTION Laser beam Indicates a caution concerning operations that may lead to in- jury to persons if not performed correctly. To use the ma- chine safely, always pay attention to these cautions. IMPORTANT Indicates an operational requirement or restriction.
-
Page 12: Users Of The Print System
Users of the print system Users of the print system Print environments where the VarioPrint 6000 line is installed differ in many aspects. Therefore, it is difficult to describe general roles that are applicable to each situation. The VarioPrint 6000 line has default user accounts that are related to the access of password-protected functionality or settings. -
Page 13: Information In This Operation Guide
The other hardware optionals have an operation guide that is delivered together with the product. Other product information On the downloads site downloads.cpp.canon you can find all product information for the VarioPrint 6000 line, among others: • This operation guide •... - Page 14 Information in this operation guide Chapter 1 - Introduction VarioPrint 6000 line...
-
Page 15: Explore The Print System
Chapter 2 Explore the print system... -
Page 16: Introduction To The Varioprint 6000 Line
Introduction to the VarioPrint 6000 line Introduction to the VarioPrint 6000 line Introduction The VarioPrint 6000 line is a series of high-volume, cut-sheet printers. The printers are intended both for document printing and stream printing. The key feature of the machine is the Gemini Instant Duplex Technology. This technology enables the machine to print the front side and back side of a sheet at the same time. -
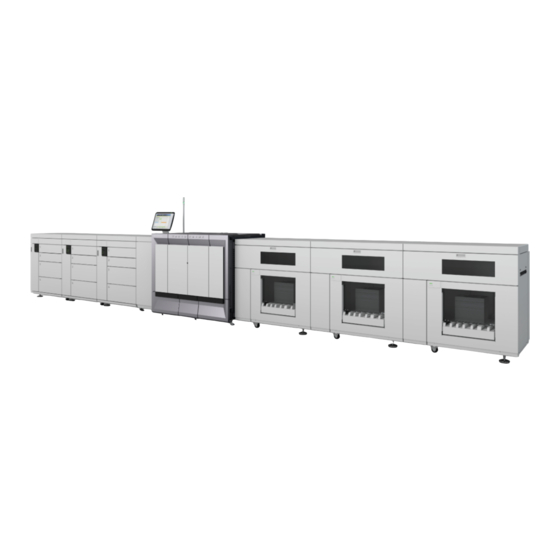
Page 17: Introduction To The Main System Components
Introduction to the main system components Introduction to the main system components Introduction The following illustrations show the main system components. The table describes the main components. Please follow the links in the table for comprehensive information. The main system components Component Function Control panel... - Page 18 Introduction to the main system components Component Function Paper module The paper module contains 4 paper trays. The paper trays contain the media that will be printed. The default configuration of the system contains 1 paper module. You can add 1 or 2 more paper modules to the default configuration to increase the media input capacity (see The paper modules on page 19).
-
Page 19: The Paper Modules
The paper modules The paper modules Introduction The paper trays contain the media that are required for the print jobs. The default configuration of the machine contains 1 paper module with 4 paper trays. • Two standard trays with a capacity of 600 sheets each. •... - Page 20 The paper modules The parts of the control panel Number Description The LEDs indicate the current amount of sheets in the corresponding paper tray. Each lit-up LED indicates the presence of about 100 sheets (based on media of 80 g/m or 20 lb bond).
-
Page 21: The Output Locations
The output locations The output locations Introduction The machine supports several output locations for the printed jobs. The default configuration of your machine contains a stacker and the system output. The finisher is an optional output location. Furthermore, you can connect several optional external finishers to the machine. NOTE You need the optional finisher or another optional external finisher to staple the jobs. - Page 22 The output locations Component Description [Finisher] (op- The optional finisher contains the following output trays. tional) • 3 output trays • 1 upper output (see no. 4 below) The finisher contains 2 staple cartridges to staple the jobs. The 3 output trays can receive A4, Letter and similar media sizes.
-
Page 23: Optional Finishers And Other Devices
Optional finishers and other devices Optional finishers and other devices Form Assist Module Introduction The printer allows you to print on special media with irregular thickness. Examples of such media are media with glued-on (membership or bank) passes, folded media, or media with a slip attached. -
Page 24: Easylift
EasyLift EasyLift Introduction The EasyLift is a device that helps you to lift stacks of paper out of the stacker more easily. The EasyLift is delivered with an 'Information sheet'. CAUTION The maximum lifting weight is 15 kg / 33 lb. Caution: this is only a guideline, the amount may be lower/higher depending on your physical strength. -
Page 25: 7" X 10" Statement Size Support
7" x 10" Statement Size Support 7" x 10" Statement Size Support Introduction The smallest media size that this machine supports is 203 x 203 mm / 7.9 x 7.9 inch. The 7" x 10" Statement Size Support device enables you to print on media with a size of 7 x 10 inches / 178 x 254 mm and on JIS B5. - Page 26 7" x 10" Statement Size Support Action Illustration Flip the metal plates over to the left-hand side over the media. Close the paper tray Chapter 2 - Explore the print system VarioPrint 6000 line...
-
Page 27: Dual Paper Tray
Dual paper tray Dual paper tray Introduction The dual paper tray enables you to load 2 stacks of the same media in one paper tray. When the first stack of media becomes empty, the printing stops. The second stack is moved to the left- hand side and printing continues. - Page 28 Dual paper tray Icon Description The left-hand stack of the dual paper tray is partly filled. NOTE Each line of the left-hand stack indicates the presence of about 100 sheets. The right-hand stack of the dual paper tray is partially or completely fil- led.
-
Page 29: Flex-Xl Paper Input Module
Flex-XL paper input module Flex-XL paper input module The Flex-XL PIM paper input module is the same as the standard paper module. The only difference is that the two bulk trays are replaced by Flex-XL trays. A Flex-XL tray can contain media until media size 350 mm x 500 mm. -
Page 30: Integrated Camera Mounting Unit Icmu
Integrated camera mounting unit ICMU Integrated camera mounting unit ICMU The integrated camera mounting unit ICMU is a unit that can contain a camera system. With the camera system you can compare the actual printed sheets with the digital original. When the printed image and the original do not match the print job is aborted. -
Page 31: Explore The Ease Of Operation
Chapter 3 Explore the ease of operation... -
Page 32: What The Print System Can Do For You
What the print system can do for you What the print system can do for you The VarioPrint 6000 line is an easy-to-use multitasking print system that offers many useful functions. You can define the same job properties from several locations: in Remote Printer Driver, the control panel, and Remote Manager. -
Page 33: Control Panel
Control panel Control panel The control panel is the location on the print system to manage print jobs, copy jobs, and scan jobs. The control panel provides you full system control. The following table describes the main parts of the control panel and their functions. The main components of the control panel Component Function... - Page 34 Control panel Component Function [Trays] button Access the [Trays] section on the control panel to do the following, for example: • Check the content of all paper trays. • Load a new media type into a paper tray, or • Change the media type which is available in one of the paper trays.
- Page 35 Control panel Component Function Status LED The status LED displays the status of the system: • Red LED The machine has stopped, for example because a required media type is not available or an error has occurred. Operator attention is required now. •...
-
Page 36: Settings Editor
Settings Editor Settings Editor Introduction PRISMAsync offers the web-based Settings Editor to configure the print system according to requirements of the print environment. Part of these settings is also available on the control panel. The following configuration settings, tooling, and support information are available in the Settings Editor: •... - Page 37 Settings Editor Setting is also available on the control panel Setting can be changed with key operator or system administrator credentials How to access the Settings Editor Make sure you have the following information before you access the Settings Editor. •...
-
Page 38: Prismasync Remote Manager
PRISMAsync Remote Manager PRISMAsync Remote Manager PRISMAsync Remote Manager PRISMAsync Remote Manager is a multi-printer schedule and remote management console to control PRISMAsync Print Server-driven printers. This web-based tool helps central operators manage their print production and provide insight into the production schedules. PRISMAsync Remote Manager enables you to upload jobs, to edit job properties and to change the print queues from a remote location or workstation. - Page 39 PRISMAsync Remote Manager Description The lists of waiting jobs on the selected printer. The DocBox and list of printed jobs. Chapter 3 - Explore the ease of operation VarioPrint 6000 line...
-
Page 40: Prismasync Remote Match
PRISMAsync Remote Match PRISMAsync Remote Match PRISMAsync Remote Match is a cloud-based application that can align the color (printer- dependent), media and workflow configuration of similar printers in the printer fleet. Printers that belong to the same printer series and have the same printer software version can be grouped in a cluster. - Page 41 PRISMAsync Remote Match You can start PRISMAsync Remote Match from the Settings Editor. Location: [Configuration]→ [Connectivity]→[Cloud service]→[Open cloud service administration portal] [9] [Open cloud service administration portal] option in [Cloud service] group Use the help function or user guide of PRISMAsync Remote Match for more information. Chapter 3 - Explore the ease of operation VarioPrint 6000 line...
-
Page 42: Media-Based Workflow
Media-based workflow Media-based workflow The media catalog is the backbone of the media-based workflow. The media catalog contains the media that the print system supports. The prepress staff select the media for the job from the media catalog. The control panel shows the operator the media the job needs. -
Page 43: Learn About The Document Printing Workflow
Learn about the document printing workflow Learn about the document printing workflow The following illustration shows the document print job workflow from the job preparation to the delivery of the prints. Job preparation PRISMAprepare PRISMAsync driver Remote Manager Workload planning Job planning Waiting Printed jobs... -
Page 44: Transaction Printing Workflow
Transaction printing workflow Transaction printing workflow When there is a license for transaction printing (IPDS or PCL), you can operate the print system in the transaction printing mode. An IPDS or PCL host sends a streaming job to a dedicated port in the print system. - Page 45 Transaction printing workflow You specify which logical tray (indicated by a number) corresponds to a physical paper tray. The print system will use the media that are loaded in the physical paper tray to which the job refers via a logical tray. Also other paper trays that contain these media are used when needed.
- Page 46 Transaction printing workflow Chapter 3 - Explore the ease of operation VarioPrint 6000 line...
-
Page 47: Start The Print System
Chapter 4 Start the print system... -
Page 48: The Power Buttons And Power Modes
The power buttons and power modes The power buttons and power modes The power buttons The printer has the following button to control the power supply. Button Name Description Sleep button The Sleep button is located at the right-hand side of the control panel. - Page 49 The power buttons and power modes Power mode Control panel Description Sleep mode Once the printer has been idle for the time defined in the [Sleep mode timer] setting in the Settings Editor, the printer goes into sleep mode automatically. Compared to the low power mode, the printer uses less energy.
-
Page 50: Turn On The System
Turn on the system Turn on the system Procedure 1. Press the Sleep button at the right-hand side of the control panel. The power switch must be turned on. Chapter 4 - Start the print system VarioPrint 6000 line... -
Page 51: Shut Down The System
Shut down the system Shut down the system Illustration [13] Shut down the system Procedure 1. Touch [System] -> [Setup] -> [Shut down printer]. The control panel displays the message [Are you sure you want to shut down the printer?]. 2. -
Page 52: Restart The System
Restart the system Restart the system Introduction You can restart the system via the Settings Editor (under [Support] -> [Troubleshooting]) or via the printer control panel. Illustration [14] Restart the system Procedure 1. Touch [System] -> [Setup] -> [Shut down printer]. The control panel displays the message [Are you sure you want to shut down the printer?]. -
Page 53: Log In, Log Out, And Change Passwords
Log in, log out, and change passwords Log in, log out, and change passwords Log in to the printer This topic contains the following instructions. 1. Access the printer without login 2. Log in with a factory defined user account 3. - Page 54 Log in to the printer 1. When the [Domain] drop-down list is displayed, select the hostname or IP address of the printer. Domains are defined by the system administrator. 2. Select the factory defined user account from the [Username] drop-down list. 3.
- Page 55 Log in to the printer Domains are defined by the system administrator. 2. Select [Personal username] from the [Username] drop-down list. 3. Enter your username in the [Personal username] field. 4. Enter your password in the [Password] field. 5. Touch or click [OK]. After a successful login, the name of your user account is displayed.
- Page 56 Log in to the printer Chapter 4 - Start the print system VarioPrint 6000 line...
-
Page 57: Log Out Or Switch Roles
Log out or switch roles Log out or switch roles This topic contains the following instructions. 1. End the session 2. Log out on the control panel and the Settings Editor 3. Log out on control panel when you use a PKI smart card 4. - Page 58 Log out or switch roles Switch roles to change settings When you are logged in to the Settings Editor or to the control panel and you want to perform a task for which you do not have sufficient rights, you can log in again with the appropriate credentials.
-
Page 59: Change Password
Change password Change password When do you need to change your password You are strongly recommended to follow the security guidelines of your organization. The definition of your password is part of these security guidelines. You are warned when your password no longer meets the guidelines. - Page 60 Change password 4. Enter your new password and confirm the new password. 5. Touch or click [OK]. Chapter 4 - Start the print system VarioPrint 6000 line...
-
Page 61: Recover Password
Recover password Recover password This topic contains the following instructions. 1. Recover password from control panel 2. Recover password from Settings Editor or PRISMAsync Remote Manager What is a password recovery mail If you have lost your password, you can define a new password via a password recovery email. The email that holds the link to define a new password, is sent to the email address that belongs to your user account. - Page 62 Recover password 4. Touch [Forgot password?]. Recover password from Settings Editor or PRISMAsync Remote Manager 1. Click [Recover password] at the login window. 2. Click [OK]. Chapter 4 - Start the print system VarioPrint 6000 line...
-
Page 63: Prepare The Print System
Chapter 5 Prepare the print system... -
Page 64: Adjust The Control Panel
Adjust the control panel Adjust the control panel You can change several settings to adjust the control panel according to your needs or workflow. Change the display language of the control panel 1. Touch [System] -> [Setup] -> [Language]. 2. Select the language. 3. - Page 65 Adjust the control panel [17] Job name truncation 1. Touch [System] -> [Setup] -> [Job name truncation]. 2. Indicate if you want to use the long job name. 3. Indicate how you want to shorten the job name. 4. Touch [OK]. Adjust the readability of the control panel You can adjust the brightness and contrast of the control panel screen.
- Page 66 Adjust the control panel [18] Control panel adjustments 1. Touch [System] -> [Setup] -> [Control panel settings]. 2. Choose the automatic adjustment method or touch the + and - buttons to adjust the brightness and contrast manually. 3. Touch [OK]. Chapter 5 - Prepare the print system VarioPrint 6000 line...
-
Page 67: Define The Handling Of Media Attributes In Jdf Ticket
Define the handling of media attributes in JDF ticket Define the handling of media attributes in JDF ticket When you select a media in the media catalog, all media attributes need to be specified. However, it can occur that not all media attributes in a JDF job ticket are specified. When you allow that not all media attributes in the JDF ticket are specified, media matching is used to find values for these attributes. -
Page 68: Work With Workflow Profiles
Work with workflow profiles Work with workflow profiles Introduction The machine is used in different printing environments. Each environment requires specific settings to optimize the workflow or to match personal workflow preferences. The machine contains a number of default workflow profiles to help you optimize your workflow. The default workflow profiles are combinations of frequently used settings for print jobs ([Receive], [Print] and [Output]). - Page 69 Work with workflow profiles Job by job workflow profile [Job by job] • The job-by-job workflow profile fits a workflow in which every job Job planning needs attention. • All jobs come in the list of sched- uled jobs and you start the jobs Waiting DocBox jobs...
- Page 70 Work with workflow profiles Unattended workflow profile [Unattended] • The unattended workflow profile fits a workflow in which productiv- ity is very important. • All jobs go to the list of scheduled jobs and are printed. DocBox • To keep the system running, you should make sure consumables remain available and you remove printed output and waste on time.
- Page 71 Work with workflow profiles Workflow profile [Output] set‐ tings [Next output [Offset stacking] [Tray linking] tray] [Job by job] [After each job] [As in job] [Never] [Check and print] [After each job] [As in job] [Never] [Manual planning] [After each job] [As in job] [Never] [Unattended]...
- Page 72 Work with workflow profiles Setting Values Effect [Next output tray] [After each job] Each job is sent to the next available output tray. In this context, the second stack of the stacker is also defined as an output tray. [When tray is full] All the jobs are stacked until an output tray is full. When an output tray is full, the next jobs are sent to the next output tray.
-
Page 73: Eject The Stack After The System Is Idle For A Certain Time
Eject the stack after the system is idle for a certain time Eject the stack after the system is idle for a certain time Introduction To prevent that the operator forgets to pick up finished output, you can set the [Ejection timer of stack tray]. -
Page 74: Reprint The Set After An Error
Reprint the set after an error Reprint the set after an error Introduction A printer error can occur while printing a set. When the error causes a restart of the printer, the set is printed only partially. Enable the setting [Reprint the complete set] to reprint the complete set. -
Page 75: Work With Automated Workflows
Work with automated workflows Work with automated workflows Learn about automated workflows Automated workflows are managed in the Settings Editor. An automated workflow bundles a series of pre-set attributes to define job and workflow properties. You can apply an automated workflow when you submit one or more PDF jobs. - Page 76 Learn about automated workflows [26] Select jobs with a certain label Factory default automated workflow (default) . The name of this automatic The printer has one factory defined automated workflow: workflow is an empty string and cannot be changed. It is not possible to delete this automated workflow.
-
Page 77: Define A New Automated Workflow
Define a new automated workflow Define a new automated workflow An automated workflow bundles a series of pre-defined job properties. 1. Open the Settings Editor and go to: [Workflow]→[Automated workflows]. [27] Workflow menu 2. Use the [Add], [Edit] or [Copy] function. [28] Automated workflow menu 3. -
Page 78: Define The Attributes Of An Automated Workflow
Define the attributes of an automated workflow Define the attributes of an automated workflow NOTE It is not mandatory to define all the settings. When you put a check mark in front of a setting, that setting and its values become enabled. [General] attributes Description [Queue name]... - Page 79 Define the attributes of an automated workflow [Layout] attributes Description [Tumble] You can indicate the orientation of page images on opposite sides of a sheet. When [Tumble] is set to [Yes], the two pages are oriented in such a way that the binding is at the top or bottom. The image is rota- ted 180 degrees on alternate pages.
- Page 80 Define the attributes of an automated workflow [Finishing] attributes Description [Offset after N sets] You can indicate the number of sets that will be shifted together. [Punching] You can indicate how many punch holes are required. [Folding] You can indicate the required folding method. [Fold side] You can indicate the side that must be folded.
- Page 81 Define the attributes of an automated workflow [Workflow] attributes Description [Media of separator sheets] Select the media of the separator sheets. [PDF XObject optimization] [Select whether XObjects are cached per document or re-interpre- ted per page. 'Automatic': only the XObjects of PDF-VT documents are cached.
-
Page 82: Restore The Default Automated Workflow
Restore the default automated workflow Restore the default automated workflow An automated workflow bundles a series of pre-defined job properties. When you want to restore the default automated workflow you use the [Restore] function. IMPORTANT Be aware that this function removes all custom automated workflows. [29] Automated workflows 1. -
Page 83: Apply An Automated Workflow In Job Destination
Apply an automated workflow in job destination Apply an automated workflow in job destination You can apply an automated workflow when you submit one or more PDF jobs. It is also possible to apply an automated workflow to jobs that are visible on the control panel. You can apply an automated workflow to jobs on the control panel in the following situations: •... - Page 84 Apply an automated workflow in job destination [32] Select automated workflow NOTE (default) automated workflow to restore the original job properties. Select the 4. Press [OK]. NOTE You can filter jobs based on job label. The [Job label] field is the name of the automated workflow that has been applied.
-
Page 85: Submit Jobs Via Lpr
Submit jobs via LPR Submit jobs via LPR PDF files can be submitted to the printer with an LPR command. When you print via LPR the queue name is the name of an automated workflow. Jobs submitted via LPR take over the attributes of the automated workflow. -
Page 86: Use Hotfolders
Use hotfolders Use hotfolders Introduction to hotfolders Introduction Technically, a hotfolder is a mapped network drive on a workstation that is linked to a shared folder on the PRISMAsync controller. Hotfolders enable you to submit print jobs by simply dragging and dropping ready-to-print PDF files onto a shortcut on your desktop. -
Page 87: Configure Hotfolders
Configure hotfolders Configure hotfolders A hotfolder is a shared folder on PRISMAsync Print Server. A hotfolder is linked to an automated workflow to determine the job settings for a hotfolder. The system administrator can configure hotfolder settings. [34] Hotfolders When you want to Solution Go to the hotfolders 1. - Page 88 Configure hotfolders When you want to Solution Edit a hotfolder 1. Select a hotfolder. 2. Click [Edit]. 3. Change the required attributes. 4. Click [OK]. Delete a hotfolder 1. Select a hotfolder. 2. Click [Delete]. Create a shortcut to a hot- 1.
-
Page 89: Submit Jobs Via Hotfolders
Submit jobs via hotfolders Submit jobs via hotfolders Hotfolders enable you to submit print jobs by simply drag & drop printable files onto a shortcut on your desktop. The job properties are taken over from the automated workflow that is part of the hotfolder definition or from the JDF ticket that you put in the hotfolder. - Page 90 Submit jobs via hotfolders After printing, the printable files are removed from the hotfolder. Chapter 5 - Prepare the print system VarioPrint 6000 line...
-
Page 91: Accounting
Accounting Accounting General Information The basics of accounting Introduction NOTE Accounting requires a license. Contact your local authorized dealer for more information. The accounting function is meant to charge the costs for jobs to customers or users. Below, the basics of accounting are described. Detailed information about the accounting function is described in separate chapters. -
Page 92: The Accounting Related Settings In The Settings Editor
The accounting related settings in the Settings Editor The accounting related settings in the Settings Editor Description NOTE Accounting requires a license. Contact your local authorized dealer for more information. The table below describes the available accounting related settings in the Settings Editor (navigate to [Configuration] ->... -
Page 93: The Account Log File
The Account Log File The Account Log File The Account Log File The Name of an Account Log File NOTE Accounting requires a license. Contact your local authorized dealer for more information. An account log file has the following name format: <serialnumber><yyyy><mm><dd><extension>, for example 012345678920120115.CSV. - Page 94 The Account Log File Field name Specification Description <documentid> A text string with a max- A unique identification for a job or document, imum length of 40 char- which is supplied by the submitter of the job. The acters document ID is extracted from the print data, for ex- ample the attribute 'documentid' in an OJT.
- Page 95 The Account Log File Field name Specification Description <starttime> <hh>:<mm>:<ss> The time on which the printer started printing the job. Typically, this is the first moment that a job can NOTE be interrupted or stopped via the control panel. When you open the file in Microsoft®...
- Page 96 The Account Log File Field name Specification Description <accountid> A text string with a max- The account ID as defined in the [Account ID] field imum length of 40 char- of the [Account] tab of the printer driver, or on the acters control panel, or in the attribute 'accountid' in an OJT, for example.
- Page 97 The Account Log File Field name Specification Description <nofsim- A number The number of 1-sided sheets of a certain paper plex>(1-16)* type used in a job. <nofdu- A number The number of 2-sided sheets of a certain paper plex>(1-16)* type used in a job. <mediafor- A text string with a max- The media size used for the job.
- Page 98 The Account Log File Field name Specification Description <noffolds> A number The number of folded sheets in a job. <nofbooklets> A number The number of booklets in a job. <nofbinds> A number The number of bound sets in a job. <operator A text string The operator name.
- Page 99 The Account Log File NOTE * All fields that contain (1-16) will be included 16 times in an account log file. Each number refers to the type of media (1 up to 16) that is used. The media characteristics of the first media type in a job are logged in the fields ending on '1'.
-
Page 100: Download An Account Log File
Download an account log file Download an account log file Procedure NOTE Accounting requires a license. Contact your local authorized dealer for more information. 1. In the Settings Editor, click [Configuration] -> [Accounting]. 2. Click [Download account log file]. 3. Select one of the available account log files, then click [OK]. 4. -
Page 101: Prepare The Print Jobs
Chapter 6 Prepare the print jobs... -
Page 102: Where To Define Print Job Settings
Where to define print job settings Where to define print job settings Introduction Print jobs can vary from straightforward jobs with only a few settings to complex jobs with extended settings. Therefore, there are several possibilities to define the settings for your print jobs. - Page 103 Where to define print job settings Item Description Control panel After a print job has arrived on the PRISMAsync controller, the print job becomes visible on the control panel. There you can change a number of job settings or combine print jobs, for exam- ple.
-
Page 104: Prepare Print Jobs With Remote Printer Driver
Prepare print jobs with Remote Printer Driver Prepare print jobs with Remote Printer Driver PRISMAsync Remote Printer Driver The printer driver is the remote point to prepare a print job from a desktop application, such as Microsoft Office and Adobe Acrobat. The job properties in the printer driver match the job properties on the control panel and PRISMAsync Remote Manager. -
Page 105: Print A Job Using Prismaprepare (Option)
Print a job using PRISMAprepare (option) Print a job using PRISMAprepare (option) Introduction PRISMAprepare (optional) is a software application that enables you to prepare your print jobs on page level. You can preview the result per page. This procedure describes the most important steps for the preparation of print jobs. NOTE See the online help of PRISMAprepare for all the details. -
Page 106: Drag & Drop Print Files On Hotfolders
Drag & drop print files on hotfolders Drag & drop print files on hotfolders Use hotfolders to submit multiple print files to the print system. The automated workflow that is linked to the hotfolder determines the print properties. In this way, all print files are printed with the same settings. -
Page 107: Print A File From A Usb Drive
Print a file from a USB drive Print a file from a USB drive Introduction You can print documents (*.pdf, *.ps, *.prn files) on a USB drive. You can disable / enable this function in the Settings Editor. Illustration [39] Example of a folder structure on the USB drive Chapter 6 - Prepare the print jobs VarioPrint 6000 line... - Page 108 Print a file from a USB drive [40] Save a file to a different location Procedure 1. Insert the USB drive into the USB port at the left-hand side of the control panel. 2. On the control panel, touch [Jobs] -> [USB]. 3.
-
Page 109: Print A Page Number Via Prismasync
Print a page number via PRISMAsync Print a page number via PRISMAsync Introduction You can print a page number on each page for PDF print jobs. Per job you can specify the position and alignment of the page number, the prefix, and the suffix of the page number. You can also add a page number via PRISMAprepare. - Page 110 Print a page number via PRISMAsync Chapter 6 - Prepare the print jobs VarioPrint 6000 line...
-
Page 111: Plan The Workload Remotely
Chapter 7 Plan the workload remotely... -
Page 112: Prismasync Remote Manager (Optional)
PRISMAsync Remote Manager (optional) PRISMAsync Remote Manager (optional) With PRISMAsync Remote Manager you can monitor printers, operate printers remotely and send jobs and ready-to-print documents to the printer queues of all configured printers. You must enable and configure PRISMAsync Remote Manager in the Settings Editor. Refer to the user manual for the PRISMAsync Remote Manager for the options available when using this product. -
Page 113: Use The Remote Control App To Monitor Printing
Use the Remote Control app to monitor printing Use the Remote Control app to monitor printing The PRISMAsync Remote Control app helps you to stay informed about the print production on the available PRISMAsync printers. Even at a distance. With PRISMAsync Remote Control on your smartphone, you see the status of your PRISMAsync driven printers at a glance. - Page 114 Use the Remote Control app to monitor printing Chapter 7 - Plan the workload remotely VarioPrint 6000 line...
-
Page 115: Plan The Jobs
Chapter 8 Plan the jobs... -
Page 116: Manage The Jobs In The Queue
Manage the jobs in the queue Manage the jobs in the queue Learn about job management in the queues The destination of a print job is determined when a job is submitted. However, the active workflow profile and the automated workflow can overrule the destination. Completed print jobs are stored in the list of printed jobs, if enabled. - Page 117 Learn about job management in the queues the split function. You can change some settings and the print order of the individual jobs in the bundled job. DocBox The DocBox is a job destination to collect jobs before printing. DocBox folders make it easy to group jobs for example per job owner or per department.
- Page 118 Learn about job management in the queues [43] List of scheduled jobs Printed jobs When a job is ready, it is visible in the list of printed jobs. You must copy the printed job to the list of waiting jobs or a DocBox folder, before you can reprint the job. Printed jobs remain available after the print system is shut down.
- Page 119 Learn about job management in the queues [44] List of printed jobs In the following situations, you are not able to reprint jobs: • The list of printed jobs is disabled in the Settings Editor. • The print system is in the transaction printing mode. •...
-
Page 120: Search, Filter And Select Jobs
Search, filter and select jobs Search, filter and select jobs PRISMAsync Print Server offers a search, filter and select function to quickly find and easily select jobs at all available job locations. Search function The search function makes it possible to find jobs with a specific attribute, for example job name, media, or user. - Page 121 Search, filter and select jobs When you want to Filter option Show only jobs that use a certain output tray. [Output tray] Show only jobs that use media that are in paper trays. [Loaded media] Show only jobs that use a certain job label. [Job label] Remove the filter and show all jobs.
- Page 122 Search, filter and select jobs When you want to Selection option Select the unselected jobs and unselect the selected jobs. [Invert selection] Select a number of jobs manually. Touch the required jobs one by one. Procedure 1. Touch [Jobs]. 2. Select the location •...
-
Page 123: Move Jobs To Another Destination
Move jobs to another destination Move jobs to another destination The destination of a print job is determined when a job is submitted. However, you can decide to move the job to another destination because you want to print a job later or want to store a job. You can also decide to store or reprint a printed job. - Page 124 Move jobs to another destination Move a job to the waiting jobs Move the selected jobs to the list of waiting jobs [49] Move scheduled job to waiting jobs You can move jobs to the list of waiting jobs from the following locations: Function Scheduled Waiting jobs...
- Page 125 Move jobs to another destination [50] Copy printed job to DocBox or waiting jobs You can copy and move printed jobs from the following location: Function Scheduled Waiting jobs DocBox Printed jobs jobs [Copy to waiting jobs] [Copy to DocBox] 1.
- Page 126 Move jobs to another destination [51] Forward job to another printer You can forward jobs from the following locations: Function Scheduled Waiting jobs DocBox Printed jobs jobs [Forward] 1. Touch [Jobs]→[Printed jobs]. 2. Go to the location of the job. 3.
- Page 127 Move jobs to another destination 6. Touch [OK]. Chapter 8 - Plan the jobs VarioPrint 6000 line...
-
Page 128: Schedule A Waiting Job For Printing
Schedule a Waiting Job for Printing Schedule a Waiting Job for Printing Introduction The selected workflow determines the destination of jobs. When jobs go to the list of [Waiting jobs], you must manually send the jobs to the print queue (list of [Scheduled jobs]). This enables you to keep full control of all jobs that must be printed. -
Page 129: Print An Urgent Job Immediately
Print an Urgent Job Immediately Print an Urgent Job Immediately Introduction When a job must be printed urgently, you can give that print job priority over all other print jobs. The [Print now] button allows you to print a job immediately. When you use the [Print now] button, the active print job will be paused as soon as the current set is ready. -
Page 130: Give Priority To A Print Job
Give Priority to a Print Job Give Priority to a Print Job Introduction When you want to print a job as soon as possible, but not necessarily immediately, you must use the [Move to top] function. The [Move to top] function moves the selected job to the second position in the list of [Scheduled jobs], below the active print job . -
Page 131: Print A Scheduled Job Later
Print a scheduled job later Print a scheduled job later Introduction The machine prints the jobs that are present in the list of [Scheduled jobs] jobs. However, you can decide to print a job later, for example because: • The required media are out of stock, or •... -
Page 132: Combine Jobs In The List Of [Waiting Jobs] (Bundle Function)
Combine jobs in the list of [Waiting jobs] (bundle function) Combine jobs in the list of [Waiting jobs] (bundle function) Introduction The bundle function allows you to combine two or more jobs into one new job. For example, this can be convenient when the participants of a meeting need several documents in a specific order. Often, the required documents are sent from several workplaces to the printer in advance. - Page 133 Combine jobs in the list of [Waiting jobs] (bundle function) Illustration [53] Properties of a bundle job Procedure 1. Go to the list of waiting jobs. 2. Touch the jobs you want to combine, or use an option from the [Select] menu to select multiple jobs at once.
-
Page 134: Define Default Use Of Special Pages
Define default use of special pages Define default use of special pages This topic describes the following instructions. 1. Define banner pages 2. Define trailer pages 3. Define the default media of banner and trailer pages 4. Define the default media of separator sheets What are special pages Banner pages, trailer pages and separator sheets are special pages that can be added to a job. - Page 135 Define default use of special pages • [Use job media]: the banner pages are printed on job media. • [Use default media]: the banner pages are printed on default media. 5. Click [OK]. Define trailer pages 1. Open the Settings Editor and go to: [Preferences]→[System settings]→[Basic]. [58] [System settings] tab 2.
- Page 136 Define default use of special pages • [Use default media]: the trailer pages are printed on default media. Define the default media of banner and trailer pages Define the default media of banner and trailer pages when you have selected [Use default media] in the [Media of banner / trailer pages] option.
- Page 137 Define default use of special pages [63] Media setting for separator sheets 2. Use the [Media of separator sheets] option to select the default media of the separator sheets. [64] Default media of separator sheets 3. Click [OK]. 4. Use the [Separator sheets] option to select the sheet orientation of the separation sheets. •...
-
Page 138: Create A Note For The Operator
Create a note for the operator Create a note for the operator You can create a note for the operator on several locations. A job that has a note for the operator has the following symbol. Function Scheduled Waiting jobs DocBox Printed jobs jobs... - Page 139 Create a note for the operator 5. Touch [OK]. Chapter 8 - Plan the jobs VarioPrint 6000 line...
-
Page 140: Use The Docbox (Option)
Use the DocBox (Option) Use the DocBox (Option) The DocBox function Introduction to the DocBox Function Introduction DocBox is short for Document Box. The DocBox function, which is available through the control panel, creates a buffer between the preparation of a job and the printing of the job. The DocBox supports the operator by offering comprehensive means to store, group, edit and reprint documents. - Page 141 Introduction to the DocBox Function When to Use the DocBox For example: • To correct settings when the proof print is not correct, for example change the print quality or layout of a document. • To combine analogue documents with digital documents. •...
-
Page 142: Create A New Docbox
Create a New DocBox Create a New DocBox Illustration [66] Create a DocBox Procedure NOTE Only the System Administrator is allowed to create a new DocBox in the Settings Editor. 1. Open your web browser and enter the host name or IP address of the PRISMAsync controller. 2. -
Page 143: Handle The Jobs In A Docbox
Handle the Jobs in a DocBox Handle the Jobs in a DocBox Overview of the Available Settings for DocBox Jobs Introduction When you select a job in a DocBox and touch [Edit], the current settings of the selected job are displayed. - Page 144 Overview of the Available Settings for DocBox Jobs Change the job settings [1- or 2-sided] Setting Values Description [1- or 2-sided] The output contains an image on one side. [1-sided] The output contains an image on both sides. [2-sided] Chapter 8 - Plan the jobs VarioPrint 6000 line...
- Page 145 Overview of the Available Settings for DocBox Jobs [Binding edge] Setting Values Description [Binding edge] [Left] • The original has a vertical format (height > [Portrait] width). • The binding edge is at the left-hand side. The left-hand side of a page is bound to the right-hand side of the previous page •...
- Page 146 Overview of the Available Settings for DocBox Jobs Setting Values Description [Binding edge] [Left] • The original has a horizontal format (width > [Landscape] height). • The binding edge is at the left-hand side. The left-hand side of a page is bound to the right-hand side of the previous page •...
- Page 147 Overview of the Available Settings for DocBox Jobs [Media] Setting Values Description Names of the media in Here you can select the media for the job. The the media catalogue list displays all the media that are available in the media catalog including the temporary me- dia.
- Page 148 Overview of the Available Settings for DocBox Jobs [Layout] Name of the setting Available options Description [Layout] The machine prints 2, 4, 6, 9 or 16 consecutive images on 1 side of a sheet. By default, the system keeps the size of the originals. If neces- sary, use the Zoom function to reduce or en- [Multiple up] large the size of the images.
- Page 149 Overview of the Available Settings for DocBox Jobs [Align] Setting Values Description [Align] An image on a sheet may be smaller than the media size of the output, for example because you scaled the image to 70% of its original size.
- Page 150 Overview of the Available Settings for DocBox Jobs [Shift] Setting Values Description [Shift] [Margin shift] Use this setting to increase or decrease the margin. By default, the values of the front side and the back side are interlocked. This means that the values for the front side and the back side remain identical.
- Page 151 Overview of the Available Settings for DocBox Jobs [Print delivery] Setting Values Description [Print delivery] [Output tray] Select the output location for the job. Depend- ing on the settings for your job, the machine automatically suggests the preferred output lo- cation for your job.
- Page 152 Overview of the Available Settings for DocBox Jobs Setting Values Description [Print delivery] [Sheet order] [Advanced settings] [Face up] Deliver the prints face up, first sheet on top. [Face up reverse] Deliver the prints face up, last sheet on top. [Face down] Deliver the prints face down, first sheet on top.
- Page 153 Overview of the Available Settings for DocBox Jobs Setting Values Description [Print delivery] [Print order] • [Front/back] [Advanced settings] Default value. The front page on the front, the back page on the back. • [Back/front] Puts the front page on the back and the back page on the front.
- Page 154 Overview of the Available Settings for DocBox Jobs [Number of sets] Setting Values Description [Number of sets] [Check first set] When the [Check first set] setting is enabled, the printer stops after the first set of a job has been printed. You can check the quality of the output.
- Page 155 Overview of the Available Settings for DocBox Jobs [Special pages] Setting Values Description Banner pages, trailer pages, and separator [Special pages] sheets • [Overrule default banner / trailer page set‐ tings]: indicate if you want to overrule the default banner page, trailer page, and sepa- rator sheets settings.
- Page 156 Overview of the Available Settings for DocBox Jobs [Page numbering] This setting is only available for PDF jobs. Setting Values Description [On] Print a page number on each page of the job. [Off] No page number on each page of the job. [Page numbering] [Location] [Top left, alternating]...
-
Page 157: Edit A Job In A Docbox
Edit a Job in a DocBox Edit a Job in a DocBox Procedure 1. On the control panel, touch [Jobs] -> [DocBox]. 2. Touch the DocBox that contains the job you want to edit. 3. Touch the job you want to edit. 4. -
Page 158: Combine Jobs In A Docbox (Build Function)
Combine Jobs in a DocBox (Build Function) Combine Jobs in a DocBox (Build Function) Introduction You can combine a job in a DocBox with other jobs from the same DocBox. The system creates a new job from the selected jobs. The icon indicates a built job. -
Page 159: Split A Combined Job In The Docbox
Split a Combined Job in the DocBox Split a Combined Job in the DocBox Introduction You can split a combined job in the DocBox into the original separate jobs. Then the system restores the jobs with their original settings and status. You cannot split a combined job in the list of Waiting jobs. -
Page 160: Lock A Job In A Docbox
Lock a job in a DocBox Lock a job in a DocBox Introduction The DocBox allows you to lock the settings of your jobs. Advantages: • Settings cannot be changed accidentally. • The job is always printed exactly the same. Illustration [69] The lock function in DocBox Procedure... -
Page 161: Unlock A Job In A Docbox
Unlock a Job in a DocBox Unlock a Job in a DocBox Introduction Unlocking a job can be required if you want to split a locked, combined job into the original jobs, for example. Or if you want to change the settings of a locked job. Procedure 1. -
Page 162: Move A Job From One Docbox To Another Docbox
Move a Job from One DocBox to Another DocBox Move a Job from One DocBox to Another DocBox Procedure 1. On the control panel, touch [Jobs] -> [DocBox]. 2. Touch the DocBox button that contains the job you want to move. 3. -
Page 163: Print The Jobs In A Docbox
Print the Jobs in a DocBox Print the Jobs in a DocBox Print a Non-Urgent Job from the DocBox Introduction You can print jobs from the DocBox in two ways: • Without urgency The system sends the print job to the bottom of the list of [Scheduled jobs]. •... -
Page 164: Print An Urgent Job From The Docbox Immediately
Print an Urgent Job from the DocBox Immediately Print an Urgent Job from the DocBox Immediately Introduction You can print jobs from the DocBox in two ways: • Without urgency The system sends the print job to the bottom of the list of [Scheduled jobs]. •... -
Page 165: Carry Out Print Jobs
Chapter 9 Carry out print jobs... -
Page 166: Change The Print Job Settings On The Control Panel
Change the print job settings on the control panel Change the print job settings on the control panel Description of the print job settings that you can change on the control panel Introduction Usually, the settings for a print job is defined in PDLs, applications, printer drivers, automated workflows, or hotfolder default tickets. - Page 167 Description of the print job settings that you can change on the control panel 1. View the result of the job and imposition settings in the sheet view 2. Touch the icon and browse the document. 3. View how the document will look after printing in the document view 4.
- Page 168 Description of the print job settings that you can change on the control panel Change the job settings Pane Description [Original] The [Original] pane shows general job information [Output] The [Output] pane shows the output settings you can define for the whole job [Job] The [Job] pane shows the general settings you can define for the job...
- Page 169 Description of the print job settings that you can change on the control panel [Binding edge] Setting Values Description [Binding edge] [Left] • The original has a vertical format (height > [Portrait] width). • The binding edge is at the left-hand side. The left-hand side of a page is bound to the right-hand side of the previous page •...
- Page 170 Description of the print job settings that you can change on the control panel Setting Values Description [Binding edge] [Left] • The original has a horizontal format (width > [Landscape] height). • The binding edge is at the left-hand side. The left-hand side of a page is bound to the right-hand side of the previous page •...
- Page 171 Description of the print job settings that you can change on the control panel [Media] Setting Values Description Names of the media in Here you can select the media for the job. The the media catalogue list displays all the media that are available in the media catalog including the temporary me- dia.
- Page 172 Description of the print job settings that you can change on the control panel [Layout] Name of the setting Available options Description [Layout] The machine prints 2, 4, 6, 9 or 16 consecutive images on 1 side of a sheet. By default, the system keeps the size of the originals.
- Page 173 Description of the print job settings that you can change on the control panel [Align] Setting Values Description [Align] An image on a sheet may be smaller than the media size of the output, for example because you scaled the image to 70% of its original size.
- Page 174 Description of the print job settings that you can change on the control panel [Shift] Setting Values Description [Shift] [Margin shift] Use this setting to increase or decrease the margin. By default, the values of the front side and the back side are interlocked. This means that the values for the front side and the back side remain identical.
- Page 175 Description of the print job settings that you can change on the control panel [Print delivery] Setting Values Description [Print delivery] [Output tray] Select the output location for the job. Depend- ing on the settings for your job, the machine automatically suggests the preferred output lo- cation for your job.
- Page 176 Description of the print job settings that you can change on the control panel Setting Values Description [Print delivery] [Sheet order] [Advanced settings] [Face up] Deliver the prints face up, first sheet on top. [Face up reverse] Deliver the prints face up, last sheet on top. [Face down] Deliver the prints face down, first sheet on top.
- Page 177 Description of the print job settings that you can change on the control panel Setting Values Description [Print delivery] [Print order] • [Front/back] [Advanced settings] Default value. The front page on the front, the back page on the back. • [Back/front] Puts the front page on the back and the back page on the front.
- Page 178 Description of the print job settings that you can change on the control panel [Number of sets] Setting Values Description [Number of sets] [Check first set] When the [Check first set] setting is enabled, the printer stops after the first set of a job has been printed.
- Page 179 Description of the print job settings that you can change on the control panel [Special pages] Setting Values Description Banner pages, trailer pages, and separator [Special pages] sheets • [Overrule default banner / trailer page set‐ tings]: indicate if you want to overrule the default banner page, trailer page, and sepa- rator sheets settings.
- Page 180 Description of the print job settings that you can change on the control panel [Page numbering] This setting is only available for PDF jobs. Setting Values Description [On] Print a page number on each page of the job. [Off] No page number on each page of the job. [Page numbering] [Location] [Top left, alternating]...
-
Page 181: Change The Output Settings
Change the output settings Change the output settings Change 2-sided into 1-sided and vice versa Introduction Jobs for which [1-sided] or [2-sided] printing was defined, will be printed on either one side or both sides of a sheet. If required, you can change this setting. NOTE You cannot change this setting for the active print job . -
Page 182: Change The Binding Edge
Change the binding edge Change the binding edge Introduction The binding edge determines whether the binding position is along the long edge or the short edge of the media. The binding edge is usually set via the printer driver, for example. However, you can view and change the binding edge via the control panel. -
Page 183: Select Another Media For A Job
Select another media for a job Select another media for a job Introduction If you want to print a job on other media than originally defined for that job, you can select a different media via the operator panel. Requirements regarding the new media: •... -
Page 184: Change The Settings For Covers
Change the settings for covers Change the settings for covers Introduction When front covers or back covers are required, the settings are usually set in the printer driver, for example. However, you can view and change the settings for the covers via the control panel. You can change the following settings for both the front cover and the back cover separately. -
Page 185: Shift The Image Roughly To Create Binding Space
Shift the image roughly to create binding space Shift the image roughly to create binding space Introduction If you want to create space for staples or punch holes, for example, you can use the [Align] function. The preview in the right-hand pane of the control panel displays the consequences of your changes. -
Page 186: Shift The Image Precisely To Create Binding Space Or Correct The Layout
Shift the image precisely to create binding space or correct the layout Shift the image precisely to create binding space or correct the layout Introduction If you want to create space for staples or punch holes, for example, you can use the [Align] function. -
Page 187: Change The Print Delivery Settings
Change the Print Delivery Settings Change the Print Delivery Settings Introduction Usually the print delivery settings have been defined in the printer driver. This section describes how to change some settings on the control panel. Overview of the print delivery settings Setting Description [Output tray]... - Page 188 Change the Print Delivery Settings [Advanced settings] Setting Description [Sheet order] [Face up] Deliver the prints face up, first sheet on top. [Face up reverse] Deliver the prints face up, last sheet on top. [Face down] Deliver the prints face down, first sheet on top. [Face down reverse] Deliver the prints face down, last sheet on top.
- Page 189 Change the Print Delivery Settings 2. Touch the job you want to change. 3. Touch [Edit], or double-tap the job to open the [Edit] window. 4. Touch the [Print delivery] button. 5. Make the required changes. 6. Touch [OK]. Chapter 9 - Carry out print jobs VarioPrint 6000 line...
-
Page 190: Change The Stacking Method Per Job
Change the stacking method per job Change the stacking method per job Introduction The [Offset stacking] function creates a visible distinction between sets or jobs in an output location. The active workflow profile or the active automated workflow determines the default type of offset stacking. -
Page 191: Change The Print Quality Settings
Change the print quality settings Change the print quality settings Introduction The print quality settings help you to optimize the quality of your prints. You can use the following applications to change the print quality settings. • Printer drivers. • Job submission applications such as PRISMAprepare. •... - Page 192 Change the print quality settings Advanced settings Description [RIP resolution] (default The RIP resolution can improve the readability of fine details. [600x2400] dpi) When you print very thin, slanted lines, for example in Chinese characters, 1200x1200 gives the best result. 600x2400 is best suit- ed for mainly horizontal and vertical objects.
-
Page 193: Define The Finishing For Print Jobs
Define the finishing for print jobs Define the finishing for print jobs Introduction The required finishing method is usually set in the printer driver. However, you can change the finishing method on the control panel. Depending on the configuration of your system you can change the following finishing methods, for example. -
Page 194: Change The Job Settings
Change the job settings Change the job settings Change the number of sets Introduction Follow the procedure below to change the number of sets for a job that is present in the list of [Waiting jobs] or [Scheduled jobs], or in a DocBox. NOTE You cannot change this setting for the active print job . -
Page 195: Check The First Set
Check the first set Check the first set Introduction When you have a large print job and you want to check whether the job is printed correctly, it is advised to check the first set before printing all other sets. When a job is sent to the printer, the submitter can indicate in the job submission application that the first set must be checked. -
Page 196: Change The Page Range You Want To Print
Change the page range you want to print Change the page range you want to print Introduction Usually, in the printer driver is defined whether all pages or only a range of pages must be printed. However, you can also change this setting through the control panel. NOTE You cannot change this setting for the active print job . -
Page 197: Rename A Job
Rename a job Rename a job Introduction When you print a job, the job name is created in the application. The job name is displayed in the [Job name] field. To rename the job: 1. Touch [Jobs]. 2. Go to the location of the job. 3. -
Page 198: Change The Use Of Separator Sheets
Change the use of separator sheets Change the use of separator sheets Introduction Separator sheets are empty sheets that are automatically inserted before each new set or job to separate two sets or jobs. In the Settings Editor you can define the media that must be used as separator sheets. -
Page 199: Print Your Jobs Using The Control Panel
Print your jobs using the control panel Print your jobs using the control panel Reprint a job Introduction NOTE The following description is only applicable when the setting [Printed jobs] in the Settings Editor is enabled. Print jobs that have been completed are moved from the list of [Scheduled jobs] list to the list of [Printed jobs]. -
Page 200: Select More Than One Job For Printing
Select more than one job for printing Select more than one job for printing Introduction The table below describes the possibilities to select more than one job for printing. Select more jobs Options Description Select two or more jobs Touch the jobs you want to print one by one. manually [Select] button - [All] All jobs in the list of [Waiting jobs] are printed. -
Page 201: Print A Job Ticket
Print a job ticket Print a job ticket Introduction Job tickets are used to transfer settings from an application to the printer. It can be convenient to print a job ticket before printing a job, to get an overview of the main job characteristics. Job tickets can contain the following information, for example. -
Page 202: Make A Proof
Make a proof Make a proof When you make a proof, the print system prints one set or record of the job. A proof print does not affect the number of sets when you print the complete job. The proof function is available in the following locations: •... -
Page 203: Stop The Printer
Stop the printer Stop the printer Introduction The printer can stop in two ways. • Manually Use the Stop button or the [Stop after job] button to stop the printer. • Automatically Define a corresponding setting in the workflow profiles. Stop the printer manually Manual stop When to stop... - Page 204 Stop the printer When to stop Action Description After a job Touch the [Stop • In [Jobs] -> [Queues] -> [Scheduled jobs] you must se- after job] button lect the job after which the printer must stop. Then touch the [Stop after job] button. •...
-
Page 205: Duplicate Jobs
Duplicate jobs Duplicate jobs When you want to use different print settings for the same source document, you can duplicate one or more waiting or DocBox jobs. [73] Duplicate jobs You can duplicate jobs at the following locations: Function Scheduled Waiting jobs DocBox Printed jobs... -
Page 206: Delete Print Jobs
Delete print jobs Delete print jobs You can remove print jobs before or after they are printed. Jobs that are not printed completely and proof prints do not come in the list of printed jobs. [74] Delete function and confirmation window in list of waiting jobs NOTE For the list of [Printed jobs], the system administrator can indicate in the Settings Editor that the list must be cleaned automatically at specified times. -
Page 207: Variable Data Printing
Variable data printing Variable data printing Variable data printing Introduction Printing variable data (VDP or variable document printing) is a print method that uses variable text and graphics, for example names and addresses. A VDP job has records to distinguish the different sets. -
Page 208: Convert A Job To A Variable Data Job
Convert a job to a variable data job Convert a job to a variable data job If you print a large document that has the structure of a variable data document, you can instruct the print system to handle this job as a variable data job. To indicate how the job is composed, you enter either the number of records or the pages per record. - Page 209 Convert a job to a variable data job NOTE You cannot change a VDP job into a normal job. Chapter 9 - Carry out print jobs VarioPrint 6000 line...
-
Page 210: The Transaction Section (Optional)
The Transaction section (optional) The Transaction section (optional) Introduction to the transaction section Introduction NOTE Transaction printing requires a license. The [System] view on the control panel displays the [Transaction] section only when transaction printing is licensed. Transaction printing enables you to print typical transactional documents like invoices, salary slips or other variable data streams. - Page 211 Introduction to the transaction section The items of the [Transaction] section Description of the [Transaction] section Num‐ Item Function Dashboard The dashboard displays the following information for transaction printing. • The connection status • The IP address of the host that sends the jobs •...
- Page 212 Introduction to the transaction section Step Actions on the print‐ Actions on the host Remarks Change the active Via the Settings Editor: [Transac- PDL when currently tion printing] -> [Transaction set- the wrong PDL is ac- ups] -> [Requested PDL]. tive.
-
Page 213: Activate Transaction Printing
Activate transaction printing Activate transaction printing Before you begin Make sure that the list of [Scheduled jobs] is empty. Procedure 1. On the control panel, touch [System] -> [Transaction] -> [Transaction printing mode]. The text on the button changes from [Off] to [On]. 2. -
Page 214: Deactivate Transaction Printing
Deactivate transaction printing Deactivate transaction printing Before you begin Make sure that the list of [Scheduled jobs] is empty. Procedure 1. On the control panel, touch [System] -> [Transaction] -> [Transaction printing online] to put the printer offline. The text on the button changes from [On] to [Off]. Note that you can only switch the [Transaction printing online] function to offline when •... -
Page 215: Shift The Image In The Transaction Printing Mode
Shift the image in the transaction printing mode Shift the image in the transaction printing mode Introduction When a misalignment occurs you can shift the image to correct the problem. You can shift the image on the front side and back side horizontally and vertically. Examples of possible misalignments: •... -
Page 216: Print In Transaction Printing Mode
Print in transaction printing mode Print in transaction printing mode When the transaction mode is active, you select a transaction setup that matches your print requirements. When the alignment of the variable data is not correct, you adjust the image shift via the control panel or via a transaction printing setup with a preset defined image shift. - Page 217 Print in transaction printing mode Activate a transaction setup during transaction printing IMPORTANT For IPDS only. Make sure the current streaming job does not activate other transaction setups. 1. Press the [Stop] button once. 2. Wait until the printer is put on hold. 3.
-
Page 218: Transaction Setups
Transaction setups Transaction setups Create a new transaction setup Introduction For transaction printing, transaction setups are required. Transaction setups contain specific settings for specific transaction jobs. You can create setups in the Settings Editor. NOTE This section describes how to create a transaction setup from scratch. If you want to create a transaction setup that is very similar to an existing setup, you can also create a copy and make changes afterwards. -
Page 219: Edit A Transaction Setup
Edit a transaction setup Edit a transaction setup Procedure 1. Select [Transaction printing] -> [Transaction setups]. 2. Tick the checkbox of the setup you want to edit. 3. If required, click the [Edit] button to change the name or description of the setup, then click [OK]. 4. -
Page 220: Activate A Transaction Setup
Activate a transaction setup Activate a transaction setup Introduction After you create a new transaction setup or edited an existing transaction setup, you must activate the transaction setup in the Settings Editor. Otherwise, the changes are not applied. Procedure 1. In the Settings Editor, click [Transaction printing] -> [Settings] -> [Bring transaction printing online or offline] to switch the printer offline. -
Page 221: Import, Export, Or Restore Transaction Setups
Import, export, or restore transaction setups Import, export, or restore transaction setups You can import, export, and restore transaction setups. Go to the transaction setups Open the Settings Editor and go to: [Transaction printing]→[Transaction setups]. [78] [Transaction setups] menu Import transaction setups 1. -
Page 222: Validate A Transaction Setup
Validate a transaction setup Validate a transaction setup What is transaction setup validation When you use the [Validate] option, the printer checks for each tray if the media definition is valid. It depends on the tray selection mode ([Tray to media] or [Tray to tray]) if the media in the logical trays (tray to media table in setup) or the media in the physical tray (tray to tray) are checked. -
Page 223: Validate All Transaction Setups
Validate all transaction setups Validate all transaction setups You can validate all available transaction setups. The report displays for every transaction setup the tray selection mechanism ([Tray to media] or [Tray to tray]) and the number of valid and invalid trays. For transaction setups with problems, use the [Validate] option to get more information. -
Page 224: Ipds
IPDS IPDS Media information (IPDS) Introduction The media catalog: • Contains a list of predefined media and their attributes. • Is an essential part of the system behavior of the VarioPrint 6000 line. • Helps you to print your jobs more easily while using the correct media. Make sure that the [Tray selection mechanism] setting in the Settings Editor is set to [Tray to media]. -
Page 225: Output Recovery In Case Of An Error (Ipds)
Output recovery in case of an error (IPDS) Output recovery in case of an error (IPDS) Introduction The printer is equipped with an efficient, reliable output recovery in case of an error. By factory default, the output recovery is set to [Normal]. After the error is solved, the job continues at the page where the error occurred automatically. - Page 226 Output recovery in case of an error (IPDS) Job progress states Normal output recov‐ End up in the output location after error re‐ covery The control panel dis- plays instructions on how to solve the pa- per jam. The operator has to remove these the jammed sheets manually.
- Page 227 Output recovery in case of an error (IPDS) Job progress states Suppressed output re‐ End up in the output covery location after error re‐ covery Are deleted complete- Sheets copied to con- These sheets are not troller memory (in- delivered to the out- cluding error pages).
-
Page 228: Pcl
Media messages (PCL) Introduction The media catalog: • Contains a list of predefined media and their attributes. • Is an essential part of the system behavior of the VarioPrint 6000 line. • Helps you to print your jobs more easily while using the correct media. Response to media messages For transaction printing, the content of the paper trays (in terms of media from the media catalog) is translated into a format that the controller understands. -
Page 229: Handle The Media Messages In The Tray-To-Media Mode (Pcl)
Handle the media messages in the tray-to-media mode (PCL) Handle the media messages in the tray-to-media mode (PCL) Procedure 1. A message on the control panel indicates that a media is missing. Select one of the following actions as a response to the message. •... -
Page 230: Handle The Media Messages In The Tray-To-Tray Mode (Pcl)
Handle the media messages in the tray-to-tray mode (PCL) Handle the media messages in the tray-to-tray mode (PCL) Procedure 1. A message on the control panel indicates that a media is missing. Select one of the following actions as a response to the message. •... -
Page 231: Make An Intermediate Check Print
Make an intermediate check print Make an intermediate check print Introduction The machine has a function that enables you to make a check print while a job is printed. This function is called the intermediate check print. When you use this function, the machine prints a copy of the sheet that is printed at the moment you press the [Intermediate check print] button. - Page 232 Make an intermediate check print Chapter 9 - Carry out print jobs VarioPrint 6000 line...
-
Page 233: Keep The System Printing
Chapter 10 Keep the system printing... -
Page 234: Use The Schedule
Use the Schedule Use the Schedule Introduction to the [Schedule] view Introduction The [Schedule] is your daily planning board for print jobs. The [Schedule] helps you to keep the machine running. This section shows and describes the main parts of the [Schedule]. NOTE The descriptions of the colors of the bars and the indication of the required amount of sheets are only valid for document printing. - Page 235 Introduction to the [Schedule] view An icon and the job name represent a job. The icon indicates the state of the job, for example printing . Furthermore, the icon indicates the stop moments of the machine. For example, when the setting [Confirm start of job: On] in the workflow profiles (see list of references below) is set to [On] or when you use the [Stop after job] function.
- Page 236 Introduction to the [Schedule] view The icons in the media toolbar Icon Description The list of [Required media] shows the required media for the sched- uled jobs. When the paper module indicator is completely grey, this means that not one of the required media is available in the paper trays.
-
Page 237: Load Media Via The [Schedule] View
Load media via the [Schedule] view Load media via the [Schedule] view Introduction When the [Schedule] view is available on your printer, you can load and assign the required media directly in the [Schedule] section. NOTE When you load a different media size, you must also set the paper guides inside the paper tray to the correct dimensions. - Page 238 Load media via the [Schedule] view NOTE You can always change the assigned media type later by touching the [Assign] button. 6. Gently close the paper tray. Related information Introduction to the Schedule view on page 234 Chapter 10 - Keep the system printing VarioPrint 6000 line...
-
Page 239: The Dashboard
The dashboard The dashboard Introduction The dashboard is the upper blue part of the control panel. The dashboard is always visible, irrespective of the current view. The dashboard shows the following. • The status of the system • The current process •... - Page 240 The dashboard Number Function Display the file name of the current job (for document printing) or cur- rent stream (for stream printing). Furthermore, the progress of the cur- rent job is displayed. For document printing, the counter can display the following informa- tion.
-
Page 241: The Operator Attention Light
The operator attention light The operator attention light Introduction The operator attention light informs you about the status of the machine. To improve the productivity, the operator attention light can warn you some time before the machine stops. You can set the warning time on the control panel. The colors of the lights match the status that is currently indicated on the control panel ( dashboard on page 239). -
Page 242: Status Indicators
Status indicators Status indicators This topic provides an overview of the status indicators for: • Jobs • Paper trays • Media • Software updates • PRISMAsync Remote Match Job status indicators The job lists have icons to indicate the job status. Icon Description The printer receives the job via the network (spooling). - Page 243 Status indicators Icon Description The job causes a raster image processing error. Status indicators of paper trays The control panel shows the following icons to indicate the status of the paper trays. Icon Description The paper tray holds media. The paper tray is empty. The paper tray is empty and a print job uses this paper tray.
- Page 244 Status indicators Icon Description The paper tray of the inserter contains insert sheets. Media indicators Media is displayed on several locations of the control panel. Extra information about the media is displayed by icons. Icon Description The media is required for a job in the list of scheduled jobs or list of waiting jobs.
- Page 245 Status indicators One or more software updates are ready for installation at the specified time. One or more software updates are being installed. The installation of one or more software updates failed. Status indicators of PRISMAsync Remote Match Refer to the help of PRISMAsync Remote Match for more information. Icon Description The synchronization of this printer has been started.
- Page 246 Status indicators Chapter 10 - Keep the system printing VarioPrint 6000 line...
-
Page 247: Chapter 11 Media Handling
Chapter 11 Media handling... -
Page 248: Introduction
Introduction Introduction Introduction to the media handling Introduction The machine supports a wide range of media, including tabs and inserts. The supported media sizes range from 203 mm x 203 mm (minimum) to 320 mm x 488 mm (maximum). When the Flex- XL paper input module is installed the media sizes range to 350 mm x 500 mm. -
Page 249: Introduction To The Trays View
Introduction to the Trays view Introduction to the Trays view Introduction The [Trays] view has the following functions. • Display the current content and filling level of the paper trays. • Open the paper trays and assign the required media for the print jobs. •... - Page 250 Introduction to the Trays view The items of the [Trays] view Description of the [Trays] view Item Function Content of the paper trays Indicate the current content and filling level of the paper trays. The [Trays] view displays the parameters of the media that are currently in the paper trays.
- Page 251 Introduction to the Trays view Icon Description The paper tray is open The paper guides inside the paper tray do not match the selected me- dia size. You must correct the paper guides or the selected media The paper tray contains media that are fed over the long edge (LEF) or short edge (SEF) .
-
Page 252: Introduction To The [Media] Section
Introduction to the [Media] section Introduction to the [Media] section Introduction The [System] view gives access to system settings, system information, media information and maintenance tasks. This section gives an overview of the [Media] section in the [System] view. Overview of the [Media] section The print system uses a central media catalog from which you can select media for jobs. - Page 253 Introduction to the [Media] section Num‐ Item Function More information List of all the media that Display the current content are available in the [Media of the [Media catalog]. catalog]. What are temporary media List of temporary media Display the temporary me- dia that are currently avail- on page 248 able on the system .
- Page 254 Introduction to the [Media] section Num‐ Item Function More information What are temporary media • List of all the media that • Display the current con- are available in the [Me- tent of the [Media cata- on page 248 dia catalog]. log].
-
Page 255: Media Related Actions
Media related actions Media related actions Load the media Introduction This section describes how to load the media into a paper tray. When you load the media via the [Load] button in the [Schedule], the paper tray is automatically assigned to the correct media. When you load and assign the media via the [Assign] button in the [Trays] view, you must assign the paper tray to the loaded media manually. -
Page 256: Assign The Media To A Paper Tray - Load And Assign The Media To A Paper Tray
Assign the media to a paper tray - Load and assign the media to a paper tray Assign the media to a paper tray - Load and assign the media to a paper tray Introduction Introduction to the Trays view on page The [Trays] view has several functions (see 249). -
Page 257: Add Media To The Media Catalog
Add media to the media catalog Add media to the media catalog When enabled in the Settings Editor, you can add new media to the media catalog via the control panel. [90] Media management via the control panel Procedure 1. Touch [System] -> [Media]. 2. -
Page 258: Add Temporary Media To The [Media Catalog]
Add temporary media to the [Media catalog] Add temporary media to the [Media catalog] Introduction When a job is submitted that requires media that are not included in the [Media catalog], these media become temporary media. The control panel displays the temporary media in the following places. -
Page 259: Media Indicators Black & White
Media indicators Black & White Media indicators Black & White Media is displayed on several locations of the control panel. Extra information about the media is displayed by icons. Icon Description The media is required for a job in the list of scheduled jobs or list of waiting jobs. -
Page 260: Change The Advanced Media Settings
• Pre-printed: The system is able to handle pre-printed media without problems if the guidelines regarding pre-printed media and inks are taken into account. Contact your local Canon representative to get a copy of these guidelines. In case media or inks are used that are not listed in the guidelines, the use of pre-printed media can lead to undesired print quality issues. -
Page 261: Change The Advanced Media Settings - Enable The [Low Temperature Mode]
Change the advanced media settings - Enable the [Low temperature mode] grade media, you can improve the print quality, with respect to these undesired ghost images, by changing the value of the [Paper quality] setting to [Low] or even [Lower]. However, this affects the productivity by almost 5 and 10% respectively. -
Page 262: Change The Advanced Media Settings - Disable The Double-Sheet Detection
Change the advanced media settings - Disable the double-sheet detection Change the advanced media settings - Disable the double-sheet detection Procedure 1. Touch the [Double-sheet detection] button. The text on the button changes from [On] to [Off]. NOTE Each time you touch the button, the setting changes from [On] to [Off] and the other way round. -
Page 263: Change The Advanced Media Settings - Enable The Enhanced Media Mode
Change the advanced media settings - Enable the enhanced media mode Change the advanced media settings - Enable the enhanced media mode IMPORTANT This setting is only available on machines that are equipped with an optional finisher. Procedure 1. Touch the [Enhanced media mode] button. The text on the button changes from [Off] to [On]. -
Page 264: Change The Advanced Media Settings - Change The [Paper Quality]
Change the advanced media settings - Change the [Paper quality] Change the advanced media settings - Change the [Paper quality] Procedure 1. Touch the [Paper quality] button. A drop-down list appears. 2. Touch the desired value. 3. Press [OK]. Chapter 11 - Media handling VarioPrint 6000 line... -
Page 265: Change The Advanced Media Settings - Start The [Paper Quality Test]
Change the advanced media settings - Start the [Paper quality test] Change the advanced media settings - Start the [Paper quality test] Procedure 1. Touch the [Paper quality test] button to start the test. NOTE When the test is started, the progress of the test is displayed on the button and the text on the button changes from [Start] to [Stop]. -
Page 266: Perform A Media Registration For Standard-Size Media - Print The Test Sheets And Create The Ruler
Perform a media registration for standard-size media - Print the test sheets and create the ruler Perform a media registration for standard-size media - Print the test sheets and create the ruler Introduction The different properties of media can influence the alignment of images when the media are printed. -
Page 267: Perform A Media Registration For Standard-Size Media - Adjust The Z-Position Of Side 1
Perform a media registration for standard-size media - Adjust the Z-position of side 1 3. Fold the sheet along the line 'B-H' on side 1. [91] Fold the sheet to create a ruler This is your ruler. [92] The ruler Perform a media registration for standard-size media - Adjust the Z-position of side 1 Procedure... - Page 268 Perform a media registration for standard-size media - Adjust the Z-position of side 1 4. Enter the value. 5. Take the second test sheet. 6. Repeat the steps 2 - 4. 7. Take the third test sheet. 8. Repeat the steps 2 - 4. Chapter 11 - Media handling VarioPrint 6000 line...
-
Page 269: Perform A Media Registration For Standard-Size Media - Adjust The X-Length Of Side 1
Perform a media registration for standard-size media - Adjust the X-length of side 1 Perform a media registration for standard-size media - Adjust the X-length of side 1 Procedure 1. Take the first test sheet. 2. Put the ruler along the line 'D-F' of the test sheet. 3. -
Page 270: Perform A Media Registration For Standard-Size Media - Adjust The Z-Position Of Side 2
Perform a media registration for standard-size media - Adjust the Z-position of side 2 Perform a media registration for standard-size media - Adjust the Z-position of side 2 Procedure 1. Take the first test sheet. 2. Align the start of the ruler with point 'K' of the test sheet. [95] Align the ruler with 'K' 3. -
Page 271: Perform A Media Registration For Standard-Size Media - Adjust The X-Position Of Side 1
Perform a media registration for standard-size media - Adjust the X-position of side 1 Perform a media registration for standard-size media - Adjust the X-position of side 1 Procedure 1. Take the first test sheet. 2. Put the ruler along the line 'D-F' of the test sheet. 3. -
Page 272: Perform A Media Registration For Standard-Size Media - Adjust The X-Position Of Side 2
Perform a media registration for standard-size media - Adjust the X-position of side 2 Perform a media registration for standard-size media - Adjust the X-position of side 2 Procedure 1. Take the first test sheet. 2. Align the start of the ruler with point 'N' of the test sheet. + 5 0 P r i m a r y X i m a g e p o s i t i o n - 5 0... -
Page 273: Perform A Media Registration For Large Media - Print The Test Sheets And Create The Ruler
Perform a media registration for large media - Print the test sheets and create the ruler Perform a media registration for large media - Print the test sheets and create the ruler Introduction The different properties of media can influence the alignment of images when the media are printed. -
Page 274: Perform A Media Registration For Large Media - Adjust The Z-Position Of Side 1
Perform a media registration for large media - Adjust the Z-position of side 1 3. Fold the sheet along the line 'B-H' on side 1. [98] Fold the sheet to create a ruler This is your ruler. [99] The ruler Perform a media registration for large media - Adjust the Z- position of side 1 Procedure... - Page 275 Perform a media registration for large media - Adjust the Z-position of side 1 4. Enter the value. 5. Take the second test sheet. 6. Repeat the steps 2 - 4. 7. Take the third test sheet. 8. Repeat the steps 2 - 4. Chapter 11 - Media handling VarioPrint 6000 line...
-
Page 276: Perform A Media Registration For Large Media - Adjust The X-Length Of Side 1
Perform a media registration for large media - Adjust the X-length of side 1 Perform a media registration for large media - Adjust the X-length of side 1 Procedure 1. Take the first test sheet. 2. Align the start of the ruler with point 'D' and read the value at point 'E'. Test bitmap: REGISTRATION Size: 420 x 297 mm 2006-10-09 / 14:08:22... -
Page 277: Perform A Media Registration For Large Media - Adjust The Z-Position Of Side 2
Perform a media registration for large media - Adjust the Z-position of side 2 Perform a media registration for large media - Adjust the Z- position of side 2 Procedure 1. Take the first test sheet. 2. Align the start of the ruler with point 'K' of the test sheet. [103] Align the ruler with 'K' 3. -
Page 278: Perform A Media Registration For Large Media - Adjust The X-Position Of Side 1
Perform a media registration for large media - Adjust the X-position of side 1 Perform a media registration for large media - Adjust the X- position of side 1 Procedure 1. Take the first test sheet. 2. Put the ruler along the line 'D-F' of the test sheet. 3. -
Page 279: Perform A Media Registration For Large Media - Adjust The X-Position Of Side 2
Perform a media registration for large media - Adjust the X-position of side 2 Perform a media registration for large media - Adjust the X- position of side 2 Procedure 1. Take the first test sheet. 2. Align the start of the ruler with point 'N' of the test sheet. Test bitmap: REGISTRATION Size: 420 x 297 mm 2006-10-09 / 14:08:22... -
Page 280: Light-Weight Media
Light-weight media Light-weight media Introduction Light-weight media is media with a weight less than 50 g/m². You must handle light-weight media with extra care because light-weight media can be damaged very easily. Even minor irregularities of the light-weight media will lead to a significant reduced reliability and runability. Discard damaged sheets. -
Page 281: Load Light-Weight Media Into The Paper Module
Load light-weight media into the paper module Load light-weight media into the paper module Introduction IMPORTANT • Before you load media into the paper trays, it is important to unpack and carefully check the stack and sheets. Unpack light-weight media on page 285 •... - Page 282 Load light-weight media into the paper module Remove the light-weight media tool when there is no light-weight media loaded in the tray. Place the light-weight media tool in the storage location in the door of the paper module. • Make sure that the grain direction of the media is in the transport direction of the printer. Determine the grain direction of light-weight When needed, determine the grain direction, see media on page 287...
- Page 283 Load light-weight media into the paper module Action Take a new stack of media for loading. Load the media with the grain direction in the transport direction. Carefully put the stack in the middle of the pa- per tray, aligned against the left-hand guide plate.
- Page 284 Load light-weight media into the paper module Action IMPORTANT Ensure that the loaded media stack does not exceed the loading limit mark on the back slider. Gently push the paper tray back until it clicks into place. Chapter 11 - Media handling VarioPrint 6000 line...
-
Page 285: Unpack Light-Weight Media
Unpack light-weight media Unpack light-weight media Introduction Before you load media in the paper trays, unpack the media and check the stack. Before you begin Only unpack media just before you load the stack into the paper trays. When you leave the media unpacked for a long period, tight edges or waviness can occur. - Page 286 Unpack light-weight media Action Loosen the stack carefully a few times at the four sides and the four corners. Make sure that all sheets are loose. Chapter 11 - Media handling VarioPrint 6000 line...
-
Page 287: Determine The Grain Direction Of Light-Weight Media
Determine the grain direction of light-weight media Determine the grain direction of light-weight media Introduction For optimal runnability the grain direction is important. When the grain direction of a certain media is unknown, you must determine the grain direction according to the following procedure. Procedure Action Draw rectangles with the transport direction... - Page 288 Determine the grain direction of light-weight media Action • When rectangle A bends the least, the Picture A grain direction is in the direction of the ar- rows, see picture A. • When rectangle B bends the least, the grain direction is perpendicular to the di- rection of the arrows, see picture B.
-
Page 289: Maintain The Print System
Chapter 12 Maintain the print system... -
Page 290: System Configuration
System configuration System configuration System configuration and maintenance Your organization and print environment can ask for a system configuration that meets production and workflow requirements. In addition, authorization, security and sustainability guidelines are important when you establish a print system. The installation of the print system includes most configuration tasks, such as definitions of preferences, job workflows and print languages. - Page 291 System configuration and maintenance Maintenance tasks for maintenance operators Maintenance operators can perform procedures to clean machine parts or improve the image quality. Furthermore, they are responsible for mechanical maintenance tasks and maintenance procedures via the control panel. For some procedures you must have the rights to perform maintenance tasks to prevent unauthorized use.
-
Page 292: Change A Number Of Settings In The Settings Editor Via The Control Panel
Change a number of settings in the Settings Editor via the control panel Change a number of settings in the Settings Editor via the control panel Introduction NOTE The information contained in this section is primarily intended for key operators and system administrators. - Page 293 Change a number of settings in the Settings Editor via the control panel Group of settings Available settings Short description [Software updates] • [No updates availa- You can download and install PRISMAsync ble] software and operating system software • [New PRISMAsync through this section when the service organi- version {0}Availa- zation has made an update available via On...
- Page 294 Change a number of settings in the Settings Editor via the control panel Group of settings Available settings Short description [Logging and reports] • [Create and export When an error occurs, the help desk of your log file with report / printer supplier can ask you to create and send trace files] a log file with trace files and/or report files.
- Page 295 Change a number of settings in the Settings Editor via the control panel Group of settings Available settings Short description [Remote connection] • [Remote connection The [Remote connection] section (optional) (optional) status] (read-only) contains the settings to enable the remote con- •...
-
Page 296: Introduction To The [Setup] Section
Introduction to the [Setup] section Introduction to the [Setup] section Introduction The [System] view gives access to system settings, system information, media information and maintenance tasks. This section gives an overview of the [Setup] section in the [System] view. Overview of the [Setup] section [108] Overview of the [Setup] section The items of the [Setup] section Item... - Page 297 Introduction to the [Setup] section Item Function [Job name truncation] but- Define the way the system shortens the job name when the job name is too long to display fully. [Control panel settings] Adjust the brightness and contrast of the control panel. button [Shut down printer] button Shut down the system in a controlled way.
-
Page 298: Backup And Restore
Backup and restore Backup and restore Introduction The system administrator can make a backup of the configuration of the print system. The system administrator can use this backup a/o to restore the configuration. • After a hardware failure, for example a crash of the hard disk. •... -
Page 299: Counters
Counters Counters Introduction to the [Maintenance] section Introduction The [System] view gives access to system settings, system information, media information and maintenance tasks. This section gives an overview of the [Maintenance] section in the [System] view. Overview of the [Maintenance] section [109] Overview of the [Maintenance] section The items of the [Maintenance] section Description of the [Maintenance] section... - Page 300 Introduction to the [Maintenance] section Item Function More information [Day counters] Indicates the number of prints that Reset the day counters on have been made since the latest re- page 301 set. You can always reset the day counters. [Toner counters] Indicates the amount of toner that has been used since the printer was installed.
-
Page 301: Introduction To The Counters
Introduction to the counters Introduction to the counters Introduction The [Maintenance] section of the [System] view displays 3 types of counters. 2 of these counters provide information about the number of sheets that have been printed. The other counter provides information about the amount of toner that has been used. General counter information The following table describes the counters in the [Maintenance] section of the [System] view. -
Page 302: Reset The Day Counters
Reset the day counters Reset the day counters Procedure 1. On the control panel, touch [System] -> [Maintenance] -> [Reset day counters]. A dialog box will ask you to confirm that you really want to reset the day counters. 2. Touch [Yes] to reset the day counters to 0. Chapter 12 - Maintain the print system VarioPrint 6000 line... -
Page 303: Print The Billing Counters Report
Print the Billing Counters Report Print the Billing Counters Report Introduction You can print a report that contains all figures of the configured billing counters. The language of the billing counters report is the same as the selected language for the system. Illustration [110] Print the billing counters report Procedure... -
Page 304: Software Updates
Software updates Software updates Software updates can be operating system updates or PRISMAsync updates. Operating system updates are updates from Microsoft. PRISMAsync updates are updates from the Canon Service organization. Three methods are available to update your software: 1. Pushed by the service organization through On Remote Service (ORS). -
Page 305: Remote Service (Ors) (Optional)
Introduction NOTE Remote Service requires a license. Remote Service also requires a permission to Canon or your printer dealer site outside the customer domain, either via a proxy server or via IP white list. Contact your local IT specialist to give you the permission. - Page 306 • If required, you can change a number of connectivity settings via the control panel ([System] -> [Setup] ->[System configuration] -> [Connectivity]). • You can verify the communication with Canon or the printer dealer by creating a log file via the Settings Editor.
-
Page 307: Keeping The Printer Running
Keeping the printer running Keeping the printer running Introduction to the [Printer] section Introduction The [System] view gives access to system settings, system information, media information and maintenance tasks. This section gives an overview of the [Printer] section in the [System] view. The items of the [Printer] section Description of the [Printer] section Item... -
Page 308: Check The Status Of The Toner Reservoirs
Check the status of the toner reservoirs Check the status of the toner reservoirs Introduction The machine has 2 toner reservoirs. The toner reservoirs are located at the left-hand side and the Introduction to the main system components on page right-hand side of the engine module The dashboard on page 239 You can check the status of the toner reservoirs in the dashboard... -
Page 309: Add Toner
Add toner Add toner Introduction This section describes how to add toner to the 2 toner reservoirs of the machine. When to do Check the status of the toner reservoirs on When a toner reservoir is empty or almost empty page 308. -
Page 310: Check The Status Of The Staple Cartridges
Check the status of the staple cartridges Check the status of the staple cartridges Introduction The output locations on page 21 The optional finishers can contain staple cartridges to staple The dashboard on your jobs. You can check the status of the staple cartridges in the dashboard page 239 and in the [System] view. -
Page 311: Finisher: Add Staples
Finisher: Add staples Finisher: Add staples Introduction The output locations on page 21 The optional finisher on top of the stacker can staple your jobs. The finisher contains 2 staplers. Both staplers are located inside the finisher. Stapler 1 is located at the back side. -
Page 312: Add Staples
Add staples Add staples Procedure 1. Remove the cartridge holder from the stapler. 2. Press the striped release buttons at both sides of the cartridge holder to unlock the lower cover. [112] Press the 2 release buttons simultaneously The lower cover opens. [113] The lower cover opens Chapter 12 - Maintain the print system VarioPrint 6000 line... - Page 313 Add staples 3. Remove the empty staple cartridge in the opposite direction of the arrow. [114] Remove the staple cartridge 4. Slide a new staple cartridge into the cartridge holder, in the direction of the arrow. [115] Place a new staple cartridge Chapter 12 - Maintain the print system VarioPrint 6000 line...
- Page 314 Add staples 5. Push the staple cartridge into the cartridge holder until the cartridge clicks into place. [116] Firmly push the staple cartridge into the holder 6. Remove the paper ribbon that secures the staples in the staple cartridge. [117] Remove the paper ribbon 7.
-
Page 315: Close The Doors And Covers
Close the doors and covers Close the doors and covers Procedure 1. Hold cover E5 while you unlock E6. 2. Close cover E5. 3. Close top cover E1. 4. Close the front door of the finisher. Chapter 12 - Maintain the print system VarioPrint 6000 line... - Page 316 Close the doors and covers Chapter 12 - Maintain the print system VarioPrint 6000 line...
-
Page 317: Prismalytics Dashboard
Chapter 13 PRISMAlytics Dashboard... - Page 318 PRISMAlytics Dashboard is a set of business management tools for your PRISMAsync printers. To use PRISMAlytics Dashboard Remote Service (ORS) must be enabled on the printers. PRISMAsync printers send real-time production information, such as printing times, idle times, and the usage of media and consumables to the PRISMAlytics Dashboard. With PRISMAlytics Dashboard you can monitor the performance of your printer fleet.
-
Page 319: Chapter 14 Troubleshooting
Chapter 14 Troubleshooting... -
Page 320: Troubleshooting
Troubleshooting Troubleshooting Introduction The main types of possible errors are the following. • Errors that relate to the machine • Errors that relate to the jobs • Toner problems that relate to the use of fiber-rich media. This section gives an overview of the possible errors and the solutions to these errors. NOTE Only operators who received the special maintenance training are allowed to replace or clean parts and solve paper jams in the process units. - Page 321 Troubleshooting Overview of Possible Job Errors Handle job errors Error Solution Additional information The required sup- Add the required supplies The dashboard helps you to determine when plies are not (media, toner and staples) the supplies are required. available before the machine stops printing.
- Page 322 Troubleshooting Toner pollution problem Solution Toner pollution on the first sheets • Change the [Paper quality] setting from [Normal] to Change the advanced media settings - along the edge of the sheet (2-3 mm) [Low] (see Change the Paper quality on page after the automatic black image 264).
-
Page 323: Troubleshooting For Light-Weight Media
Troubleshooting for light-weight media Troubleshooting for light-weight media Introduction When the optional light-weight media module is installed, you can print light-weight media. Next to the general troubleshooting, you have some additional troubleshooting related to the light- weight media module. This section gives an overview of the possible errors related to the light-weight media module and the solutions to these errors. - Page 324 Troubleshooting for light-weight media Problem Solution Frequent paper jams in the paper in- • Check the stack of sheets in the paper tray. put modules. Check the filter of the light-weight media module NOTE Only trained operators are allowed to perform maintenance tasks. Action You can only check the filter when the sys- tem is printing or when the system indicates...
- Page 325 Troubleshooting for light-weight media Replace the filter of the light-weight media module NOTE Only trained operators are allowed to perform maintenance tasks. Action Move the handle up to shut off the incoming air. Remove the upper cover of the filter unit. 1.
- Page 326 Troubleshooting for light-weight media Action Move the handle down to switch on the in- coming air. Chapter 14 - Troubleshooting VarioPrint 6000 line...
-
Page 327: Store The Logging In Case Of Software Errors
Store the logging in case of software errors Store the logging in case of software errors Introduction When the system has a software error, you can store the logging. Service can use this logging to analyse the error. Procedure 1. On the control panel an error screen is visible that indicates a software error. A software error has an error code that starts with 115. -
Page 328: Create And Download A Log File
Create and download a log file Create and download a log file This topics contains the following instructions. • Manually create a log file with reports / trace files in Settings Editor • Download a log file from Settings Editor •... - Page 329 Create and download a log file [119] Create a log file with report / trace files 4. Click [OK]. Download a log file from Settings Editor Log files can be created manually or automatically by the printer when an error occurred. 1.
- Page 330 Create and download a log file 1. On the control panel touch: [System]→[Setup]→[System configuration]→[Logging and reports]. [122] System configuration NOTE You can also touch [System configuration] at the start screen of the control panel and touch [System configuration]. [123] Start screen of control panel 2.
- Page 331 Create and download a log file 4. The log file is being created. 5. The last created log file is selected in the [Export log file] dialog box. [124] Export log file 6. Touch [OK] to export this log file to the USB device. Touch [Cancel] to download this log file at a later moment.
- Page 332 Create and download a log file Export a log file to USB device from control panel You can export a manually or automatically created log file to a USB device. 1. On the control panel touch: [System]→[Setup]→[System configuration]→[Logging and reports]. NOTE You can also touch [System configuration] at the start screen of the control panel.
- Page 333 Create and download a log file Create a log file from PRISMAsync Remote Manager 1. In the top right-hand menu, click [Support]→[Create log file]. [127] Support options 2. You are forwarded to the [Create log file with report / trace files] option of the Settings Editor that belongs to the selected printer.
- Page 334 Create and download a log file Chapter 14 - Troubleshooting VarioPrint 6000 line...
-
Page 335: Chapter 15 Specifications
Chapter 15 Specifications... -
Page 336: Product Specifications
• 45 - 50 g/m² with the optional light-weight media module • 50 - 300 g/m² for Canon recommended media • 60 - 200 g/m² for other media • 70 - 160 g/m² for media size 350 mm x 500 mm; only plain paper See the acceptable paper list. - Page 337 Product specifications Other Item Specification Input capacity per paper module • Normal trays 1 and 2: 600 sheets each • Bulk trays 3 and 4: 1,700 sheets each (or 3,400 A4/Letter sheets each when the optional dual paper trays are installed; Left- hand stack 1,800 A4/Letter sheets, right-hand stack 1,600 A4/Letter sheets) •...
-
Page 338: Environmental
Environmental Environmental Specification Description Ozone emis- during printing: <= 1 mg/hr sions Optimum tem- 17-34 ºC (62.6-93.2 ºF) perature For printing on light-weight media the temperature must be between 17-28 ºC (62.6-82.4 ºF). Relative humid- 20-80% For printing on light-weight media the relative humidity must be between 40-70%. -
Page 339: Print Speed
Print speed Print speed NOTE The media specifications in the following table are based on plain paper of 80 g/m² or 20 lb bond. Below you find the maximum print speeds in images per minute. Model A4 LEF Letter LEF Ledger 6180 6220... -
Page 340: Prismasync Controller Specifications
PRISMAsync controller specifications PRISMAsync controller specifications Item Specification Description Embedded PRISMAsync controller. Processor 2.9 GHz Memory 8 GB Hard disk 2x 500 GB Network connectivity 10/100/1000 MB, 2x 1 Gbit Ethernet network ports Network protocols • TCP/IP; LPR/LPD socket • SMB static/auto IP via DHCP •... - Page 341 PRISMAsync controller specifications Item Specification Hardware options Generic USB mouse support, Section 508 kit (video, at- tention signal), copy control device interface for pre-paid accounting, operator attention light. Chapter 15 - Specifications VarioPrint 6000 line...
-
Page 342: Printer Driver Support
Printer driver support Printer driver support Printer driver Remark PS3 UPD 32 & 64-bit support • Microsoft Windows Server 2003/2008/2008 R2/2012 • Microsoft Windows Client Vista/Windows Server 2012 R2/Windows7/Windows8/ Windows8.1/Windows10 PS3 PPD - legacy Microsoft Windows & Mac/ Linux-CUPS/Other PS3 - Macintosh (Mac OSX Intel &... -
Page 343: Index
Index Index 1-sided printing.............181 Backup confidential data..........293 create...............293 delete...............293 7" x 10" Statement Size Support......USB..............Banner pages default media..........134 define.............. Account log file define default media........Description of the data records.......93 Billing counters.............301 General information.........93 Maintenance section........299 Name..............93 Print the report..........Accounting Binding edge............182... - Page 344 Index sheet orientation..........Setup section..........297 sort by page............187 Controller sort by set............hardware options........... Change media............256 Counters..............Change password...........59 Covers..............184 Check Create a DocBox........... Staple cartridges..........Toner level............Check first set............195 Dashboard.............239 workflow profile..........Date and time............295 Check-and-print workflow profile Day counters............
- Page 345 Index Binding............153 Binding edge..........Fattening............... Brightness............153 Features............16, Check first set..........Filter Contrast............153 jobs..............120 Covers............. Find Edit..............jobs..............120 Job name............Finisher..............18 Layout............. Finishing method..........193 Margin erase...........153 First print time............Media.............. Fleet management..........298 Number of sets..........154 Flex-XL..............29 Offset stacking..........151 Form Assist Module..........Output location..........151 Forward jobs............
- Page 346 Index move............... search..............123 JDF ticket Jobs view.............. creation of............88 Jobs with available media........handling of media attributes......67 Jobs with label............200 use in hotfolders..........B5...............25 change alignment.......... key operator change binding edge........settings on control panel.......290 change number of sets........Key operator settings........... change settings for covers......
- Page 347 Index Configuration report........Large media....273, 274, 276, 277, 278, Export..............294 Standard-size media..266, 267, 269, 270, Report file..........294, 271, Software error..........Media section Trace file..........294, System view........... Low power mode............48 Media settings Low temperature mode....... 260, Advanced........ 260, 263, 264, Disable............
- Page 348 Index Paper module............18 sort by page............187 Control panel............ sort by set............Green check mark..........Print job Large paper............29 1- or 2-sided............168 LEDs..............Align..............arrows............19 Binding............177, Unassigned button...........19 Binding edge..........Paper modules............19 Brightness............177 Paper quality......... 260, 263, 264, Check first set..........Paper quality test......260, 263, 264, Color profile............177...
- Page 349 Index language............Remote Control switching to transaction printing mode..description............transaction printing mode.......45 usage of............Printable area............336 Remote Diagnostics..........Printed job Remote Manager..........copy..............123 description............Printed jobs start..............delete...............206 Remote Meter Reading........E-shredding............ Remote printer driver...........104 enable printing..........Remote Service.............305 printing............118 Remote Software Upgrade........
- Page 350 Index jobs..............120 description............Select Staple different media for job........183 Status.............. Selection function Staple cartridges...........310 list of waiting jobs..........116 Stapler icons............Separator sheets...........198 Staples configure orientation........Finisher........... 311, 312, define default media........Stapling Serial number............Capacity............Settings Editor............Status..............239 Access............... Status indicators Access via control panel........292 PRISMAsync Remote Match......
- Page 351 Index Setup section..........296 validate all transaction setups...... transaction section.........210 Tray Load media............. Tray mapping transaction printing mode.......44 Task splitting Tray-to-media mapping media configuration.........42 validation report..........222 TCP/IP..............Tray-to-tray mapping Technology............validation report..........222 Temporary media......248, 253, 254, Trays view Test Remote connection......295, Overview............249 Test TCP/IP connection........
- Page 352 Index Warm-up time............336 Warning time configuration............ Setup section..........296 WINS 1..............294 WINS 2..............294 WINS settings............Workflow Setup section..........296 Workflow profiles Function............Zoom Fit to page............Percentage............VarioPrint 6000 line...
- Page 354 Canon U.S.A., Inc. www.usa.canon.com Canon Canada Inc. www.canon.ca Canon Europe Ltd www.canon-europe.com Canon Latin America Inc. www.cla.canon.com Canon Australia PTY. Ltd www.canon.com.au Canon China Co., Ltd www.canon.com.cn Canon Singapore PTE. Ltd www.canon.com.sg Canon Hongkong Co., Ltd www.canon.com.hk © 2020 Canon Production Printing...