Table of Contents
Advertisement
Quick Links
* The figure above shows a combination of this product
and the separately sold ET-PKD120S ceiling mount
bracket (for low ceilings).
Thank you for purchasing this Panasonic Product.
To customers
J
The "Installation Instructions" is intended for use by installation personnel. Be sure to employ certified
personnel to perform the installation. After installation, have the installation personnel return these "Installation
Instructions" to you, and save it for future use. When moving or removing the projector, give this "Installation
Instructions" to the installation personnel and have them perform the procedure.
To installation personnel
J
Carefully read the "Installation Instructions" and install this product correctly and safely.
Be sure to read through the section entitled "Read this first!" (page 3) before proceeding with the installation.
After installation, return these "Installation Instructions" to the customer.
Installation Instructions
Model No.
Projector Mount Bracket
ET-PKE301B
ENGLISH
FRANÇAIS
DEUTSCH
ENGLISH
DPQX1284ZB
Advertisement
Table of Contents

Related Manuals for Panasonic ET-PKE301B


Summary of Contents for Panasonic ET-PKE301B
- Page 1 * The figure above shows a combination of this product and the separately sold ET-PKD120S ceiling mount bracket (for low ceilings). Thank you for purchasing this Panasonic Product. To customers The “Installation Instructions” is intended for use by installation personnel. Be sure to employ certified personnel to perform the installation.
-
Page 2: Table Of Contents
Contents Read this first! .....................3 Product components ...................4 Standard installation dimensions ..............5 Installation ......................7 Setting up the screen ......................7 Screws tightening torques ....................7 Installing the bracket to the projector ..................7 Attaching the projector drop-prevention kit ................8 Specifications....................10 Dimensional relationship ..............Appendix 2 - ENGLISH... -
Page 3: Read This First
Electric shocks may result from contact with any metal objects inside the ceiling. r Panasonic Connect Co., Ltd. takes no responsibility for any accident or damage caused by the installation of the ceiling mount bracket using methods that are not described or methods that do not use the parts specified in these Installation Instructions. -
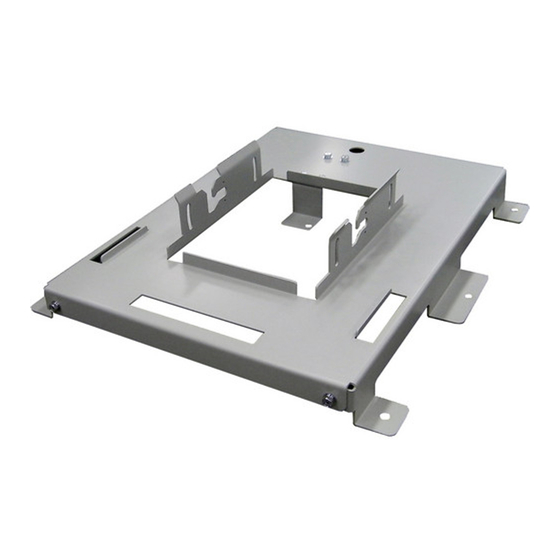
Page 4: Product Components
In this document, the alphabet letters at the end of the projector part numbers are omitted. z Models other than the above may also be supported. Refer to the operating instructions of the projector you are using or the website (https://panasonic.net/cns/projector/). ■ Structural components... -
Page 5: Standard Installation Dimensions
Standard installation dimensions The dimensional relationship between the screen and projector is shown below. Establish the ceiling installation position after accessing the “Dimensional relationship diagram” (pages 5-6) and “Dimensional relationship” in the Appendix. The projection distance can be adjusted using the zoom lens (except ET-ELW21). Check the projected image while making fine adjustments. - Page 6 Standard installation dimensions (continued) Distance from the center of lens to the attachment plate Projected image height H1 / H2 (including plate thickness) Projected image width Lens protrusion dimension (from front of set to tip of lens) Distance from the center of attachment plate to the front end of Projected image size L2F / L3F lens...
-
Page 7: Installation
Installation After checking the height, width and structure of the installation location while referring to the “Dimensional relationship diagram” (pages 5-6) and “Dimensional relationship” in the Appendix, determine the appropriate posi- tions for setting up the screen and installing the projector. Setting up the screen Set up the screen according to the specified method in a position which takes into account the projection distance and angle and the type of screen being used. -
Page 8: Attaching The Projector Drop-Prevention Kit
Installation (continued) Attaching the projector drop-prevention kit Secure the wire rope to the projector (sold separately). Attention z For the combination of the projector with the ceiling mount bracket (for low ceilings) ET-PKD120S (sold separately) and the ceiling mount bracket (for high ceilings) ET-PKD120H (sold separately), and the mounting of the wire rope to the ceiling, please refer to the installation instructions of the ceiling mount bracket ET- PKD120S (for low ceilings) and ET-PKD120H (for high ceilings). - Page 9 Installation (continued) (when using the ceiling mount bracket ET-PKD120H (for high ceilings)) 1 Secure one end of the wire rope with a captive washer screw (M6×20) to “A” on the projector as shown on the left. Attention z Be sure to use the supplied flat washers and wire rope.
-
Page 10: Specifications
Specifications Width: 410 mm (16-5/32″) External dimensions Height: 56 mm (2-7/32″) Length: 314 mm (12-3/8″) Weight Approx. 2.2 k ] (4.85 lbs) 10 - ENGLISH... - Page 11 MEMO ENGLISH - 11...
- Page 12 Panasonic Connect Co., Ltd. Web Site : https://panasonic.net/cns/projector/ HS1017AM1042 -PS © Panasonic Connect Co., Ltd. 2022 Printed in Japan...
-
Page 13: Dimensional Relationship
Appendix / Annexe / Anhang ■ Dimensional relationship ■ Relations dimensionnelles ■ Verhältnis der Abmessungen The dimensional relationship between the screen and projection is shown below. Le rapport dimensionnel entre l'écran et la projection est montré comme suit. Das maßstäbliche Verhältnis zwischen der Projektionsfläche und der Projektion wird unten aufgeführt. (when using the ceiling mount bracket ET-PKD120S (for low ceilings)) (lors de l’utilisation du support de montage au plafond ET-PKD120S (pour plafond bas)) (bei Verwendung der Aufhängevorrichtung ET-PKD120S (für niedrige Decken)) - Page 14 Height of the projection area / Hauteur de la zone de projection / Höhe des Projektionsbereichs Width of the projection area / Largeur de la zone de projection / Breite des Projektionsbereichs Diagonal length of the projection area (m) / Longueur diagonale de la zone de projection (m) / Länge der Diagonalen des Projektionsbereichs (m) Projection distance (m) / Distance de projection (m) / Projektionsabstand (m) L(LW/LT)*...
- Page 15 z Values of L1 / Valeurs L1 / Werte L1 z PT-EZ770 / PT-EZ580 / PT-EW730 / PT-EW640 / PT-EW540 / PT-EX800 / PT-EX610 / PT-EX510 Projection Lens / l’Objectif de projection / (Units / Unités / Einheiten : mm) Projektionsobjektiv Standard zoom lens / Objectif-zoom standard /...
- Page 16 z PT-EZ770 / PT-EZ580 (Units / Unités / Einheiten : m) Projection distance (L) formula Throw ratio Zoom lens Aspect ratio Formule de calcul de la distance de projection (L) Rapport de la distance Objectif-zoom Rapport d’aspect Formel für den Projektionsabstand (L) de projection Zoomobjektiv Seitenverhältnis...
- Page 17 Fixed-focus lens Throw ratio Aspect ratio Projection distance (L) formula Objectif à mise Rapport de la distance Formule de calcul de la distance de projection (L) au point fixe Rapport d’aspect de projection Feststehendes Seitenverhältnis Formel für den Projektionsabstand (L) Projektionsverhältnis Objektiv 16 : 10...
- Page 18 Zu den Größen des projizierten Bilds und den Projektionsabständen des PT-MZ670 / PT-MW630 / PT-MZ570 / PT-MW530 siehe die Bedienungsanleitung des Projektors. Panasonic Connect Co., Ltd. Web Site : https://panasonic.net/cns/projector/ HS1017AM1042 -PS © Panasonic Connect Co., Ltd. 2022 Printed in Japan...