Table of Contents
Advertisement
Quick Links
Advertisement
Table of Contents

Related Manuals for Honeywell NOTIFIER AM1000


Summary of Contents for Honeywell NOTIFIER AM1000
- Page 1 Installation AM1000 manual Analog fire panel...
-
Page 2: Table Of Contents
INDEX GENERAL DESCRIPTION ELECTRICAL CHARACTERISTICS EARTH CONNECTING PRIMARY SUPPLY POWER SUPPLY BATTERIES CHARGE SECTION LIST OF THE FUSES NUMBER OF THE DEVICES INSTALLED ON THE LINE CHARACTERISTICA OF THE OUTPUT RELAYS TERMINAL INSTALLATION NETWORK CONNECTION INTERNAL SUPPLY AND BATTERIES CONNECTION SIREN CONNECTION COMPONENTS OF THE SYSTEM COMMUNICATION LINES DETECTORS/MODULES... - Page 3 LIMITS OF THE DETECTION SYSTEMS An alarm or fire detection system can be very useful for the timely warning of every dangerous events like fire, robbery or a simple infringement; sometime it can automatically manages the events (diffusion of messages for the evacuation, automatic extinguishing of fire, to interface with TVCC systems, block of the doors or ways leading up, automatic alert to the authorities, etc.).
-
Page 4: General Description
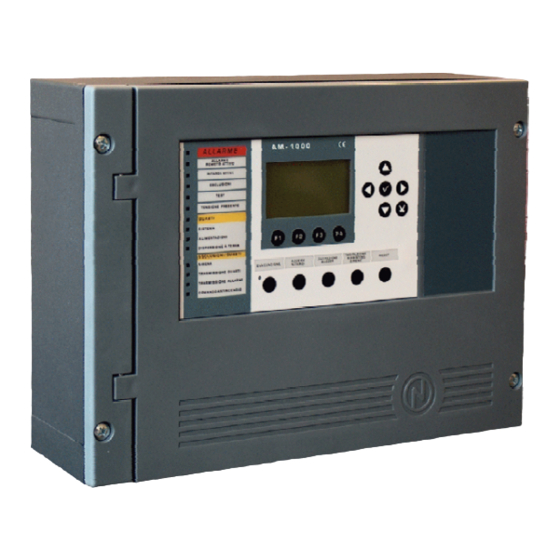
The AM-1000 is a fire detection control panel with the following main features: • Microprocessor System • 1 analog line • 99 detectors + 99 input/output modules • LCD graphic display with 8 lines for 20 columns (128 x 64 points) •... -
Page 5: Electrical Characteristics
• Functioning temperature: - 5° C - + 40° C. • Relative humidity: 10 % - 93 % (without condensate). • Storage temperature: - 10° C - + 50° C. • Weight : 2 Kg Earth connecting The earth connecting has to be realized in accordance with the CEI and ISPELS rules with a resistance lower than 10 Ohm. -
Page 6: Number Of The Devices Installed On The Line
Number of devices to be installed on the line The maximum number of devices that can be connected on the detection line is the following: • 99 detectors • 99 input/output modules Features of the output relays FUNCTION FEATURES Siren 1 24 Vdc / 1 A supervised contact. -
Page 7: Installation
For installation in a corner it is The contol panel has to be wall mounted in necessary to have a distance of order to allow a clear visibility of the disply 280mm to let the frontal panel open. and an easy access for the user. For example 1.5 m height allow an optimal display vision. -
Page 8: Network Connection
It is possible to open the control panel unscrewing the two securing screws of the lid. The connection cables to the detectors, auxiliary devices and supply network, can be inserted in the control panel making proper holes. The cables have to slide along the lateral wall of the box keeping some pieces of the cables that are connected to the CNA terminal. -
Page 9: Components Of The System
Lines for the communication to detectors/modules The AM1000 control panel interacts with the detection devices and intelligent/addressable devices through a 2 cable line. The line can be connected in the way to respect the specifications related to the STYLE 4 (open line) and STYLE 6 (closed line) signalization circuits lines. -
Page 10: Conenction Detectors Modules
Example of closed line (style 6) Base B-501 To be used with analog detectors NOTA1 Derivazioni separate ad Altro dispositivo del loop CONNECT TO PANEL EARTH % NOTE 1: It is not possible to connect devices for the transmission of alarms (telephone dialer, etc.) to this output, see the EN 54.2. -
Page 11: Circuits With Loop Connection (Style 6)
The functions are in accordance with the technical details regarding the signalization circuits NFPA STYLE 6 section 2 protected rooms ISO-X isolator module ISO-X isolator module section 1 protected rooms section 3 protected rooms ISO-X isolator module ISO-X isolator module CHANNNEL “A”... -
Page 12: Notes About The Lines For The Connection In Field
Note regarding the connection lines in field FEATURES OF THE CONNECTIONS (STYLE “A”) Canale B Loop SLC No “T” branches allowed Canale A SHIELD The total length of the SLC wire (from the output of the control panel and return) can not exceed the 3.000 meters. -
Page 13: Branch Resistance
FEATURES OF THE CONNECTIONS (STYLE “B”) BRANCH B SCHERMO BRANCH RAMO A RAMO D Branch resistance Cause a short-circuit for the terminal points of each branch and measure the DC resistance, from the beginning of the canal to the end of the branch. The total DC resistance from the panel to the end of the branch can not exceed 40 Ohm. -
Page 14: Test Procedure For Analog System Lines
Test procedure for analog system lines Before to supply the lines of the control panel it is necessary to verify the following values: NOTE: IT IS NECESSARY A DIGITAL TESTER a) line resistance Cause a positive and negative short-circuit at the of the installation and set the tester between (+) and (-) of the line. -
Page 15: Testing And Start Up
f) Line tension With the detectors/modules connected the output voltage of the n° 1 line (terminals 1-2) has to be 24 Vdc without test of the devices (no programmed point). A voltage lower than 14 Vdc is showing a connection inversion of the detectors or modules. The installation of the control panel has to be done after the careful reading the instructions carried on the Installation manual and programming Manual. -
Page 16: Periodical Maintenance Of The "Am-1000" Control Panel
Verify that the green led “Power present” is lighted. Verify that all the other led are off. Perform the procedure “lamp test” and verify that the display and all the bright indications light up for a few seconds. Remove the 230 Vca network supply from the AM1000 control panel and verify the following conditions: •... -
Page 17: Topographic Of The Frontal Board "Am-1000
ET-0206 keyboard connector Connector for Hard key for non-volatile AM1BA board memory re-write Cable: CVCV-0208 A: no change possible C: modify allowed PAGE - 14 Installation Manual AM-1000 NOTIFIER ITALIA Doc. M-145.1-AM1000-ENG Rev A.2 AM1000_manu... -
Page 18: Topographic Of The Main Borad "Am-1000
Force battery “JB” activation (temporarily shor 1-2 pin) CNAL Supply 230Vac Fuse F2AL / Supply 230Vac JDSPE Power LED Jumper for earth-fault detection (default:NC contact) Connector for AM1FR front board. Cable: CVCV-0208 JALL Jumper for relay alarm Reset button contact selection (default NA contact) LED ON: Main board fault... - Page 19 E-mail: notifier@notifier.it A Honeywell company Every care has been taken in the preparation of this data sheet but no liability can be accepted for the use of the information therein. Design features may be changed or amended without prior notice.