
Related Manuals for NETGEAR EX3800


Summary of Contents for NETGEAR EX3800
- Page 1 AC750 WiF Range Extender Mode l E X3800 Us e r Manual May 2015 202-11488-01 350 East Plumeria Drive San Jose, CA 95134...
- Page 2 Compliance For regulatory compliance information, visit http://www.netgear.com/about/regulatory. See the regulatory compliance document before connecting the power supply. Trademarks © NETGEAR, Inc., NETGEAR and the NETGEAR Logo are trademarks of NETGEAR, Inc. Any non-NETGEAR trademarks are used for reference purposes only.
-
Page 3: Table Of Contents
Table of Contents Chapter 1 Overview Meet Your Extender ..........6 Front Panel . - Page 4 AC750 WiF Range Extender Automatically Adjust for Daylight Saving Time......35 Manually Set the Extender Clock ........35 Back Up and Manage the Extender Configuration .
-
Page 5: Chapter 1 Overview
Note: Firmware updates with new features and bug fixes are made available from time to time at downloadcenter.netgear.com. Some products can regularly check the site and download new firmware, or you can check for and download new firmware manually. -
Page 6: Meet Your Extender
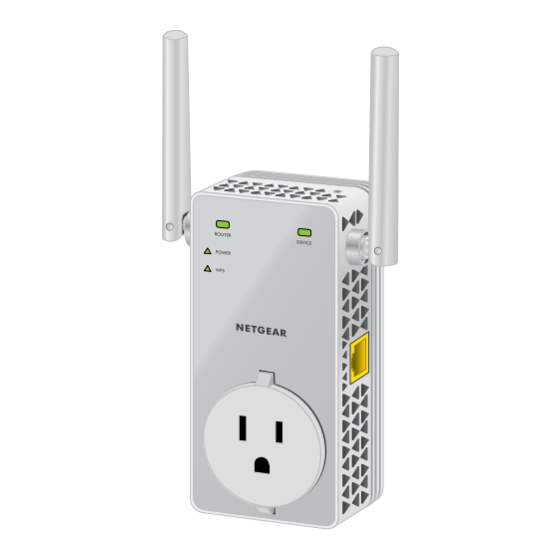
AC750 WiF Range Extender Meet Your Extender Before you install your extender, familiarize yourself with its LEDs, buttons, and port. Front Panel Router Device Link LED Link LED Power LED WPS LED Figure 1. Front panel LEDs Side Panels Power connector (varies by region) Factory Reset... -
Page 7: When To Use Your Extender
Off. WiFi security is not enabled. When to Use Your Extender NETGEAR recommends that you connect through the extender network only when the WiFi device is in a “dead zone” where connection from the existing network is poor or nonexistent. - Page 8 AC750 WiF Range Extender The extender must do each of these jobs so that both ends of the bridge are in place. WiFi Range Extender Existing WiFi Boosts the range of your existing WiFi and Sometimes your creates a stronger router does not signal in hard-to-reach provide the WiFi...
-
Page 9: Chapter 2 Get Started
Get Started This chapter covers the following topics: • Install the WiFi Extender • Use the Extender in Access Point Mode • Log In to the Extender After Installation • Run Smart Setup Installation... -
Page 10: Install The Wifi Extender
AC750 WiF Range Extender Install the WiFi Extender Place the extender, apply power, and connect the extender to your WiFi network. Note: You can also use the extender as a WiFi access point and create a new WiFi hotspot by using a wired Ethernet connection. See Use the Extender in Access Point Mode on page 14. - Page 11 AC750 WiF Range Extender Within two minutes, press the WPS button on your router or access point. The WPS LED on the extender lights solid green, the Router Link LED lights, and the extender connects to your existing WiFi network. If the Router Link LED does not light, try again.
- Page 12 AC750 WiF Range Extender The New Extender Setup page displays. Click the NEW EXTENDER SETUP button. The first time that you log in to the extender, the Create Account page displays. If the Create Account page does not display, visit www.mywifiext.net. Complete the fields on the Create Account page and click the NEXT button.
-
Page 13: Find The Best Location
Complete the registration fields and click the FINISH button to complete the setup. If you do not want to register your extender, click the Skip Registration link. Note that you must register your extender before you can use NETGEAR telephone support. The Status page displays. -
Page 14: Connect An Ethernet-Enabled Device
AC750 WiF Range Extender Connect an Ethernet-Enabled Device After the extender is connected to your existing WiFi network, you can connect a wired device to the extender using an Ethernet cable. The device can then access your existing network through the extender’s WiFi connection. Figure 4. - Page 15 AC750 WiF Range Extender To use the extender in access point mode: Plug the extender into an electrical outlet. Wait for the Power LED to light amber and then turn green. If the Power LED does not light, press the Power On/Off button on the side of the extender.
-
Page 16: Log In To The Extender After Installation
Complete the registration fields and click the FINISH button to complete the setup. If you do not want to register your extender, click the Skip Registration link. Note that you must register your extender before you can use NETGEAR telephone support. The Status page displays. -
Page 17: Run Smart Setup Installation
Complete the registration fields and click the FINISH button to complete the setup. If you do not want to register your extender, click the Skip Registration link. Note that you must register your extender before you can use NETGEAR telephone support. The Status page displays. -
Page 18: Chapter 3 Extender Network Settings
Extender Network Settings This chapter covers the following topics: • View Connected Devices • Boost Your Video Streaming with FastLane Technology • View WiFi Settings • Change the WiFi Network Name • Turn Off the SSID Broadcast to Create a Hidden Network •... -
Page 19: View Connected Devices
AC750 WiF Range Extender View Connected Devices You can view a list of devices that are connected to the extender network. To view connected devices: On a computer or WiFi device that is connected to the extender network, launch a web browser. -
Page 20: Boost Your Video Streaming With Fastlane Technology
AC750 WiF Range Extender Boost Your Video Streaming with FastLane Technology Get the most out of your HD entertainment with FastLane technology. With FastLane technology, the extender connects to your router using one band and connects to your devices using another band. Because a band is dedicated to each function, performance is enhanced. -
Page 21: View Wifi Settings
AC750 WiF Range Extender The page adjusts and displays two more radio buttons. Select a radio button: • Router-to-Extender in 2.4 GHz only and Extender-to-Device in 5 GHz only • Router to Extender in 5 GHz only and Extender-to-Device in 2.4 GHz only Click the Save button. -
Page 22: Change The Wifi Network Name
AC750 WiF Range Extender Change the WiFi Network Name To change the WiFi network name: On a computer or WiFi device that is connected to the extender network, launch a web browser. In the address field of your browser, enter www.mywifiext.net. When prompted, enter your email address and password. -
Page 23: Disable Or Enable The Wifi Radios
AC750 WiF Range Extender To turn off the SSID broadcast to create a hidden network: On a computer or WiFi device that is connected to the extender network, launch a web browser. In the address field of your browser, enter www.mywifiext.net. When prompted, enter your email address and password. -
Page 24: Change The Wifi Speed
AC750 WiF Range Extender Click the Menu icon The extender menu displays. Select Settings > Wireless. Select or clear the Enable 2.4 GHz WiFi check box. Select or clear the Enable 5 GHz WiFi check box. Click the SAVE button. Your settings are saved. -
Page 25: Use Wps To Add A Computer To The Extender's Wifi Network
AC750 WiF Range Extender Select Settings > Wireless. In each WiFi Speed menu, select a speed. Click the SAVE button. Your settings are saved. Use WPS to Add a Computer to the Extender’s WiFi Network WPS (WiFi Protected Setup) lets you connect a computer or WiFi device to the extender’s network without entering the WiFi network passphrase or key. -
Page 26: Use Wps With The Push Button Method
AC750 WiF Range Extender Use WPS with the Push Button Method For you to use the push button method to connect a WiFi device to the extender’s WiFi network, the WiFi device that you are trying to connect must include a physical WPS button or an onscreen WPS button that you can click. -
Page 27: Deny Access To A Computer Or Wifi Device
AC750 WiF Range Extender When prompted, enter your email address and password. Click the Menu icon The extender menu displays. Select Settings > Do More > Connect Devices (WPS). The Connect Devices (WPS) page displays. Select the PIN Number radio button. Type the PIN of the WiFi device in the field. -
Page 28: Set Up An Access Schedule
AC750 WiF Range Extender When prompted, enter your email address and password. Click the Menu icon The extender menu displays. Select Settings > Connected Devices. In the WiFi Devices section, select the Enable Access Control check box. The WiFi devices table displays the names and MAC addresses of WiFi devices that are connected to the extender. -
Page 29: Change The Extender's Device Name
Click the SAVE button. Your settings are saved. Change the Extender’s Device Name The default name is EX3800. To change the extender’s device name: On a computer or WiFi device that is connected to the extender network, launch a web browser. -
Page 30: Set Up The Extender To Use A Static Ip Address
AC750 WiF Range Extender Scroll down and click the IP Address heading. In the Device Name field, type a name. Click the SAVE button. Your settings are saved. Set Up the Extender to Use a Static IP Address The extender comes set up to use a dynamic IP address, which is the correct setting for most home networks. -
Page 31: Use The Extender With Mac Filtering Or Access Control
AC750 WiF Range Extender By default, the Dynamically get IP Address from Router radio button is selected. Select the Use Static IP Address radio button. Complete the fields to specify the IP network IP addresses. Click the SAVE button. Your settings are saved. Use the Extender with MAC Filtering or Access Control When the WiFi device connects through the extender to your router, the MAC address of the wireless device that is shown on the router is translated to another MAC address. -
Page 32: Chapter 4 Maintain And Monitor The Extender
Maintain and Monitor the Extender This chapter covers the following topics: • Change the Extender User Name and Password • Turn Password Protection Off and On • Recover a Forgotten User Name or Password • Automatically Adjust for Daylight Saving Time •... -
Page 33: Change The Extender User Name And Password
AC750 WiF Range Extender Change the Extender User Name and Password You can change the user name and password to log in to the extender. To add an extender user: On a computer or WiFi device that is connected to the extender network, launch a web browser. -
Page 34: Turn Password Protection Off And On
AC750 WiF Range Extender Turn Password Protection Off and On NETGEAR recommends that you leave password protection on to help keep your network secure. You can turn password protection off and on. To turn password protection off or on: On a computer or WiFi device that is connected to the extender network, launch a web browser. -
Page 35: Automatically Adjust For Daylight Saving Time
AC750 WiF Range Extender A login window opens. Log in to the extender. Automatically Adjust for Daylight Saving Time To set up the extender to automatically adjust for daylight saving time: On a computer or WiFi device that is connected to the extender network, launch a web browser. -
Page 36: Back Up And Manage The Extender Configuration
AC750 WiF Range Extender Back Up and Manage the Extender Configuration When the extender works correctly after initial setup, NETGEAR recommends that you back up the extender configuration settings. After you have back up the settings, if you change the extender configuration settings but are not content with the new settings, you can restore the extender configuration to the backed-up settings. -
Page 37: Restore The Configuration Settings
AC750 WiF Range Extender Restore the Configuration Settings You can restore the configuration file of the extender to a previously saved configuration file. To restore the extender configuration settings: On a computer or WiFi device that is connected to the extender network, launch a web browser. - Page 38 AC750 WiF Range Extender To reset the extender to factory default settings, you can either use the Factory Reset button on the side panel or log in to the extender and reset it. For a list of factory default settings, see Factory Default Settings on page 46.
-
Page 39: Update The Firmware
AC750 WiF Range Extender When prompted, enter your email address and password. Click the Menu icon The extender menu displays. Select Settings > Other Settings. CAUTION: After you click the RESET button, do not try to go online, turn off the extender, shut down the computer, or do anything else to the extender until it finishes restarting! Click the Factory Reset button. -
Page 40: Restart The Extender Remotely
AC750 WiF Range Extender Select Settings > Firmware Update. Click the CHECK ONLINE button. If new firmware is available, follow the onscreen prompts to download it onto your computer. Note: You might need to unzip the firmware file. Click the BROWSE button. Locate and select the new firmware file. - Page 41 AC750 WiF Range Extender The Other Settings page displays. Click the RESTART button and click the Yes button to confirm. The extender restarts, which takes about two minutes. Maintain and Monitor the Extender...
-
Page 42: Chapter 5 Faqs And Troubleshooting
FAQs and Troubleshooting This chapter covers the following topics: • FAQs • Cannot Connect to the Extender • Cannot Join a WiFi Network and Receive an Error Message... -
Page 43: Faqs
AC750 WiF Range Extender FAQs This section provides answers for difficulties you might experience with the extender. The web browser setup keeps asking me for my network password (passphrase) or security key, and I am sure that I entered the correct password. What can I do? The extender is probably placed at the borderline of the range covered by the router or access point. -
Page 44: Cannot Join A Wifi Network And Receive An Error Message
AC750 WiF Range Extender Cannot Join a WiFi Network and Receive an Error Message To join a WiFi network, you must know its network name (also called the SSID) so that you can select it. If the network is secure, you must know the passphrase or key. If the extender does not connect to the network that you select, the cause might be one of the following: •... -
Page 45: Appendix A Factory Settings And Technical Specifications
Factory Settings and Technical Specifications This appendix covers the following topics: • Factory Default Settings • Technical and Environmental Specifications... -
Page 46: Factory Default Settings
AC750 WiF Range Extender Factory Default Settings To reset the extender to factory default settings, you can use the Factory Reset button on the side panel or you can log in and click the onscreen RESET button. For more information, Return the Extender to Its Factory Default Settings on page 37. -
Page 47: Technical And Environmental Specifications
AC750 WiF Range Extender Technical and Environmental Specifications The following table shows the technical and environmental specifications. Table 3. Technical specifications Technical Specifications Network protocol and Data and routing protocols: TCP/IP, DHCP server and client, DNS relay, standards compatibility Physical specifications •...