
Related Manuals for NETGEAR EX6250


Summary of Contents for NETGEAR EX6250
- Page 1 User Manual AC1750 WiFi Mesh Extender Model EX6250 NETGEAR, Inc. January 2019 350 E. Plumeria Drive 202-11920-01 San Jose, CA 95134, USA...
- Page 2 Compliance For regulatory compliance information, visit http://www.netgear.com/about/regulatory. See the regulatory compliance document before connecting the power supply. Trademarks © NETGEAR, Inc., NETGEAR and the NETGEAR Logo are trademarks of NETGEAR, Inc. Any non_NETGEAR trademarks are used for reference purposes only.
-
Page 3: Table Of Contents
Place the extender and apply power..........11 Connect the extender to an existing WiFi network....11 Connect with WPS..............11 Connect with the NETGEAR installation assistant....13 Install your extender in access point mode........14 Connect a device to the extender network........16 Connect a device to the extender network using WiFi.....17 Connect an Ethernet-enabled device to the extender.....18... - Page 4 AC1750 WiFi Mesh Extender Chapter 4 Extender Network Settings Enable or disable One WiFi Name...........36 Enable or disable smart connect............37 View connected devices..............38 View WiFi settings................39 Change the WiFi network name............40 Turn off the SSID broadcast to create a hidden network....41 Disable or enable the WiFi radios............42 Change the WiFi speed..............43 Use WPS to add a computer to the extender’s WiFi network..44...
-
Page 5: Chapter 1 Overview
This chapter covers the following topics: • LEDs • Side and bottom panels • When to use your extender • How the extender works Note: For more information about the topics covered in this manual, visit the support website at support.netgear.com. -
Page 6: Leds
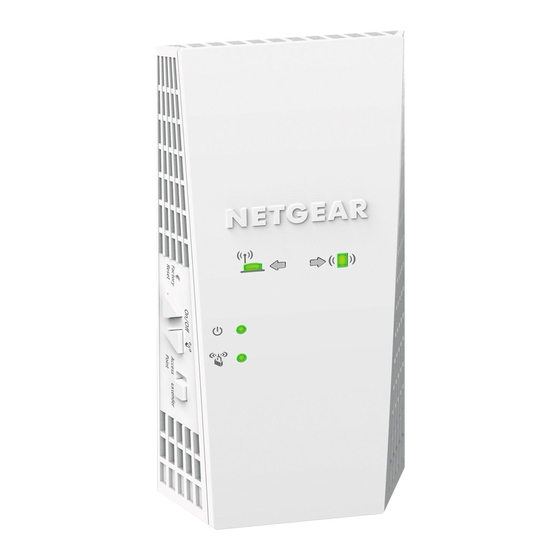
AC1750 WiFi Mesh Extender LEDs Figure 1. LEDs The following table describes the LEDs on the extender. Table 1. LED descriptions Description Router Link LED This LED indicates the WiFi connection between the extender and the router. • Solid white. Best connection. •... - Page 7 AC1750 WiFi Mesh Extender Table 1. LED descriptions (Continued) Description • Off. The extender is in a good location. Client Arrow LED • Blinking. Move your WiFi client, such as a WiFi-enabled computer or mobile device, closer to the extender. Power LED •...
-
Page 8: Side And Bottom Panels
AC1750 WiFi Mesh Extender Side and bottom panels A switch and buttons are located on the side panel. An Ethernet port is located on the bottom panel. Figure 2. Side and bottom panel The side panel contains the following components: •... -
Page 9: When To Use Your Extender
AC1750 WiFi Mesh Extender When to use your extender We recommend that you connect through the extender network only when your WiFi device is in a “dead zone” where connection from the existing network is poor or nonexistent. Data traffic routed through the extender is inherently slower than traffic routed directly from the network. -
Page 10: Chapter 2 Get Started
Get started This chapter covers the following topics: • Install your extender in extender mode • Install your extender in access point mode • Connect a device to the extender network • Log in to the extender after installation • Run the Smart Setup installation... -
Page 11: Install Your Extender In Extender Mode
Note: WPS does not support WEP network security or a hidden SSID network. If your router WiFi network uses WEP security or its SSID is hidden, follow the instructions in Connect with the NETGEAR installation assistant on page 13. • Connect with web browser setup. For more information, see Connect with the NETGEAR installation assistant on page 13. - Page 12 If the Router Link LED doesn't light, move the extender closer to the router and try again. If it still does not light, see Connect with the NETGEAR installation assistant on page Note: If your router supports the 5 GHz band and your extender didn’t connect to that band, repeat the WPS process.
-
Page 13: Connect With The Netgear Installation Assistant
MyWiFiExample-5G Connect with the NETGEAR installation assistant You can use the NETGEAR installation assistant to connect your extender to your existing WiFi router network. To use the NETGEAR installation assistant, you must launch a web browser on your computer or mobile device. -
Page 14: Install Your Extender In Access Point Mode
AC1750 WiFi Mesh Extender 6. Unplug the extender and move it to a new location about halfway between your router and the area with a poor WiFi signal. 7. Use the Router Link LED to help you choose a spot where the extender-to-router connection is optimal. - Page 15 DHCP server. d. Return to the NETGEAR installation assistant and follow the prompts to finish setting up your extender as an access point. • Ethernet connection directly to the extender. You can connect your computer directly to your extender using an Ethernet connection.
-
Page 16: Connect A Device To The Extender Network
The NETGEAR installation assistant displays. d. Follow the prompts to set up your extender in access point mode. At the end of the installation, the NETGEAR installation assistant displays the extender's WiFi network credentials. Use the extender's WiFi credentials to connect your WiFi-enabled devices to the extender network. -
Page 17: Connect A Device To The Extender Network Using Wifi
AC1750 WiFi Mesh Extender Connect a device to the extender network using WiFi If you enabled the One WiFi Name feature, your extender uses the same WiFi network name and password as your router. The following is an example of what your WiFi network names might look like if One WiFi Name is enabled: •... -
Page 18: Connect An Ethernet-Enabled Device To The Extender
AC1750 WiFi Mesh Extender Connect an Ethernet-enabled device to the extender After the extender is connected to your existing WiFi network, you can connect a wired device to the extender using an Ethernet cable. P-SCAN DVD PLAYER OPEN?CLOSE PLAY STOP POWER ON/STANDBY PROGRESSIVE SCAN... -
Page 19: Log In To The Extender After Installation
AC1750 WiFi Mesh Extender Log in to the extender after installation After installation, you can log in to the extender to view or change the extender’s settings. To log in to the extender: 1. Launch a web browser from a computer or mobile device that is connected to your extender network. - Page 20 AC1750 WiFi Mesh Extender For more information about how to find your extender’s IP address, see Find the extender’s IP address on page 58. A login page displays. 3. Enter your admin user name and password and click the LOG IN button. The Status page displays.
-
Page 21: Chapter 3 Maintain And Monitor The Extender
Maintain and monitor the extender This chapter covers the following topics: • Change the extender login user name and password • Turn password protection off and on • Recover a forgotten user name or password • Automatically adjust for daylight saving time •... -
Page 22: Change The Extender Login User Name And Password
AC1750 WiFi Mesh Extender Change the extender login user name and password You can change the admin user name and password that you use to log in to the extender. To change the extender's login user name and password: 1. Launch a web browser from a computer or mobile device that is connected to your extender network. -
Page 23: Turn Password Protection Off And On
AC1750 WiFi Mesh Extender 9. Click the SAVE button. Your settings are saved. Turn password protection off and on We recommend that you leave password protection on to help keep your network secure. You can turn password protection off and on. To turn password protection off or on: 1. -
Page 24: Recover A Forgotten User Name Or Password
AC1750 WiFi Mesh Extender Recover a forgotten user name or password If you changed the password that you use to access the extender and you set up password recovery, you can recover your password if you lose it. To recover your password that you use to access the extender: 1. -
Page 25: Automatically Adjust For Daylight Saving Time
AC1750 WiFi Mesh Extender Automatically adjust for daylight saving time To set up the extender to automatically adjust for daylight saving time: 1. Launch a web browser from a computer or mobile device that is connected to your extender network. 2. -
Page 26: Back Up And Manage The Extender Configuration
AC1750 WiFi Mesh Extender To manually set the extender clock: 1. Launch a web browser from a computer or mobile device that is connected to your extender network. 2. Log in to your extender: • If you did not enable the One WiFi Name feature, enter http://mywifiext.local/ in the address field of the browser. -
Page 27: Back Up The Configuration Settings
AC1750 WiFi Mesh Extender extender configuration settings but are not content with the new settings, you can restore the extender configuration to the backed-up settings. Back up the configuration settings You can back up the configuration file of the extender. To back up the extender configuration settings: 1. -
Page 28: Restore The Configuration Settings
AC1750 WiFi Mesh Extender Restore the configuration settings You can restore the configuration settings of the extender to a previously saved configuration file. To restore the extender configuration settings: 1. Launch a web browser from a computer or mobile device that is connected to your extender network. -
Page 29: Return The Extender To Its Factory Default Settings
AC1750 WiFi Mesh Extender A confirmation pop-up window opens. 9. Confirm your decision. The extender configuration is restored and the extender restarts. This process takes about one minute. Return the extender to its factory default settings Under some circumstances (for example, if you lose track of the changes that you made to the extender settings), you might want to erase the configuration and reset the extender to factory default settings. - Page 30 AC1750 WiFi Mesh Extender To log in to the extender and reset the extender’s factory settings: 1. Launch a web browser from a computer or mobile device that is connected to your extender network. 2. Log in to your extender: •...
-
Page 31: Update The Extender Firmware
AC1750 WiFi Mesh Extender Update the extender firmware You can log in to the extender and check to see if new firmware is available, or you can manually load a specific firmware version to your extender. Check for new firmware and update the extender Unless you changed the settings in the Firmware Update page previously, the extender is set up to check for new firmware automatically at login. -
Page 32: Manually Upload Firmware To The Extender
If you want to upload a specific firmware version, follow these instructions. To manually upload a firmware file to your extender: 1. Download the firmware file for your extender from the NETGEAR Download Center, save it to your desktop, and unzip the file if needed. -
Page 33: Restart The Extender From The Extender Web Interface
AC1750 WiFi Mesh Extender The firmware file name ends with a extension. .img 9. Click the UPLOAD button. Caution: After you click the UPLOAD button, do not try to go online, turn off the extender, shut down the computer, or do anything else to the extender until it finishes restarting. - Page 34 AC1750 WiFi Mesh Extender 5. Select Settings > Other. The Other Settings page displays. 6. Click the RESTART button and click the Yes button to confirm. The extender restarts, which takes about two minutes. Maintain and monitor the User Manual extender...
-
Page 35: Chapter 4 Extender Network Settings
Extender Network Settings This chapter covers the following topics: • Enable or disable One WiFi Name • Enable or disable smart connect • View connected devices • View WiFi settings • Change the WiFi network name • Turn off the SSID broadcast to create a hidden network •... -
Page 36: Enable Or Disable One Wifi Name
AC1750 WiFi Mesh Extender Enable or disable One WiFi Name The One WiFi Name feature enables your extender to use the same WiFi network settings as your router. If you enabled the One WiFi Name feature, your extender uses the same WiFi network name and password as your router. -
Page 37: Enable Or Disable Smart Connect
AC1750 WiFi Mesh Extender If your browser displays the Menu icon , click it. The extender menu displays. 5. Select Settings > Wireless. The Wireless page displays. 6. To enable the One WiFi name feature, select the Yes radio button. If this is the first time you’re enabling the One WiFi Name feature, you must run the Smart Setup. -
Page 38: View Connected Devices
AC1750 WiFi Mesh Extender • If you enabled the One WiFi Name feature, enter one of the following URLs: Windows-based computers. http://mywifiext/ or http://mywifiext.local/ Mac computers, iOS devices, and Linux devices. http://mywifiext.local/ Android devices. http://<extender’s IP address>/ (for example, http://192.168.1.3/) For more information about how to find your extender’s IP address, see Find the extender’s IP address on page 58. -
Page 39: View Wifi Settings
AC1750 WiFi Mesh Extender To view connected devices: 1. Launch a web browser from a computer or mobile device that is connected to your extender network. 2. Log in to your extender: • If you did not enable the One WiFi Name feature, enter http://mywifiext.local/ in the address field of the browser. -
Page 40: Change The Wifi Network Name
AC1750 WiFi Mesh Extender • If you enabled the One WiFi Name feature, enter one of the following URLs: Windows-based computers. http://mywifiext/ or http://mywifiext.local/ Mac computers, iOS devices, and Linux devices. http://mywifiext.local/ Android devices. http://<extender’s IP address>/ (for example, http://192.168.1.3/) For more information about how to find your extender’s IP address, see Find the extender’s IP address on page 58. -
Page 41: Turn Off The Ssid Broadcast To Create A Hidden Network
AC1750 WiFi Mesh Extender 3. Enter your admin user name and password and click the LOG IN button. The Status page displays. If your browser displays the Menu icon , click it. The extender menu displays. 5. Select Settings > Wireless. The Wireless page displays. -
Page 42: Disable Or Enable The Wifi Radios
AC1750 WiFi Mesh Extender 3. Enter your admin user name and password and click the LOG IN button. The Status page displays. If your browser displays the Menu icon , click it. The extender menu displays. 5. Select Settings > Wireless. The Wireless page displays. -
Page 43: Change The Wifi Speed
AC1750 WiFi Mesh Extender The extender menu displays. 5. Select Settings > Wireless. The Wireless page displays. 6. Select or clear the Enable 2.4 GHz WiFi check box. 7. Select or clear the Enable 5 GHz WiFi check box. 8. Click the SAVE button. Your settings are saved. -
Page 44: Use Wps To Add A Computer To The Extender's Wifi Network
AC1750 WiFi Mesh Extender The Wireless page displays. 6. In the 5 GHz network WiFi Speed menu, select a speed. 7. Click the SAVE button. Your settings are saved. Use WPS to add a computer to the extender’s WiFi network WPS (WiFi Protected Setup) lets you connect a computer or WiFi device to the extender’s network without entering the WiFi network passphrase or key. -
Page 45: Use Wps With The Pin Method
AC1750 WiFi Mesh Extender • If you enabled the One WiFi Name feature, enter one of the following URLs: Windows-based computers. http://mywifiext/ or http://mywifiext.local/ Mac computers, iOS devices, and Linux devices. http://mywifiext.local/ Android devices. http://<extender’s IP address>/ (for example, http://192.168.1.3/) For more information about how to find your extender’s IP address, see Find the extender’s IP address on page 58. - Page 46 AC1750 WiFi Mesh Extender To add a computer or WiFi device to the extender’s WiFi network: 1. Launch a web browser from a computer or mobile device that is connected to your extender network. 2. Log in to your extender: •...
-
Page 47: Deny Access To A Computer Or Wifi Device
AC1750 WiFi Mesh Extender Deny access to a computer or WiFi device By default, access control is disabled so that it is easy for you to connect to the extender’s WiFi networks. You can deny network access to specific computers and WiFi devices based on their MAC addresses. -
Page 48: Set Up An Access Schedule
AC1750 WiFi Mesh Extender The WiFi devices table displays the names and MAC addresses of WiFi devices that are connected to the extender. 7. Select the Deny check box for the device. 8. Click the SAVE button. Your settings are saved and that device cannot connect to the extender’s WiFi network. -
Page 49: Change The Extender's Device Name
AC1750 WiFi Mesh Extender 6. Select the Access Schedule On radio button. The page adjusts. 7. In the Days menu and the Time menu, select the day and time when you want to disable the extender’s wireless or wired connection to the router. 8. -
Page 50: Set Up The Extender To Use A Static Ip Address
AC1750 WiFi Mesh Extender 6. Scroll down and click the IP Address heading. The page expands. 7. In the Device Name field, type a name. 8. Click the SAVE button. Your settings are saved. Set up the extender to use a static IP address The extender comes set up to use a dynamic IP address, which is the correct setting for most home networks. -
Page 51: Configure A Router With Advanced Mac Settings To Work With Your Extender
AC1750 WiFi Mesh Extender The page expands. By default, the Dynamically get IP Address from Router radio button is selected. 7. Select the Use Static IP Address radio button. 8. Complete the fields to specify the IP network IP addresses. 9. -
Page 52: Boost Your Video Streaming With Fastlane Technology
AC1750 WiFi Mesh Extender 4. Log in to your extender: a. Launch a web browser from a computer or mobile device that is connected to your extender network. b. Log in to your extender: • If you did not enable the One WiFi Name feature, enter http://mywifiext.local/ in the address field of the browser. - Page 53 AC1750 WiFi Mesh Extender If all your devices and your WiFi router support only the 2.4 GHz band, or all your devices and your WiFi router support only the 5 GHz band, do not enable FastLane Technology. When you enable FastLane Technology, two options are available: •...
-
Page 54: Enable Or Disable 20/40 Mhz Coexistence
AC1750 WiFi Mesh Extender 7. Select a radio button: • Router-to-Extender in 2.4 GHz only and Extender-to-Device in 5 GHz only • Router to Extender in 5 GHz only and Extender-to-Device in 2.4 GHz only 8. Click the SAVE button. Your changes are saved. - Page 55 AC1750 WiFi Mesh Extender 6. Enable or disable 20/40 MHz coexistence: • To enable 20/40 MHz coexistence, select the Enable 20/40 MHz Coexistence check box. • To disable 20/40 MHz coexistence, clear the Enable 20/40 MHz Coexistence check box. 7. Click the SAVE button. Your settings are saved.
-
Page 56: Chapter 5 Faqs And Troubleshooting
FAQs and troubleshooting This chapter contains the following topics: • FAQs • Find the extender’s IP address • Cannot connect to the extender • Cannot join a WiFi network and receive an error message • Cannot access mywifiext.net... -
Page 57: Faqs
AC1750 WiFi Mesh Extender FAQs This section provides answers for difficulties you might experience with the extender. The web browser setup keeps asking me for my network password (passphrase) or security key, and I am sure that I entered the correct password. What can I do? The extender is probably placed at the borderline of the range covered by the router or access point. -
Page 58: Find The Extender's Ip Address
Android device, you must use the extender’s IP address. You can log in to your router to find your extender’s IP address. If you own a NETGEAR router, use the following procedure to find the extender’s IP address. If you do not own a NETGEAR router, see your router's documentation. -
Page 59: Cannot Connect To The Extender
AC1750 WiFi Mesh Extender The user name is admin. The password is the one that you specified the first time that you logged in. The user name and password are case-sensitive. The BASIC Home page displays. 4. Select Attached Devices. A list of devices connected to your router displays. -
Page 60: Cannot Access Mywifiext.net
Try these troubleshooting tips to connect to www.mywifiext.net: • If you’re trying to access www.mywifiext.net for the first time to set up your extender, see Connect with the NETGEAR installation assistant on page 13 and follow the instructions. • After you connect your computer or mobile device to the extender network, make sure that the extender’s Client Link LED is solid white. - Page 61 AC1750 WiFi Mesh Extender • If your extender and router use the same WiFi network name (SSID), enter http://<extender’s IP address>/ (for example, http://192.168.1.3/). For more information about how to find your extender’s IP address, see Find the extender’s IP address on page 58. •...
-
Page 62: Chapter 6 Supplemental Information
Supplemental information This appendix covers the following topics: • Factory default settings • Technical and environmental specifications... -
Page 63: Factory Default Settings
AC1750 WiFi Mesh Extender Factory default settings To reset the extender to factory default settings, you can use the Factory Reset button on the side panel or you can log in and click the onscreen RESET button. For more information, see Return the extender to its factory default settings on page 29. The following table shows the factory default settings. -
Page 64: Technical And Environmental Specifications
AC1750 WiFi Mesh Extender Technical and environmental specifications The following table shows the technical and environmental specifications. Table 3. Technical specifications Technical Specifications Network protocol and Data and routing protocols: TCP/IP, DHCP server and client, DNS relay standards compatibility Physical specifications Dimensions: 6.34 x 3.2 x 1.75 in (161 x 81.4 x 44.5 mm) Weight: 0.66 lb (0.3 kg) Environmental...