Table of Contents
Advertisement
Quick Links
Advertisement
Table of Contents

Related Manuals for AEG ECE455020B


Summary of Contents for AEG ECE455020B
- Page 1 ECE455020B User Manual Oven ECE455020M ECS45522CM USER MANUAL...
-
Page 2: Table Of Contents
13. ENERGY EFFICIENCY..................33 FOR PERFECT RESULTS Thank you for choosing this AEG product. We have created it to give you impeccable performance for many years, with innovative technologies that help make life simpler – features you might not find on ordinary appliances. Please spend a few minutes reading to get the very best from it. - Page 3 ENGLISH responsible for any injuries or damage that are the result of incorrect installation or usage. Always keep the instructions in a safe and accessible location for future reference. 1.1 Children and vulnerable people safety This appliance can be used by children aged from 8 •...
-
Page 4: Safety Instructions
Before carrying out any maintenance, disconnect the • appliance from the power supply. WARNING: Ensure that the appliance is switched off • before replacing the lamp to avoid the possibility of electric shock. Do not use the appliance before installing it in the •... - Page 5 ENGLISH be replaced, this must be carried out by our Authorised Service Centre. Cabinet minimum 578 (600) mm • Do not let mains cables touch or height (Cabinet under come near the appliance door or the the worktop minimum niche below the appliance, especially height) when it operates or the door is hot.
- Page 6 • Do not apply pressure on the open • Replace immediately the door glass door. panels when they are damaged. • Do not use the appliance as a work Contact the Authorised Service surface or as a storage surface.
-
Page 7: Product Description
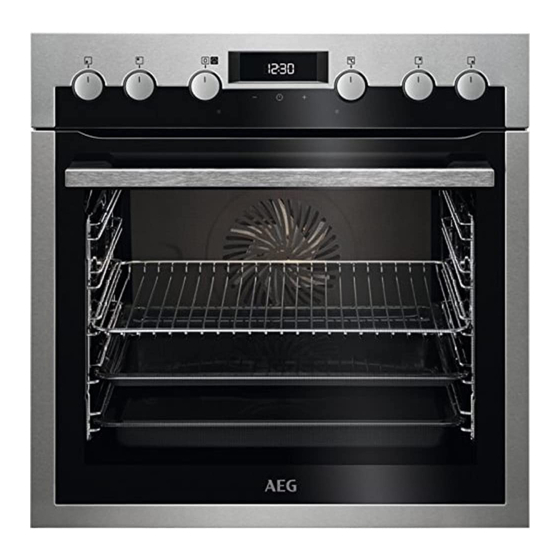
ENGLISH • Remove the door catch to prevent children or pets from becoming trapped in the appliance. 3. PRODUCT DESCRIPTION 3.1 General overview Control panel Knob for the heating functions Power lamp / symbol Display Temperature indicator / symbol Control knob (for the temperature) Knobs for the cooking zones Heating element Lamp... - Page 8 You must read the Safety chapters in the hob user manual. 4.2 Heat settings 2. Immediately set the necessary heat setting. 3. To deactivate the function, turn the Knob indication Function knob to the off position. Off position 4.4 Using the double zone (if...
-
Page 9: Before First Use
ENGLISH 5. BEFORE FIRST USE WARNING! Refer to Safety chapters. 5.1 Before first use The oven can emit an odour and smoke during preheating. Make sure that the room is ventilated. Step 1 Step 2 Step 3 Set the clock Clean the oven Preheat the empty oven 1. - Page 10 Step 2 Fill the cavity embossment with tap water. The maximum capacity of the cavity embossment is 250 ml. Do not refill the cavity em‐ bossment during cooking or when the oven is hot. Step 3 Set the function: Step 4 Turn the control knob for the temperature to set temperature.
-
Page 11: Clock Functions
ENGLISH The lamp may turn off Heating func‐ Application automatically at a tion temperature below 60 °C during some oven functions. To bake on up to three shelf positions at the 6.4 Notes on: Moist Fan same time and to dry Baking food. -
Page 12: Using The Accessories
How to change: Time of Day Step 1 - press repeatedly. - starts to flash. Step 2 - press to set the time. After approximately 5 sec., the flashing stops and the display shows the time. - press repeatedly to change the time of day. -
Page 13: Additional Functions
ENGLISH prevents cookware from slipping of the shelf. Wire shelf: Push the shelf between the guide bars of the shelf support. Baking tray / Deep pan: Push the tray between the guide bars of the shelf support. Wire shelf, Baking tray / Deep pan: Push the tray between the guide bars of the shelf support and the wire shelf on the guide bars above. - Page 14 10.1 Examples of cooking applications for the hob Heat set‐ Application Time Hints ting (min) To keep cooked food warm. as re‐ Put a lid on the cookware. quired 1 - 2 To make Hollandaise sauce, and 5 - 25 Mix at intervals.
- Page 15 ENGLISH CAKES / PASTRIES / BREADS (ml) (°C) (min) Cookies / Scones / Croissants 150 - 180 10 - 20 Focaccia 200 - 210 10 - 20 Pizza 10 - 20 Bread rolls 20 - 25 Bread 35 - 40 Plum cake / Apple pie / Cinnamon rolls, baked in a 100 - 150 160 - 180...
- Page 16 ROASTING (°C) (min) Roast beef 50 - 60 Chicken 60 - 80 Roast pork 65 - 80 10.4 Baking need to change the temperature setting if an unequal browning occurs. The For the first baking, use the lower differences equalize during baking.
- Page 17 ENGLISH 10.6 Baking on one shelf level BAKING IN (°C) (min) TINS Flan base - True Fan Cooking 170 - 180 10 - 25 short pastry, preheat the empty oven Flan base - True Fan Cooking 150 - 170 20 - 25 sponge cake mixture Ring cake /...
- Page 18 CAKES / PASTRIES / (°C) (min) BREADS Buttered almond 190 - 210 20 - 30 cake / Sugar cakes Cream puffs / Eclairs 190 - 210 20 - 35 Plaited bread / Bread 170 - 190 30 - 40...
- Page 19 ENGLISH (°C) (min) Baguettes topped with True Fan Cooking 160 - 170 15 - 30 melted cheese Vegetables au gratin, Turbo Grilling 160 - 170 15 - 30 preheat the empty oven Lasagne Conventional Cooking 180 - 200 25 - 40 Fish bakes Conventional Cooking 180 - 200...
- Page 20 BIS‐ CUITS / SMALL (°C) (min) 2 positions 3 positions CAKES / PAS‐ TRIES / ROLLS Puff pastries, 170 - 180 30 - 50 1 / 4 preheat the empty oven Biscuits made of 160 - 170 30 - 60...
- Page 21 ENGLISH PORK Use the function: Turbo Grilling. (kg) (°C) (min) Shoulder / Neck / Ham 1 - 1.5 160 - 180 90 - 120 joint Chops / Spare rib 1 - 1.5 170 - 180 60 - 90 Meatloaf 0.75 - 1 160 - 170 50 - 60 Pork knuckle, precooked 0.75 - 1...
- Page 22 GAME Use the function: Conventional Cooking. (kg) (°C) (min) Saddle / Hare leg, up to 1 30 - 40 preheat the empty oven Venison saddle 1.5 - 2 210 - 220 35 - 40 Haunch of venison 1.5 - 2...
- Page 23 ENGLISH 10.11 Crispy baking with: Pizza Function PIZZA PIZZA Preheat the empty oven before cooking. Use the first shelf position. Use the second shelf position. (°C) (min) Tarts 180 - 200 40 - 55 (°C) (min) Spinach flan 160 - 180 45 - 60 Pizza, thick 180 - 200...
- Page 24 GRILL Use the function: Grill (°C) (min) (min) 1st side 2nd side Roast beef 210 - 230 30 - 40 30 - 40 Beef fillet 20 - 30 20 - 30 Pork loin 210 - 230 30 - 40...
- Page 25 ENGLISH DEFROSTING Use the function: True Fan Cooking. (°C) (min) Lasagne / Cannelloni, fro‐ 160 - 180 40 - 60 Baked cheese 170 - 190 20 - 30 Chicken wings 190 - 210 20 - 30 10.14 Defrost the oven cavity. Put the food in a deep dish and set it on top of the plate inside Remove the food packaging and put the the oven.
- Page 26 10.15 Dehydrating - True Fan Cooking VEGETA‐ Cover trays with grease proof paper or BLES (°C) baking parchment. For a better result, stop the oven halfway Vegetables for soup 60 - 70 5 - 6 through the drying time, open the door...
- Page 27 ENGLISH (°C) (min) Whole fish in salt, 0.3 - 0.5 kg 190 - 200 45 - 50 Whole fish in parchment, 0.3 - 0.5 kg 190 - 200 50 - 60 Amaretti (20; 0.5 kg in total) 170 - 180 40 - 50 Apple crumble 190 - 200...
- Page 28 BAKING ON ONE LEVEL. Biscuits Use the third shelf position. (°C) (min) Small cakes, 20 per tray, True Fan Cooking 20 - 35 preheat the empty oven Small cakes, 20 per tray, Conventional Cooking 20 - 30 preheat the empty oven MULTILEVEL BAKING.
-
Page 29: Care And Cleaning
ENGLISH 11. CARE AND CLEANING WARNING! Refer to Safety chapters. 11.1 Notes on cleaning Clean the front of the oven with a soft cloth with warm water and a mild detergent. Use a cleaning solution to clean metal surfaces. Clean stains with a mild detergent. Do not apply it on the catalytic surfa‐ Cleaning ces. - Page 30 Spots or discolouration of the catalytic the empty oven on a regular basis. coating have no effect on the cleaning. Clean the oven with catalytic cleaning Step 1 Turn off the oven and wait until it is cold.
- Page 31 ENGLISH Step 1 Fully open the door. Step 2 Fully press the clamping levers (A) on the two door hinges. Step 3 Close the oven door to the first opening position (approximately 70° angle). Hold the door at both sides and pull it away from the oven at an upwards an‐ gle.
-
Page 32: Troubleshooting
Top lamp Step 1 Turn the glass cover to remove Step 2 Clean the glass cover. Step 3 Replace the lamp with a suitable 300 °C heat-resistant lamp. Step 4 Install the glass cover. 12. TROUBLESHOOTING WARNING! Problem Check if... -
Page 33: Energy Efficiency
ENGLISH 13. ENERGY EFFICIENCY 13.1 Product Information and Product Information Sheet* Supplier's name ECE455020B 940321374 Model identification ECE455020M 940321340 ECS45522CM 940321342 Energy Efficiency Index 81.2 Energy efficiency class Energy consumption with a standard load, conven‐ 0.99 kWh/cycle tional mode Energy consumption with a standard load, fan-forced 0.69 kWh/cycle... - Page 34 The residual heat inside the Moist Fan Baking oven will continue to cook. Function designed to save energy during cooking. Use the residual heat to warm up other dishes. Keep food warm Choose the lowest possible temperature setting to use residual heat and keep a meal warm.
- Page 36 www.aeg.com/shop...