Makita DUH483 Instruction Manual
Cordless hedge trimmer
Hide thumbs
Also See for DUH483:
- Instruction manual (84 pages) ,
- Technical information (13 pages) ,
- Instruction manual (80 pages)
Table of Contents
Advertisement
Quick Links
Advertisement
Table of Contents

Related Manuals for Makita DUH483


Summary of Contents for Makita DUH483
- Page 1 INSTRUCTION MANUAL Cordless Hedge Trimmer DUH483 DUH523 Read before use.
-
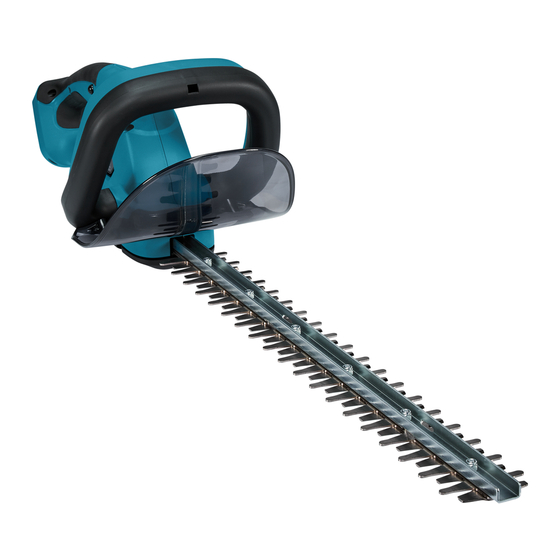
Page 2: Specifications
SPECIFICATIONS Model DUH483 DUH523 Blade length 480 mm 520 mm Strokes per minute (min 1,350 Rated voltage D.C. 18 V Overall length 873 - 888 mm 923 - 938 mm (Depending on the battery) Net weight 3.0 - 3.3 kg 3.0 - 3.4 kg... -
Page 3: General Power Tool Safety Warnings
The typical A-weighted noise level determined accord- WARNING: Read all safety warnings, instruc- ing to EN62841-4-2: tions, illustrations and specifications provided Model DUH483 with this power tool. Failure to follow all instructions Sound pressure level (L ) : 73 dB(A) listed below may result in electric shock, fire and/or Uncertainty (K) : 3.9 dB(A) - Page 4 Use personal protective equipment. Always Disconnect the plug from the power source wear eye protection. Protective equipment such and/or remove the battery pack, if detachable, from the power tool before making any adjust- as a dust mask, non-skid safety shoes, hard hat or ments, changing accessories, or storing power hearing protection used for appropriate conditions will reduce personal injuries.
-
Page 5: Additional Safety Instructions
Service Never use the tool when under the influence of alcohol, drugs or medication. Have your power tool serviced by a qualified repair person using only identical replacement parts. This Work gloves of stout leather are part of the will ensure that the safety of the power tool is maintained. basic equipment of the tool and must always be worn when working with it. - Page 6 Avoid storing battery cartridge in a con- also void the Makita warranty for the Makita tool and tainer with other metal objects such as charger. nails, coins, etc.
-
Page 7: Functional Description
Battery protection system (Lithium- FUNCTIONAL ion battery with star marking) DESCRIPTION CAUTION: • Always be sure that the tool is switched off and the battery cartridge is removed before adjust- ing or checking function on the tool. Installing or removing battery cartridge ► 1 . Star marking Lithium-ion batteries with a star marking are equipped with a protection system. - Page 8 Indicator lamps Remaining capacity Lighted Blinking 75% to 100% 50% to 75% 25% to 50% 0% to 25% Charge the battery. The battery may have malfunctioned. NOTE: • Depending on the conditions of use and the ambient temperature, the indication may differ slightly from the actual capacity. Switch action CAUTION: •...
-
Page 9: Indication Lamp
Indication lamp ► 1 . Indication lamp Running the tool allows the indication lamp to show the battery cartridge capacity status. When the tool is also overloaded and has stopped during operation, the lamp lights up in red. Refer to the following table for the status and action to be taken for the indication lamp. Indication lamp Status Action to be taken... - Page 10 Hold the trimmer with both hands and pull the switch Attaching the chip receiver (optional accessory) on the trigger A or B and then move it in front of your body. tool when trimming the hedge straight can avoid cut off leaves’ being thrown away. ► 1 . Trimming direction 2. Hedge surface to be trimmed 3.
-
Page 11: Maintenance
Installing or removing chip receiver (optional accessory) CAUTION: • Always be sure that the tool is switched off and unplugged before installing or removing chip receiver. NOTE: • When replacing the chip receiver, always wear gloves so that hands and face does not directly contact the blade. Failure to do so may cause personal injury. - Page 12 Blade maintenance Smear the blade before and once per hour during oper- ation using machine oil or the like. NOTE: • Before smearing the blade, remove the chip receiver. After operation, remove dust from both sides of the blade with wired brush, wipe it off with a rag and then apply enough low-viscosity oil, such as machine oil etc. and spray-type lubricating oil.
- Page 13 ► 1 . Blade 2. Sponge 3. Sleeves Adjust the hole positions by turning the gear as illustrated. Put the removed sponge in the same position as the old one. Make sure that the sleeves provided with the new shear blades are put on the pins of the blade. Place the new shear blades on the tool so that the pins fit in the holes of the gear. If the sleeves on the pins come off mistakenly, put them into the holes of the gear...
-
Page 14: Optional Accessories
The use of any other accessories or attachments might present a risk of injury to persons. Only use accessory or attachment for its stated purpose. If you need any assistance for more details regard- ing these accessories, ask your local Makita Service Center. • Blade cover •... - Page 16 Makita Europe N.V. Jan-Baptist Vinkstraat 2, 3070 Kortenberg, Belgium Makita Corporation 3-11-8, Sumiyoshi-cho, Anjo, Aichi 446-8502 Japan 885312G226 www.makita.com 20210118...