Table of Contents
Advertisement
Quick Links
Advertisement
Table of Contents

Related Manuals for Makita DUN501W


Summary of Contents for Makita DUN501W
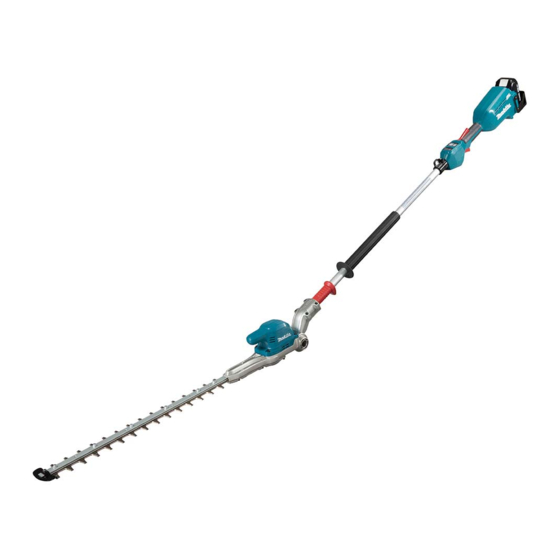
- Page 1 INSTRUCTION MANUAL Cordless Pole Hedge Trimmer DUN501W Read before use.
-
Page 2: Specifications
SPECIFICATIONS Model: DUN501W Blade length 500 mm Strokes per minute 2,000 / 3,600 / 4,400 min Cutting blade angle 115° (up 45°, down 70°) Overall length 2,115 mm Rated voltage D.C. 18 V Net weight 3.9 - 4.2 kg •... -
Page 3: Save All Warnings And Instruc- Tions For Future Reference
Save all warnings and instruc- Remove any adjusting key or wrench before turning the power tool on. A wrench or a key left tions for future reference. attached to a rotating part of the power tool may The term "power tool" in the warnings refers to your result in personal injury. mains-operated (corded) power tool or battery-operated Do not overreach. Keep proper footing and (cordless) power tool. balance at all times. This enables better control of the power tool in unexpected situations. -
Page 4: Additional Safety Instructions
Maintain power tools and accessories. Check Never service damaged battery packs. Service for misalignment or binding of moving parts, of battery packs should only be performed by the breakage of parts and any other condition that manufacturer or authorized service providers. may affect the power tool’s operation. If dam- Follow instruction for lubricating and chang- aged, have the power tool repaired before use. - Page 5 Check the hedges and bushes for foreign If cutting tool strikes any object or the tool objects, such as wire fences or hidden wiring starts making unusual noise or vibration, before operating the tool. switch off the tool and remove the battery car- tridge immediately and allow the tool to stop.
- Page 6 SAVE THESE INSTRUCTIONS. CAUTION: Only use genuine Makita batteries. Use of non-genuine Makita batteries, or batteries that have been altered, may result in the battery bursting causing fires, personal injury and damage. It will also void the Makita warranty for the Makita tool and charger. 6 ENGLISH...
-
Page 7: Parts Description
Tips for maintaining maximum battery life Charge the battery cartridge before completely discharged. Always stop tool operation and charge the battery cartridge when you notice less tool power. Never recharge a fully charged battery car- tridge. Overcharging shortens the battery service life. -
Page 8: Functional Description
Indicating the remaining battery FUNCTIONAL capacity DESCRIPTION Only for battery cartridges with the indicator CAUTION: Always be sure that the tool is switched off and the battery cartridge is removed before adjusting or checking function on the tool. Installing or removing battery cartridge CAUTION: Always switch off the tool before... -
Page 9: Overload Protection
Tool / battery protection system Power switch action The tool is equipped with a tool/battery protection sys- WARNING: For your safety, this tool is tem. This system automatically cuts off power to the equipped with lever which prevents the tool from motor to extend tool and battery life. The tool will auto- unintended starting. NEVER use the tool if it runs matically stop during operation if the tool or battery is when you simply pull the switch trigger without placed under one of the following conditions: pressing the lever. -
Page 10: Adjusting The Cutting Angle
To prevent the switch trigger from being accidentally Reverse button for debris removal pulled, a lever is provided. To start the tool, pull the switch trigger while pressing the lever. Release the WARNING: switch trigger to stop. If the entangled branches or debris cannot be removed by the reverse func- tion, switch off the tool and remove the bat- tery cartridge, and then remove the entangled branches or debris using tools such as pliers. - Page 11 The angle of the head can be adjusted in 6 steps. To Place the tool upside down, and then remove 6 change the angle of the head, follow the steps below. bolts. Hold the head and the slide sleeve as shown in the figure. ► 1 . Bolt Remove the cover, gasket, plate A, and plate B. ► 1 .
- Page 12 Remove 2 bolts, 2 sleeves, and the felt pad, and Align the protrusions on the shear blades vertically then remove the shear blades. at the same position. ► 1 . Protrusion Attach the felt pad to the shear blades. ► 1 . Felt pad 2. Bolt 3. Sleeve 4. Shear blades NOTICE: Be careful not to lose the bolts.
- Page 13 Insert the protrusion on the shear blades to the Attach the bearing and the rod. hole on the rod, then align the position of the felt pad with the holes on the tool, and then attach the sleeves. ► 1 . Rod 2. Small hole 3. Bearing NOTICE: Apply a small amount of grease to the inner periphery of the small hole of the rod.
-
Page 14: Operation
Install the shear blades again. NOTICE: If the parts other than the shear blades such as the rods are worn out, ask Makita Authorized Service Centers for parts replacement or repairs. OPERATION Attaching the shoulder harness... -
Page 15: Operating The Tool
Hold the tool with both hands. Operating the tool WARNING: Do not use the tool near any electrical power lines. Contacting with power lines or using the tool near power lines may cause serious injury or electric shock resulting in death. WARNING: Keep hands away from shear blades. WARNING: Be extremely careful to maintain control of the tool at all times. Do not allow the tool to be deflected toward you or anyone in the work vicinity. -
Page 16: Maintenance
Store the tool in a place not exposed to serious injury. moisture or rain. Grinding the shear blades To maintain product SAFETY and RELIABILITY, repairs, any other maintenance or adjustment should be performed by Makita Authorized or Factory Service NOTICE: If the shear blades have considerably Centers, always using Makita replacement parts. deformed by grinding, replace the shear blades Cleaning the tool with new ones. -
Page 17: Grease Lubrication
Remove the screw, and then remove the branch Grease lubrication catcher. Interval of lubrication: Every 25 operating hours Remove the bolt from the hole for lubrication. ► 1 . Screw 2. Branch catcher Set the angle of a file to 45°, and grind the upper ► 1 . Bolt blade from 3 directions with the file. Remove the cap from the grease vessel. Align the outlet of the grease vessel with the hole on the cover, and then press the outlet of the grease vessel onto the hole. -
Page 18: Troubleshooting
Remove the battery and ask your local authorized service center for repair. Remove the battery immediately! OPTIONAL ACCESSORIES CAUTION: These accessories or attachments are recommended for use with your Makita tool specified in this manual. The use of any other accessories or attachments might present a risk of injury to persons. Only use accessory or attachment for its stated purpose. If you need any assistance for more details regard- ing these accessories, ask your local Makita Service Center. - Page 20 Makita Corporation 3-11-8, Sumiyoshi-cho, Anjo, Aichi 446-8502 Japan 885775-923 www.makita.com 20191120...