Table of Contents
Advertisement
Quick Links
Cisco C390 Email Security Appliance
Quick Start Guide
Welcome
•
Before You Begin
•
Document Network Settings
•
Plan the Installation
•
Install the Appliance in a Rack
•
Plug In the Appliance
•
Temporarily Change Your IP Address for Remotes Access
•
Connect to the Appliance
•
Power Up the Appliance
•
Log In to the Appliance
•
Run the System Setup Wizard
•
Run the Active Directory Wizard (Optional)
•
Check for Available Upgrades
•
Configure Network Settings
•
Configuration Summary
•
Cisco Systems, Inc.
www.cisco.com
Advertisement
Table of Contents

Related Manuals for Cisco C390

Summary of Contents for Cisco C390
- Page 1 Cisco C390 Email Security Appliance Quick Start Guide Welcome • Before You Begin • Document Network Settings • Plan the Installation • Install the Appliance in a Rack • Plug In the Appliance • Temporarily Change Your IP Address for Remotes Access •...
-
Page 2: Before You Begin
Welcome Thank you for choosing the Cisco C390 Email Security Appliance (Cisco C390). The Cisco C390 appliance is designed to serve as your SMTP email gateway at your network perimeter—that is, the first appliance with an IP address that is directly accessible to the Internet for sending and receiving email. - Page 3 Network and administrator information for the “Document Network • Settings” section on page 3 and “go live” configuration Document Network Settings Before you begin, write down the following information about your network and administrator settings. System Settings Default System Hostname: Email System Alerts To: Deliver Scheduled Reports To: Time Zone Information:...
-
Page 4: Plan The Installation
To defend your email system against spam, malware, phishing, and other threats, the Cisco C390 appliance must be installed at the perimeter of your network. It needs to be the first appliance with an IP address that can access the Internet. - Page 5 To remotely configure the Cisco C390 using the network connection, you must temporarily change the IP address of your computer. Alternatively, you can use the serial console to configure the Cisco C390, without changing the IP address. If you use the serial console, proceed to section 8 below.
-
Page 6: For Windows
For Windows The exact steps depend on your operating system version. Go to the Start menu and choose Control Panel. Step 1 Click Network and Internet, then Network and Sharing Center. Step 2 Click the Change adapter settings link. Step 3 Right-click Local Area Connection and choose Properties. -
Page 7: Connect To The Appliance
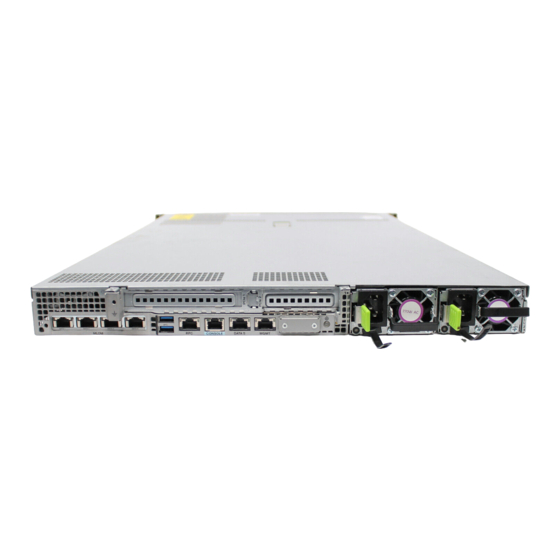
Step 7 Connect to the Appliance The Cisco C390 appliances have five gigabit network ports and a Management port, as shown in the figure on the following page . At least one static IP address is required to send and receive email. -
Page 8: Power Up The Appliance
Power up the appliance by pressing the On/Off switch on the front panel of the Cisco C390. You must wait 10 minutes for the system to initialize each time you power up the system. After the machine powers up, solid green lights on the front of the appliance indicate that the appliance is operational. -
Page 9: Web-Based Interface
Log In to the Appliance You can log in to the Cisco C390 appliance using one of two interfaces: the web-based interface or the command-line interface. Web-Based Interface For web browser access via the Ethernet port (see the “Connect to the Step 1 Appliance”... - Page 10 Step 9 password that you set in the System Setup Wizard. The Cisco C390 Email Security Appliance uses a self-signed certificate that may trigger a warning from your web browser. You can simply accept the certificate and ignore this warning.
- Page 11 Run the Active Directory Wizard (Optional) After running the System Setup Wizard in the web interface, the Active Directory Wizard appears. If you are running an Active Directory server on your network, use the Active Directory Wizard to configure an LDAP server profile for the Active Directory server.
-
Page 12: Configure Network Settings
Telnet: port 23 • If you do not open port 80 and port 443, you cannot download feature Note keys. For more information, see firewall information in the user guide for your version of AsyncOS for Cisco Email Security Appliances. -
Page 13: Configuration Summary
System Setup Wizard, see the user guide for your version of AsyncOS for Cisco Email Security Appliances. Additional Configurations Congratulations! You have completed installation and basic configuration. You can now configure additional features of your appliance. See the online help or user guide for your AsyncOS release for complete details. -
Page 14: Where To Go From Here
Documentation roducts-support-series-home.html Links from this page hold release notes, user guides, and information about hardware and its installation, including: Cisco C390 Email Security Appliance Quick Start Guide • (This document) Cisco x90 Series Content Security Appliances Installation • and Maintenance Guide (Includes technical specifications... - Page 15 A Cisco.com account is required. If you do not have one, register at https://tools.cisco.com/RPF/register/register.do. Cisco and the Cisco logo are trademarks or registered trademarks of Cisco and/or its affiliates in the U.S. and other countries. To view a list of Cisco trademarks, go to this URL: www.cisco.com/go/trademarks. Third-party trademarks mentioned are the property of their respective owners.