Table of Contents
Advertisement
Quick Links
Advertisement
Table of Contents

Related Manuals for Brady Wraptor A6200


Summary of Contents for Brady Wraptor A6200
- Page 1 User Manual...
- Page 2 Copyright and Trademarks Disclaimer This manual is proprietary to Brady Worldwide, Inc. (hereafter "Brady"), and may be revised from time to time without notice. Brady disclaims any understanding to provide you with such revisions, if any. This manual is copyrighted with all rights reserved. No portion of this manual may be copied or reproduced by any means without the prior written consent of Brady.
- Page 3 Brady’s satisfaction to have been defective at the time Brady sold it. This warranty does not extend to any persons obtaining the product from the buyer. THIS WARRANTY IS IN LIEU OF ANY OTHER WARRANTY, EXPRESS OR IMPLIED, INCLUDING, BUT NOT LIMITED TO, ANY IMPLIED WARRANTY OF MERCHANTABILITY OR FITNESS FOR A PARTICULAR PURPOSE, AND OF ANY OTHER OBLIGATIONS OR LIABILITY ON BRADY’S PART.
- Page 4 • www.bradycorp.com/register Repair and Return If for any reason you need to return the product for repair, please contact Brady Technical Support for repair and replacement information. Document Conventions When using this document, it is important that you understand the conventions used throughout the manual.
-
Page 5: Table Of Contents
Ethernet Network ....................13 Installing the Windows Driver (Optional) .............. 14 Loading Ribbon ....................... 15 Loading Label Supply ..................... 17 Rewinder Accessory ....................21 Installing the Rewinder ..................21 Starting a New Roll .....................23 Removing Spent Label Backing ................24 Wraptor A6200 User Manual... - Page 6 Wrap is not applied correctly ................. 47 Labels jam on the tarp..................... 49 Label material jams within the printer ..............49 Label material feeds incorrectly................49 Print quality is poor ....................50 Print is too light ....................... 50 Wraptor A6200 User Manual...
- Page 7 Turkey .........................53 China ........................54 Wireless Regulatory Information ................54 United States ......................54 Canada .......................55 Mexico .........................55 European Union ....................55 International ......................56 Japan ........................56 B • Licensing End User License Agreement for Microsoft Windows CE© ........ 57 Wraptor A6200 User Manual...
-
Page 8: Introduction
(1.25” maximum printable height) • One-year warranty • Accepts USB drives for added storage capability and standalone operation. USB drives must be formatted with FAT, FAT32, or exFAT file systems. The Wraptor A6200 printer does not support NTFS. Physical Dimensions Physical U.S. Units... -
Page 9: Environmental Ranges
Microsoft Windows 8 • Microsoft Windows 10 Safety The following information is necessary for the safe operation of the Wraptor A6200 printer. Be sure to read this section prior to setting up or operating the printer. Wraptor A6200 User Manual... -
Page 10: Automatic Stops
Wrapper Module When the wrapper module is opened, the wrapping mechanism stops. With the wrapper module open you can print and peel labels as well as feed labels. Wraptor A6200 User Manual... -
Page 11: Top Cover
Do not disable the automatic stop mechanisms. Doing so may cause injury. Electrical Safety CAUTION! Make sure the power outlet is grounded. WARNING! Turn off power and unplug unit before performing any service or maintenance on the Wraptor A6200 printer. Wraptor A6200 User Manual... -
Page 12: Setup
• Print Driver • Driver Installation Guide • Printed Quick Start Guide • Brady Workstation Product & Wire Identification Software Suite with download instructions and license key. • Power cord and AC adapter. • USB cable • Label supply: A62-3-427 die cut 1" x 1.25"... -
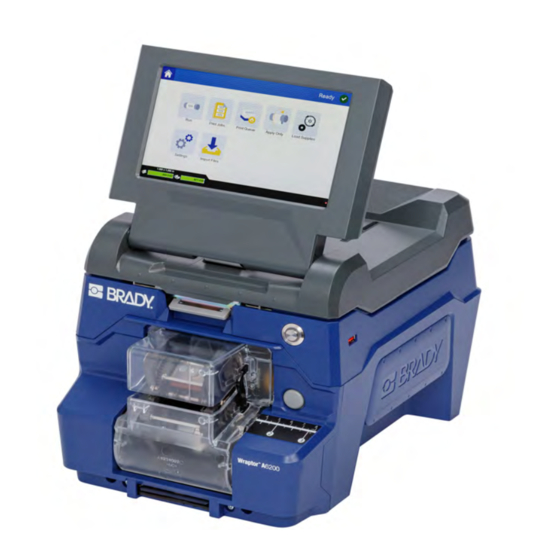
Page 13: Printer Components
7. Trigger bar: One on each side. The trigger bars initiate wrapping. See “Printing and Wrapping” on page 27. 8. Wrapper module release: Push to release the wrapper module to open it for loading labels or cleaning. 9. Jaws: Hold the wire in place as the label is applied. Wraptor A6200 User Manual... -
Page 14: Power
10. USB port (type A): Connect a USB drive. The USB drive must be formatted with FAT, FAT32, or exFAT file systems. NTFS is not compatible with the Wraptor A6200 printer. The printer has two type A USB ports, one on the back and one on the side. -
Page 15: Advance To Next Label
Choose whether the printer accesses files from memory or from a USB drive. To set the file location: 1. From the home screen, tap Settings. 2. Tap System Configuration, then File Location. 3. Tap the desired value. Wraptor A6200 User Manual... -
Page 16: Keyboards
External USB: Choose this option when transferring files from one Wraptor A6200 printer to another. Insert a USB drive into the USB port on the printer. When you print a label from Brady Workstation software, the print file is sent to the USB drive. When you tap Print Jobs on the home screen, the printer accesses the list of files from the USB drive. -
Page 17: Units Of Measure
2. Tap Connection, and then tap Printer Name. The printer displays a keyboard. The printer name can only contain the characters A-Z, a-z, 0-9, and -. Regardless of the keyboards you have enabled for your printer, the printer displays a keyboard with the allowed characters. Wraptor A6200 User Manual... -
Page 18: Software For Creating Labels
Brady Workstation software provides a variety of apps to simplify label creation for specific purposes. It also provides easy-to-use apps for custom label design. The printer comes with a license for the Brady Workstation Product & Wire Identification Suite. -
Page 19: Connecting The Printer
Brady Workstation software automatically detects the printer when connected via USB cable. Note: If you are not using Brady Workstation software, you need to install the printer driver. See the Driver Installation Guide PDF file on the USB drive that came with the printer. -
Page 20: Manually Enter Settings
Ethernet connection, you may need to edit the port settings for the printer in Windows to update the IP address. To configure network settings on the printer: 1. Make sure the printer is turned on. Wraptor A6200 User Manual... -
Page 21: Installing The Windows Driver (Optional)
6. Tap the home button to return to the home screen. Installing the Windows Driver (Optional) If you are using Brady Workstation software, you do not need to install the windows driver. You must install the Windows driver if you are using any of the following. -
Page 22: Loading Ribbon
Setup Loading Ribbon Loading Ribbon Ribbon can be loaded with the power on or off. The Wraptor A6200 printer uses BMP71 series R4300 ribbon, part number M71-R4300. To change the ribbon: 1. Pull up on the latch and lift open the cover on the printer. - Page 23 Setup Loading Ribbon 3. Orient the new cartridge as shown above with the label on the top and the Brady logo on the bottom. Grasp the finger tabs and place it directly over the print head, pushing slightly to snap it into place.
-
Page 24: Loading Label Supply
Loading Label Supply Loading Label Supply Brady labels come equipped with smart-cell technology that enables the printer and Brady labeling software to recognize the type of label and automatically set many label formatting details. Use only genuine Brady A62 series labels. - Page 25 Make sure the smart cell on the label roll aligns with the reader in the label well. smart cell 6. Press the gray button on the front of the printer to open the wrapper module. Wraptor A6200 User Manual...
- Page 26 CAUTION! Feeding labels past this point will cause labels to become stuck during printing. Make sure you are feeding bare liner. 8. Slide the liner to the right, between the peel plate and peel assist plate. peel assist plate peel plate Wraptor A6200 User Manual...
- Page 27 10. Insert the liner into the yellow and black opening behind the two rollers until it hits a stop. 11. Lift the peeler door up to close it. 12. Turn the thumbwheel to the right of the peeler to tighten the liner. 13. Close the top cover on the printer until it latches. Wraptor A6200 User Manual...
-
Page 28: Rewinder Accessory
To avoid damaging the printer, make sure the top cover and wrapper module are closed and latched so that they do not fall open. Unplug power and USB cables so that they do not catch and cause the printer to fall while turning it over. Wraptor A6200 User Manual... - Page 29 4. Tighten the screw. 5. Attach the cable from the rewinder to the rewinder port on the back of the printer. 6. Turn the entire unit right-side up and plug in the printer. Wraptor A6200 User Manual...
-
Page 30: Starting A New Roll
2. Print labels until approximately six inches of backing is discharged from the printer. (Alternatively, you can press Feed Supply on the touch screen to expel label material.) 3. Open the door on the front of the rewinder. Wraptor A6200 User Manual... -
Page 31: Removing Spent Label Backing
2. Open the door on the front of the rewinder. 3. Pull out the yellow knob on the left side of the spool. This releases the material and slides it off the spool. 4. Remove the spent material. Wraptor A6200 User Manual... -
Page 32: General Operation
Note: Do not use a writing pen or other sharp object. Doing so may mar the touch screen surface. Home Ribbon status Printer status Ribbon remaining Supply size Ribbon part number Supply status Print job status Supply remaining Wi-Fi on and signal Supply part number Wraptor A6200 User Manual... -
Page 33: Navigation And Status Bar
To close the Material Details screen, click the x in the upper right corner. Creating Labels Create label files using Brady Workstation software. When you first create a label file, you specify the printer. This allows the software to provide features specific to your printer. Also, the software automatically detects the labels installed in the printer. -
Page 34: Printing: Quick Start
However, you can also print a label without wrapping When you print labels to the Wraptor A6200 printer from your labeling software, the printer does not immediately print the labels. The software sends the labels to the printer’s internal memory. Because the printer requires an operator to insert a wire or cable for wrapping, or to remove a printed label, the operator must initiate printing at the printer. -
Page 35: Wrap Quality
General Operation Printing: Quick Start CAUTION! The maximum wire diameter that can be used in the Wraptor A6200 printer, INCLUDING the wire's outer jacket, is 0.25 inch. Exceeding this diameter will jam and potentially damage the machine. If a wire diameter less than 0.06 inch (including wire jacket) is used, the label... -
Page 36: Wrapping Without Printing (Apply Only)
5. Remove the printed label. 6. Close the wrapper module. Wrapping Without Printing (Apply Only) When you have pre-printed labels, you can use the Wraptor A6200 printer to apply the labels to the wire or cables without printing. To apply labels without printing: 1. -
Page 37: Finding A Print Job
Printing: Details To add jobs to this list: • Printer memory: Print from Brady Workstation software with the Wraptor A6200 printer selected. On the printer, Settings > System Configuration > File Location must be set to Internal Memory. • USB drive: See “Transferring Print Jobs Between Printers” on page 35. -
Page 38: Adding A Job To The Queue
Jobs that are in the print queue have this symbol rather than a check box next to them. To remove jobs from the print queue, see “Print Queue” on page 35. 2. Tap the Delete button. Wraptor A6200 User Manual... -
Page 39: Managing The Print Queue
Cancel One. Removes the selected job from the queue. Cancel All. Removes all jobs from the queue. Move Up. Moves the selected print job up one position in the queue. Move Down. Moves the selected print job down one position in the queue. Wraptor A6200 User Manual... -
Page 40: Running Jobs
Goes to the last label in the file. (Not available if the print file contains only one label.) Goes to the first label in the file. (Not available if the print file contains only one label.) Wraptor A6200 User Manual... -
Page 41: Settings
Settings > System Configuration > Measurement Units. Note: Using the Batch Print tool in Brady Workstation software, you can save printer position adjustments with the label file so that you do not have to change the horizontal and vertical offsets each time you print that file. -
Page 42: Print Queue
Transferring Print Jobs Between Printers If you have one printer that has access to Brady Workstation software, and another that does not, use a USB drive to transfer the print jobs. -
Page 43: Import Print Jobs
Tap File Location, then tap External USB. c. Tap the home button to return to the home screen. 3. Use Brady Workstation software to send the label file to the printer. The file is placed on the USB drive rather than in the printer’s memory. -
Page 44: Set Up The Scanner
General Operation Running a File Using a Barcode Scanner Set Up the Scanner Connect a USB scanner to the Wraptor A6200 printer. We recommend the Brady Code Reader scanner configured for USB. • Set up the scanner for at least a 30ms inter-character delay. This will ensure that the printer receives all characters transmitted by the barcode scanner. -
Page 45: Maintenance
1. On a computer, go to the technical support website for your region. See “Technical Support and Registration” on page iv. 2. Find firmware updates. 3. Find the most recent Wraptor A6200 firmware upgrade. 4. Download the firmware. 5. Save the downloaded file to a USB drive. -
Page 46: Updating Y And B Values
Update Y and B values periodically to make sure the printer has data for any new label supplies. Also, update if you have ordered a custom label supply from Brady and it came with new Y and B values. You do not need to know your current database version. The printer displays a confirmation message showing the version numbers during the import process. -
Page 47: Cleaning The Print Head
1. Turn off the printer and unplug it. 2. Open the top cover. 3. Remove the ribbon to expose the print head. See “Loading Ribbon” on page 15. 4. Dip a cotton swab in the isopropyl alcohol. Wraptor A6200 User Manual... -
Page 48: Cleaning The Rollers And Peel Plate
3. Remove the label supply. See “Loading Label Supply” on page 17. 4. Press the yellow button to the lower left of the peeler to open the peeler door. peeler door closed 5. Dip a cotton swab in the isopropyl alcohol.k Wraptor A6200 User Manual... - Page 49 7. Dip a clean swab in isopropyl alcohol and clean the edge of the peel plate. 8. Close the wrapper module and open the top cover. 9. Dip a clean cotton swab in isopropyl alcohol. Wraptor A6200 User Manual...
-
Page 50: Cleaning The Sensors
2. Open the top cover and the wrapper module. (Press the gray button on the front of the printer to release the wrapper module.) 3. Remove the ribbon and label supply. See “Loading Ribbon” on page 15 and “Loading Label Supply” on page 17. Wraptor A6200 User Manual... - Page 51 4. Clean the label notch sensor in the printer chassis with a clean swab dipped in isopropyl alcohol. 5. Clean the ribbon out sensor in the printer chassis with a clean swab dipped in isopropyl alcohol. Wraptor A6200 User Manual...
- Page 52 6. Clean the smart cell contact in the top cover with a clean swab dipped in isopropyl alcohol. 7. Clean the trigger sensors, located on either side of the wrapper mechanism with a clean swab dipped in isopropyl alcohol. 8. Reload ribbon and labels, then close the top cover and wrapper module. Wraptor A6200 User Manual...
-
Page 53: Cleaning The Fan Filter
Wash it with a mild detergent and allow it to dry. 4. Replace the clean filter. 5. Snap the grate back into place over the fan. The fan filter is a replacement part that you can Filter Grate order. Wraptor A6200 User Manual... -
Page 54: Troubleshooting Wrap Is Not Applied Correctly
The wrapping mechanism may not be revolving around the wire or cable enough times to adhere the full length of the label. On the touch screen, tap Settings, then Print Adjustments, then Wrap Count and increase the number of times the wrapper moves around the wire. Wraptor A6200 User Manual... - Page 55 Clear Jam. Tap Feed Supply and observe whether the labels flow freely on the grooved roller. If not, clean the roller with isopropyl alcohol and a cotton swab. See “Cleaning the Rollers and Peel Plate” on page 41 Wraptor A6200 User Manual...
-
Page 56: Labels Jam On The Tarp
Label material feeds incorrectly Problem: Rollers move, but the label material stays in place, the label material has slack in it, or the label material seems to feed backwards. An error message states that the peeler door is open. Wraptor A6200 User Manual... -
Page 57: Print Quality Is Poor
The print head may be worn and need to be replaced. Call Technical Support, see “Technical Support and Registration” on page iv. Print is too light Problem: Print is too light. Solutions: • Tap Settings, then Print Adjustments, then Print Energy and increase the darkness. Wraptor A6200 User Manual... -
Page 58: Nothing Happens When I Place A Wire In The Jaws
The trigger sensors may need to be cleaned. See “Cleaning the Sensors” on page 43 No print jobs are in the printer Problem: I printed a file to the Wraptor A6200 printer from Brady Workstation software, but when I tap Print Jobs on the touch screen, no jobs are listed. -
Page 59: A Regulatory Compliance
IFETEL notice: La operación de este equipo está sujeta a las siguientes dos condiciones: (1) es posible que este equipo o dispositivo no cause interferencia perjudicial y (2) este equipo o dispositivo debe aceptar cualquier interferencia, incluyendo la que pueda causar su operación no deseada. Wraptor A6200 User Manual... -
Page 60: Europe
Dispose of in accordance with local regulations. Turkey Turkish Ministry of Environment and Forestry (Directive on the Restriction of the use of certain hazardous substances in electrical and electronic equipment). Türkiye Cumhuriyeti: EEE Yönetmeliğine Uygundur Wraptor A6200 User Manual... -
Page 61: China
Operation of this equipment in a residential area is likely to cause harmful interference in which case the user will be required to correct the interference at own expense. Changes or modifications not expressly approved by the party responsible for compliance could void the user's authority to operate the equipment. Wraptor A6200 User Manual... -
Page 62: Canada
This is a Class A product. In a domestic environment, this product may cause radio interference in which case the user may be required to take adequate measures. Radio Equipment Directive (RED) 2014/53/EC a. Frequency band(s) in which the radio equipment operates; 2.401GHz to 2.483GHz Wraptor A6200 User Manual... -
Page 63: International
< +20dBm EIRP (100mW) International The Wi-Fi radio module used in Brady host printers comply with internationally recognized standards covering human exposure to electromagnetic fields, i.e. EN 62311 "Assessment of electronic and electrical equipment related to human exposure restrictions for electromagnetic fields (0 Hz - 300 GHz)". -
Page 64: B Licensing
End User License Agreement for Microsoft Windows CE © You have acquired a device that includes software licensed by Brady Worldwide, Inc. from Microsoft Licensing or its affiliates (“MS”). Those installed software products of Microsoft origin, as well as associated media, printed materials, and “online” or electronic documentation (“SOFTWARE”) are protected by international intellectual property laws and treaties. - Page 65 SOFTWARE, including the U.S. Export Administration Regulations, as well as end-user, end-use, and country destination restrictions issued by U.S. and other governments. For additional information on exporting the SOFTWARE, see http://www.microsoft.com/exporting. Wraptor A6200 User Manual...