
Related Manuals for Makita XGD01


Summary of Contents for Makita XGD01
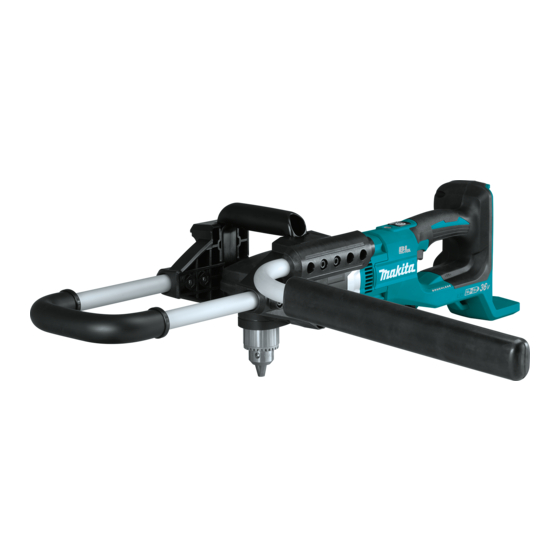
- Page 1 INSTRUCTION MANUAL MANUAL DE INSTRUCCIONES Cordless Earth Auger Ahoyadora Inalámbrica XGD01 IMPORTANT: Read Before Using. IMPORTANTE: Lea antes de usar.
-
Page 2: Specifications
ENGLISH (Original instructions) SPECIFICATIONS Model: XGD01 No load speed High 0 - 1,400 /min 0 - 350 /min Drilling capacities For sandy soil: 200 mm (7-7/8") For clay soil: 150 mm (5-7/8") Overall length 840 mm (33") Rated voltage D.C. 36 V Net weight 7.3 - 8.2 kg (16.1 - 18.1 lbs) - Page 3 If operating a power tool in a damp location is Disconnect the plug from the power source unavoidable, use a ground fault circuit inter- and/or remove the battery pack, if detachable, rupter (GFCI) protected supply. Use of a GFCI from the power tool before making any adjust- ments, changing accessories, or storing power reduces the risk of electric shock.
- Page 4 Do not nail, cut, crush, throw, drop the battery abnormal sounds, stop operating immediately cartridge, or hit against a hard object to the and ask your local Makita Service Center for battery cartridge. Such conduct may result in a repair.
-
Page 5: Initial Setting
5 mm (3/16") have been altered, may result in the battery bursting causing fires, personal injury and damage. It will NOTE: The type of the bit adapter varies depending also void the Makita warranty for the Makita tool and on the country. charger. Tips for maintaining maximum... -
Page 6: Functional Description
Installing the reaction receiver Setting up the tool Place the reaction receiver so that the bar of the reac- tion receiver comes to the left side of the operator. CAUTION: Always be sure that the side Adjust the position of the reaction receiver so that the axis handle and the reaction receiver are installed of the drill chuck is in the center of the operator's body. -
Page 7: Overload Protection
6 minutes. Electric brake This tool is equipped with an electric brake. If the tool consistently fails to quickly stop after the switch trigger is released, have the tool serviced at a Makita service center. 7 ENGLISH... -
Page 8: Speed Change
Lighting up the front lamp Automatic speed change function This tool has "high speed mode" and "high torque CAUTION: Do not look in the light or see the mode". source of light directly. The tool automatically changes the operation mode depending on the work load. -
Page 9: Installing Or Removing Battery Cartridge
Two speed ranges can be preselected with the speed ASSEMBLY change knob. To change the speed, depress the lock button and turn the speed change knob so that the pointer points to the Installing or removing battery position 1 for low speed or the position 2 for high speed. cartridge CAUTION: Always switch off the tool before... -
Page 10: Operation
Mounting the auger bit on the bit adapter Mounting the auger bit NOTE: The shape and mechanism of the auger bit CAUTION: and the auger pin may vary depending on your auger Always be sure that the tool is bit. switched off and the battery cartridge is removed before carrying out any work on the tool. -
Page 11: Maintenance
Store the tool in a stable condition. To maintain product SAFETY and RELIABILITY, repairs, any other maintenance or adjustment should be performed by Makita Authorized or Factory Service Centers, always using Makita replacement parts. 11 ENGLISH... -
Page 12: Optional Accessories
OPTIONAL ACCESSORIES CAUTION: These accessories or attachments are recommended for use with your Makita tool specified in this manual. The use of any other accessories or attachments might present a risk of injury to persons. Only use accessory or attachment for its stated purpose. If you need any assistance for more details regard- ing these accessories, ask your local Makita Service Center. -
Page 13: Especificaciones
ESPAÑOL (Instrucciones originales) ESPECIFICACIONES Modelo: XGD01 Velocidad sin carga Alta 0 r/min - 1 400 r/min Baja 0 r/min - 350 r/min Capacidades de taladrado Para tierra arenosa: 200 mm (7-7/8″) Para tierra arcillosa: 150 mm (5-7/8″) Longitud total 840 mm (33″) Tensión nominal 36 V c.c. Peso neto 7,3 kg - 8,2 kg (16,1 lbs - 18,1 lbs) •... - Page 14 Seguridad eléctrica Retire cualquier llave de ajuste o llave de apriete antes de encender la herramienta. Una Las clavijas de conexión de las herramientas llave de ajuste o llave de apriete que haya sido eléctricas deberán encajar perfectamente en la dejada puesta en una parte giratoria de la herra- toma de corriente. No modifique nunca la clavija mienta eléctrica puede ocasionar alguna lesión.
- Page 15 Mantenga las herramientas de corte limpias Servicio y filosas. Si recibe un mantenimiento adecuado Haga que una persona calificada repare la y tiene los bordes afilados, es probable que la herramienta eléctrica utilizando sólo piezas de herramienta se atasque menos y sea más fácil repuesto idénticas. Esto asegura que se man- controlarla. tenga la seguridad de la herramienta eléctrica. Utilice la herramienta eléctrica, los accesorios Nunca dé...
- Page 16 Evite cortocircuitar el cartucho de batería: de servicio de Makita de su localidad. No toque las terminales con ningún mate- 16. Antes de iniciar la operación, asegúrese de rial conductor.
-
Page 17: Configuración Inicial
12. Utilice las baterías únicamente con los pro- CONFIGURACIÓN ductos especificados por Makita. Instalar las baterías en productos que no cumplan con los INICIAL requisitos podría ocasionar un incendio, un calen- tamiento excesivo, una explosión o una fuga de electrolito. PRECAUCIÓN: Asegúrese siempre de que la 13. Si no se utiliza la herramienta por un herramienta esté... -
Page 18: Configuración De La Herramienta
Instalación de la unidad receptora de Configuración de la herramienta reacción PRECAUCIÓN: Antes de la operación, asegú- Coloque la unidad receptora de reacción, de manera rese siempre de que el mango lateral y la unidad que la barra de la unidad receptora de reacción alcance receptora de reacción estén bien instalados. -
Page 19: Descripción Del Funcionamiento
Sistema de protección para la DESCRIPCIÓN DEL herramienta/batería FUNCIONAMIENTO La herramienta está equipada con un sistema de pro- tección de la herramienta/batería. Este sistema corta PRECAUCIÓN: Asegúrese siempre de que la en forma automática el suministro de energía al motor herramienta esté apagada y el cartucho de batería para prolongar la vida útil de la herramienta y la batería. haya sido extraído antes de realizar cualquier La herramienta se detendrá automáticamente durante ajuste o comprobación en la herramienta. la operación si la herramienta o la batería se someten a una de las siguientes condiciones: Indicación de la capacidad restante... - Page 20 Makita. PRECAUCIÓN: Cuando no esté utilizando la herramienta, ponga siempre la palanca del con- Iluminación de la luz delantera...
-
Page 21: Cambio De Velocidad
Con la perilla de cambio de velocidad se puede prese- Función de cambio de velocidad leccionar dos rangos de velocidad. automática Para cambiar la velocidad, oprima el botón de bloqueo y gire la perilla de cambio de velocidad de manera que Esta herramienta cuenta con “modo de alta velocidad”... -
Page 22: Montaje
Montaje de la broca de barrena MONTAJE PRECAUCIÓN: Asegúrese siempre de que la Instalación o extracción del herramienta esté apagada y el cartucho de batería cartucho de batería haya sido extraído antes de realizar cualquier trabajo en la misma. PRECAUCIÓN: Cuando instale el adaptador PRECAUCIÓN: Apague siempre la herra-... -
Page 23: Operación
Después de usarla, regrese la llave de mandril a la OPERACIÓN cavidad para su almacenamiento en la herramienta, tal como se muestra en la ilustración. PRECAUCIÓN: Esta es una herramienta potente que genera una torsión elevada. Es importante que la herramienta sea sujetada con firmeza y apoyada adecuadamente. -
Page 24: Mantenimiento
Makita especificada en este manual. El empleo para excavar en pasos pequeños. de cualquier otro accesorio o aditamento puede conllevar el riesgo de lesiones personales. Utilice los accesorios o aditamentos solamente para su fin establecido. - Page 25 GARANTÍA LIMITADA DE MAKITA Ésta Garantía no aplica para México Consulte la hoja de la garantía anexa para ver los términos más vigentes de la garantía aplicable a este producto. En caso de no disponer de esta hoja de garantía anexa, consulte los detalles sobre la garantía descritos en el sitio web de su país respectivo indicado a continuación. Estados Unidos de América: www.makitatools.com Canadá: www.makita.ca Otros países: www.makita.com 25 ESPAÑOL...
- Page 28 Para reducir la exposición a estos productos químicos: trabaje en un área bien ventilada y póngase el equipo de seguridad indicado, tal como las máscaras contra polvo que están especialmente diseñadas para filtrar partículas microscópicas. Makita Corporation 3-11-8, Sumiyoshi-cho, Anjo, Aichi 446-8502 Japan 885819-943...