Cisco Headset 500 Series Manual
Hide thumbs
Also See for Headset 500 Series:
- Configuration manual (1140 pages) ,
- Administration manual (653 pages) ,
- Quick start manual (72 pages)
Advertisement
Quick Links
Accessories
•
•
•
•
•
Supported Accessories
You can use your phone with different types of accessories, such as headsets, microphones, and speakers.
This table shows you which ones you can use with your particular phone.
To check which phone model you have, press Applications
number field shows your phone model.
When you add features to your phone, some features require a line button. But each line button on your phone
can support only one function (a line, a speed dial, or a feature). If your phone's line buttons are already in
use, your phone won't display any additional features.
The following table describes the accessories supported on the Cisco IP Phone 7800 Series.
Table 1: Accessory Support for the Cisco IP Phone 7811, 7821, 7841, and 7861
Accessory
Cisco Accessory
Wall Mount Kit
Cisco Headset
531 and Cisco
Headset 532
Cisco Headset
561 and Cisco
Headset 562
Silicone Case
Supported Accessories, on page 1
View the Accessories Associated with Your Phone, on page 2
Check Your Phone Model, on page 2
Headsets, on page 2
Silicone Covers, on page 19
Type
Analog
Wireless with
the base station
7811
7821
Supported
Supported
Not supported
Supported
Not supported
Supported
Supported
Supported
and select Phone information. The Model
7841
7861
Supported
Supported
Supported
Supported
Supported
Supported
Supported
Supported
Accessories
1
Advertisement

Related Manuals for Cisco Headset 500 Series


Summary of Contents for Cisco Headset 500 Series
- Page 1 (a line, a speed dial, or a feature). If your phone's line buttons are already in use, your phone won't display any additional features. The following table describes the accessories supported on the Cisco IP Phone 7800 Series. Table 1: Accessory Support for the Cisco IP Phone 7811, 7821, 7841, and 7861...
- Page 2 Select Phone information. The Model number field shows your phone model. Headsets There are a number of Cisco and third party headsets available for use on your Cisco IP Phones and devices. For additional information about Cisco headsets, see https://www.cisco.com/c/en/us/products/ collaboration-endpoints/headsets/index.html.
-
Page 3: Important Headset Safety Information
• Cisco Headset 522—A headset with a dual earpiece that comes with an inline USB controller. • Cisco Headset 531—A headset with a single earpiece that can be used as either a standard headset or a USB headset with the USB adapter. - Page 4 The Cisco Headset USB Adapter is also available for use on the Cisco IP Phone 8851, 8851NR, 8861, 8865, and 8865NR. The adapter converts the Cisco Headset 531 and 532 into a USB headset, and it gives you a few extra features.
- Page 5 Occasionally a tone is played over your Cisco Headset 561 or 562. Some of these tones alert you when you perform an action, such as pressing a button. Other tones warn you that the headset requires attention, such as when the battery needs recharging, or when you are too far from the base station.
- Page 6 Cisco Headset 500 Series Support The Cisco IP Phone 7811 is the only phone in the Cisco IP Phone 7800 Series that does not support a headset. The Cisco IP Phone 7821, 7841, and 7861 use an RJ-style connector to connect with a headset or base.
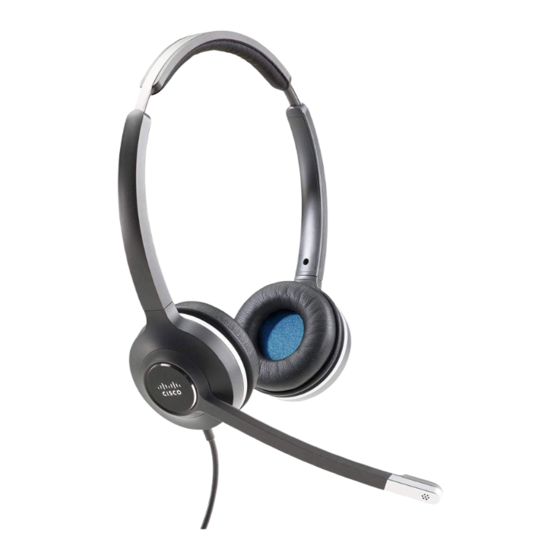
- Page 7 Accessories Cisco Headset 561 and 562 Buttons and LED The following table describes the Cisco Headset 561 and 562 Headset buttons. Table 2: Cisco Headset 561 and 562 Headset Buttons Number Name Description Power and Call button Use to power the headset on and off.
- Page 8 Standard Base for Cisco Headset 561 and 562 The Cisco Headset 561 and 562 come with a standard base to charge your headset. The base's LED display shows the current battery level, and your call state. In addition to the call control buttons on the headset, you can also answer and end calls when you lift or set down your headset on the base.
- Page 9 • Mini USB Cable: for PC or Mac. • Mini USB to USB-C cable: available separately for PC or Mac devices. Figure 9: Multibase LEDs The following table describes the Cisco Headset 560 Series Multibase multibase LEDs. Table 4: Multibase LEDs Number...
- Page 10 Even if you are connected to a source, the LED may not be lit. The source LED only lights when the source is selected or has an active call. For example, you may be properly connected to a Cisco IP Phone, your PC, and your mobile phone through Bluetooth.
-
Page 11: Audio Quality
Cisco doesn't recommend or test any third-party headsets with their products. For information about third-party headset support for Cisco products, go to the manufacturer's web site. Cisco does test the Cisco headsets with the Cisco IP Phones. For information about Cisco Headsets and Cisco IP Phone support, see https://www.cisco.com/c/en/us/products/collaboration-endpoints/headsets/index.html. - Page 12 Plug the headset into the headset jack on the back of the phone. Press the cable into the cable channel. Connect a Cisco Standard Base with the Y-Cable You can connect the standard base to your phone with the included Y-cable. But note that the Y-cable has two RJ-type connectors - one for the auxiliary or AUX port, and one for the headset port.
- Page 13 The Cisco Headset 560 Series Multibase can connect to Bluetooth devices such as a mobile phone or tablet. The headset base appears on your call device as Cisco Headset followed by the last three digits on your headset serial number.
- Page 14 After you have connected the headset, you may have to configure it on your phone. Reset Cisco Headset Settings from Your Phone You can reset your Cisco headset to remove your custom settings. This action returns the headset to the original configuration set by your administrator.
- Page 15 Enable Electronic Hookswitch Control on Your Phone If your administrator has enabled Admin settings on your Cisco IP Phone, you can enable or disable electronic hookswitch control to connect with a Cisco Headset 560 Series base. Electronic hookswitch control is enabled by default.
- Page 16 (Optional) If you place a call, dial the number. Troubleshoot Your Cisco Headset Try the following basic troubleshooting steps if you have trouble with your Cisco headset. • Restart your headset. • Make sure that all cords are properly plugged in and functioning properly.
- Page 17 Accessories No Sound in Headset No Sound in Headset Problem There is little or no sound coming through the headset. Solution Check the volume level on your headset by pressing the volume controls to adjust the sound level. If the problem continues, use the following work flow to troubleshoot your problem.
- Page 18 • Make sure that your headset is properly plugged into your device. • For the Cisco Headset 560 Series, check that you are not taking your headset too far from the headset base. The headset has an effective range of approximately 100 feet or 30 meters.
- Page 19 The wireless headset is not holding a full charge. Solution Your Cisco Headset 561 and 562 holds a charge for up to 8 hours of continuous use. If your headset battery seems weak or defective, contact Cisco support. Silicone Covers You can use the Cisco IP Phone Silicone Cover to protect your desk phone and handset.
- Page 20 Use a low-strength cleaning agent to prolong the life and look of the case. • Reduces damage when the handset is dropped. For part numbers and other additional information, refer to the phone model data sheet. The Cisco IP Phone 8800 Series data sheets can be found here https://www.cisco.com/c/en/us/products/collaboration-endpoints/...
- Page 21 • 10 pack of Silicone Covers for Desktop Phone Handsets (CP-HS-COVER=) Install the Cisco IP Phone Silicone Cover The silicone cover helps prolong the life of your Cisco IP Phone and make it easier to keep the buttons and number pad clean. Procedure Step 1 Position the phone facing you.
- Page 22 Accessories Install the Cisco IP Phone Handset Cover Step 4 Secure the cover around the corners and side of the phone. The cover should fit securely over the phone without much resistance. Step 5 Place the handset back on the cradle.
- Page 23 Accessories Clean the Silicone Cover Procedure Step 1 Remove the silicone cover. Step 2 Clean the cover. Use a low-strength cleaning agent to prolong the life and look of the case. Note Step 3 Dry the cover thoroughly. Don't put it back on the phone until it is completely dry. Step 4 Put the cover back on the phone.
- Page 24 Accessories Clean the Silicone Cover Accessories...