Makita DHK180 Instruction Manual
Cordless power scraper
Hide thumbs
Also See for DHK180:
- Instruction manual (69 pages) ,
- Instruction manual (36 pages) ,
- Instruction manual (68 pages)
Table of Contents
Advertisement
Quick Links
Advertisement
Table of Contents

Related Manuals for Makita DHK180


Summary of Contents for Makita DHK180
- Page 1 INSTRUCTION MANUAL Cordless Power Scraper DHK180 Read before use.
-
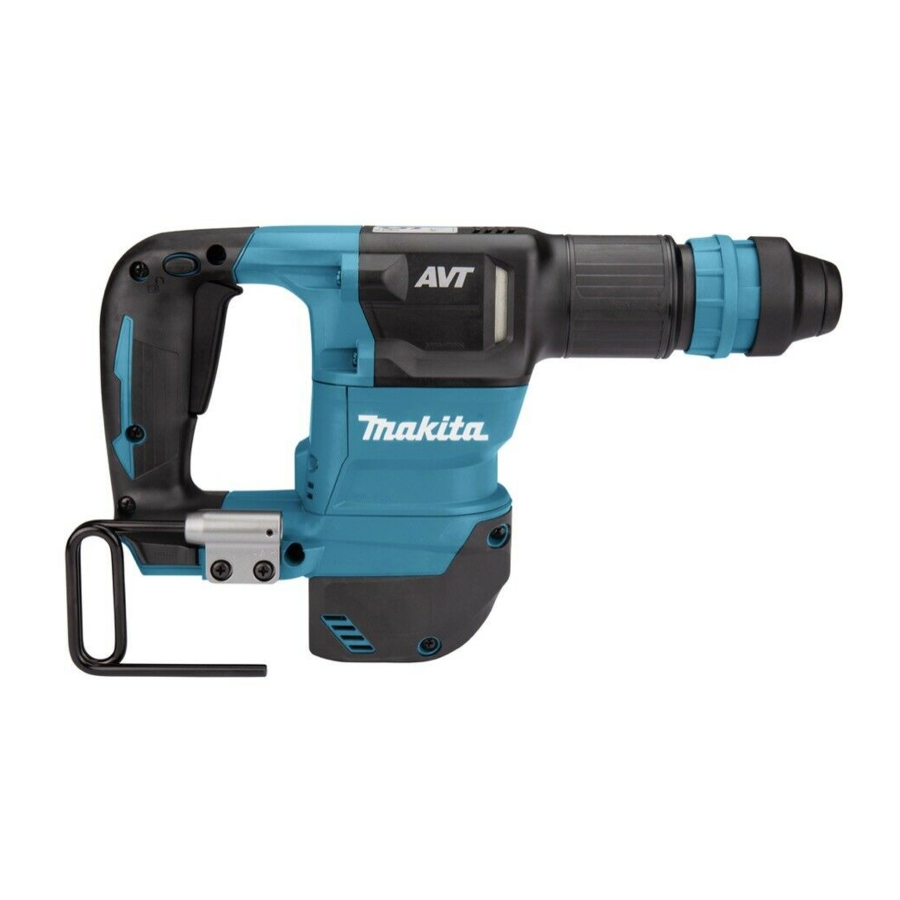
Page 2: Specifications
SPECIFICATIONS Model: DHK180 Blows per minute 0 - 3,200 min Overall length 368 mm Rated voltage D.C. 18 V Net weight 3.3 - 3.6 kg • Due to our continuing program of research and development, the specifications herein are subject to change without notice. • Specifications may differ from country to country. • The weight may differ depending on the attachment(s), including the battery cartridge. The lightest and heavi- est combination, according to EPTA-Procedure 01/2014, are shown in the table. Applicable battery cartridge BL1815N / BL1820 / BL1820B / BL1830 / BL1830B / BL1840 / BL1840B / BL1850 / BL1850B / BL1860B • Some of the battery cartridges listed above may not be available depending on your region of residence. WARNING: Only use the battery cartridges listed above. Use of any other battery cartridges may cause... - Page 3 Power tools can produce electromagnetic fields (EMF) that are not harmful to the user. However, users of pacemakers and other similar medical devices should contact the maker of their device and/or doctor for advice before operating this power tool. Personal safety Stay alert, watch what you are doing and use common sense when operating a power tool. Do not use a power tool while you are tired or under the influence of drugs, alcohol or med- ication. A moment of inattention while operating power tools may result in serious personal injury.
- Page 4 Battery tool use and care Under normal operation, the tool is designed to produce vibration. The screws can come Recharge only with the charger specified by loose easily, causing a breakdown or accident. the manufacturer. A charger that is suitable for Check tightness of screws carefully before one type of battery pack may create a risk of fire operation.
-
Page 5: Functional Description
13. If the tool is not used for a long period of time, the battery must be removed from the tool. SAVE THESE INSTRUCTIONS. Fig.1 ► 1 . Red indicator 2. Button 3. Battery cartridge CAUTION: Only use genuine Makita batteries. Use of non-genuine Makita batteries, or batteries that To remove the battery cartridge, slide it from the tool have been altered, may result in the battery bursting while sliding the button on the front of the cartridge. causing fires, personal injury and damage. It will also void the Makita warranty for the Makita tool and To install the battery cartridge, align the tongue on the charger. -
Page 6: Overheat Protection
Overheat protection Indicating the remaining battery capacity When the tool or battery is overheated, the tool stops automatically. In this case, let the tool and battery cool before turning the tool on again. Only for battery cartridges with the indicator NOTE: When the tool is overheated, the lamp blinks. Overdischarge protection When the battery capacity is not enough, the tool stops automatically. In this case, remove the battery from the tool and charge the battery. Switch action WARNING: Before installing the battery car- tridge into the tool, always check to see that the switch trigger actuates properly and returns to Fig.2... -
Page 7: Electronic Function
Using the trigger-lock button for NOTICE: The speed adjusting dial can be turned continuous operation only as far as 5 and back to 1. Do not force it past 5 or 1, or the speed adjusting function may no For continuous operation, depress the trigger-lock but- longer work. - Page 8 Installing or removing bit Bit angle Clean the shank end of the bit and apply grease before The bit can be secured at 12 different angles. To installing the bit. change the bit angle, slide the change ring forward, then turn the change ring to change the bit angle. At the desired angle, slide the change ring back to the original position. The bit will be secured in place. Fig.7 ► 1 . Shank end 2. Grease Fig.10 Insert the bit into the tool. Turn the bit and push it in until ► 1 . Change ring it engages. After installing the bit, always make sure that the bit is securely held in place by trying to pull it out. Hook CAUTION: Always remove the battery when hanging the tool with the hook. CAUTION: Never hook the tool at high loca- tion or on potentially unstable surface.
-
Page 9: Operation
The hook is also used for connecting the lanyard (tether strap). Be sure to connect the lanyard (tether strap) to the double looped portion of the hook. Fig.12 Removing or installing the hook To remove the hook, loosen the screws and remove the washers and hook. To install the hook, insert the wash- ers to the slits on the tool housing, and then secure the hook with 2 screws. Fig.14 ► 1 . Double looped portion of the hook 2. Lanyard (tether strap) 3. Locking carabiner (multi-action and screw gate type) OPERATION CAUTION: Always hold the tool firmly with both hands during operations. -
Page 10: Maintenance
CAUTION: These accessories or attachments Do not wrap lanyards around or allow them to are recommended for use with your Makita tool come in contact with sharp or rough edges. specified in this manual. The use of any other accessories or attachments might present a risk of Fasten the other end of the lanyard outside injury to persons. Only use accessory or attachment... - Page 12 Makita Corporation 3-11-8, Sumiyoshi-cho, Anjo, Aichi 446-8502 Japan 885744-924 www.makita.com 20190827...