Honeywell HCE80R Mounting And Operation Manual
Hide thumbs
Also See for HCE80R:
- Mounting and operation instructions (32 pages) ,
- Installation and operation manual (34 pages)
Table of Contents
Advertisement
Available languages
Available languages
Quick Links
- 1 Hce80(R) / Hcc80(R) Mounting and Operation
- 2 Table of Contents
- 3 System Overview
- 4 Mounting and Installation
- 5 Installing the Underfloor Heating Controller
- 6 Settings at the Underfloor Heating Controller
- 7 Connecting Devices (Binding)
- 8 Binding Room Setpoint Generators/Sensors with the Evohome Controller
- Download this manual
Advertisement
Chapters
Table of Contents

Related Manuals for Honeywell HCE80R


Summary of Contents for Honeywell HCE80R
- Page 1 HCE80(R) / HCC80(R) Mounting and operation Montage en bedrijf Montage et fonctionnement...
- Page 2 English Nederlands Français...
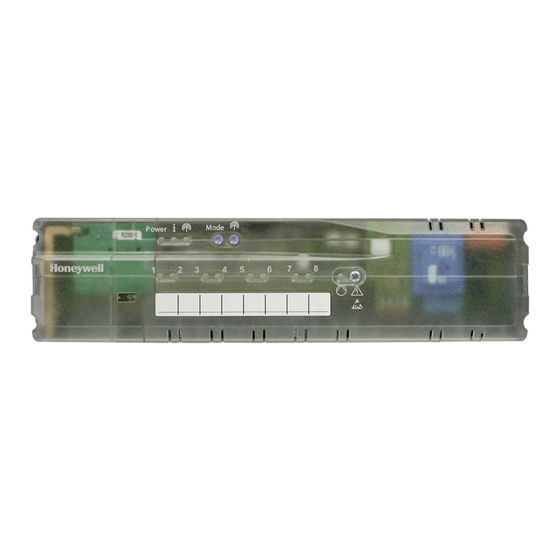
- Page 3 HCE80(R) / HCC80(R) Mounting and operation Fig. 1 Fig. 2 Fig. 3 Power Mode Fig. 4 1 2 3 4 5 6 HRA80 Z4 Z5 Z6 Z7 Z8 Panter Smile Fig. 5 Fig. 6 Fig. 7 7 m m 5.5 mm 5.5 mm...
-
Page 5: Table Of Contents
HCE80(R) / HCC80(R) Mounting and operation Contents Introduction Help with problems System overview Changing the fuse Function overview Restoring the factory settings at the underfloor heating controller Mounting and installation Fault displays Errors and elimination Creating a zoning plan Zoning plan (sample) Options Safety instructions Boiler feedback... -
Page 6: Introduction
Introduction Introduction These installation and operating instructions contain all the information required for installation, commissioning and configuring the underfloor heating controller HCE80(R) / HCC80(R). All the operating elements and connections are shown on a fold-out page. Fold out the left-hand cover. Legend for fold-out page Leave the cover folded out while reading further. -
Page 7: System Overview
Central operating device (CM927) Controls the room temperature via Boiler feedback programmable time programs (1 zone) Analog output (only HCE80/HCC80) or relay output (only HCE80R/HCC80R) Room thermostat (DTS92) Measures the room temperature, Integrated pump relay room setpoint temperature can be set, with digital display... - Page 8 Introduction System overview – continued An underfloor heating control system can in principle have 3 different configurations: • with an evohome controller If you use the underfloor heating controller • with a central operating device CM927 with Smile Room Connect SRC‑10, •...
-
Page 9: Function Overview
• Integrated pump relay • Boiler feedback – Analog (only HCE80/HCC80) – Integrated relay with floating contact 42 V AC/VDC (only at HCE80R, HCC80R) – Wireless via relay BDR91 • Underfloor heating controller can be switched between heating and cooling • 1 antenna (internal or external) can be used for 3 controllers •... -
Page 10: Mounting And Installation
Mounting and installation Mounting and installation Creating a zoning plan Within a building rooms (zones) can be controlled with different room setpoint temperatures. The thermal actuators of the allocated zone (room) are controlled depending on the room setpoint temperature. Temperature Thermal actuators Number of zones (maximum) -
Page 11: Zoning Plan (Sample)
HCE80(R) / HCC80(R) Mounting and operation Zoning plan (sample) Zone Thermal actuator Room setpoint Room name Operating (type, location) generator (location) modes Heating Cooling* Heating Cooling* Heating Cooling* Heating Cooling* Heating Cooling* Heating Cooling* Heating Cooling* Heating Cooling* * Optional... -
Page 12: Safety Instructions
Mounting and installation Safety instructions CAUTION Insufficient data transfer DANGER Danger to life through electric shock! Interference of the radio receiver in the device Contacts that are through metallic objects open are live. and further radio devices. f Unplug the power f When mounting the plug before opening device ensure that... -
Page 13: Installing The Underfloor Heating Controller
HCE80(R) / HCC80(R) Mounting and operation Installing the underfloor heating controller The underfloor heating controller can be installed within or outside the distributor box. 4 4.2-mm holes for installation are located on the underfloor heating controller. Wall installation Mark, drill and insert plugs into fastening holes. Screw on the underfloor heating controller. -
Page 14: Settings At The Underfloor Heating Controller
Mounting and installation Settings at the underfloor heating controller DANGER! Danger to life through electric shock! Contacts that are open are live. f Ensure that the cable is deenergized. Opening the housing Open the housing (see fold-out page, Fig. 2). Plugging in the expansion module (optional) The expansion module HCS80 expands the number of possible temperature zones of the... -
Page 15: Cabling
HCE80(R) / HCC80(R) Mounting and operation Cabling Permissible cable types and lengths Connecting the power cable DANGER! Danger to life through Thermal actuators electric shock! Outer cable diameter min. 3.5 mm / max. 5.3 mm Contacts that are open are live. Cable length max. - Page 16 Mounting and installation Cabling – continued Connecting a pump (230 V AC) Connecting the thermal actuators As soon as a zone is active, the pump is activated with a time delay. The pump switches off as soon as all the valves are closed. The LED (see fold-out page, Fig.
-
Page 17: Commissioning
HCE80(R) / HCC80(R) Mounting and operation Installing an external antenna Commissioning Up to three underfloor heating controllers can be connected to an antenna. During commissioning, room setpoint generators/sensors and, if applicable, the Only install the external antenna outside time programs of the central operating metal housings (e.g. -
Page 18: Connecting Devices (Binding)
Connecting devices (binding) Connecting devices (binding) Binding room setpoint generators/sensors with the evohome controller T87 RF DTS92A(E) HCW82 HCF82 With the evohome controller each zone can be controlled separately with an individual time program. For information on installing the device please read the evohome installation instructions. - Page 19 HCE80(R) / HCC80(R) Mounting and operation Commissiong and binding the evohome Binding a room setpoint generator/ controller sensor (HCW82 or HCF82) If you want to control the room temperature with Briefly press the bind button in the bottom the evohome controller (that has to be located right-hand corner.
- Page 20 Connecting devices (binding) Binding room setpoint generators/sensors with the evohome controller – continued Binding the underfloor heating controller with the evohome controller Press and hold the installation button on the underfloor heating controller for 2 seconds. The LED lights up. The LED of zone 1 flashes green.
-
Page 21: Binding The Room Device Cm927
HCE80(R) / HCC80(R) Mounting and operation Binding the room device CM927 with the underfloor heating controller T87 RF DTS92A(E) HCW82 HCF82 CM927 Each zone can be controlled with the same time program with the CM927 operating device. For information on installing the device please read the CM927 installation instructions. -
Page 22: Binding The Underfloor Heating Controller Without Time Program
Connecting devices (binding) Binding the underfloor heating controller without time program T87 RF DTS92A(E) HCW82 HCF82 The following section describes how you can assign (bind) the various components of a temperature zone. Option Setting the parameter SU at the room thermostat DTS92 The parameter SU:2 has to be set so that the room thermostat DTS92 can be assigned directly to the underfloor heating controller. - Page 23 HCE80(R) / HCC80(R) Mounting and operation Binding the room thermostat DTS92 with Binding the underfloor heating controller Press the installation button the underfloor heating controller Setting the underfloor heating twice (skip red flashing LED). controller to the binding mode The green LED of the next Keep the zoning plan at hand.
- Page 24 Connecting devices (binding) Binding the underfloor heating controller without time program – continued Binding room setpoint generators/sensors HCW82/ Binding the room temperature selector T87RF HCF82 with the underfloor heating controller with the underfloor heating controller Setting the underfloor heating Setting the underfloor heating controller to the binding mode controller to the binding mode Press and hold the installation...
-
Page 25: Cancelling The Assignment Of Zones (Rooms)
HCE80(R) / HCC80(R) Mounting and operation Cancelling the assignment of zones (rooms) Cancelling the assignment of a room Cancelling the assignment of the time setpoint generator/sensor of a zone program (room setpoint) of a zone Keep the installation button pressed Keep the installation button pressed for at least 2 seconds in order to... -
Page 26: Checking The Installation
Connecting devices (binding) Checking the installation Checking the configuration Test the radio communication Press the installation button Sending test signals LED flashes orange. The colours of LEDs 1...8 indicate the configuration of the temperature zones. LEDs 1...8 Meaning The underfloor heating controller can send a test signal to all the allocated radio No device installed receivers in order to test the signal strength. -
Page 27: Help With Problems
HCE80(R) / HCC80(R) Mounting and operation Help with problems Changing the fuse Restoring the factory settings at the underfloor heating controller Only use ceramic fuses of the type 230 V AC; 2.5 A; fast; 5 x 20 mm. When the underfloor heating controller is reset to the factory settings, the cur- rent configuration (assignment) is deleted. -
Page 28: Errors And Elimination
Help with problems Errors and elimination Problem Cause/solution Problem Cause/solution Power LED does not Mains voltage not connected. There is a fault in one of the The LED lights light up when the temperature zones (see Page 15). up red after f Check voltage of power is switched on. -
Page 29: Options
The relay is switched on and off depending on the valve setting. Implementing a boiler feedback with an integrated relay 42 V AC, floating contact (only HCE80R/HCC80R) The relay is switched on and off depending on the valve setting. Strip the connections 5.5 mm (see fold-out page, Fig. -
Page 30: Cooling With Cm927
Options Cooling with CM927 Activating the cooling function at the CM927 Binding the room temperature setpoint cooling The heating/cooling function is specified by The cooling function at the CM927 has Parameter 4:HC in the installation mode. to be activated to this purpose. Set the slide switch to the "OFF"... -
Page 31: Time Program For Cooling Function
HCE80(R) / HCC80(R) Mounting and operation Time program for cooling function If the cooling function was activated, a separate time program for heating and cooling can be assigned to each zone. Time programs and setpoint values are activated by the switchover contact heating or cooling. The time program for heating is active when the connection at Terminal 3 and 4 is open at Connector 9 (see fold-out page, Fig. -
Page 32: Appendix
Appendix Appendix Navigation and function overview Function Press button Zone LED Exit mode Status LED Normal mode Lights up green = Valve open LED off = Valve closed Binding Lights up orange Flashing 4 min after last action > 2 s Delete assigned Mode >... -
Page 33: Technical Data
1 kg Manufactured for and on behalf of the Environmental Fuse Ceramic fuse 5 x 20 mm, & Energy Solutions Division of Honeywell Technologies 230 V AC; 2.5 A; fast Sàrl, E&ES, Z.A., La Pièce 16, 1180 Rolle, Switzerland by its Authorised Representative Honeywell Inc. - Page 34 Inhoudsopgave Inleiding Storingen verhelpen Systeemoverzicht Zekering vervangen Functieoverzicht Zoneregelaar resetten naar de standaardinstellingen Montage en installatie Storingsweergave Storingen en oplossingen Zoneschema opstellen Zoneschema (sjabloon) Opties Veiligheidsaanwijzingen Ketelsturing Zoneregelaar monteren Relaismodule voor aansturing van Instellingen op de zoneregelaar de warmtebron toewijzen Bekabeling Koelen met de CMS927 Inbedrijfstelling...
-
Page 35: Inleiding
HCE80(R) / HCC80(R) Montage en bedrijf Inleiding Deze montage- en bedieningshandleiding bevat alle informatie over montage, inbedrijfstelling en configuratie van de zoneregelaar HCE80(R) / HCC80(R). Alle bedieningselementen en aansluitingen zijn afgebeeld op een uitklappagina. Klap de linker omslagpagina open. Legenda bij de uitklappagina Laat deze omslagpagina tijdens Fig. -
Page 36: Systeemoverzicht
(tot maximaal 12 zones) Ketelsturing Bedieningstoestel (CMS927) Analoge uitgang (uitsluitend Regelt met instelbare tijdprogramma's HCE80/HCC80) of relaisuitgang de ruimtetemperatuur (1 zone) (uitsluitend HCE80R/HCC80R) Kamerthermostaat (DTS92) Geïntegreerd pomprelais Meet de ruimtetemperatuur, gewenste ruimtetemperatuur instelbaar, met digitale weergave Thermische motoren Thermostaat (T87RF) - Page 37 HCE80(R) / HCC80(R) Montage en bedrijf Een zoneregelsysteem kan in principe op 3 verschillende manieren worden opgebouwd: • met de evohome bedieningsinterface Wanneer u de zoneregelaar gebruikt met de • met het bedieningstoestel CMS927 Smile Room Connect SRC‑10, vindt u de •...
-
Page 38: Functieoverzicht
• Geïntegreerd pomprelais • Ketelsturing – Analoog (uitsluitend HCE80/HCC80) – Geïntegreerd relais met potentiaalvrij contact 42 V AC/VDC (uitsluitend bij HCE80R, HCC80R) – Draadloos via relais BDR91 • Zoneregelaar omschakelbaar tussen verwarmen/koelen • 1 antenne (intern (bij HCC80) of extern (bij HCE80)) voor 3 regelaars te gebruiken •... -
Page 39: Montage En Installatie
HCE80(R) / HCC80(R) Montage en bedrijf Montage en installatie Zoneschema opstellen In een gebouw kunnen ruimten (zones) met een verschillend ingestelde ruimtetemperatuur worden geregeld. Afhankelijk van de ingestelde ruimtetemperatuur worden de thermische motoren van de toegewezen zone (ruimte) aangestuurd. Temperatuurzones Thermische motoren Aantal (maximaal) -
Page 40: Zoneschema (Sjabloon)
Montage en installatie Zoneschema (sjabloon) Zone Thermische motor Temperatuurinstelling Ruimtenaam Bedrijfsstanden (type, locatie) (locatie) Verwarmen Koelen* Verwarmen Koelen* Verwarmen Koelen* Verwarmen Koelen* Verwarmen Koelen* Verwarmen Koelen* Verwarmen Koelen* Verwarmen Koelen* * optioneel... -
Page 41: Veiligheidsaanwijzingen
HCE80(R) / HCC80(R) Montage en bedrijf Veiligheidsaanwijzingen VOORZICHTIG Ontoereikende ge- GEVAAR Levensgevaar door gevensoverdracht elektrische schok! Storing van de Niet-afgeschermde draadloze ontvanger in contacten met netspanning. het toestel door metalen f Verwijder de netstekker voorwerpen en andere voor het openen draadloze apparatuur. -
Page 42: Zoneregelaar Monteren
Montage en installatie Zoneregelaar monteren De zoneregelaar kan in of buiten de verdeelkast worden gemonteerd. De zoneregelaar is voorzien van 4 montagegaten van 4,2 mm diameter. Wandmontage Teken de bevestigingsgaten af, boor de gaten en breng pluggen aan. Bevestig de zoneregelaar. 52. -
Page 43: Instellingen Op De Zoneregelaar
HCE80(R) / HCC80(R) Montage en bedrijf Instellingen op de zoneregelaar GEVAAR Levensgevaar door elektrische schok! Niet-afgeschermde contacten met netspanning. f Controleer dat de kabel niet onder spanning staat. Behuizing openen Open de behuizing (zie uitklappagina Fig. 2). Uitbreidingsmodule plaatsen (optioneel) De uitbreidingsmodule HCS80 verhoogt het aantal temperatuurzones van de zoneregelaar van 5 tot 8. -
Page 44: Bekabeling
Montage en installatie Bekabeling Toegestane kabeltypen en -lengten Netkabel aansluiten GEVAAR Levensgevaar door Thermische motoren elektrische schok! Uitwendige kabeldiameter min. 3,5 mm / max. 5,3 mm Niet-afgeschermde contacten met netspanning. Kabellengte max. 400 m f Controleer dat de Kerndiameter max. 1,0 mm² kabel niet onder spanning staat. - Page 45 HCE80(R) / HCC80(R) Montage en bedrijf Pomp aansluiten (230 V AC) Thermische motoren aansluiten Zodra een zone actief is, wordt de pomp met tijdvertraging ingeschakeld. Zodra alle ventielen zijn gesloten, schakelt de pomp uit. De LED (zie uitklappagina Fig. 3 (6)) Beschadiging van de zoneregelaar.
-
Page 46: Inbedrijfstelling
Montage en installatie Bekabeling – vervolg Externe antenne installeren Inbedrijfstelling Er kunnen maximaal drie zoneregelaars op een antenne worden aangesloten. Bij de inbedrijfstelling worden temperatuurvoelers (met instelknop) en zo Installeer de externe antenne uitsluitend buiten nodig de tijdprogramma's van de centrale metalen behuizingen (bv. -
Page 47: Toestellen Toewijzen (Binding)
HCE80(R) / HCC80(R) Montage en bedrijf Toestellen toewijzen (binding) Temperatuurvoeler toewijzen aan evohome bedieningsinterface T87 RF DTS92A(E) HCW82 HCF82 Met de evohome bedieningsinterface kan elke zone met een individueel tijdprogramma onafhankelijk worden geregeld. Hoe u het toestel moet installeren, leest u in de installatiehandleiding evohome. - Page 48 Toestellen toewijzen (binding) Temperatuurvoeler toewijzen aan evohome bedieningsinterface – vervolg evohome bedieningsinterface in Temperatuurvoeler (met instelknop) bedrijf stellen en toewijzen (HCW82 of HCF82) toewijzen Druk op JA, wanneer u de ruimtetemperatuur wilt Druk kort op de toewijs-knop regelen met de evohome bedieningsinterface rechtsonder.
-
Page 49: Temperatuurvoeler Toewijzen Aan Evohome Bedieningsinterface - Vervolg
HCE80(R) / HCC80(R) Montage en bedrijf Zoneregelaar toewijzen aan de evohome bedieningsinterface (binding) Houd de installatieknop de zoneregelaar gedurende 2 seconden ingedrukt. LED brandt. De LED van zone 1 knippert groen. Druk op de evohome bedieningsinterface op de groene toewijzingsknop Wanneer de toewijzing succesvol was, brandt de gele LED van de betreffende zone op de zoneregelaar. -
Page 50: Bedieningstoestel Cms927 Toewijzen Aan De Zoneregelaar
Toestellen toewijzen (binding) Bedieningstoestel CMS927 toewijzen aan de zoneregelaar T87 RF DTS92A(E) HCW82 HCF82 CM927 Met bedieningstoestel CMS927 kan elke zone met hetzelfde tijdprogramma worden geregeld. Hoe u het toestel moet installeren, leest u in de installatiehandleiding CMS927. Optioneel Geïntegreerde temperatuurvoeler CMS927 in de toewijs-modus zetten van de CMS927 activeren Zet de schuifschakelaar in... -
Page 51: Toewijzing Van De Zoneregelaar Zonder Tijdprogramma
HCE80(R) / HCC80(R) Montage en bedrijf Toewijzing van de zoneregelaar zonder tijdprogramma T87 RF DTS92A(E) HCW82 HCF82 In onderstaande paragraaf wordt beschreven hoe u de verschillende componenten aan een temperatuurzone kunt toewijzen (binding). Optioneel Parameter SU instellen op kamerthermostaat DTS92 Om de kamerthermostaat DTS92 rechtstreeks aan de zoneregelaar te kunnen toewijzen, moet de parameter SU:2 zijn ingesteld. - Page 52 Toestellen toewijzen (binding) Toewijzing van de zoneregelaar zonder tijdprogramma – vervolg Kamerthermostaat DTS92 toewijzen Toewijzing aan de zoneregelaar (binding) Druk twee keer op de installatieknop van de zoneregelaar (rood Zoneregelaar in de toewijs-modus zetten knipperende LED overslaan). Houd het zoneschema onder handbereik. De groene LED van de volgende Houd de installatieknop zone knippert groen.
- Page 53 HCE80(R) / HCC80(R) Montage en bedrijf Temperatuurvoeler met instelknop HCW82/ Thermostaat T87RF met de zoneregelaar verbinden HCF82 toewijzen aan de zoneregelaar Zoneregelaar in de Bind-stand zetten Zoneregelaar in de toewijs-modus zetten Houd de installatieknop Houd de installatieknop de zoneregelaar gedurende de zoneregelaar gedurende 2 seconden ingedrukt.
-
Page 54: Toewijzing Van Zones (Ruimten) Opheffen
Toestellen toewijzen (binding) Toewijzing van zones (ruimten) opheffen Toewijzing van een temperatuurvoeler Toewijzing van het tijdprogramma (ingestelde aan een zone opheffen ruimtetemperatuur) aan een zone ongedaan maken Houd de installatieknop Houd de installatieknop de zoneregelaar ten minste de zoneregelaar ten minste 2 seconden ingedrukt om naar 2 seconden ingedrukt om naar de installatiemodus te gaan. -
Page 55: Installatie Controleren
HCE80(R) / HCC80(R) Montage en bedrijf Installatie controleren Configuratie controleren Test van de draadloze communicatie Druk op de installatieknop Testsignalen zenden De LED knippert oranje. De kleuren van de LED’s 1…8 geven de configuratie van de temperatuurzones aan. De zoneregelaar kan naar alle toegewezen LED's 1...8 Betekenis ontvangers een testsignaal zenden ter... -
Page 56: Storingen Verhelpen
Storingen verhelpen Storingen verhelpen Zekering vervangen Zoneregelaar resetten naar de standaardinstellingen Gebruik uitsluitend glaszekeringen van het type 230 V AC; 2,5 A; snel; 5 x 20 mm. Wanneer de zoneregelaar wordt gereset naar de standaardinstellingen, wordt de hui- dige configuratie (toewijzing) gewist. Bij een Schakel het toestel spanningsloos. -
Page 57: Storingen En Oplossingen
HCE80(R) / HCC80(R) Montage en bedrijf Storingen en oplossingen Probleem Oorzaak/oplossing Probleem Oorzaak/oplossing Bij het inschakelen Er is geen netspanning. In een van de De LED brandt na de van de netspanning temperatuurzones is inbedrijfstelling rood. f Controleer de spanning gaat de LED Power een storing opgetreden op de wandcontactdoos. -
Page 58: Opties
(met BDR91) Afhankelijk van de afsluiterstand wordt het relais in- en uitgeschakeld. Ketelsturing realiseren met geïntegreerd relais 42 V AC, potentiaalvrij contact (uitsluitend HCE80R/HCC80R) Afhankelijk van de afsluiterstand wordt het relais in- en uitgeschakeld. Strip de aansluitingen over 5,5 mm (zie uitklappagina Fig. -
Page 59: Koelen Met De Cms927
HCE80(R) / HCC80(R) Montage en bedrijf Koelen met de CMS927 Koelfunctie op de CMS927 activeren Toewijzen ingestelde ruimtetemperatuur koelen De functie verwarmen/koelen wordt in de Hiervoor moet de koelfunctie op de installatiemodus bepaald met parameter 4:HC. CMS927 zijn geactiveerd. Zet de schuifschakelaar in Houd de installatieknop de stand "VORST". -
Page 60: Tijdprogramma Voor Koelfunctie
Opties Tijdprogramma voor koelfunctie Wanneer de koelfunctie is geactiveerd, kan aan elke zone een eigen tijdprogramma voor verwarmen en koelen worden toegewezen. De tijdprogramma's en ingestelde waarden worden geactiveerd met het omschakelcontact verwarming/koeling. Het tijdprogramma voor verwarmen is actief, wanneer de verbinding tussen de klemmen 3 en 4 op aansluitklem 9 is onderbroken (zie uitklappagina Fig. -
Page 61: Bijlage
HCE80(R) / HCC80(R) Montage en bedrijf Bijlage Navigatie- en functieoverzicht Functie Knop indrukken Zone-LED Modus verlaten Status-LED Normaal bedrijf Brandt groen = afsluiter open LED uit = afsluiter dicht Toewijzing Brandt oranje Knippert 4 min. na laatste > 2 s handeling Toegewezen Brandt oranje... -
Page 62: Technische Gegevens
1 kg Vervaardigd voor en namens de afdeling Environmental Zekering Glaszekering 5 x 20 mm, & Energy Solutions van Honeywell Technologies Sàrl, 230 V AC; 2,5 A; snel E&ES, Z.A., La Pièce 16, 1180 Rolle, Zwitserland door haar gemachtigde vertegenwoordiger Honeywell Inc. -
Page 63: Hce80(R) / Hcc80(R) Montage Et Fonctionnement
HCE80(R) / HCC80(R) Montage et fonctionnement Table des matières Introduction Aide en cas de problème Vue d'ensemble du système Remplacer le fusible Aperçu des fonctions Remettre le régulateur de zone au réglage d'usine Montage et installation Indications de défaut Défaut et remède Créer un plan des zones Plan des zones (exemple) Options... -
Page 64: Introduction
Introduction Introduction Ces instructions de montage et mode d'emploi contiennent toutes les informations sur le montage, la mise en service et la configuration des régulateurs de zone HCE80(R) / HCC80(R). Tous les éléments de commande et raccordements sont représentés sur un rabat. Dépliez le rabat de gauche. -
Page 65: Vue D'ensemble Du Système
Module d'ambiance programmable Commande chaudière central (CM927) Sortie analogique (uniquement HCE80/HCC80) ou sortie de relais Règle la température ambiante suivant (uniquement HCE80R/HCC80R) des programmes horaires (1 zone) Thermostat d'ambiance (DTS92) Relais de pompe intégré Mesure la température ambiante, consigne de température ambiante réglable, avec affichage numérique... - Page 66 Introduction Vue d'ensemble du système – suite Un système de régulation pour plancher chauffant peut par principe être construit de 3 façons différentes: Si vous utilisez le régulateur de zone avec • avec module d'ambiance Smile Room Connect SRC‑10, la liaison programmable central evohome est décrite dans le mode d'emploi SRC-10.
-
Page 67: Aperçu Des Fonctions
• Relais de pompe intégré • Commande chaudière – Analogique (uniquement HCE80/HCC80) – Relais intégré avec contact libre de potentiel 42 V AC/VDC (uniquement HCE80R, HCC80R) – Sans fil via relais BDR91 • Régulateur de zone commutable chauffage/rafraîchissement • 1 antenne (interne ou externe) utilisable pour 3 régulateurs... -
Page 68: Montage Et Installation
Montage et installation Montage et installation Créer un plan des zones Dans un bâtiment, on peut régler des locaux (zones) avec des consignes de température ambiante différentes. Les moteurs thermiques de la zone affectée (local) sont commandés en fonction de la consigne de température ambiante. Zones de Moteurs Nombre de... -
Page 69: Plan Des Zones (Exemple)
HCE80(R) / HCC80(R) Montage et fonctionnement Plan des zones (exemple) Zone Moteur thermique Combiné d'ambiance Nom du local Modes de (type, emplacement) (emplacement) fonctionnement Chauffage Rafraîchissement* Chauffage Rafraîchissement* Chauffage Rafraîchissement* Chauffage Rafraîchissement* Chauffage Rafraîchissement* Chauffage Rafraîchissement* Chauffage Rafraîchissement* Chauffage Rafraîchissement* * en option... -
Page 70: Consignes De Sécurité
Montage et installation Consignes de sécurité PRUDENCE Transmission de DANGER Danger de mort par données insuffisante choc électrique! Perturbation du Contacts sous tension récepteur radio réseau exposés à nu. dans l'appareil f Tirez la fiche de la prise par des objets avant d'ouvrir le boîtier. -
Page 71: Monter Le Régulateur De Zone
HCE80(R) / HCC80(R) Montage et fonctionnement Monter le régulateur de zone Le régulateur de zone peut être monté à l'intérieur ou à l'extérieur du coffret de distribution. Le régulateur de zone comporte 4 trous de montage de 4,2 mm de diamètre. Montage mural Tracez, forez et chevillez les trous de fixation. -
Page 72: Réglages Sur Le Régulateur De Zone
Montage et installation Réglages sur le régulateur de zone DANGER Danger de mort par choc électrique! Contacts sous tension réseau exposés à nu. f Assurez-vous que le câble est hors tension. Ouvrir le boîtier Ouvrez le boîtier (voir rabat, Fig. 2). Enficher le module d'extension (option) Le module d'extension HCS80 augmente le nombre possible de zones de température... -
Page 73: Câblage
HCE80(R) / HCC80(R) Montage et fonctionnement Câblage Types et longueurs de câbles admissibles Raccorder le cordon d'alimentation DANGER Danger de mort par Moteurs thermiques choc électrique! Diamètre extérieur du câble Min. 3,5 mm / max. 5,3 mm Contacts sous tension réseau exposés à... - Page 74 Montage et installation Câblage – suite Raccorder la pompe (230 V AC) Raccorder les moteurs thermiques Dès qu'une zone est active, la pompe est enclenchée avec temporisation. Dès que toutes les vannes sont fermées, la pompe se met hors service. La LED (voir rabat Fig.
-
Page 75: Mise En Service
HCE80(R) / HCC80(R) Montage et fonctionnement Installer l'antenne externe Mise en service On peut raccorder jusqu'à trois régulateurs de zone à une antenne. Lors de la mise en service, les combinés d'ambiance et le cas échéant les programmes Installez l'antenne externe uniquement en dehors de des modules d'ambiance programmables boîtiers métalliques (p. -
Page 76: Lier L'appareil (Liaison)
Lier l'appareil (liaison) Lier l'appareil (liaison) Lier le combiné d'ambiance au module d'ambiance programmable evohome T87 RF DTS92A(E) HCW82 HCF82 Le module d'ambiance programmable evohome permet de régler indépendamment chaque zone avec un programme horaire individuel. Veuillez lire dans la notice d'installation evohome comment installer l'appareil. - Page 77 HCE80(R) / HCC80(R) Montage et fonctionnement Mettre en service et lier le Lier le combiné d'ambiance (HCW82 ou HCF82) module d'ambiance programmable evohome Appuyez brièvement sur la touche Si vous désirez régler la température ambiante de liaison dans le coin inférieur avec le module d'ambiance programmable droit.
-
Page 78: Lier Le Combiné D'ambiance Au Module D'ambiance Programmable Evohome - Suite
Lier l'appareil (liaison) Lier le combiné d'ambiance au module d'ambiance programmable evohome – suite Lier le régulateur de zone au module d'ambiance programmable evohome (liaison) Maintenez la touche d'installation du régulateur de zone enfoncée pendant 2 secondes. La LED s'allume. La LED de la zone 1 clignote en rouge. -
Page 79: Lier Le Module D'ambiance Cm927
HCE80(R) / HCC80(R) Montage et fonctionnement Lier le module d'ambiance CM927 au régulateur de zone T87 RF DTS92A(E) HCW82 HCF82 CM927 Le module d'ambiance programmable CM927 permet de régler chaque zone avec le même programme horaire. Veuillez lire dans la notice d'installation CM927 comment installer l'appareil. -
Page 80: Liaison Du Régulateur De Zone Sans Programme Horaire
Lier l'appareil (liaison) Liaison du régulateur de zone sans programme horaire T87 RF DTS92A(E) HCW82 HCF82 Dans la section suivante, vous apprenez comment vous pouvez affecter les différents composants d'une zone de température (liaison). Option Régler le paramètre SU sur le thermostat d'ambiance DTS92 Afin de pouvoir affecter le thermostat d'ambiance DTS92 directement au régulateur... - Page 81 HCE80(R) / HCC80(R) Montage et fonctionnement Lier le thermostat d'ambiance DTS92 Liaison au régulateur de zone (liaison) Appuyez 2 fois sur la touche d'installation au régulateur de zone Mettre le régulateur de zone dans le mode de liaison (sauter la LED clignotant en rouge). Tenez le plan des zones à...
- Page 82 Lier l'appareil (liaison) Liaison du régulateur de zone sans programme horaire – suite Lier le combiné d'ambiance HCW82/ Lier le sélecteur de température HCF82 au régulateur de zone T87RF au régulateur de zone Mettre le régulateur de zone dans le mode de liaison Mettre le régulateur de zone dans le mode de liaison Maintenez la touche d'installation Maintenir la touche d'installation...
-
Page 83: Annuler L'affectation De Zones (Locaux)
HCE80(R) / HCC80(R) Montage et fonctionnement Annuler l'affectation de zones (locaux) Annuler l'affectation d'un combiné Annuler l'affectation d'un programme horaire d'ambiance à une zone (consigne de température ambiante) d'une zone Maintenez la touche d'installation Maintenez la touche d'installation du régulateur de zone enfoncée du régulateur de zone enfoncée pendant au moins 2 secondes pour pendant au moins 2 secondes pour... -
Page 84: Contrôler L'installation
Lier l'appareil (liaison) Contrôler l'installation Contrôler la configuration Test de la communication par radio Appuyez sur la touche d'installation Envoyer des signaux de test La LED clignote en orange. Les couleurs des LED 1...8 indiquent la configuration des zones de température. LED 1...8 Signification Le régulateur de zone peut envoyer... -
Page 85: Aide En Cas De Problème
HCE80(R) / HCC80(R) Montage et fonctionnement Aide en cas de problème Remplacer le fusible Remettre le régulateur de zone au réglage d'usine Utilisez uniquement des fusibles de type 230 V AC; 2,5 A; rapide; 5 x 20 mm. Si le régulateur de zone est remis au réglage d'usine, la configuration ac- tuelle (affectation) est effacée. -
Page 86: Défaut Et Remède
Aide en cas de problème Défaut et remède Problème Cause/solution Problème Cause/solution A l'enclenchement Il n'y a pas de tension Il y a un défaut dans une La LED s'allume de la tension de réseau présente. des zones de température en rouge après la de réseau, la (voir page 15). -
Page 87: Options
Réaliser une commande de chaudière via le relais 42 V AC intégré, contact libre de potentiel (uniquement HCE80R/ HCC80R) En fonction de la position de la vanne, le relais est activé ou désactivé. Dénudez les raccordements sur 5,5 mm (voir rabat Fig. -
Page 88: Rafraîchissement Avec Le Cm927
Options Rafraîchissement avec le CM927 Activer la fonction de rafraîchissement sur le CM927 Liaison de la consigne de température ambiante de rafraîchissement La fonction de chauffage/rafraîchissement est définie A cet effet, la fonction de rafraîchissement dans le mode d'installation par le paramètre 4:HC. doit être activée sur le CM927. -
Page 89: Programme Horaire Pour La Fonction De Rafraîchissement
HCE80(R) / HCC80(R) Montage et fonctionnement Programme horaire pour la fonction de rafraîchissement Si la fonction de rafraîchissement est activée, un programme propre peut être affecté à chaque zone pour le chauffage et le rafraîchissement. Les programmes et les valeurs de consigne sont activées par le contact de commutation Chauffage ou Rafraîchissement. -
Page 90: Annexe
Annexe Annexe Vue d'ensemble de la navigation et des fonctions Fonction Touche LED de zone Quitter le mode LED d'état Fonctionnement S'allume en vert normal = vanne ouverte LED éteinte = vanne fermée Liaison S'allume en orange Clignote 4 min après la dernière action >... -
Page 91: Caractéristiques Techniques
Ceci remplace toute autre information 230 V AC; 2,5 A; rapide d’homologation pouvant apparaître Matériau sur la documentation du produit. Par la présente, Honeywell déclare que les produits Degré de protection IP30 mentionnés ci-dessous dans les groupes A, B et C sont Classe de protection... - Page 94 Manufactured for and on behalf of the Environmental and Combustion Controls Division of Honeywell Technologies Sàrl, Z. A. La Pièce 16, Switzerland by its Authorized Representative: Honeywell Honeywell House Skimped Hill Lane Bracknell Berkshire RG12 1EB United Kingdom Geproduceerd voor en in opdracht van de Environmental and Combustion Controls Division van Honeywell Technologies Sàrl, Rolle, Z.A.