Advertisement
Quick Links
http://waterheatertimer.org/plug-in-timers.html#15433
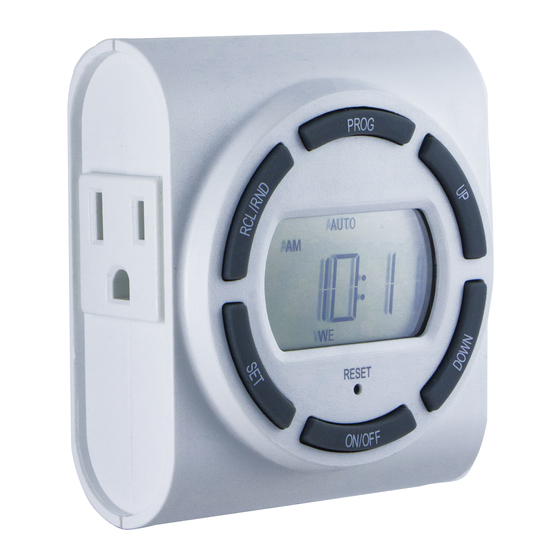
If your Timer looks like this,
use the following instructions
If your Timer does not look
like this, go to the next page
SunSmart
TM
DISPLAY SHOWN IN STANDARD "CLOCK" MODE.
RCL/RND
- When programming press
to clear ON/OFF setting
- When in clock mode, push
to activate random feature
PM
SET
- Hold 5 seconds to set
clock/date
- Push to confirm a setting
and move to next option
Note: The timer will automatically return to clock mode if a button is not pushed for
1 minute while programming. Return to step 1 if this happens.
Initial Set Up:
1. If the LCD screen is displaying numbers, you are ready to program, please proceed
to step 2. If the screen is blank plug in the timer and leave for two hours to charge
internal battery before programing.
2. Use a toothpick or sharp pencil to push the RESET button. Once pushed, the screen
will go blank briefly and then display 12:00 AM. See Figure 1.
3. Press and hold the SET button for 5 seconds until hour begins to flash. Release button.
4. Press the UP/DOWN to adjust hour. Press SET to confirm. The timer HOUR is default to
12 AM. Take note of the AM/PM on the upper left of the screen when setting the hour.
5. Press the UP/DOWN to adjust minute. Press SET to confirm.
6. Press the UP/DOWN to adjust year. Press SET to confirm.
7. Press the UP/DOWN to adjust month. Press SET to confirm.
8. Press the UP/DOWN to adjust day. Press SET to confirm.
9. Press the UP/DOWN to select DST ON or DST OFF. Press
SET to confirm. Note: DST stands for Daylight Savings
Time. DST is either "ON" or "OFF". DST will automatically
reset the times in the timer to match the current time
change, if DST is set to ON. The default DST time change
is 2:00 am, the second Sunday of March, and then the first
Sunday in November.
10. The next setting is the Zone for the SunSmart
Look at the map below and determine which zone best fits
your location. Use the UP/DOWN buttons to scroll through
the available zones in the timer and stop when you find the
zone where the timer is being installed. Press "SET" to confirm zone.
ALASKA
NORTH
CENTRAL
SOUTH
11. The screen will show SUNUP and a time with the HOUR blinking. This is the timer's
pre-set time for SUNUP. If the time is correct for SUNUP press "SET" twice to move to
the SUNSET setting. If the HOUR is not correct use the UP/DOWN buttons to adjust
the hour to match SUNUP for your area. Press "SET" to
confirm. The minutes are now blinking. If the minutes
are not correct use the UP/DOWN buttons to adjust the
minutes to match SUNUP for your area. Press "SET" when
minutes are correct.
12. The screen will show SUNSET and a time with the HOUR
blinking. This is the timer's pre-set time for SUNSET. If the
time is correct for SUNSET press "SET" twice to complete time setting. If the HOUR is
not correct use the UP/DOWN buttons to adjust the hour to match SUNSET for your
area. Press "SET" to confirm. The minutes are now blinking. If the minutes are not
correct use the UP/DOWN buttons to adjust the minutes to match SUNSET for your
area. Press "SET" when minutes are correct. This completes the time set portion.
Programming ON/OFF Times:
1. Hold down the PROG button for 5 seconds. Figure 3 should appear on the screen.
Digital Timer
PROGRAM
- Hold 5 seconds to program
ON/OFF timer settings
- Push when programming is
complete to activate timer
AUTO
UP/DOWN
Scroll through settings options
TU
RESET
RESET
Press and hold with toothpick
to clear all settings
ON/OFF (push to scroll)
ON= Always ON
Auto = Timer is active
OFF = Always OFF
Figure 1 - Ready to set
AUTO
AM
TH
DAY
Feature.
TM
MONTH
CENTRAL
HAWAII
Figure 3
GE 15433 plug-in timer
2. 1 ON --:-- is the first setting.
3. Press "SET" and the days of the week will begin blinking. This will tell the timer the
days of the week the timer will be in control of the lights/devices plugged into the
timer. Press the UP/DOWN buttons to scroll through the multiple weekday program
options shown below.
Multiple Weekday Program Options:
Apart from individual week days, pressing the UP/DOWN keys to scroll through the
multiple day combinations such as:
• Monday thru Sunday
• M, T, W, Th, F, Sat & Sun
• Monday & Wednesday & Friday
Choose the days you want the program to be active and press "SET"
4. Now that you have chosen the days the timer will function, the next step is to choose
the times the timer will turn ON. There are 3 options to choose from when selecting
the program ON time. Use the UP/DOWN buttons to scroll through the options.
CUSTOM TIME (12:00) – SUNUP – SUNSET.
A. If you would like to set the Program 1 ON Time to the pre-set SUNUP time, use the
UP/DOWN buttons to find the SUNUP time on the display and press "SET". You will
now move to the Program 1 OFF time set. (Go to step 5).
B. If you would like to set the Program 1 ON Time to the pre-set SUNSET time, use
the UP/DOWN buttons to find the SUNSET time on the display and press "SET". You
will now move to the Program 1 OFF time set. (Go to step 5).
C. If you would like to choose a custom time, use the UP/DOWN buttons to find the
screen showing 12:00 blinking and press "SET". The hour will be blinking, use the
UP/DOWN buttons to find the hour you would like the timer to turn the program
ON. (Take note of the AM/PM on the upper left of the screen when setting the
HOUR.) Once you have found the hour desired press "SET". The minutes will now be
blinking, use the UP/DOWN buttons to find the minute you would like the timer to
turn the program ON. Once you found the hour desired press "SET". You will now
move to set the Program 1 OFF time.
5. The screen will now show 1 OFF --:--. and you will repeat the routine above to select a
CUSTOM TIME (12:00), SUNUP or SUNSET for the OFF time.
6. Repeat the same routine for Program 2 (P2) through P7 to set as many ON/OFF cycles
as desired. At any time, push PROG button to complete programming and return to
clock mode.
7. Once all programming is complete make sure lamp or device is set in the on position,
and AUTO shows at the top of the timer display. Plug the lights or devices into the
timer and plug the timer into the wall. Your timer is ready to use!
Note: The lamp or device will not come on until the next ON time is triggered. To
manually turn the device ON and start the program, cycle the ON/OFF button until the
light/device turns on. Then press once more to put timer in AUTO mode (timer active). You
can also use the ON/OFF button to override the timer and set to ON (always on) or OFF
Figure 5
(always off).
RCL (Clear settings) Button:
When programming ON/OFF times, push the RCL/RND button to clear an ON/OFF
setting. Press again to resume programming. See figure 5.
YEAR
Random Security Option (RND):
The program feature will turn lights ON and OFF using the programed times + or - 30
minutes, giving the house a more lived in appearance while occupant is away.
1. Push RCL/RND (random) button to activate the Random feature while in clock mode.
The screen will display RND in the top right corner.
2. Push RCL/RND button again to deactivate the Random feature and return the timer
NORTH
to its set programming.
This device complies with part 15 of the FCC rules. Operation is subject to the
following two conditions:
SOUTH
(1) this device may not cause harmful interference, and (2) this device must
accept any interference received, including interference that may cause
undesired operation.
FCC NOTE: The manufacturer is not responsible for any radio or TV
interference caused by unauthorized modifications to this equipment. Such
modifications could void the user's authority to operate the equipment.
NOTE: This equipment has been tested and found to comply with the limits
for a Class B digital device, pursuant to Part 15 of the FCC Rules. These limits
are designed to provide reasonable protection against harmful interference
in a residential installation. This equipment generates, uses and can radiate
radio frequency energy and, if not installed and used in accordance with
the instructions may cause harmful interference to radio communications.
However, there is no guarantee that interference will not occur in a particular
installation. If this equipment does cause harmful interference to radio or
television reception, which can be determined by turning the equipment off
and on, the user is encourage to try to correct the interference by one or more
of the following measures:
• Reorient or relocate the receiving antenna.
• Increase the separation between the equipment and receiver.
• Connect the equipment into an outlet on a circuit different from that to
which the receiver is connected.
• Consult the dealer or an experienced radio/TV technician for help.
This Class B digital apparatus complies with Canadian ICES-003
• Tuesday & Thursday & Saturday
• Saturday & Sunday
• Monday thru Friday
Current time display
RCL/RND
15079
07-2011
Advertisement

Related Manuals for GE SunSmart 15042


Summary of Contents for GE SunSmart 15042
- Page 1 GE 15433 plug-in timer 2. 1 ON --:-- is the first setting. 3. Press “SET” and the days of the week will begin blinking. This will tell the timer the If your Timer looks like this, days of the week the timer will be in control of the lights/devices plugged into the use the following instructions timer. Press the UP/DOWN buttons to scroll through the multiple weekday program options shown below. If your Timer does not look like this, go to the next page Multiple Weekday Program Options: Apart from individual week days, pressing the UP/DOWN keys to scroll through the multiple day combinations such as: • Monday thru Sunday...
- Page 2 If your Timer looks like this, use the following instructions If your Timer does not look like this, go to the previous page Manual Override Option: Digital Timer Independent of the programming, it is possible at any given time to advance to the next switching command by continuously pressing the key “MANUAL” ,as Models: 15042, 15089, and 15079 shown below: AUTO OFF AUTO ON Install Set Up: ON = Always ON;...