Table of Contents
Advertisement
Advertisement
Chapters
Table of Contents

Related Manuals for Sony PSP-1006 K


Summary of Contents for Sony PSP-1006 K
- Page 1 PSP-1006 PSP-1007 2-549-103-63(1)
-
Page 2: Warnings
WARNINGS Photosensitivity A very small percentage of individuals may experience epileptic seizures when exposed to certain light patterns or flashing lights. Exposure to certain patterns or backgrounds on a television screen or while playing video games, including games played on the PSP™ system, may trigger an epileptic seizure in these individuals. - Page 3 WARNINGS...
- Page 4 GAME • Playing games • Managing saved data VIDEO • Playing UMD™VIDEO • Playing videos saved on a Memory Stick Duo™ MUSIC • Playing UMD™MUSIC • Playing music saved on a Memory Stick Duo™ PHOTO • Displaying images saved on a Memory Stick Duo™...
- Page 5 Using the home menu The basic operation of the PSP™ system starts from the home menu. Press the home button to display the home menu and use the directional buttons to navigate the horizontal and vertical icon bars. Basic button operations Directional buttons: HOME SELECT...
-
Page 6: Table Of Contents
Table of contents WARNINGS ........2 Precautions . - Page 7 x Music Listening to music ....... 57 Using the control panel ......60 Operating with PSP™...
- Page 8 x Additional information PSP™ updates ....... . . 117 Compatible media ....... 119 Specifications .
-
Page 9: Precautions
Precautions Before using this product, carefully read this manual and retain it for future reference. Safety This product has been designed with the highest concern for safety. However, any electrical device, if used improperly, has the potential for causing fire, electrical shock or personal injury. - Page 10 • Do not use the system or accessories near water. • Use only attachments/accessories specified by the manufacturer. • Do not use the headphones if they cause discomfort to your skin. If the supplied headphones cause discomfort to your skin, discontinue use immediately.
- Page 11 • Do not allow dust or foreign matter to build up around the system or accessory connectors. If there is dust or foreign matter on the system's connectors or the AC power cord, wipe it off with a dry cloth before connecting. Dust or other matter on the connectors can result in fire or electrical shock.
-
Page 12: Memory Stick Duo
If, for any reason, software or data loss or corruption occurs, it is usually not possible to recover the software or data. It is recommended that you regularly back up software and data. Sony Computer Entertainment Inc. and its subsidiaries and affiliates will not be held liable for any damages or injury in the case of software or data loss or corruption. - Page 13 In accordance with copyright law, no recorded data may be used for purposes other than personal enjoyment without permission from the copyright holder. Pouch and hand strap • If you want to pause or temporarily store the system while playing games or video, put the system in sleep mode before placing it in the pouch.
- Page 14 UMD™ handling • Do not touch the opening on the rear of the disc (recorded surface of the disc) with your fingers. • Do not allow dust, sand, foreign objects or other types of dirt to get on the disc. •...
-
Page 15: Battery Pack Precautions
Battery pack precautions Do not handle a damaged or leaking battery pack. Contact with the material can result in injury or burns to the eyes or skin. Even if foreign substances are not immediately visible, chemical changes in the material can result in injuries occurring at a later time. If you come into contact with material from a leaking battery pack, take the following actions: •... -
Page 16: Preparation
Hand strap s Pouch s Cloth s Printed materials Checking the package contents Portable) ® s Headphones with remote control s AC power cord (with 3-pin converting adaptor attached) (supplied with PSP-1006 K) s AC power cord (supplied with PSP-1007 K) - Page 17 Removing the 3-pin converting adaptor (PSP-1006 K only) Electrical outlet configuration may vary depending on the region of use. If the plug on the supplied AC power cord does not match the electrical outlet, loosen the screw and remove the converting adaptor.
-
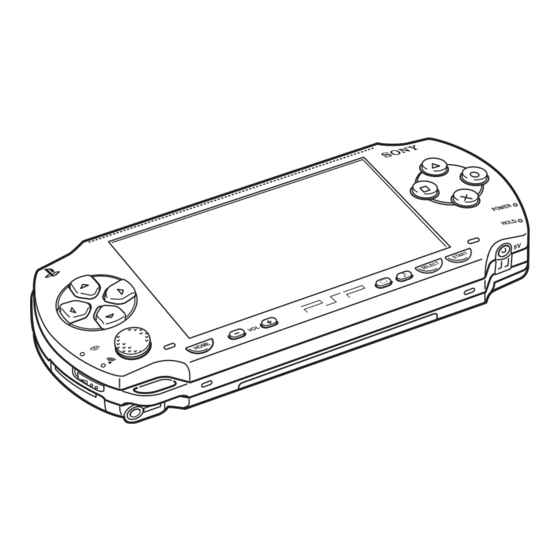
Page 18: Part Names And Functions
Part names and functions System front A L button B Directional buttons C Memory Stick Duo™ access indicator Lights up when saving and loading data D WLAN access indicator Lights up when using the wireless networking feature E Analog stick Can be used with games that support analog operation Part names and functions... - Page 19 K LCD screen L Display button Adjusts screen brightness page 36) M Sound button Adjusts the tone ( page 34) N Select button O Start button P R button System rear A Battery cover B Push button button button button button U Power indicator Lights up, flashes or changes color...
- Page 20 System top A IR port B USB connector System bottom A Headset connector B Charging terminals Part names and functions OPEN C Open latch DC IN C DC IN 5V connector...
- Page 21 System left side A Memory Stick Duo™ slot System right side A Power/hold switch Turns the system on and off, puts in sleep mode ( pages 27, 29) and locks the system buttons page 33) R:WLAN on r:WLAN off B WLAN switch Turns on the wireless networking feature R:Power switch...
- Page 22 Headphones with remote control Remote control front A . button B > button C Volume + button Turns the volume up D Volume - button Turns the volume down E u button Part names and functions Remote control side A Hold switch Locks the operation of the remote control.
-
Page 23: Preparing The Psp™ System For Use
Preparing the PSP™ system for use Before using the PSP™ system for the first time after purchase, you must follow these steps to charge the battery. Getting started 1: Inserting the battery pack Remove the battery cover. Hold down the push button and slide the battery cover open. - Page 24 Getting started 2: Charging Caution • The socket-outlet shall be installed near the equipment and shall be easily accessible. • Do not plug the AC power cord for the PSP™ system into an electrical outlet until you have made all other connections. Plug the AC power cord into the AC adaptor.
- Page 25 Plug the AC power cord into an electrical outlet. POWER HOLD SELECT START The power indicator lights up in orange, indicating that charging has begun. The power indicator will turn off when the battery is fully charged. Unplug the AC power cord from the electrical outlet and disconnect the AC adaptor from the system.
-
Page 26: Connecting The Headphones With Remote Control
Connecting the headphones with remote control Connect the headphones to the PSP™ system. 1 Plug the headphones into the remote control. 2 Plug the headphones into the headset connector on the system bottom. Hint The remote control is exclusively for use with the PSP™ system and cannot be used with other devices. -
Page 27: Basic Operations
Basic operations Turning the PSP™ system on and off Turning the system on Slide the power/hold switch up. The power indicator lights up in green, and the home menu is displayed. Hints • If the PSP™ system is turned on with a UMD™ inserted, the UMD™ will begin playback automatically. - Page 28 Turning the system off Hold the power/hold switch in the up position for more than three seconds. The power indicator flashes and then turns off, indicating that the system is turned off. Turning the PSP™ system on and off...
-
Page 29: Using Sleep Mode
Using sleep mode If the PSP™ system is switched to sleep mode, the software that is playing will be paused. When sleep mode is cleared, you can begin playback from the point you entered sleep mode. Notices • Do not put the system into sleep mode while the Memory Stick Duo™ access indicator is on. - Page 30 Clearing sleep mode Slide the power/hold switch up again. Sleep mode is cleared. Hints • You can also clear sleep mode by pressing the u (play/pause) button of the remote control, if the system was put into sleep mode during music or video playback. •...
-
Page 31: Inserting A Umd
Inserting a UMD™ Notice Do not eject a UMD™ during playback. Slide the open latch on the PSP™ system top. The disc cover opens. Insert a UMD™. With the disc label facing the system rear, slide the UMD™ in the direction of the arrow until it is fully inserted. -
Page 32: Inserting A Memory Stick Duo
Inserting a Memory Stick Duo™ Warning Keep Memory Stick Duo™ media out of the reach of small children, as the media could be swallowed by accident. Open the slot cover and insert the Memory Stick Duo™. Open the slot cover in the direction of the arrow. -
Page 33: Avoiding Unintended Operation Of The Psp™ System
Avoiding unintended operation of the PSP™ system Slide the power/hold switch down. The hold indicator turns yellow, indicating that the system buttons are locked. Clearing hold mode Slide the power/hold switch to its original position. Avoiding unintended operation of the PSP™ system The switch locks into place. -
Page 34: Using The Sound Button
Using the sound button The sound button is used to adjust the tone and to mute the sound for audio playback and for key tones. Adjusting the tone Press the sound button. SELECT Each time you press the button, the tone changes as follows: HEAVY POPS JAZZ... - Page 35 Clearing mute Muting can be turned off by the following methods: • Pressing the sound button. • Pressing the volume + or volume - button on the system front or on the remote control. Using the sound button...
-
Page 36: Using The Display Button
Using the display button The display button is used to adjust screen brightness. Adjusting screen brightness Press the display button. SELECT Each time you press the button, the display changes as follows: Level 1 Level 2 Level 3 (Level 4) Hint Level 4 can be selected only while plugged in using the AC adaptor. -
Page 37: Battery
Battery Battery charge level The battery charge level is displayed on the screen. Estimating the remaining battery power There is plenty of power left. The battery is getting low. The battery has almost run out. No battery power remains. The power indicator flashes green. Recharge the battery. - Page 38 • Battery charge level can also be checked in "Battery information" under "System Settings" ( page 92). • If the PSP™ system is left unused after the battery runs out, the date and time settings may be reset. If this occurs, the date and time setting screen will be displayed the next time the system is turned on.
-
Page 39: Replacing The Battery Pack
Hint The battery pack lifespan varies depending on how it is stored, the conditions of use and environmental factors, such as temperature. Replacing the battery pack For safety reasons, turn off the system and remove the power cord from the electrical outlet before replacing the battery pack. -
Page 40: Game
Game Playing a game Select from the home menu. Insert a UMD™ ( The UMD™ icon is displayed. With the game icon selected, press the The game starts. Icons displayed under Game In addition to playing games, the following features are available under Game. Game Sharing Saved Data Utility UMD™... - Page 41 Hints • If (Restricted Content) is displayed when you select the control restrictions have been set on the system. You must enter the password as described below to access the game. See "Parental Control Level" ( Select (Restricted Content), and then press the Enter the 4-digit password using the directional buttons, and then press button.
-
Page 42: Game Options Menu
Game options menu You can view game information or copy or delete saved data by displaying the options menu. Select an icon, and then press the The options menu is displayed. Icons Select a menu item, and then press the Closing the options menu Press the button or the... -
Page 43: Copying And Deleting Saved Data
Copying and deleting saved data You can copy or delete saved game data that is saved on a Memory Stick Duo™ using the saved data utility. Copying saved data You can copy saved data to another Memory Stick Duo™. It is recommended that important data be copied as a backup. -
Page 44: Video
Video Watching a video You can watch UMD™VIDEO and videos saved on a Memory Stick Duo™. Select from the home menu. Insert a UMD™ or Memory Stick Duo™ ( An icon for the inserted media is displayed. Select the icon, and then press the UMD™VIDEO playback begins. - Page 45 Icons displayed under Video UMD™ Memory Stick™ Hints • If (Restricted Content) is displayed when you select the control restrictions have been set on the system. Enter the password as described below to access the video. See "Parental Control Level" ( parental control feature.
-
Page 46: Using The Control Panel
Using the control panel You can perform the following operations using the on-screen control panel. Notice Depending on the UMD™VIDEO, playback conditions may be set in advance by the software developer. In such cases, certain options may not be available, even if you follow the instructions in this manual. - Page 47 Icon Go To Audio Options Angle Options Subtitle Options UMD™Video Volume Screen Mode Display Help Previous Return to Beginning Next Fast Reverse/ Fast Forward Slow Motion Frame Advance Play Pause Description Plays from a specified chapter* or time ( Switches between available audio options for UMD™VIDEO recorded with multiple audio tracks Switches between Left, Right, and Left + Right audio output for video saved on a Memory Stick Duo™...
- Page 48 Icon Stop A-B Repeat Repeat Clear * This operation cannot be performed during playback of video saved on a Memory Stick Duo™. Viewing playback status and related information Select from the control panel during playback, and then press the The playback status of the video is displayed. Title Status icon Clearing display...
- Page 49 Hint The items displayed when playing a UMD™VIDEO are different from those displayed when playing a video saved on a Memory Stick Duo™. Changing the Screen Mode Changes the size of the viewable image on the screen. Select from the control panel, and then press the button.
- Page 50 Chapter XX:XX:XX * You cannot use this feature when playing video saved on Memory Stick Duo™. Adjusting the UMD™Video volume The volume can be adjusted if the audio output level of the UMD™ is low. Select from the control panel, and then press the button.
- Page 51 Slow playback During playback, select then press the Returning to normal playback Select from the control panel, and then press the Hint Selecting from the control panel while playback is paused, and then pressing the button, will also start slow playback. If will continue only as long as the Playing repeatedly You can play the entire disc or a chapter repeatedly.
- Page 52 Playing a section of video repeatedly You can specify a section of video that you want to play repeatedly. During playback, select then press the be repeated. The starting point, point A, is set. Press the repeated. The ending point, point B, is set and the specified section begins to play repeatedly.
-
Page 53: Operating With Psp™ System Buttons Or The Remote Control
Operating with PSP™ system buttons or the remote control You can operate the PSP™ system without using the control panel by using the system buttons or the remote control. Play Pause Display the UMD™VIDEO menu Stop Play the previous chapter Play the next chapter Fast Reverse Fast Forward... -
Page 54: Video Options Menu
Video options menu You can use the Video options menu to play a UMD™VIDEO or view information or delete videos saved on a Memory Stick Duo™. Select the icon, and then press the The options menu is displayed. Icons Select a menu item, and then press the Clearing the options menu Press the button or the... -
Page 55: Saving Videos On A Memory Stick Duo
"Files that can be played" ( http://www.memorystick.com/psp for more information about compatible devices. Hint A Memory Stick Duo Adaptor (model number MSAC-M2: a Sony product sold separately) is required if your device can handle only a standard-size Memory Stick™. page 121). - Page 56 3 Use a commercially available Memory Stick USB reader/writer. * If the device can handle only the standard-size Memory Stick™, you will need a Memory Stick Duo Adaptor (model number MSAC-M2: a Sony product sold separately). Hints • See http://www.memorystick.com/psp for information on the formats that can be converted.
-
Page 57: Music
Music Listening to music You can listen to UMD™MUSIC and music saved on a Memory Stick Duo™. Select from the home menu. Insert a UMD™ or a Memory Stick Duo™ ( An icon for the inserted media is displayed. Select the icon, and then press the Playback begins. - Page 58 Hints • If the start button or the u button on the remote control is pressed in step 3, the first track of the first group will begin playing. • If the home button or select button is pressed during playback, the screen will return to the home menu.
- Page 59 Stopping playback Press the button during playback. Playback stops. How to read the screen Album name Track name Status icon Control panel Hints • "Album name" and "Track number/total number of tracks" are shown on the screen only while (Display) is turned on. •...
-
Page 60: Using The Control Panel
Using the control panel You can perform the following operations using the on-screen control panel. Press the The control panel is displayed. Select an icon, and then press the Hint UMD™MUSIC containing video content (such as music videos) are played in the same way as UMD™VIDEO. - Page 61 Icon Next Track Fast Reverse/ Fast Forward Play Pause Stop Group Mode A-B Repeat Play Mode Clear Display Help * If you press and hold the long as the button is held down. Using Group Mode Tracks can be played in groups. Playback stops after all tracks in the group have been played.
- Page 62 Clearing Group Mode While Group Mode is on, select button. Using Play Modes (Repeat/Shuffle) During playback, select then press the Each time the following functions: Play Mode No icon * If there is a group, tracks in the group are played in a random order. The order of the groups will not change.
- Page 63 Playing part of a track repeatedly Specify and then play the part that you want to play repeatedly. Select from the control panel during playback, and then press the repeated playback to begin. The starting point (point A) is set. Press the button at the point where you want the repeated playback to end.
-
Page 64: Operating With Psp™ System Buttons Or The Remote Control
Operating with PSP™ system buttons or the remote control You can operate the PSP™ system without using the control panel by using the system buttons or the remote control. Play Pause Stop Skip to the beginning of the current track or the previous track Skip to the beginning of the next track... -
Page 65: Music Options Menu
Music options menu You can use the Music options menu to view information about or delete music data saved on a Memory Stick Duo™. Select an icon, and then press the The options menu is displayed. Icons Select a menu item, and then press the Clearing the options menu Press the button or the... - Page 66 Playing with a selected codec With UMD™MUSIC that has multiple file formats and bit rates recorded, you can select from among these options for playback. Select a group you want to listen to, and then press the button. Select "Select Codec", and then press the The types of file formats and bit rates are displayed.
-
Page 67: Transferring And Saving Music On A Memory Stick Duo
Transferring and saving music on a Memory Stick Duo™ You can use the PSP™ system to play music data obtained in the following ways: 1) Music imported from an audio CD. 2) Music purchased from a music download Web site. See below for instructions regarding item 1). - Page 68 Stick Duo Adaptor (model number MSAC-M2: a Sony product sold separately) is required. *2 A PC with Windows *3 A device that supports MagicGate™ such as model number MSAC-US30 (a Sony product sold separately) is required. Hints • For detailed information about importing tracks, see http://www.memorystick.com/psp •...
- Page 69 Hint The method of importing tracks varies depending on the software. For details, refer to the instructions supplied with the software. Where to save music data Create a folder named "PSP" directly on the Memory Stick Duo™, and then create a folder named "MUSIC" "MUSIC"...
-
Page 70: Photo
Photo Viewing images You can view images saved on a Memory Stick Duo™. Select from the home menu. Insert a Memory Stick Duo™ ( is displayed. Press the Icons for Digital Camera Images, folders and images saved on the Memory Stick Duo™... -
Page 71: Using The Control Panel
Using the control panel You can perform the following operations using the on-screen control panel. Press the button while displaying an image. The control panel is displayed. Select an icon, and then press the Clearing the control panel Press the button or the List of operations Icon... - Page 72 Icon Help Clear Zoom Zoom Out Zoom In Rotate Left Rotate Right Up/Down/Left/Right Previous Next Slideshow Displaying image information While displaying an image, select panel, and then press the The image status is displayed. Using the control panel Description Displays the functions that can be performed using the PSP™...
- Page 73 Image name Image number/Total images Display Status Clearing the display Select from the control panel, and then press the Adjusting image size You can change the size of the image displayed on the screen. While displaying the image, select panel, and then press the Each time you press the button, the option switches as follows: Displays the image to fit the screen size without changing Normal...
- Page 74 Setting an image as wallpaper You can set the currently displayed image as wallpaper. With an image displayed, select and then press the Select "Yes", and then press the "Save completed" is displayed and the setting is complete. Hints • You can only save one image as wallpaper on the PSP™ system. If you have wallpaper set and perform this setting, the existing image will be overwritten.
-
Page 75: Operating With Psp™ System Buttons Or The Remote Control
Operating with PSP™ system buttons or the remote control You can operate the PSP™ system without using the control panel by using the system buttons or the remote control. Play a slideshow Cancel zoom in/out Back Display the previous image Press the L button. Display the next image Zoom in Zoom out... -
Page 76: Photo Options Menu
Photo options menu When the Photo options menu is displayed, you can view information about or delete images saved on a Memory Stick Duo™. Select an icon, and then press the The options menu is displayed. Icons Select a menu item, and then press the Clearing the options menu Press the button or the... - Page 77 Sending and receiving images You can transfer images with another PSP™ system using ad hoc mode page 104). The steps for the sender and the receiver are different. Sender Set up for ad hoc mode. (both sender and receiver) 1 Turn on the WLAN switch on the left side of the PSP™ system page 21).
-
Page 78: Playing Slideshows
Playing slideshows You can set the available images to be displayed in order. Select the icon for a folder or media containing images, and then press the start button. The slideshow begins. The content displayed varies depending on the icon selected. - Page 79 Select an icon, and then press the Clearing the control panel Press the button or the List of Operations Icon Slideshow Options View Mode Display Help Previous Next Play Pause Stop button. button. Description Switches the information displayed on the screen page 80) Changes the size of the image displayed on the screen Displays image information...
- Page 80 Icon Repeat Displaying slideshow options During a slideshow, select then press the Each time you press the Image name and date of last update are displayed. Image name and date of last update are displayed, together with thumbnails of each image. The display is cleared.
- Page 81 Hint Some buttons cannot be operated while the control panel is displayed on the screen. In this case, press the button to clear the control panel. Playing slideshows...
-
Page 82: Saving Images On A Memory Stick Duo
You can use Memory Stick Duo™ media with a digital still camera that can handle only the standard-size Memory Stick™ by using a Memory Stick Duo Adaptor (model number MSAC-M2: a Sony product sold separately). Saving image data items from a PC to a Memory Stick Duo™... - Page 83 * A Memory Stick Duo Adaptor (model number MSAC-M2: a Sony product sold separately) is required if the slot on the device you are using is able to handle only the standard-size Memory Stick™. Where to save image data Create a folder named "PSP" directly on the Memory Stick Duo™, and then create a folder named "PHOTO"...
-
Page 84: Network
Network Connecting to the Internet You can connect to the Internet to view Web pages using the Internet browser. Note that you must be in an Internet-accessible location to connect to the Internet. Check that you have completed network settings. To connect to the Internet, you must first enter settings and save a connection for infrastructure mode ( Select... - Page 85 Using the up button, select the address bar, and then press button. The on-screen keyboard is displayed. Enter the address for the Web page using the on-screen keyboard ( page 114). After you have entered the address, the PSP™ system will connect to the Internet.
- Page 86 Users are responsible for all actions taken in browsing the Web site as well as playing and downloading files from the Internet. Except to the extent prohibited by applicable laws, Sony Computer Entertainment Inc. and/or any of its affiliates shall not be liable for any loss or damage to your Internet Browser or PSP™...
-
Page 87: Settings
Settings Settings for the PSP™ system You can adjust the settings for the PSP™ system, as well as settings for features, such as video, photo and network. Select from the home menu. Icons for various settings are displayed. Select an icon, and then press the A setting screen for the selected icon is displayed. - Page 88 Icons displayed under Settings Network Update USB Connection Video Settings Photo Settings System Settings Theme Settings Date & Time Settings Power Save Settings Sound Settings Security Settings Network Settings Settings for the PSP™ system Provides access to updates for the system software ( page 111) Allows for connection to a PC using a...
-
Page 89: Video Settings
"+2". Hint The settings at the time of purchase are as follows: – "Menu Language" and "Subtitle Language" are set to "English" (for PSP-1006 K) or "Chinese" (for PSP-1007 K). – "Audio Language" is set to "Original Language". – "UMD™Video Volume" is set to "Normal". -
Page 90: Photo Settings
Photo Settings You can set the Slideshow Speed. Fast Normal Slow The default setting for the menu item is underlined. Photo Settings Displays images at a faster rate Displays images at normal speed Displays images at a slower rate... -
Page 91: System Settings
System Settings You can adjust the settings for and display information about the PSP™ system, or format a Memory Stick Duo™. Nickname The nickname you selected in the initial setup can be changed. Use the on- screen keyboard to enter a new nickname. For details on entering text, see "How to use the keyboard"... - Page 92 Character Set You can set the character code to be applied to music and other types of files. It usually is not necessary to adjust this setting. For File Names For Text in Files Hint The default setting is "Multilingual Latin 1 (850)". Battery Information You can display the following information about the system battery: Charge Level...
- Page 93 Notice When you format, all software and data stored on the Memory Stick Duo™ will be deleted and cannot be recovered. Be careful not to accidentally erase important data. Restore Default Settings You can restore settings to the values as set at the time of purchase. Follow the on-screen instructions to perform this operation.
-
Page 94: Theme Settings
Theme Settings You can change the theme for the PSP™ system screen or display an image as wallpaper. Theme You can change the background color of the screen. Use the directional buttons to select a background color, and then press the setting. -
Page 95: Date & Time Settings
Date & Time Settings You can set the date and time, time zone and daylight saving time for the PSP™ system. Set each item using the directional buttons and enter the setting by pressing the button. Sets the year, month, day, hour, minute and second (and AM/ Date and Time PM setting if using a 12-hour time format) Date Format... -
Page 96: Power Save Settings
Power Save Settings You can conserve the power of the PSP™ system by setting the system to automatically switch off the backlight or go into sleep mode. Backlight Auto-Off When the system remains idle for a certain period of time, it saves power by automatically turning off the backlight on the LCD screen. - Page 97 Auto Sleep You can set the system to conserve power by automatically entering sleep mode when it remains idle for a certain period of time. For details on clearing sleep mode, see "Clearing sleep mode" ( The system does not automatically go into sleep mode. 5 minutes Enters sleep mode after five minutes 10 minutes...
-
Page 98: Sound Settings
Sound Settings You can turn off the key tone and limit the volume level. AVLS (Automatic Volume Limiter System) You can limit the maximum volume. This can help prevent sound escaping from the headphones, as well as the possible danger resulting from being unable to hear what is going on around you when wearing headphones. -
Page 99: Security Settings
Security Settings You can adjust settings related to PSP™ system security features. Change Password Changes the 4-digit password. The password is required for the following operations: • To change the "Parental Control Level" or "Internet Browser Start Control" settings • To play a UMD™ that is restricted by the system's Parental Control Level setting •... - Page 100 Parental Control Level Some UMD™ software have a preset parental control level based on the content. You can set the parental control level on the system to restrict the playback of a UMD™ with a level that is higher than that set on the system. Parental Control Level The parental control level of the system can be either turned off or set to one of 11 different levels.
- Page 101 parental control level :The UMD can be viewed. Parental control levels on games For the latest information about ratings, call the PSP™ service line at the number listed on your warranty card for assistance. Hints • The parental control level of a UMD™ can be checked under "Information" in the UMD™...
-
Page 102: Usb Connection
USB Connection You can transfer files from a PC to a Memory Stick Duo™ inserted in the PSP™ system using a commercially available USB cable. Note however that files that can be played are limited to file formats supported by the system. USB cables that can be used with the PSP™... - Page 103 Select (USB Connection) under menu, and then press the The Memory Stick Duo™ inserted in the system is detected by the PC. Notice Do not format a Memory Stick Duo™ on a PC, as it may no longer be recognized by the PSP™...
-
Page 104: Network Settings
Network Settings You can adjust the network settings to allow connection to a wireless local area network (WLAN). There are two WLAN modes. Warning Turn off the WLAN switch when in crowded places, such as in a crowded train. If a person nearby is using a pacemaker, it is possible that the radio waves could affect the pacemaker. - Page 105 Required items The following items are generally required to set up the system to connect to a network and perform a network update. • Subscription to an Internet service provider • A network device, such as a DSL or cable modem •...
- Page 106 Select (Network Settings) under menu, and then press the Select "Infrastructure Mode", and then press the Select "New Connection", and then press the Enter a name for the network connection. When you press the displayed, allowing you to enter characters for the name. You can choose any name you like for the network connection.
- Page 107 Scan Searches for nearby access points and displays the SSIDs Allows the user to enter the SSID using the keyboard. Select this Enter Manually option if you know the SSID of the access point. When the settings have been completed, press the right button to go to the next screen.
- Page 108 Select the address setting method. This screen is used to select the settings listed below. Most home networks will allow you to use the settings shown in the "Easy" setup (this is the recommended setup). Easy Custom When you have finished selecting your settings, press the right button to go to the next screen.
- Page 109 Check the settings. This screen displays the setting details. Press the left button to return to the previous screens to correct any of the settings, if necessary. When you have finished selecting your settings, press the right button to go to the next screen. Save the connection.
- Page 110 Information" ( page 93). About DNAS Sony Computer Entertainment Inc. uses DNAS (Dynamic Network Authentication System), a proprietary authentication system, to help protect copyright and security in connecting the PSP™ system to a network. DNAS may retrieve information about a user's hardware and software for authentication, copy protection, account blocking, system, rules, or game management and other purposes.
-
Page 111: Network Update
Network Update You can update the system software for the PSP™ system using the Network Update feature. For details on updates, see "PSP Updates" ( For the latest information about updates, visit http://www.sceh.com.hk (Hong Kong, Southeast Asia) http://www.sceh.com.tw (Taiwan) Network update process Connect to the network Connect using a wireless LAN access point. - Page 112 Starting a network update You can connect to a network using an access point to download update data. Before starting, check that the battery is charged. Insert a Memory Stick Duo™ in the PSP™ system. Connect the AC adaptor to the system. If the AC adaptor is not connected, you cannot start the update even if you have downloaded the update data.
- Page 113 Connect Connects to an access point Changes the settings of a network connection saved on the Edit system Delete Deletes a network connection Information Displays information about a network connection * For detailed instructions, see "Creating a new network connection" ( Network Update page 105).
-
Page 114: How To Use The Keyboard
How to use the keyboard You can use the on-screen keyboard for text entry such as when entering a nickname for the PSP™ system or entering network setting information. Function keys Alphabet/symbol keys Control panel item list The keys that are displayed vary depending on the state of text entry. Keyboard keys How to use the keyboard Text entry field (Displays... - Page 115 Keyboard keys Function Displays a diagram showing the system buttons and their usage Switches between upper and lower case Enters a line break Switching input mode The number of input modes available varies depending on the language selected. Every time you press the select button, the input mode switches among the options in the diagram below: Input mode display Input mode...
- Page 116 Entering characters This section will demonstrate how to enter text using the word "PLAY" as an example. Select PQRS7, and then press the until "P" is displayed. Each time you press the entry field is switched. Select JKL5, and then press the until "L"...
-
Page 117: Additional Information
Additional information PSP™ updates By updating the PSP™ system software, you can change or add features. You can perform an update in any of the following ways: • Network Update • Update using a PC • Update using a UMD™ Select the update method that works best for you. - Page 118 Update using a UMD™ You can update using a UMD™ that contains update data. Before starting, check that the battery is charged. Notice During an update: – do not remove the UMD™ – do not turn off the system – do not disconnect the AC adaptor The system software may be damaged if the update is interrupted.
-
Page 119: Compatible Media
Compatible media The media types listed below can be used on the PSP™ system. Throughout this manual, the term "Memory Stick Duo™" is used to refer to all types of Memory Stick™ media in the table below. Type UMD™ Memory Stick Duo™ (not MagicGate™-compatible) MagicGate™... - Page 120 The standard-size Memory Stick™ cannot be used with the system. Memory Stick Duo Adaptor The Memory Stick Duo Adaptor (MSAC-M2: a Sony product sold separately) allows a Memory Stick Duo™ to be used with devices that take a standard-size Memory Stick™.
- Page 121 Files that can be played You can play files of the following types on the PSP™ system: Content File types category -MP4 (video codecs for video files that conform to the Memory Video Stick™ video file format are MPEG-4 or AVC) -Memory Stick™...
-
Page 122: Specifications
Specifications Design and specifications are subject to change without notice. PSP™ (PlayStation LCD screen Sound Internal disc drive Interface Compatible codecs Power source Specifications Portable) ® 4.3 inches (16:9) full-transparent type, TFT drive Approximately 16,770,000 colors displayed Stereo speakers Read-only UMD™ drive DC IN 5V connector Charging terminals Headset connector... - Page 123 Battery duration See page 38 Maximum power Approx. 6 W (when charging) consumption Approx. 170 × 74 × 23 mm / 6 External dimensions depth) (excludes largest projection) Weight Approx. 280 g (including battery pack) Operating environment 5°C - 35°C/41°F - 95°F temperature UMD™...
- Page 124 Battery pack Battery type Voltage Capacity Contents See page 16. x Memory Stick Duo™ The supplied Memory Stick Duo™: • is compatible with MagicGate™. • is able to perform parallel data transfer (high-speed data transfer). This type of high-speed data transfer can be used only with compatible devices. Transfer speed will vary depending on the device used.
- Page 125 This product contains Co., Ltd. Copyright © 1996-2005 ACCESS Co., Ltd. is a trademark or registered trademark of ACCESS Co., Ltd. in Japan and other countries. Portions of the PSP™ system software requires the following notices: This software is based in part on the work of the Independent JPEG Group. Copyright ©...
- Page 126 Sony Computer Entertainment Inc. " " and "XMB" are trademarks of Sony Corporation and Sony Computer Entertainment Inc. "SONY" is a registered trademark, and " " is a trademark of Sony Corporation. Also, "Memory Stick Duo", "Memory Stick PRO Duo", "Memory Stick", "...
-
Page 127: Troubleshooting
Troubleshooting Go through this section if you experience difficulty in operating the PSP™ system. Should any problem persist, call the PSP™ service line at the number listed on your warranty card for assistance. Power, battery and charging issues The power does not turn on. , Check that the battery is charged ( , Check that the battery pack is properly inserted ( The battery does not charge, or does not fully recharge. - Page 128 The power indicator is on, but the LCD screen is not displayed. , Check that the LCD screen's backlight is not turned off. If it is, press any of the system buttons to turn on the backlight. The battery loses its charge even when the system is turned off. , Because battery power is used even when the system is turned off, it is recommended that you charge the battery frequently.
- Page 129 Sound There is no sound. , Check that the volume is not set to zero. Try raising the volume pages 18, 22). , Check that the mute setting is not on. Press the sound button on the system front to clear the mute setting ( , If headphones are inserted, the system will not produce any sound through the speakers.
- Page 130 Upon starting a UMD™, a message recommending an update is displayed. , Update the system software ( Memory Stick Duo™ The Memory Stick Duo™ cannot be inserted. , Set the Memory Stick Duo™ in the proper direction when inserting page 32). The system does not recognize the Memory Stick Duo™.
- Page 131 Videos do not play. , Depending on the bit rate, certain videos may not be playable on the system. Check that the video files were converted at a bit rate of 768 kbps or lower. The system does not recognize a video data item. , Video data of types that are not compatible with the system will not be recognized ( page 121).
- Page 132 Photo Images do not display. , Depending on the image data size, certain images are not viewable. , If images are edited using a PC, they may not be viewable. The system does not recognize the image data. , Check that the data is saved in the correct folder on the Memory Stick Duo™...
- Page 133 The Web page won't display properly , Some Web pages may not display properly. Headphones with remote control There is no sound or the sound quality from the headphones is poor. , Check that the headphones are fully inserted into the system ( , Check that the headset connector and the headphone plug are clean.
- Page 134 When the buttons are pressed, there are no key tones. , Check that the Key Tone feature is turned on ( The date and time are reset. , If the battery is not recharged and runs out, or if the battery pack is replaced, the system date and time settings may be reset.
-
Page 135: Warranty
WARRANTY Refer to the enclosed document for region-specific warranty information. WARRANTY... - Page 136 警告 光敏感 有極少部分的人,可能會於接觸閃光或強烈光線照射時,出現癲癇發作 的症狀。此類型的人們有時會因觀看電視機的動態影像或靜止畫面,或 是遊玩遊戲機 (包括 PSP™)而引發癲癇發作。即使至今未曾有過類似 發作經驗的人,亦有遭遇上述症狀之可能。若您或您家族的任何人曾經 有過癲癇發作的經驗,請於開始遊玩前,先詢問您的家庭醫生。如果您 在遊玩家用遊戲時曾經出現下列症狀:感覺眼花撩亂、視力模糊、眼睛 或肌肉感覺疼痛、喪失知覺、迷失方向感、無意識地行動或全身痙攣時, 請立刻中止遊玩並於繼續遊玩前先詢問您的家庭醫生。 無線電波 無線電波可能會影響電子設備或醫療裝置 (例如心律調整器) ,且可能 會導致這些設備或裝置故障或損壞。 • 若您有使用心律調整器或其他醫療裝置,請在使用無線網路功能之前 先詢問您的主治醫生或您身上之醫療裝置的製造廠商。 • 使用無線網路功能時, 請讓 PSP™ 主機與心律調整器或其他醫療裝置之 間保持至少 23 公分 (9 吋)的距離。 • 請勿在下列場所使用無線網路功能: – 禁止使用的場所,例如飛機或醫院中。在醫院中使用 PSP™ 主機時請 遵守醫院的規定。此外,在飛機中使用無線網路功能或是於飛機起降 時使用 PSP™ 之行為,可能會導致您因為違反航空安全規定而受到嚴 厲的懲罰。...
- Page 137 以下規定僅適用於台灣 根據 交通部電信總局低功率電波輻射性電機管理辦法規定: 第十二條 經型式認證合格之低功率射頻電機,非經許可,公司、商號或 使用者均不得擅自變更頻率、加大功率或變更原設計之特性及 功能。 第十四條 低功率射頻電機之使用不得影響飛航安全及干擾合法通信;經 發現有干擾現象時,應立即停用,並改善至無干擾時方得繼續 使用。 前項合法通信,指依電信法規定作業之無線電通信。 低功率射頻電機須忍受合法通信或工業、科學及醫療用電波輻 射性電機設備之干擾。 警告...
- Page 138 遊戲 • 玩遊戲 • 管理保存資料 影像 • 播放 UMD™VIDEO • 播放保存在 Memory Stick Duo™ 内的影像 音樂 • 播放 UMD™MUSIC • 播放保存在 Memory Stick Duo™ 内的音樂 相片 • 顯示保存在 Memory Stick Duo™ 内的圖像 • 播放幻燈片秀 NETWORK (網路) • 與網路連線 設定 • 調整 PSP™ 主機設定 •...
- Page 139 使用自家選單 PSP™ 主機的基本操作皆從自家選單 (home menu) 起步。按下 HOME (歸 返)按鈕開啟自家選單後,可使用方向按鈕水平或垂直瀏覽圖示列。 基本按鈕操作 方向按鈕: 選擇螢幕上顯示的項目 HOME SELECT HOME (歸返)按鈕: 按鈕: 顯示該選擇項目的選項 選單 按鈕: 決定選擇該項目 POWER HOLD 按鈕: 取消操作 START 顯示自家選單...
- Page 140 目錄 警告 ... 136 使用前須知事項 ... 143 電池組注意事項 ... 148 x 準備工作 檢查各項配件 ... 149 各部名稱與功能 ... 151 使用 PSP™ 主機的事前準備 ... 156 連接線控裝置與耳機 ... 159 x 基本操作 打開和關閉 PSP™ 主機電源 ... 160 離開睡眠模式 ... 162 插入 UMD™ ... 164 插入...
- Page 141 x 音樂 聽音樂 ... 190 使用控制介面 ... 193 利用 PSP™ 主機的按鈕或線控裝置進行操作 ... 197 音樂選項選單 ... 198 將音樂傳送並保存至 Memory Stick Duo™ ... 200 x 相片 瀏覽圖像 ... 203 使用控制介面 ... 204 利用 PSP™ 主機的按鈕或線控裝置進行操作 ... 208 相片選項選單 ... 209 播放幻燈片秀 ... 211 將圖像保存至...
- Page 142 x 其他資訊 PSP™ 更新 ... 247 相容媒體 ... 249 規格 ... 252 故障檢修 ... 257 維修責任 ... 264 目錄...
-
Page 143: 使用前須知事項
使用前須知事項 使用本機以前,請先詳細閱讀本說明書,並妥善保存,以備將來參考之 用。 關於安全 本產品是在充分重視安全性能的情況下設計的。但如果使用不當,任何 電器產品都有可能引起火災觸電或人身傷害的潛在危險。為確保安全操 作,請遵循以下各項規則: • 遵守所有警告條文注意事項及使用說明。 • 定期檢查交流電轉換器與交流電源線是否有損壞,以及電源插頭或電 源插座有沒有灰塵堆積。 • 如果裝置出現動作不正常,或者發出異常聲音或氣味時,請立即停止使 用,並從電源插座中拔掉交流電源線插頭及所有的其他連接線。 • 如果 PSP™ 出現故障情形, 請聯絡保證書上記載的 PSP™ 消費者服務中 心,以取得必要協助。 使用和保養 • 請在光線良好的地方使用本機,並與螢幕保持一段安全距離。 • 避免長時間使用 PSP™ 主機。 為了避免眼睛疲勞, 每玩一小時請休息 15 分鐘。 • 若您有遭遇下列健康問題,請立即停止使用主機。如果不良症狀持續存 在,請立即就醫。 – 頭昏眼花,噁心、疲勞或類似暈船感覺 – 當眼睛、耳朵、手臂、手腕等,身體一部分感覺不舒服或疼痛時。 •... - Page 144 • 當耳機對您的皮膚造成不適時,請勿繼續使用。 若隨附的耳機對您的皮膚造成不適時,請立即停止使用。若停止使用之 後,狀況仍舊沒有改善,請立即就醫。 • 請勿將主機或附屬品放在高溫、濕氣極重或受日光直射的地方。 • 請勿將主機或附屬品放在窗戶密閉的車內 (特別是夏天) 。 • 請勿將主機或附屬品暴露在灰塵、煙霧或蒸氣中。 • 請勿讓液體或小顆粒掉入主機或附屬品中。 • 請勿將主機或附屬品放在傾斜、不平穩或易受振動的地方。 • 請勿投擲或掉落主機或附屬品,或使它們受到強烈的外力撞擊。請小心 持用類比墊。 • 請勿於遊玩時強制扭轉 PSP™ 主機或使主機受到強烈外力撞擊, 否則可 能會損壞主機或導致光碟蓋開啟及射出光碟。 • 請勿在主機或附屬品上放置重物。 • 請勿觸摸、或將異物插入主機或附屬品的端子部分。 • 請勿將主機放置在信用卡等帶磁帶的物體附近。 • 使用主機時請勿長時間碰觸主機或交流電轉換器。主機或交流電轉換 器的溫度可能隨使用狀況而達到 40 下的長時間接觸可能會導致低溫灼傷 * 當皮膚與相對低溫(40°C 或以上 /104°F 或以上)的物體長時間接觸時,便會產生 低溫灼傷。...
- Page 145 • 請勿於使用布等物品覆蓋主機時遊玩遊戲或觀賞影像。假如您想於遊 玩遊戲或觀賞影像時暫停或暫時收起主機,請在放入收藏包前,先讓主 機進入睡眠或固定模式。又,於使用布覆蓋主機時,請勿使用交流電轉 換器,以避免主機出現過熱現象。 • 請勿將交流電源線插入變壓器或反相器。 將交流電源線插入海外旅行者使用的變壓器或汽車專用的反相器,可 能會導致交流電轉換器發熱,並造成灼傷或故障。 液晶畫面 • 液晶畫面上的某些特定位置可能會出現紅色、藍色或綠色點 (亮點) 或黑色點 (暗點) 。液晶畫面出現此類現象乃是正常現象,並非故障。 液晶畫面係使用高精密度的技術製造。但每個畫面仍可能會殘存極少 數的暗點或持續性的亮點。又,在關閉主機後,部分已消滅的影像仍可 能於畫面上殘存數秒鐘。 • 直射的日光可能會損壞主機的液晶畫面。當於戶外或窗戶附近使用本 主機時請務必小心。 • 在寒冷的環境中使用本機時,您可能會發現圖像出現陰影或畫面似乎 顯得比平常陰暗。此非一種故障,且螢幕會於溫度上昇後恢復正常。 • 請勿讓畫面長時間顯示靜態影像。這可能會導致模糊的影像永遠殘留 在畫面上。 Memory Stick Duo™ 為了達到最佳效果,請遵守下列指示: • 請勿用手或金屬物品碰觸連接端子部位 (A) 。 • 當於備忘區域 (B)書寫時,請勿過度用力。 • 請勿將Memory Stick Duo™直接插入僅對應標準尺寸之Memory Stick™ 的裝置。...
- Page 146 保存資料 請勿以下述方法使用 Memory Stick Duo™,否則可能會導致資料的遺失 或毀損。 • 於載入、 保存資料或進行格式化時, 強硬取出 Memory Stick Duo™ 或關 閉主機電源。 • 於帶有靜電或有電波干擾之區域使用。 無論理由為何,遊戲與資料一旦遺失或毀損,通常即已無法尋回該 遊戲或資料。因此建議您應為遊戲與資料預留備份檔案。Sony Computer Entertainment Inc. 與其子公司、關係企業對於因遊戲或 資料的遺失或毀損而造成之損害,概不承擔任何責任。 依據著作權法,在未取得著作權人同意前,除了個人娛樂用途外,任 何錄製的資料皆不得用於其他用途。 收藏包與吊帶 • 假如您想於遊玩遊戲或觀賞影像時暫停或暫時收起主機,請在放入收 藏包前,先讓主機進入睡眠或固定模式。如此可避免主機出現過熱現 象。 • 請讓 PSP™ 主機與線控裝置進入固定 (hold)模式以避免錯誤操作。 • 請將收藏包與吊帶放在兒童拿不到的地方保管。 切勿分解主機或提供的附屬品...
- Page 147 結露現象 若把 PSP™ 主機或 UMD™ 從寒冷的地方直接搬放到溫暖的場所,機內的 透鏡或 UMD™ 上可能會凝結水氣。此種現象可能會導致主機無法正常運 作。這時,請把 UMD™ 取出,關閉電源,並拔掉主機電源插頭。在水氣 尚未蒸發之前,切勿再次放入 UMD™(水氣蒸發可能需要數小時) 。如果 主機仍無法恢復正常操作的話,請聯絡保證書上記載的 PSP™ 消費者服 務中心,以取得必要協助。 持拿 UMD™ • 請勿用手觸摸光碟背面的開口部分 (UMD™ 的記錄面) 。 • 請注意不要讓灰塵、沙粒等異物或其他類型的塵埃進入或弄髒光碟。 • 當 UMD™ 出現污痕時, 請使用擦拭眼鏡的乾淨軟布輕柔擦拭 UMD™ 的外 殼表面與記錄面。切勿使用溶劑或其他化學藥劑。 清潔 為了安全著想,請在開始清潔前,先自電源插座中拔出交流電源線,並 從主機中取出電池組。 x 清潔外殼表面 以稍微沾濕的擦布擦拭,然後再將表面擦乾。請勿使用溶劑或其他化學...
-
Page 148: 電池組注意事項
電池組注意事項 請勿使用已損壞或電解液外洩的電池組。 碰觸這些有毒物質可能會導致眼睛或皮膚受到損傷或傷害。即使這些有 毒性化學物質非為即時性的危險,仍可能因為物質的化學變化而於日後 造成損傷。 假如您不慎碰觸了這些電解液外洩的電池組排出的有毒物質, 請即刻 採取以下行動。 • 當有毒物質進入眼睛時,勿用手揉眼睛。應立即用乾淨清水沖洗眼 睛並接受醫生的診療。 • 當有毒物質滲入皮膚或衣服時,應立即用乾淨清水沖洗遭滲入部 位。若引起發炎或疼痛,請迅速詢問您的家庭醫生。 請細心保管電池組。 若不留意保管,本電池組可能會引發爆炸或導致火災、化學傷害。 • 請勿將電池組放置於接觸火、受日光直射或曝露於太陽下、接近熱源的 高溫場所。 • 請勿造成電池組短路。 • 請勿分解或擅自開啟電池組。 • 為避免對電池組造成損害,請勿與硬幣或鑰匙等金屬物品一同攜帶或 保管電池組,否則可能會造成無法繼續使用的永久性損害。 • 請勿投擲、掉落電池組,且不可使其受到強烈的外力衝擊。 • 請勿在電池組上放置重物或施加重壓。 • 請勿讓液體掉落至電池組。沾有濕氣的電池組在完全變乾前都不得繼 續使用。 • 請將電池組放在兒童拿不到的地方保管。 • 若長時間不使用 PSP™ 主機,請取出電池組並放置在陰涼、乾燥且兒童 拿不到的地方保管。 •... -
Page 149: 準備工作
給保證書上記載的 PSP™ 消費者服務中心。 s PSP™ (PlayStation ® s 電池組 s 交流電轉換器 s Memory Stick Duo™ (32MB) s 吊帶 s 收藏包 s 擦布 s 説明書等 Portable) s 線控裝置與耳機 s 交流電源線 (附 3 插針電源插頭轉 換器) (提供 PSP-1006 K 使用) s 交流電源線 (提供PSP-1007 K使用) 檢查各項配件... - Page 150 拆除 3 插針電源插頭轉換器 (僅限 PSP-1006 K) 電源插座的形狀因地區而異。若預裝於交流電源線上的插頭形狀與您府 上的電源插座不相容時,請鬆開螺絲並拆掉電源插頭轉換器。 主電源插頭 3 插針電源插頭轉換器 檢查各項配件...
-
Page 151: 各部名稱與功能
各部名稱與功能 主機前面 HOME A L 按鈕 B 方向按鈕 C Memory Stick Duo™ 讀取燈 會於保存 / 載入資料時不斷閃 爍。 D 無線 LAN 顯示燈 會於使用無線網路功能時不斷閃 爍。 E 類比墊 可於放入對應類比操作的遊戲時 使用。 SELECT START F 手繩固定勾 以如圖所示的方式連接手繩。 G 左喇叭 H HOME (歸返)按鈕 顯示自家選單 I 音量 - 按鈕 調低音量... - Page 152 K 液晶畫面 L 顯示按鈕 調整畫面亮度 ( M 聲音按鈕 調整音質 ( 第 167 頁) N SELECT (選擇)按鈕 O START (開始)按鈕 P R 按鈕 主機背面 A 電池蓋 B PUSH (推動)按鈕 各部名稱與功能 按鈕 按鈕 第 169 頁) 按鈕 按鈕 U POWER (電源)指示燈 可透過指示燈的亮燈、閃爍的顏 色來了解主機狀態...
- Page 153 主機上方 A 紅外線連接埠 B USB 連接埠 主機下方 A 耳機 / 麥克風連接端 B 充電用端子 OPEN C OPEN (開啟)按鈕 DC IN C DC IN 5V 電源端子 各部名稱與功能...
- Page 154 主機左側 A Memory Stick Duo™ 插口 主機右側 A POWER (電源)/HOLD (固 定)按鈕 開啟及關閉主機,讓主機進入睡 眠模式 ( 第 160、162 頁)以 及鎖定主機的按鈕操作功能 ( 第 166 頁) 各部名稱與功能 R:無線 LAN 開啓 r:無線 LAN 關閉 B 無線 LAN 按鈕 啟動無線網路功能 R:POWER (電源)按鈕 r:HOLD (固定)按鈕...
- Page 155 線控裝置與耳機 線控裝置前面 A . 按鈕 B > 按鈕 C 音量 + 按鈕 調高音量 D 音量 - 按鈕 調低音量 E u 按鈕 線控裝置側面 A HOLD (固定)按鈕 鎖定線控裝置的操作功能。請注 意,此按鈕並不會鎖定 PSP™ 主 機按鈕的操作功能。 B 固定夾 各部名稱與功能...
-
Page 156: 使用 Psp™ 主機的事前準備
使用 PSP™ 主機的事前準備 於購買並準備開始使用 PSP 電。 準備 1:裝入電池組 拔起電池蓋。 按住 PUSH (推動)按鈕並將電池 蓋推出。 裝入電池組。 讓電池組的下方正確對準主機插入。 裝回電池蓋。 2 讓電池蓋向箭頭指示方向滑動, 直到確實固定爲止。 使用 PSP™ 主機的事前準備 主機前,您必須先依照下述步驟替電池充 ™ 1 對準垂勾。... - Page 157 準備 2:充電 注意 • 請插入接近且容易連接的電源插座。 • 在完成所有連接之前,請勿將 PSP™ 主機的交流電源線插頭插入電源插 座。 將交流電源線連接至交流電轉換器。 交流電轉換器 將交流電轉換器連接至主機下方的 DC IN 5V 電源端子。 POWER HOLD SELECT START 交流電源線 DC IN 交流電轉換器 使用 PSP™ 主機的事前準備...
- Page 158 將交流電源線插頭插入電源插座。 POWER HOLD SELECT START POWER (電源)指示燈會亮起橘色燈,表示開始為電池充電。在電池完 全充飽電之後,POWER (電源)指示燈便會熄滅。 此時請將交流電源線從電源插座上拔下,並從主機拔下交流電 轉換器。 提示 若您想了解更多如何為電池充電的資訊,請參閱 " 電池 " 的説明 ( 準備 3:初始設定 開啟 PSP™ 主機的電源 ( 電源指示燈會亮起綠色燈,並顯示初始設定畫面。 請依照畫面指示設定 system language(系統語言) 、time zone (時區) 、date and time(日期與時間)及 nickname(暱稱) 。 完成初始設定之後,即會顯示自家選單 ( 提示 • 請參閱 " 如何使用鍵盤 " ( •...
-
Page 159: 連接線控裝置與耳機
連接線控裝置與耳機 將耳機連接至 PSP™ 主機。 耳機 1 請將耳機插入線控裝置中。 2 將耳機插入主機下面的耳機 / 麥克風連接端。 提示 這套線控裝置乃 PSP™ 專用。請勿與其他產品併用。同時,其他裝置隨附的線控裝 置也無法操作 PSP™ 主機。 HOME 線控裝置 連接線控裝置與耳機... -
Page 160: 基本操作
基本操作 打開和關閉 PSP™ 主機電源 打開主機電源 向上滑動 POWER (電源)/HOLD (固定)按鈕。 POWER (電源)指示燈會亮起綠色燈,並顯示自家選單。 提示 • 若於放入 UMD™ 後打開 PSP™ 主機電源,則會自動開始播放 UMD™。 • 亦可在連接交流電轉換器後使用。此時,將會自動替電池充電。且 POWER (電 源)指示燈會於充電時亮起橘色燈。 • 當未將電池組放入主機時,請勿併用 PSP™ 與交流電轉換器。若是突然拔掉交流 電轉換器,可能會導致主機受損。 POWER (電源)指示燈 燈光的顏色與狀態 (持續或閃爍)會指示主機狀態。 持續綠色 持續橘色 閃爍綠色 燈光熄滅 打開和關閉 PSP™ 主機電源 電源打開... - Page 161 關閉電源 向上按住 POWER (電源)/HOLD (固定)按鈕超過三秒鐘。 POWER (電源)指示燈於閃爍後熄滅,代表主機電源已被關閉。 打開和關閉 PSP™ 主機電源...
-
Page 162: 離開睡眠模式
離開睡眠模式 若將 PSP™ 主機切換為睡眠模式,將會暫時中斷正在遊玩的軟件。解除 睡眠模式後,可自進入睡眠模式前的地點繼續遊玩或播放。 重要 • 請勿在 Memory Stick Duo™ 讀取燈亮起時讓主機進入睡眠模式,否則可能會導致 資料的遺失或毀損。 • 若電池電力在睡眠模式中耗盡,那麼即使解除睡眠模式,螢幕亦不會返回進入睡 眠模式前顯示的畫面。建議您在讓主機進入睡眠模式前先保存遊戲資料。 離開睡眠模式 打開主機電源時,向上滑動 POWER (電源)/HOLD (固定)按 鈕。 POWER (電源)指示燈於閃爍後熄滅,代表主機進入睡眠模式。 提示 部分軟件可能無法進入睡眠模式。 離開睡眠模式... - Page 163 解除睡眠模式 再次向上滑動 POWER (電源)/HOLD (固定)按鈕。 解除睡眠模式。 提示 • 當主機於播放音樂或影像途中進入睡眠模式時,您亦可按下線控裝置的 u (播 放 / 暫停)按鈕,以解除睡眠模式。 • 於解除睡眠模式後,您可選擇自依循上述步驟進入睡眠模式前的播放點,繼續觀 賞影像或聆聽音樂。 影像 於選擇影像圖示後,可選擇以下其中一種方法開始播放。 - 按下 START (開始)按鈕或 - 按下線控裝置的 - 選擇選項選單的 "Play (播放)" ( 保存於 Memory 於選擇 Memory Stick Duo™ 圖示後, 可選擇以下其中一種 Stick Duo™ 的音樂 方法開始播放。...
-
Page 164: 插入 Umd
插入 UMD™ 重要 請勿於播放中取出 UMD™。 向右滑動 PSP™ 主機上方的 OPEN (開啟)按鈕。 打開光碟蓋。 插入 UMD™。 讓光碟標籤面朝主機後方,將 UMD™ 向箭頭指示方向滑入直到完全 插入為止。 關閉光碟蓋。 取出 UMD™ 向右滑動主機上方的 OPEN (開啟)按鈕,打開光碟蓋。 提示 取出 UMD™ 時,請讓 PSP™ 維持按鈕朝上狀態 (如圖) 。 插入 UMD™ 切勿觸摸記錄面。 OPEN (開啟)按鈕... -
Page 165: 插入 Memory Stick Duo
插入 Memory Stick Duo™ 警告 請將 Memory Stick Duo™ 放在兒童拿不到的地方保管,以避免不小心之誤 食事故的發生。 打開插蓋並插入 Memory Stick Duo™。 向箭頭指示方向打開插蓋。 取出 Memory Stick Duo™ 向箭頭指示方向打開插蓋並按下 Memory Stick Duo™,取出記憶卡。 重要 當 Memory Stick Duo™ 讀取燈亮起時, 代表 PSP™ 主機正在保存或載入資料。 於此指示燈亮起時請勿取出 Memory Stick Duo™、關閉主機或讓 PSP™ 主機 進入睡眠模式。否則可能會導致資料的 遺失或毀損。... -
Page 166: 避免 Psp™ 主機的錯誤操作
避免 PSP™ 主機的錯誤操作 向下滑動 POWER (電源)/HOLD (固定)按鈕。 HOLD (固定)指示燈亮起黃色燈,代表已鎖定主機的按鈕。 解除 hold (固定)模式 將 POWER (電源)/HOLD (固定)按鈕滑回原來的位置。 避免 PSP™ 主機的錯誤操作 此按鈕便會固定 在該位置。... -
Page 167: 使用聲音按鈕
使用聲音按鈕 聲音按鈕是用來調整播放聲音與按鍵音的音質以及關閉聲音的按鈕。 調整音質 按聲音按鈕。 SELECT START 您每按一次此按鈕,都能依照下列順序變更音質: HEAVY 強調低音域與高音域以創造魄力十足的音效 POPS 強調中音域,適合有歌聲的聲樂作品 JAZZ 強調低音域與高音域以創造均衡適切的音效 UNIQUE 強調低音域、高音域與中音域的音效 一般音質 提示 唯有使用耳機時才能調整音質。且請注意,於玩遊戲時,音質會被暫時設定為 "OFF"。 關閉聲音 (靜音) 按住聲音按鈕一秒鐘以上。 聲音消失。 POWER HOLD 使用聲音按鈕... - Page 168 解除靜音 可透過下列方式關閉靜音功能: • 按聲音按鈕。 • 按主機前面或線控裝置上的音量 + 或音量 - 按鈕。 使用聲音按鈕...
-
Page 169: 使用顯示按鈕
使用顯示按鈕 顯示按鈕是用來調整畫面亮度的按鈕。 調整畫面亮度 按顯示按鈕。 SELECT START 您每按一次此按鈕,都能依照下列順序變更畫面的顯示方式: 第一級 較暗 第二級 第三級 較亮 (第四級) 提示 只有在使用交流電轉換器時才可選擇第四級。 關閉背光燈 按住顯示按鈕一秒鐘以上。 背光燈將關閉且畫面會變成一片烏黑。 只要再按下主機的任何一個按鈕,畫面即會再度顯示。 POWER HOLD 使用顯示按鈕... - Page 170 電池 電池殘存充電量 電池殘存充電量會顯示在畫面上。 殘存電力的預估標準 剩餘電力充足。 電力不足。 電力即將耗盡。 電力已耗盡。POWER (電源)指示燈閃爍綠色。請替電池充電。 提示 • 若 POWER (電源)指示燈閃爍綠色,請保存遊戲進度並替電池充電。若電池的電 力於保存前即已耗盡,則會喪失尚未保存的資料。 • 顯示的充電量會因使用狀況與溫度等環境因素,而與實際的充電量有些微差異。 若顯示不正確,請繼續使用電池組直到電力完全耗盡並再次充電。請注意,於遭 遇下列情況時,充電量可能無法精確顯示: – 長時間在高溫狀態下使用電池 – 電池在充電後很久沒有使用 – 電池已經充電太多次 • 您也可選擇 "System Settings (系統設定)" ( Information (電池資訊)",以確認電池的殘存充電量。 電池 電池殘存充電量 第 223 頁)的 "Battery...
- Page 171 • 若於電池電力耗盡後並未再次使用 PSP™ 主機,則日期與時間的設定可能會被重 新設定。於發生此類情形時,主機會於再度啟動時,顯示日期與時間的設定畫 面。 • 使用 WLAN 功能時將無法替電池充電。 電池的預估持續時間 遊戲 約 3 - 6 小時 播放影像 約 3 - 5 小時 *1 選擇單人遊玩模式,使用線控裝置與耳機,但未使用無線 LAN,選用附屬電池組 的測試結果。 *2 選擇交替使用主機喇叭、耳機,且切換各種音量與畫面亮度的測試結果。 提示 電池使用時間會視遊戲內容與使用狀況,例如畫面亮度與環境因素,而有所不同。 隨著電池使用時間越久,電池使用時間也會逐漸縮短。 電池的預估充電時間 若使用附屬電池組,於耗盡電池電力後使用交流電轉換器,大約需充電 2 小時 20 分始可充電完畢。 提示 • 請在 10° C 至 30° C/50° F 至 86° F 的溫度間為電池充電。 在其他溫度間的充電動 作可能無效。...
- Page 172 更換電池組 爲了安全起見,請在更換電池組之前先關閉主機電源並自電池插座拔下 交流電轉換器。亦請在處理電池組之前先參閱 " 電池組注意事項 " ( 第 148 頁) 。 提示 若於取出電池組後並未再度使用 PSP™ 主機,則日期與時間的設定可能會被重新設 定。於發生此類情形時,主機會於再度啟動時,顯示日期與時間的設定畫面。 保存電池組 若長時間不使用 PSP™ 主機,請從主機中取出電池組並放置在陰涼、乾 燥且兒童拿不到的地方保管。 電池...
-
Page 173: 遊戲
遊戲 玩遊戲 選擇自家選單的 插入 UMD™ ( 第 164 頁) 。 顯示 UMD™ 圖示。 選擇遊戲圖示後,按下 開始遊戲。 Game (遊戲)時顯示的圖示 除了玩遊戲之外,Game (遊戲)尚能執行下列功能。 Game Sharing (遊戲 分享) Saved Data Utility (管理保 存資料) UMD™ PSP™ Update (PSP™ 更新) Memory Stick™ 。 按鈕。 您可使用 Ad Hoc 模式( 台... - Page 174 提示 • 若您選擇 (UMD™) 圖示時,顯示了 示,即代表其具有限制內容功能。您必須依照以下手續輸入密碼,才能遊玩該遊 戲。詳細請參閱 "Parental Control Level:視聽年齡限制 " ( 選擇 (Restricted Content:限制內容)後,按下 按鈕。 使用方向按鈕輸入四位數的密碼後,按下 按鈕。 • 若於遊玩途中按下 HOME (歸返)按鈕,可檢查目前的殘存電力。 • 本說明書中刊載的遊戲名稱與簡介圖像皆非實際產品。 離開遊戲 請於遊玩途中按下 HOME (歸返)按鈕。 顯示 "Do you want to quit the game? (您要離開遊戲嗎?)" 的 訊息。 選擇 "Yes (是)" 後,按下 結束遊戲並顯示自家選單。...
-
Page 175: 遊戲選項選單
遊戲選項選單 於顯示選項選單後,您可檢視遊戲資訊或拷貝、刪除保存資料。 選擇圖示後,按下 顯示選項選單。 圖示 選擇選單項目後,按下 關閉選項選單 按下 按鈕或 按鈕。 操作一覽表 有效的選單項目會因選擇之圖示而有所不同。 Start 開始遊玩或下載資料 (開始) Copy 將 Memory Stick Duo™ 內的保存資料拷貝至另一張 Memory Stick (拷貝) Duo™ ( Delete 刪除 Memory Stick Duo™ 內的資料 (刪除) Information 顯示所選圖示的相關資訊 (資訊) 按鈕。 選項選單 按鈕。 第 176 頁) 遊戲選項選單... -
Page 176: 拷貝及刪除保存資料
拷貝及刪除保存資料 利用 「管理保存資料」 功能, 您可拷貝或刪除保存於 Memory Stick Duo™ 內的遊戲保存資料。 拷貝保存資料 您可將保存資料拷貝至另一張 Memory Stick Duo™。建議您應為重要的 資料預留備份檔案。 選擇 後,按下 選擇您想要拷貝的保存資料後,按下 顯示選項選單。 選擇 "Copy (拷貝)" 後,按下 遵循畫面指示進行操作。 若可用空間不足 請刪除設為保存位置之 Memory Stick Duo™ 內的資料,或是更換其他的 Memory Stick Duo™。於開啟選項選單 ( 存資料或檢查剩餘的可用空間。 提示 隨使用之 Memory Stick Duo™ 種類的不同,儘管是相同的資料,亦可能會出現不同 的檔案大小顯示。... -
Page 177: 影像
影像 觀賞影像 您可觀賞 UMD™VIDEO 或保存於 Memory Stick Duo™ 內的影像。 選擇自家選單的 插入 UMD™ 或 Memory Stick Duo™ ( 顯示被插入之媒體的圖示。 選擇圖示後,按下 開始播放 UMD™VIDEO。若您選擇 示。選擇您想要播放的影像後,按下 。 第 164、165 頁) 。 按鈕。 ,將會顯示每個影像資料的圖 按鈕。 觀賞影像... - Page 178 Video (影像)時顯示的圖示 UMD™ Memory Stick™ 提示 • 若您選擇 (UMD™) 圖示時,顯示了 示,即代表其具有限制內容功能。您必須依照以下手續輸入密碼,才能觀賞該影 片。詳細請參閱 "Parental Control Level:視聽年齡限制 " ( 選擇 (Restricted Content:限制內容)後,按下 按鈕。 使用方向按鈕輸入四位數的密碼後,按下 按鈕。 • 若於影像播放途中按下 HOME (歸返)按鈕或是 SELECT (選擇)按鈕,螢幕上將 會顯示自家選單以及目前播放之影像的暫停靜止畫面。只要您再按下任何一個按 鈕,即可關閉自家選單。 • 您可使用聲音按鈕 ( • 關於 PSP™ 主機可播放之檔案格式,請參閱 " 可播放的檔案 " ( 停止播放...
-
Page 179: 使用控制介面
使用控制介面 您可使用螢幕上的控制介面,執行下列操作。 重要 某些 UMD™VIDEO 會因為軟件製作者的意圖,而被事先設定播放條件。當遭遇這類情 形時,即使您依照本說明書的指示進行操作,亦可能會出現無法啟動之現象。 於播放影像時,按下 顯示控制介面。 選擇圖示後,按下 隱藏控制介面 按下 按鈕或 按鈕。 操作一覽表 播放 UMD™VIDEO 時顯示的圖示與播放保存於 Memory Stick Duo™ 之影 像時顯示的圖示並不相同。 圖示 Menu (選單) Go To (進入) 自指定的章或時間起開始播放 ( 按鈕。 按鈕。 說明 顯示 UMD™VIDEO 選單 控制介面 第 182 頁) 使用控制介面... - Page 180 圖示 Audio Options (聲音選項) Angle Options (角度選項) Subtitle Options (字幕選項) UMD™Video Volume (UMD™Video 音量) Screen Mode (螢幕模式) Display (顯示) Help (輔助) Previous (後退) Return to Beginning (回到開頭) Next (前進) Fast Reverse/ Fast Forward (快退 / 快進) Slow Motion (慢動作) Frame Advance (停格播放)...
- Page 181 圖示 Pause (暫停) 暫停播放 Stop (停止) A-B Repeat (A-B 重複) Repeat (重複) Clear (解除) 解除 "Repeat (重複)" 設定 * 播放保存於 Memory Stick Duo™ 之影像時,無法執行此項操作。 檢視播放狀態與相關資訊 於播放時,選擇控制介面的 顯示該影像的播放狀態。 標題 狀態圖示 隱藏顯示 選擇控制介面的 後,按下 說明 停止播放 重複播放特定的部分 ( 第 185 頁) 。 重複播放影像...
- Page 182 提示 播放 UMD™VIDEO 時顯示的項目與播放保存於 Memory Stick Duo™ 之影像時顯示的 項目並不相同。 變更 Screen Mode (螢幕模式) 變更螢幕的顯示比例。 選擇控制介面的 您每按一次 按鈕,都能依照下列順序變更 Screen Mode ( 畫面模 式) : Normal (標準) 配合 PSP™ 的螢幕尺寸調整影像 Zoom (放大) Full Screen (全景) Original (原始) 提示 部分影像可能無法改變螢幕模式的顯示比例。 從選擇的場景開始播放 您可從指定的章或時間起開始播放。 選擇控制介面的 使用方向按鈕,指定章或時間後,按下...
- Page 183 Chapter (章) 指定章節碼 * 指定經過時間 XX:XX:XX * 當播放保存於 Memory Stick Duo™ 的影像時,您無法使用此功能。 調整 UMD™Video 的音量 如果 UMD™ 的輸出音量較低,則您可以調整音量。 選擇控制介面的 您每按一次 按鈕,都能依照下列順序變更音量: 提高音量 提高音量 (最大) Normal (標準) 通常選擇此項設定 提示 音量設定會於取出 UMD™ 後自動解除。若想維持高音量設定,請選擇 "Video Settings (影像設定)" ( Fast Reverse/Fast Forward (快退 / 快進) 於播放時,選擇控制介面的...
- Page 184 慢放 於播放時,選擇控制介面的 返回正常播放 選擇控制介面的 提示 暫停播放時,選擇控制介面的 (Fast Forward:快進) ,則只會於按住 重複播放 可反覆持續播放整張光碟或某個章。 選擇控制介面的 您每按一次 按鈕,都能依照下列順序變更重複模式: Disc Repeat (光碟重複播放) Chapter Repeat (章重複播放) Repeat Off (解除重複播放) 提示 • 您亦可於選擇控制介面的 • 播放保存於 Memory Stick Duo™ 的影像時,只能選擇 "Repeat On (開始重複播 放)" 或 "Repeat Off (解除重複播放)" 兩種重複選項。 使用控制介面...
- Page 185 重複播放影像的特定部份 您可指定希望重複播放的部分後開始播放。 於播放時,選擇控制介面的 起點,按下 按鈕。 起點 (A 點)設定完成。 於希望重複播放之部分的終點,按下 終點 (B 點)設定完成。且開始重複播放指定部分。 解除 A-B 重複 選擇控制介面的 或 ,並於希望重複播放之部分的 按鈕。 後,按下 按鈕。 使用控制介面...
-
Page 186: 利用 Psp™ 主機的按鈕或線控裝置進行操作
利用 PSP™ 主機的按鈕或線控裝置進行操作 您也可不使用控制介面,而利用主機的按鈕或線控裝置來操作 PSP™ 主 機。 播放 暫停 顯示 UMD™VIDEO 選單 停止 播放上一章 播放下一章 快退 快進 慢放 *1 播放保存於 Memory Stick Duo™ 的影像時,將無法執行此項操作。 *2 若您按下並按住此按鈕,則將會持續以 Fast Reverse (快退)/Fast Forward (快進)/Slow (慢放)的方式播放影像。 提示 當畫面上顯示控制介面時,將無法操作某些按鈕。遇此情形時,請按下 閉控制介面。 利用 PSP™ 主機的按鈕或線控裝置進行操作 主機按鈕操作 按 按鈕或... -
Page 187: 影像選項選單
影像選項選單 您可使用 Video(影像)選項選單,以播放 UMD™VIDEO、檢視相關資訊, 或是刪除保存於 Memory Stick Duo™ 的影像。 選擇圖示後,按下 顯示選項選單。 圖示 選擇選單項目後,按下 關閉選項選單 按下 按鈕或 按鈕。 選項一覽表 有效的選單項目會因選擇之圖示而有所不同。 Play (播放) 播放 UMD™VIDEO 或保存於 Memory Stick Duo™ 的影像 Play from Beginning 從頭開始播放 UMD™VIDEO (從頭開始播放) Delete (刪除) 刪除保存於 Memory Stick Duo™ 的影像 Information (資訊)... -
Page 188: 將影像保存至 Memory Stick Duo
相容 Memory Stick™ 規格的裝置錄製的畫像或影像 當您準備了影像格式為 PSP™ 主機可播放格式之裝置時,您可透過該裝 置,在 PSP™ 主機上,播放插入 Memory Stick Duo™ 內的影像。 * 若您想了解PSP™主機可播放之影像檔案類型的相關資訊, 請參閱"可播放的檔案" ( 第 251 頁) 。若您想了解更多關於對應機器的資訊,請連結以下網站 (http://www.memorystick.com/psp) 。 提示 若您的機器只能使用標準尺寸的 Memory Stick ™時, 您必須準備 Memory Stick Duo 專用轉接卡 (型號:MSAC-M2。需另行選購之 Sony 產品) 。 將影像保存至 Memory Stick Duo™... - Page 189 影像檔案 1 使用有 Memory Stick™ 插口的電腦。 2 使用市售的 USB 連接線 ( 3 使用市售的 Memory Stick USB 讀卡機。 * 若您的裝置只能使用標準尺寸的 Memory Stick™ 時,您必須準備 Memory Stick Duo 專用轉接卡 (型號:MSAC-M2。需另行選購之 Sony 產品) 。 提示 • 若欲了解更多規格的相關資訊,請瀏覽以下網站 (http://www.memorystick.com/psp) 。 • PSP™ 無法播放以高於 768kbps 的位元率轉換的影像資料。...
-
Page 190: 音樂
音樂 聽音樂 您可聆聽 UMD™MUSIC 與保存於 Memory Stick Duo™ 的音樂。 選擇自家選單的 插入 UMD™ 或 Memory Stick Duo™ ( 顯示被插入之媒體的圖示。 選擇圖示後,按下 開始播放。於顯示群組或曲目時,選擇您想聽的曲目後,按下 鈕。 提示 內含影像內容 (例如音樂 MTV)之 UMD™MUSIC 能以播放 UMD™VIDEO 時的相同方法 開始播放。詳情請參閱 " 影像 " 的 " 使用控制介面 " ( Music (音樂)時顯示的圖示 UMD™... - Page 191 提示 • 您可於步驟3時,按下線控裝置的 START(開始)按鈕或是 u 按鈕,開始播放第 一個群組之第一首曲目。 • 若於播放途中按下 HOME (歸返)按鈕或是 SELECT (選擇)按鈕,將強制返回自 家選單。只要再按下任何一個按鈕,即可開啟音樂播放畫面。 • 您可使用聲音按鈕 ( 第 167 頁)來調整音質或選擇靜音。 • 關於 PSP™ 主機可播放之檔案格式,請參閱 " 可播放的檔案 " ( • 本說明書中刊載的遊戲名稱與簡介圖像皆非實際產品。 何謂 Group (群組)? Group (群組)為依照歌曲或演唱 / 演奏者等特定順序整理的音樂資料 庫。當開啟 Group Mode (群組模式)時,PSP™ 主機可依據使用電腦編 輯的群組進行播放。...
- Page 192 停止播放 於播放音樂時,按下 停止播放。 如何觀看畫面 專輯名稱 狀態圖示 提示 • "專輯名稱"與"目前曲目/曲目總數"唯有於開啟 面中。 • 顯示於 " 狀態圖示 " 欄位的圖示會因選擇之播放模式而有所不同。 • Codec 的詳細說明,請參閱 " 選擇 codec 進行播放 " ( 聽音樂 按鈕。 曲目名稱 演唱 / 演奏者姓名 控制介面 此曲目之已播放時間 / 總播放時間 目前曲目 / 曲目總數 Codec (顯示) 功能時才會顯示於畫 第...
-
Page 193: 使用控制介面
使用控制介面 您可使用螢幕上的控制介面,執行下列操作。 於播放時,按下 顯示控制介面。 選擇圖示後,按下 提示 內含影像內容 (例如音樂 MTV)之 UMD™MUSIC 能以播放 UMD™VIDEO 時的相同方法 開始播放。詳情請參閱 " 影像 " 的 " 使用控制介面 " ( 隱藏控制介面 按下 按鈕或 按鈕。 操作一覽表 圖示 Previous Group (上一個群組) Next Group (下一個群組) Previous Track (上一首曲目) 按鈕。 按鈕。 說明 返回上一個群組的開頭... - Page 194 圖示 Next Track (下一首曲目) Fast Reverse/ Fast Forward (快退 / 快進) Play (播放) Pause (暫停) Stop (停止) Group Mode (群組模式) A-B Repeat (A-B 重複播放) Play Mode (播放模式) Clear (解除) Display (顯示) Help (輔助) * 按住 按鈕,即可持續執行快退 / 快進。 使用 Group Mode (群組模式) 以群組方式播放曲目。於播放群組中的所有曲目後便會停止播放。...
- Page 195 使用 Play Mode (播放模式) (重複 / 隨機) 於播放時,選擇控制介面的 您每按一次 按鈕,都能依照下列順序變更功能: 播放模式 說明 重複播放某首曲目 重複播放所有曲目 以任意順序播放所有曲目 以任意順序重複播放所有曲目 解除 Play Mode (播放模式)並以正常順序播放至最後 無顯示圖示 一首曲目 * 若設定了群組,則會以任意順序隨機播放群組內的曲目。但不會改變群組的 排列順序。 提示 可選擇控制介面的 ,按下 重複播放曲目的某一部份 指定並播放您想重複播放的部分。 於播放時,選擇控制介面的 間點,按下 按鈕。 完成 A 點的設定。 於您想要結束重複播放的時間點,按下 完成 B 點的設定,並開始指定部分的重複播放。 後,按下...
- Page 196 解除 A-B 重複播放 選擇控制介面的 或 後,按下 按鈕,即可消除指定部分, 並恢復正常播放。 提示 • 只能於單一曲目中指定 A-B 重複播放的範圍。 • 若並未設定終點 (B 點) ,則曲目的結束點將會被自動設定為終點 (B 點) 。 • 若於設定 Play Mode (播放模式)時設定 A-B 重複播放,將自動解除 Play Mode (播放模式) 。 使用控制介面...
-
Page 197: 利用 Psp™ 主機的按鈕或線控裝置進行操作
利用 PSP™ 主機的按鈕或線控裝置進行操作 您也可不使用控制介面,而利用主機的按鈕或線控裝置來操作 PSP™ 主 機。 主機按鈕操作 按 播放 按鈕 暫停 按 START (開始)按鈕 停止 按 返回播放中曲目的開 頭或上一首曲目的開 按 L 按鈕 頭 跳至下一首曲目的開 按 R 按鈕 頭 快退 按方向按鈕左 快進 按方向按鈕右 * 若您按下並按住此按鈕,則將會持續以 Fast Reverse (快退)/Fast Forward (快進)的方式播放音樂。 提示 •... -
Page 198: 音樂選項選單
音樂選項選單 您可使用 Music (音樂)選項選單,以檢視相關資訊,或是刪除保存於 Memory Stick Duo™ 的音樂資料。 選擇圖示後,按下 顯示選項選單。 圖示 選擇選單項目後,按下 關閉選項選單 按下 按鈕或 按鈕。 選項一覽表 有效的選單項目會因選擇之圖示而有所不同。 Play (播放) Play from Beginning (自開頭播放) Select Codec (選擇 Codec) 音樂選項選單 按鈕。 按鈕。 播放 UMD™MUSIC 或保存於 Memory Stick Duo™ 的音樂資 料 自 UMD™MUSIC 的開頭起播放 設定音樂播放的檔案格式或位元率... - Page 199 Delete (刪除) 刪除保存於 Memory Stick Duo™ 的音樂資料 Information 顯示所選圖示的相關資訊 (資訊) 選擇 codec 進行播放 播放以多種檔案格式與位元率錄製的 UMD™MUSIC 時,您可以選擇一些選 項後再進行播放。 選擇您想聆聽的群組後,按下 選擇 "Select Codec (選擇 Codec)" 後,按下 顯示檔案格式類型與位元率。以灰色顯示的項目由於非屬本機能播 放的類型,因此無法選擇。 選擇您想聆聽的格式類型與位元率後,按下 按下 按鈕。 顯示群組的圖示。 選擇群組後,再選擇您想聆聽的曲目,按下 開始播放。 提示 "ATRAC3plus™" 等項目為檔案格式的類型,"256kbps" 等項目則代表位元率。一般 而言,位元率愈高,音質愈好。檔案類型的詳細說明,請參閱 " 可播放的檔案 " (...
-
Page 200: 將音樂傳送並保存至 Memory Stick Duo
3 使用市售的 Memory Stick USB 讀卡機。 *1 若裝置上的插口只能使用標準尺寸的 Memory Stick™ 時,您必須準備 Memory Stick Duo 專用轉接卡 (型號:MSAC-M2。需另行選購之 Sony 產品) 。 *2 一台已安裝 Windows® XP 且安裝 3.1 或更新版本之 SonicStage™ 的電腦。 *3 必須準備型號為 MSAC-US30 等, 支援 MagicGate™ 的產品 (需另行選購之 Sony 產 品) 。 將音樂傳送並保存至 Memory Stick Duo™ 。... - Page 201 電腦 1 使用有 Memory Stick™ 插口的電腦。 2 使用市售的 USB 連接線 ( 3 使用市售的 Memory Stick USB 讀卡機。 * 若裝置上的插口只能使用標準尺寸的 Memory Stick™ 時,您必須準備 Memory Stick Duo 專用轉接卡 (型號:MSAC-M2。需另行選購之 Sony 產品) 。 提示 音軌的輸入方法隨軟件而異。詳細請參閱該軟件的使用說明。 第 249 頁) 。 傳送至插入 PSP™ 主機的 Memory Stick Duo™...
- Page 202 音樂資料的保存位置 於 Memory Stick Duo™ 直接建立一個名為 "PSP" 的資料夾後, 再於 "PSP" 資料夾下建立一個名為 "MUSIC" 的檔案。 並將 MUSIC 資料保存於 "MUSIC" 資料夾中。PSP™ 主機無法辨識保存於此資料夾以外的任何資料。 * 資料夾名稱不需要都是大寫字母。 Memory Stick Duo™ 提示 • 假如名為 "PSP" 的資料夾已存在於 Memory Stick Duo™ 中,請於該資料夾下建立 "MUSIC" 資料夾。 • 您可於 "MUSIC" 資料夾內新建資料夾 (圖 1) ,主機將視為一個群組。 •...
-
Page 203: 相片
相片 瀏覽圖像 您可瀏覽、翻閱保存於 Memory Stick Duo™ 內的圖像。 選擇自家選單的 插入 Memory Stick Duo™ ( 顯示 。 選擇 ,按下 按鈕。 開始顯示數碼 (數位)圖像、資料夾、以及保存於 Memory Stick Duo™ 的靜止圖像。選擇您想要顯示的圖示後,按下 Photo (相片)時顯示的圖示 Memory Stick™ 提示 • 若於顯示相片時按下 HOME (歸返)按鈕或是 SELECT (選擇)按鈕,螢幕上將會 顯示自家選單並繼續顯示圖像。只要您再按下任何一個按鈕,即可返回圖像顯示 畫面。 • 關於 PSP™ 主機可播放之檔案格式,請參閱 " 可播放的檔案 " ( 。... -
Page 204: 使用控制介面
使用控制介面 您可使用螢幕上的控制介面,執行下列操作。 於顯示圖像時,按下 顯示控制介面。 選擇圖示後,按下 隱藏控制介面 按下 按鈕或 按鈕。 操作一覽表 圖示 Send (傳送) Set as Wallpaper (設定為桌布) View Mode (檢視模式) Display (顯示) Help (輔助) 使用控制介面 按鈕。 按鈕。 說明 傳送圖像 ( 第 210 頁) 。 將目前顯示的圖像設定為桌布 ( 第 207 頁) 。 變更圖像的顯示比例... - Page 205 圖示 Clear Zoom (解除縮放) Zoom Out (縮小) Zoom In (放大) Rotate Left (左旋轉) Rotate Right (右旋轉) Up (上)/Down (下)/Left (左)/ Right (右) Previous (後退) Next (前進) Slideshow (幻燈片秀) 顯示圖像資訊 於顯示圖像時,選擇控制介面的 顯示圖像狀態。 說明 讓縮放過的圖像恢復原始比例 縮小圖像 放大圖像 讓圖像朝逆時針方向旋轉 90 度 讓圖像朝順時針方向旋轉 90 度 當放大圖像或檢視模式設定為放大時,可...
- Page 206 圖像名稱 顯示狀態 隱藏顯示 選擇控制介面的 調整圖像尺寸 您可變更畫面上的圖像顯示尺寸。 於顯示圖像時,選擇控制介面的 您每按一次按鈕,都能依照下列順序變更選項: Normal (標準) 不改變圖像縱橫比,配合螢幕尺寸顯示圖像 Zoom (縮放) 提示 部分圖像可能無法改變 View Mode (檢視模式) 。 使用控制介面 (圖像編號/圖像總數) 後,按下 按鈕。 不改變圖像縱橫比,切除上下或左右的邊緣畫面,以全畫 面顯示 最後更新時間 後,按下 按鈕。...
- Page 207 將圖像設定為桌布 您可將目前顯示的圖像設定為桌布。 顯示圖像,並選擇控制介面的 選擇 "Yes (是)" 後,按下 顯示 "Save completed (保存完成)" 且完成設定。 提示 • 您只能替 PSP™ 主機設定一張圖像做為桌布。若您設定且執行了桌布的變更,則 已存在之圖像將會因覆寫而消滅。 • 若您替圖像進行擴大縮小或迴轉等操作,將會保存已顯示於螢幕上的圖像以為目 前的桌布。 • 若您不希望顯示桌布,您可進入 "Theme Settings (主題設定)" 的 "Wallpaper (桌布)" ( 後,按下 按鈕。 第 225 頁) ,變更其設定。 按鈕。 使用控制介面...
-
Page 208: 利用 Psp™ 主機的按鈕或線控裝置進行操作
利用 PSP™ 主機的按鈕或線控裝置進行操作 您也可不使用控制介面,而利用主機的按鈕或線控裝置來操作 PSP™ 主 機。 播放幻燈片秀 取消縮放 Back (返回) 顯示上一張圖像 顯示下一張圖像 Zoom In (放大) Zoom Out (縮小) 旋轉 (左) 旋轉 (右) 移動 * 於縮放圖像或將 View Mode (檢視模式)設定為 "Zoom (縮放)" 時,會顯示因縮 放機能而隱藏的部分圖像。 提示 當畫面上顯示控制介面時,將無法操作某些按鈕。遇此情形時,請按下 閉控制介面。 利用 PSP™ 主機的按鈕或線控裝置進行操作 主機按鈕操作 按... -
Page 209: 相片選項選單
相片選項選單 於顯示 Photo (相片)選項時,您可檢視相關資訊,或是刪除保存於 Memory Stick Duo™ 的圖像。 選擇圖示後,按下 顯示選項選單。 圖示 選擇選單項目後,按下 關閉選項選單 按下 按鈕或 按鈕。 選項一覽表 有效的選單項目會因選擇之圖示而有所不同。 Slideshow (幻燈片秀) 以張為單位,依順序自動顯示圖像 ( Receive (接收) 接收圖像 ( Display (顯示) 顯示圖像 Send (傳送) 傳送圖像 ( Delete (刪除) 刪除資料夾或圖像 Information (資訊) 顯示所選圖示的相關資訊 按鈕。 選項選單... - Page 210 傳送與接收圖像 您可透過 Ad Hoc 模式 ( 傳送與接收的執行步驟並不相同。 傳送者 設定 Ad Hoc 模式 (傳送者與接收者皆同) 1 開啟 PSP™ 主機左側的無線 LAN 按鈕 ( 準備接收圖像 (接收者) 1 進入 ,選擇您想保存圖像之圖示位置後,按下 2 選擇 "Receive (接收)" 後,按下 主機準備接收圖像。 傳送圖像 (傳送者) 1 選擇您想要傳送的圖像後,按下 2 選擇 "Send (傳送)" 後,按下 顯示準備接收圖像之...
-
Page 211: 播放幻燈片秀
播放幻燈片秀 您可設定圖像的顯示順序。 選擇內含圖像的資料夾或媒體之圖示後,按下 START (開始) 按鈕。 開始播放幻燈片秀。顯示的內容會因選擇之圖示而有所不同。 圖示 Memory Stick™ Digital Camera Images Folder (資料夾) Images (圖像) 停止幻燈片秀 按下 按鈕。 提示 • 您可調整圖像的顯示速度。詳細請參閱 "Photo Settings (相片設定)" ( 第 221 頁) 。 • 您亦可以下述方法開始幻燈片秀: – 從選項選單啟動 ( 第 209 頁) – 從相片控制介面啟動 ( 使用控制介面... - Page 212 選擇圖示後,按下 隱藏控制介面 按下 按鈕或 按鈕。 作業清單 圖示 Slideshow Options (幻燈片秀選項) View Mode (檢視模式) Display (顯示) Help (輔助) Previous (後退) 顯示上一張圖像 Next (前進) Play (播放) Pause (暫停) Stop (停止) 播放幻燈片秀 按鈕。 說明 切換畫面上顯示的資訊 ( 變更螢幕的圖像顯示比例 顯示圖像的相關資訊 顯示使用 PSP™ 主機之按鈕可執行的功能 顯示下一張圖像 開始幻燈片秀 暫停幻燈片秀...
- Page 213 圖示 Repeat (重複) 顯示幻燈片秀選項 於播放幻燈片秀時,選擇控制介面的 您每按一次 按鈕,都能依照下列順序變更選項: 顯示圖像名稱與最後更新時間。 圖像名稱、最後更新時間與一覽表同時顯示。 解除顯示。 利用 PSP™ 主機的按鈕或線控裝置進行操作 您也可不使用控制介面,而利用主機的按鈕或線控裝置來操作 PSP™ 主 機。 播放幻燈片秀 暫停幻燈片秀 停止幻燈片秀 顯示上一張圖像 顯示下一張圖像 顯示幻燈片秀選項 提示 當畫面上顯示控制介面時,將無法操作某些按鈕。遇此情形時,請按下 閉控制介面。 說明 反複播放幻燈片秀 後,按下 主機按鈕操作 線控裝置操作 按 START (開始)按鈕 按 u 按鈕 按 START (開始)按鈕 按...
-
Page 214: 將圖像保存至 Memory Stick Duo
於使用相容 Memory Stick Duo™ 的數碼(數位)相機時,可將插入相機 的 Memory Stick Duo™ 直接插入 PSP™ 主機並愉悅瀏覽。 保存於 Memory Stick Duo™ 的圖像將會被顯示於主機的 "Digital Camera Images" 資料 夾中。 提示 使用 Memory Stick Duo 專用轉接卡 (型號:MSAC-M2。需另行選購之 Sony 產品) 後,您即可於僅對應標準尺寸的數碼 (數位)相機使用 Memory Stick Duo™。 將圖像資料從電腦保存至 Memory Stick Duo™ 您可透過下列方式保存圖像: 電腦... - Page 215 圖像資料的保存位置 於 Memory Stick Duo™ 直接建立一個名為 "PSP" 的資料夾後, 再於 "PSP" 資料夾下建立一個名為 "PHOTO" 的檔案。 並將相片資料保存於 "PHOTO" 資 料夾中。PSP™ 主機無法辨識保存於此資料夾以外的任何資料。 * 資料夾名稱不需要都是大寫字母。 Memory Stick Duo™ 提示 • 假如名為 "PSP" 的資料夾已存在於 Memory Stick Duo™ 中,請於該資料夾下建立 "PHOTO" 資料夾。 • 您可於 "PHOTO" 資料夾內新建資料夾 (圖 1) 。 •...
-
Page 216: 網路
網路 連接網際網路 (互聯網) 您可使用網路瀏覽介面,與網際網路 (互聯網)連線並閱覽 WEB 網頁。 注意您必須在可連接網路的位置下使用始可連線。 確認是否已經完成網路設定。 連接網際網路 (互聯網)前,必須先輸入 Infrastructure (基礎 建設)模式的連線設定 ( 進入自家選單的 啟動網路瀏覽介面,顯示選單。 使用方向按鈕之上,選擇位址列後按下 螢幕上顯示鍵盤。 連接網際網路 (互聯網) 第 235 頁) 。 ,選擇 後,按下 按鈕。 按鈕。 位址列 選單列... - Page 217 嘗試連接網路。 • 通常情形,於連線至網路後,將會自動選擇最後使用的網路設定。 • 網路瀏覽介面並未正式對應繁體中文。若欲取得最新情報,請瀏覽以下網站。 http://www.sceh.com.hk (香港、東南亞) ,http://www.sceh.com.tw (台灣) 若您想了解更多網路瀏覽介面之使用方法,請閱覽網路瀏覽介面操作手冊 的專屬網頁。 http://www.playstation.com/manual/psp/ 關閉網路瀏覽介面 於顯示網路瀏覽介面時,按下 結束網路瀏覽介面。 您需對使用網路瀏覽介面閱覽網頁或啟動網路上的資料,以及下載等行為 負擔一切責任。除依據各國法律規定不可免責之情形外,Sony Computer Entertainment Inc. 與關係企業,對因閱覽網頁、啟動檔案、下載或執行 等行為而對網路瀏覽介面或 PSP™ (PlayStation 常,或出現保存於 Memory Stick Duo™ 之資料消失 / 毀損等情形,皆不 負一切相關責任。 按鈕,隱藏選單。 按鈕。 Portable) 主機造成異 ® 連接網際網路 (互聯網) 忙碌圖示...
-
Page 218: 設定
設定 PSP™ 主機的設定 您可調整 PSP™ 主機的設定以及影像、相片、網路等功能的設定。 選擇自家選單的 顯示各種設定的圖示。 選擇圖示後,按下 顯示選擇圖示的設定畫面。詳細請參閱各設定的介紹說明 ( 第 219-244 頁) 。 PSP™ 主機的設定 。 按鈕。... - Page 219 Settings (設定)時顯示的圖示 Network Update (網路更新) USB Connection (USB 連接) Video Settings (影像設定) Photo Settings (相片設定) System Settings (系統設定) Theme Settings (主題設定) Date & Time Settings (日期 & 時間設定) Power Save Settings (省電設定) Sound Settings (聲音設定) Security Settings (安全性設定) Network Settings (網路設定)...
-
Page 220: Video Settings (影像設定
(UMD™Video 音量) 提示 購買時的初期預設如下: – "Menu Language(選單語言)" 與 "Subtitle Language(字幕語言)" 是設定為 "English (英文)" (PSP-1006 K)或 "Chinese (中文)" (PSP-1007 K) 。 – "Audio Language (聲音語言)" 是設定為 "Original Language (原始語言)"。 – "UMD™Video Volume (UMD™Video 音量)" 是設定為 "Normal (標準)"。 Video Settings (影像設定) 選擇 UMD™VIDEO 選單的使用語言... -
Page 221: Photo Settings (相片設定
Photo Settings (相片設定) 您可設定幻燈片秀的播放速度。 Fast (高速) 以較快的速度顯示圖像 Normal (標準) 以標準速度顯示圖像 Slow (慢速) 以較慢的速度顯示圖像 選單項目的初期預設標有下線。 Photo Settings (相片設定)... -
Page 222: System Settings (系統設定
System Settings (系統設定) 您可調整 PSP™ 主機的系統設定並閱覽相關資訊,或是為 Memory Stick Duo™ 進行格式化。 Nickname (暱稱) 您可變更於初始設定時選擇的暱稱。請使用畫面上顯示的鍵盤,輸入一 個新的暱稱。輸入文字的詳細使用方法,請參閱 " 如何使用鍵盤 " ( 第 245 頁) 。 System Language (系統語言) 設定自家選單等系統選單的語言。 Deutsch English Español Français Italiano Nederlands Português Pyccкий 選單項目的初期預設標有下線。 System Settings (系統設定) 以德文顯示訊息 以英文顯示訊息 以西班牙文顯示訊息... - Page 223 Character Set (文字設定) 您可替音樂以及其他類型的檔案設定文字編碼。通常情形並無必要調整 此項設定。 For File Names 設定音樂以及其他檔案名稱的文字編碼。 (檔案名稱) For Text in Files 設定 m3u 文書以及其他類型檔案的文字編碼。 (檔案文書) 提示 初期預設為 "Multilingual Latin 1 (850)"。 Battery Information (電池資訊) 您可閱覽主機電源的相關資訊。 Charge Level 以百分比顯示電池的充電量 (充電量) Hours Left 顯示電池剩餘的使用時間 (充電時例外) (剩餘時間) Power Source 顯示目前電力來源為 "External (外接)" 或 "Battery (電力來源)...
- Page 224 Format Memory Stick™ (Memory Stick™ 格式化) 您可使用主機,進行 Memory Stick Duo™ 的格式化。請遵循畫面上的指 示,正確操作。 重要 於進行格式化後,原先保存於 Memory Stick Duo™ 內的軟件與資料都會遭強制刪 除,且永遠無法恢復。請小心不要因意外疏忽而刪除了重要資料。 Restore Default Settings (恢復預設) 讓所有設定皆回復至購買時的初期設定。請遵循畫面上的指示,正確操 作。 重要 • 恢復預設後,之前變更的所有設定都會遭強制消滅,且永遠無法恢復。 • 執行更新後,將無法使用系統軟件更新前版本之機能。 System Information (系統資訊) 您可閲覽 PSP™ 主機的相關資訊。 MAC Address (MAC 位址) System Software (系統軟件)...
-
Page 225: Theme Settings (主題設定
Theme Settings (主題設定) 您可改變 PSP™ 主機螢幕的主題或顯示的桌布圖像。 Theme (主題) 您可改變螢幕之背景顏色。使用方向按鈕選擇背景顏色後,按下 即可完成設定。 Original 每月自動變更為原先設定的顏色。 (原始預設) 顏色樣本 設定為所選擇之顏色。 選單項目的初期預設標有下線。 Wallpaper (桌布) 您可要求顯示或隱藏桌布。 Do Not Use 設定不顯示桌布。 (不使用) 透過 Use (使用) ( 選單項目的初期預設標有下線。 (Photo (相片) )設定圖像為桌布 第 207 頁) 。 Theme Settings (主題設定) 按鈕... -
Page 226: Date & Time Settings (日期 & 時間設定
Date & Time Settings (日期 & 時間設定) 您可設定 PSP™ 主機的日期與時間、時區與夏令時間。請使用方向按鈕 選擇項目,並輸入設定,再按下 Date and Time (日期與時間) Date Format (日期顯示方式) Time Format (時間顯示方式) Time Zone (時區) Daylight Saving (夏令時間) 提示 • 於變更 Time Zone (時區)後,日期與時間的設定亦會依據舊時區與新時區之間 的差異,自動進行調整。 • 若 "Theme(主題)"( 更了 "Date & Time Settings (日期&時間設定)" 的月份設定後,自動改變背 景顏色。... -
Page 227: Power Save Settings (省電設定
Power Save Settings (省電設定) 您可透過自動關閉背光燈或進入睡眠模式等方法,節省 PSP™ 主機的消 耗電力。 Backlight Auto-Off (自動關閉背光燈) 於一定時間沒有操作後,主機會自動關閉液晶畫面的背光燈以節省電 力。背光燈被關閉後,畫面將顯得晦暗。 Off (關) 背光不會自動關閉。 2 minutes 1 分鐘之後讓畫面變暗,再過 1 分鐘之後則關閉背光。 (2 分鐘) 5 minutes 1 分鐘之後讓畫面變暗,再過 4 分鐘之後則關閉背光。 (5 分鐘) 10 minutes 1 分鐘之後讓畫面變暗,再過 9 分鐘之後則關閉背光。 (10 分鐘) 選單項目的初期預設標有下線。... - Page 228 Auto Sleep (自動睡眠) 您可設定主機於一定時間沒有操作後,即自動進入睡眠模式以節省電 力。若您想了解解除睡眠模式的相關資訊,請參閱 " 解除睡眠模式 " ( 第 163 頁) 。 Off (關) 系統不會自動進入睡眠模式。 5 minutes 5 分鐘之後進入睡眠模式 (5 分鐘) 10 minutes 10 分鐘之後進入睡眠模式 (10 分鐘) 15 minutes 15 分鐘之後進入睡眠模式 (15 分鐘) 選單項目的初期預設標有下線。 提示 於進行以下操作時,Auto Sleep (自動睡眠)功能可能會暫時失效: – 連接交流電轉換器時 –...
-
Page 229: Sound Settings (聲音設定
Sound Settings (聲音設定) 您可關閉按鍵音並限制音量。 AVLS(Automatic Volume Limiter System:自動音 量限制系統) 您可設定最大音量,如此能避免聲音自耳機漏出,且降低您在戴上耳機 時,因聽不見周圍聲音而遭遇危險的機率。 Off (關) 不設定任何限制;允許手動調整音量 On (開) 設定音量限制 選單項目的初期預設標有下線。 Key Tone (按鍵音) 您可關閉按鍵音 (您按下按鈕時的確認聲音) 。 Off (關) 不要製造確認聲音 On (開) 製造確認聲音 選單項目的初期預設標有下線。 Sound Settings (聲音設定)... -
Page 230: Security Settings (安全性設定
Security Settings (安全性設定) 您可調整 PSP™ 主機安全性功能的相關設定。 Change Password (變更密碼) 變更四位數的密碼。於進行以下操作時,您需要輸入這個密碼。 • 變更"Parental Control Level (視聽年齡限制) "或"Internet Browser Start Control (網路瀏覽介面控制台)" 的設定。 • 播放內具 "Parental Control Level (視聽年齡限制)" 的 UMD™。 • 當 "Internet Browser Start Control (網路瀏覽介面控制台)" 設定 為 "On (開)",卻要開啟瀏覽介面時。 •... - Page 231 Parental Control Level (視聽年齡限制) 某些 UMD™ 軟件會因為內容需要,而被事先設定視聽年齡限制。您可設 定主 機的視聽年 齡限制,以禁止 主機播放一 些等級高於 主機設定的 UMD™。 Parental Control Level (視聽年齡限制) 您可關閉主機的視聽年齡限制或自 11 種等級中,挑選適切的等級完成設 定。 Off (關) 關閉視聽年齡限制 11-1 設定視聽年齡限制。"1" 為最嚴格,"11" 則最為寬鬆緩和。 選單項目的初期設定為 "9"。 PSP™ 主機與 UMD™ 兩者之視聽年齡限制的結合將決定是否可播放該張 UMD™。兩者造成的組合請參閱下表。 範例:若主機的視聽年齡限制為 "9",則等級設定為 "1" 至 "9" 的 UMD™ 即可於主機上播放。...
- Page 232 遊戲的視聽年齡限制 若欲了解遊戲分級的相關資訊,請聯絡保證書上記載的 PSP™ 消費者服 務中心,以取得必要協助。 提示 • 您可進入 UMD™ 選項選單的 "Information(資訊)",確定該張 UMD™ 的視聽年齡 限制。若該張 UMD™ 並未設定視聽年齡限制,則 "Information (資訊)" 的 "Parental Control (視聽年齡限制)" 會顯示 " - "。 • 受視聽年齡限制的 UMD™ 會顯示 Internet Browser Start Control (網路瀏覽介面 控制台) 您可限制網路瀏覽介面的使用。 Off (關) 允許開啟網路瀏覽介面。 On (開)...
-
Page 233: Usb Connection (Usb 連接
USB Connection (USB 連接) 您可使用市售的 USB 連接線將檔案從電腦傳送至 PSP™ 主機的 Memory Stick Duo™。但能播放的檔案仍限於主機可支援的檔案格式。 PSP™ 主機可使用的 USB 連接線 需使用對應 Mini-B 5pin (迷你 B 5pin)類型連接端的 USB 連接線來連 接主機。 提示 您可連接安裝 Windows® XP 或 Mac OS X 等平台,支援 USB 大容量資料庫的電腦。 使用 USB 連接線連接主機與電腦 您不須關閉電源,即可使用 USB 連接線連接主機與電腦。 用... - Page 234 進入自家選單的 後,按下 按鈕。 電腦會主動偵測插入主機的 Memory Stick Duo™。 重要 請勿在電腦上進行 Memory Stick Duo™ 的格式化, 否則主機可能會出現無法辨識的 異常。 USB Connection (USB 連接) ,選擇 (USB Connection:USB 連接)...
-
Page 235: Network Settings (網路設定
Network Settings (網路設定) 您可調整網路設定以連線至無線區域網路 (WLAN) 。本機具備兩種 WLAN 模式。 警告 當您進入擁擠的火車等擁擠的場所時,請關閉無線 LAN。否則主機發出的 無線電波可能會對附近的人使用之心律調整器造成不良影響。 Ad Hoc Mode (Ad Hoc 模式) 在此模式中,您可直接與其他 PSP™ 主機通訊。若要建立 Ad Hoc 模式的 通訊連線,兩部 PSP™ 皆必須設定為 "Automatic (自動)" 或設定為相 同的頻道。詳細請參閱 Ad Hoc 模式對應軟件附帶的說明書。 透過 WLAN 與其他 PSP™ 主機通訊 Automatic (自動) 自動切換為最佳的通訊頻道... - Page 236 需要準備的物品 以下為設定主機的網路連線設定與進行網路更新時,必須事先準備的物 品。 • 加入網路服務商的服務 • DSL 或纜線數據機等網路裝置 • WLAN (無線基地台)或無線寬頻路由器 (router) • 一部電腦 • 基地台 (SSID、WEP 鍵、WPA 鍵等特定基地台)的設定 提示 • 基地台是用來連線無線網路的裝置。 • SSID、 WEP 與 WPA 鍵是一種無線網路資訊的類型。 連線至無線基地台或路由器時可 能需要使用。此類資訊一般皆是於使用電腦設定無線基地台或路由器時輸入。詳 細請參閱無線基地台或路由器附帶的說明書。 網路設定範例 網路連線設備與設定方法可能會因使用裝備而有所不同。 透過無線基地台 連接網路 建立新的網路連線 您可調整網路設定以連線至無線基地台並將網路連線資料保存至主機 内。最多可以保存 10 組連線資料。 進入自家選單的...
- Page 237 選擇 "Infrastructure Mode (基礎建設模式)" 後,按下 鈕。 選擇 "New Connection (新連線)" 後,按下 輸入網路連線的名稱。 在您按下 按鈕時,螢幕上會顯示一個鍵盤 ( 您輸入名稱。您可選擇您喜歡的網路連線名稱。 設定值輸入完成後,按下方向按鈕右,進入下一個畫面。 設定基地台的 SSID。 這是用來輸入下一頁列出之設定資訊的畫面。詳細請參閱無線基地 台或路由器附帶的說明書。 按鈕。 第 245 頁) ,讓 Network Settings (網路設定) 按...
- Page 238 Scan (掃描) Enter Manually (手動輸入) 設定值輸入完成之後,按下方向按鈕右,進入下一個畫面。 輸入基地台的加密資訊。 您可設定以下選項。若對您網路的必須資訊有任何疑問時,請聯絡 網路服務商。 None (無) WPA-PSK (TKIP) * 無論您輸入何種記號,WEP 與 WPA 鍵的位置皆只會顯示八位數的星號。 設定完成後,請按下方向按鈕之右,以進入下一個畫面。 Network Settings (網路設定) 掃描附近的無線基地台並顯示 SSID。 允許用戶使用鍵盤輸入 SSID。 若您知道基地台之 SSID 時, 請選擇此選項。 不設定加密資訊。 設定加密資訊。請按下右按鈕,移動更換 WEP 或 WPA 鍵 的輸入畫面。 *...
- Page 239 選擇位址設定方式。 此畫面可選擇下面列示的設定。大部分家用網路皆可讓您使用 "Easy (簡易)" 設定 (建議使用的設定)中顯示的設定。 會自動設定下列資訊。 - IP address settings: Automatic (IP 位址設定: 自動) Easy (簡易) - DNS settings: Automatic (DNS 設定:自動) - Proxy server: Do Not Use (代理伺服器:不使用) - 網路瀏覽介面:不開啟 您可手動輸入使用固定 IP 網路等詳細設定。 詳細請參閱網 Custom (自訂) 路裝置附帶的說明書或您的網路服務商提供的資訊。 設定值選擇完畢之後,按下方向按鈕右,進入下一個畫面。 檢查設定。...
- Page 240 (個人設定)",並將 "Internet Browser (網路瀏覽介面)" 設定為 "Start (開啟)"。當遇到需透過要求於瀏覽介面執行登入的熱點遊玩線上遊戲等情形 時,請選擇此項設定。 • 您可能會因無線基地台的設定問題,而需要輸入主機的 MAC 位址以連接網路。您 可進入 "System Information (系統資訊)" ( 位址。 關於 DNAS Sony Computer Entertainment Inc. 採 用 DNAS (Dynamic Network Authentication System),可幫助保護著作權與 PSP™ 主機與網路連線 時的加密性。DNAS 可能會為了認證、著作權保護、帳戶阻斷、系統、規 則或遊戲管理以及其他目的而自動從用戶的硬件與軟件擷取資訊。這些 被擷取的資訊並不具足以識別個人的性質。各種未經認可的傳遞、公開 展示、以及企圖破解認證程序的程式與裝置的進出口以及傳遞皆可能為 法律所嚴禁。 Network Settings (網路設定)...
- Page 241 網路設定選項選單 當選項選單顯示在 Infrastructure Mode (基礎建設模式)中時,您可 編輯或刪除保存於主機的網路連線。 進入自家選單的 定)後,按下 按鈕。 選擇 "Infrastructure Mode (基礎建設模式)" 後,按下 鈕。 選擇連線後,按下 顯示下列的項目。請選擇您想執行的作業後,按下 Edit (編輯) 將網路連線設定的變更內容保存至主機 Test Connection 測試與無線基地台間的連線 (測試連線) Delete (刪除) 刪除網路連線 Information 顯示網路連線的相關資訊 (資訊) * 詳細的操作說明,請參閱 " 建立新的網路連線 " ( ,選擇 (Network Settings:網路設 按鈕。 Network Settings (網路設定)...
-
Page 242: Network Update (網路更新
Network Update (網路更新) 您可使用 Network Update (網路更新)功能來更新 PSP™ 主機的系統軟 件。 若您想了解更新的詳細資訊,請參閱 "PSP 更新 " ( 若欲取得最新的更新情報,請瀏覽以下網站 http://www.sceh.com.hk (香港、東南亞) http://www.sceh.com.tw (台灣) 網路更新程序 連接網路 利用 LAN 基地台開始連線。 開啟 PSP™ 主機左側的無線 LAN 按鈕 下載 (接收資料) 從網路下載更新資料。更新資料會被保存至插入主機的 Memory Stick Duo™。 更新 (軟件更新) 使用保存於 Memory Stick Duo™ 的資料,更新系統軟件。 重要... - Page 243 開始網路更新 您可使用無線基地台連接網路來下載更新資料。 開始前,請先確定電池是否已經充飽電。 將 Memory Stick Duo™ 插入 PSP™ 主機。 將交流電轉換器連接至主機。 即使您已下載了更新資料,若不連接交流電轉換器仍無法開始更新 作業。 進入自家選單的 後,按下 按鈕。 選擇連線後,按下 主機將利用無線基地台連線至網路。若您並未建立並保存網路連線 設定,請選擇 "New Connection (新連線)" 後按下 啟設定畫面 ( 第 236 頁) 。 下載更新資料。 連線至網路時,主機會自動掃描最新的更新資料。請遵循畫面指 示,下載資料並開始更新。 提示 更新完成後,您即可從 Memory Stick Duo™ 刪除更新資料。 網路更新選項選單 顯示選項選單後,您可編輯或刪除保存於主機的網路連線。 進入自家選單的...
- Page 244 Delete (刪除) Information(資訊) 顯示網路連線的相關資訊 * 詳細的操作說明,請參閱 " 建立新的網路連線 " ( Network Update (網路更新) 刪除網路連線 第 236 頁) 。...
-
Page 245: 如何使用鍵盤
如何使用鍵盤 您可使用畫面上顯示的鍵盤來輸入文字,以替 PSP™ 主機輸入 Nickname (暱稱) ,或輸入網路設定資訊等。 功能按鈕 字母表 / 符號按鈕 控制介面項目一覽表 各鍵的顯示與否將會因文字輸入狀況而異。 鍵盤按鈕 功能 輸入一個空格 開啟網路瀏覽介面之位址輸入視窗時,將會顯示之前曾 輸入之位址。但唯有當輸入模式設定為 "Web address shortcuts (網址捷徑列)" 時,始會顯示位址。 確認已經鍵入但尚未輸入的字元後,離開鍵盤。 取消已經鍵入但尚未輸入的字元後,離開鍵盤。 移動游標 刪除游標左邊的字元 顯示主機之按鈕與其可執行的功能 大小寫的更換 改行、移至下一行的開始位置 文字輸入欄位 (輸入 游標 字元時顯示字元) 輸入模式顯示 輸入文字選項 如何使用鍵盤... - Page 246 切換輸入模式 輸入模式的編號可能會因選擇語言而有所不同。每次您按下 SELECT (選 擇)按鈕,都會依照下列順序變更輸入模式。 輸入模式顯示 提示 畫面鍵盤的設定語言乃與 System Settings(系統設定)時選擇的 System Language (系統語言)共通 ( 文,則此時會顯示日文鍵盤。 輸入字元 以下便以 "PLAY" 為範例,說明如何輸入文字。 選擇 PQRS7,並按下 您每按下一次 選擇 JKL5,並按下 選擇 ABC2,並按下 選擇 WXYZ9,並按下 選擇 Enter 後,按下 確認您輸入的字元後,再度選擇 Enter,並按下 提示 於輸入字元時選擇 a/A 鍵,可選擇大小寫的更換。 如何使用鍵盤 輸入模式 您可輸入的字元範例 字母與數字...
-
Page 247: 其他資訊
其他資訊 PSP™ 更新 更新 PSP™ 主機的系統軟件後,您可改變或追加機能。 您可透過下列任何一種方式,取得更新資料。 • 網路更新 • 使用電腦更新 • 使用 UMD™ 更新 選擇最適合您的更新方法。若欲取得最新的更新情報,請瀏覽以下網站: http://www.sceh.com.hk (香港、東南亞) http://www.sceh.com.tw (台灣) 網路更新 使用 PSP™ 主機的無線網路功能執行更新。詳細說明請參閱 "Network Update (網路更新)" ( 使用電腦更新 使用電腦透過網路下載更新資料。詳細說明請瀏覽以下網站: http://www.sceh.com.hk (香港、東南亞) http://www.sceh.com.tw (台灣) 1 取得更新資料。 2 使用更新資料, 覆寫 PSP™ 主機的系統 軟件。... - Page 248 使用 UMD™ 更新 您可使用內含更新資料的 UMD™ 執行更新。 開始前,請先確定電池是否已經充飽電。 重要 更新時: – 請勿取出 UMD™ – 請勿關閉主機電源 – 請勿拔下交流電轉換器 若更新被中斷,可能會導致系統軟件受損。 將交流電轉換器連接至 PSP™ 主機。 若沒有連接交流電轉換器將無法開始更新作業。 插入內含更新資料的 UMD™。 於自家選單之 選擇 後,按下 開始更新。請遵循畫面指示,完成更新。 確定更新是否已經成功 若 「System Information (系統資訊) 」( Software (系統軟件) 」項目已可顯示更新資料的版本序號,即代表更 新已經正確完成。 PSP™ 更新 下,顯示了更新資料的圖示與版本序號。 按鈕。...
-
Page 249: 相容媒體
相容媒體 PSP™ 主機可使用下列的媒體。 於本說明書中,"Memory Stick Duo™" 一詞乃包括了所有以下列出的 Memory Stick™ 媒體。 類型 UMD™ Memory Stick Duo™ (不支援 MagicGate™) MagicGate™ Memory Stick Duo™ Memory Stick Duo™ (支援 MagicGate™) *1 *2 Memory Stick PRO Duo™ *1 支援 MagicGate™ *2 支援平行資料傳輸 (高速資料傳輸) 。 實際傳輸速度會因您使用的 Memory Stick Duo™... - Page 250 Memory Stick™ 共有兩種尺寸:標準尺寸與較小的尺寸。PSP™ 主機乃 支援較小尺寸類型的 Memory Stick Duo™。本主機無法使用標準尺寸的 Memory Stick™。 Memory Stick Duo 專用轉接卡 使用 Memory Stick Duo 專用轉接卡(型號 : MSAC-M2。 需另行選購之 Sony 產品)後,您即可於僅對應標準尺寸之裝置使用 Memory Stick Duo™。 支援 MagicGate 的 Memory Stick Duo™ 為能透過瞬間的碰觸,與標準尺寸的 Memory Stick Duo™ 有所區別,支 援 MagicGate 的 Memory Stick Duo™ 有一道凹凸設定 (圖 A) 。...
- Page 251 可播放的檔案 您可使用 PSP™ 主機播放下列類型的檔案 : 內容種類 檔案類型 -MP4 (video codecs for video files that conform to the 影像 Memory Stick™ video file format are MPEG-4 or AVC) -Memory Stick™ audio file format (ATRAC3™/ ATRAC3plus™) -MP3 音樂 -MP4 (the audio codec for MP4 format audio files is MPEG-4 AAC) -WAV (Linear PCM)...
- Page 252 規格 本公司保留在没有事先通知情況下,變更設定或規格之權利。 PSP™ (PlayStation 液晶畫面 聲音 內藏光碟機 介面 相容 codec 電源 電池電力使用時間 規格 Portable) ® 4.3 英吋 (16:9)全透明型 TFT 驅動 約可顯示 1,677 萬色 立體聲喇叭 唯讀 UMD™ 光碟機 DC IN 5V 電源端子 充電端子 耳機 / 麥克風連接端 紅外線連接埠 高速 USB 連接埠 DC OUT 端子 Memory Stick Duo™...
- Page 253 最大耗電量 約 6 W (充電時) 約 170 × 74 × 23 mm / 6 外觀尺寸 深) (最大凸出部分除外) 重量 約 280g (包含電池組) 操作溫度 5°C - 35°C/41°F - 95°F UMD™ 雷射 波長 655-665 nm 能量 最大 0.28 mW 類型 半導體,連續性 無線網路 標準 IEEE 802.11b 128-bit/64-bit 調整格式...
- Page 254 內容 請參閲第 149 頁 x Memory Stick Duo™ 可相容之 Memory Stick Duo™: • 支援 MagicGate™ • 可執行平行資料傳輸(高速資料傳輸) 。此類高速資料傳輸只可搭配相 容裝置使用。實際傳輸速度會因您使用的裝置而有所不同。 • 可用容量分為玩者實際可使用的容量以及為系統檔案預留的必要容 量。本產品之玩者實際可使用容量約為 30 MB。 軟件 Software developed by the NetBSD Foundation, Inc. and its contributors is used for the communication functions of this product.
- Page 255 Permission to use, copy, modify, distribute, and sell this software and its documentation for any purpose is hereby granted without fee, provided that (i) the above copyright notices and this permission notice appear in all copies of the software and related documentation, and (ii) the names of Sam Leffler and Silicon Graphics may not be used in any advertising or publicity relating to the software without the specific, prior written permission of Sam Leffler and Silicon...
- Page 256 " " 為 Sony Computer Entertainment Inc. 之註冊商標。" " 和 "UMD" 則為該公司之商標。 " " 和 "XMB" 為 Sony Corporation 與 Sony Computer Entertainment Inc. 之商標。 "SONY" 為 Sony Corporation 之註冊商標。" " 則為該公司之商標。 "Memory Stick Duo"、"Memory Stick PRO Duo"、 "Memory Stick"、...
-
Page 257: 故障檢修
故障檢修 在使用 PSP™ 主機時,如果操作上遭遇到困難,請閱讀下面的文章,以 便找到問題的可能原因。如果仍無法解決問題,請聯絡保證書上記載的 PSP™ 消費者服務中心。 電源、電池以及充電 無法接通電源。 , 確認電池已經充電 ( , 確認電池組是否已正確安裝 ( 無法替電池充電 , 或無法充飽電。 , 確認交流電轉換器與交流電源線是否已正確插入主機與電源插座。 , 確認充電時並未使用 WLAN 功能。使用 WLAN 功能時無法替電池充電。 , 確認是否使用正確的交流電轉換器。 , 確認交流電轉換器連接端是否乾淨。若出現污痕,請使用乾淨軟布 輕柔擦拭。 , 若在極冷的場所充電,可能會需要較長的時間才能替電池充飽電。 , 電池組可能已經故障。請嘗試選用 PSP™ 主機專用的電池組。 電池無法持久。 , 若在極熱或極冷的場所使用本主機,電池可能無法持久。請嘗試避 免在類似這樣的環境中使用本主機。... - Page 258 關閉主機後,仍舊會繼續消耗電池電力。 , 即使關閉主機的電源,仍會繼續消耗電池,因此建議您經常替電池 充電。 畫面 畫面突然變暗。 , 確認 Backlight Auto-Off (自動關閉背光燈)的設定。若設定為開 啟,背光燈將會於到達設定時間後自動關閉。請按下主機的任何一 個按鈕,再度開啟背光燈 ( , 確認 Auto Sleep (自動睡眠)的設定。若設定為開啟,畫面將會於 到達設定時間後自動變暗 ( 畫面晦暗且甚難辨識。 , 畫面可能會因觀看角度而出現忽然變暗的現象。請使用主機前面的 顯示按鈕,調整畫面的亮度 ( 畫面上出現黑點、紅點、藍點與綠點且不會消失。 , 液晶畫面係使用高精密度的技術製造,但仍可能會於某些情況下, 於螢幕上殘存黑點或紅點、藍點、綠點等亮點。此非故障,詳細請 參閱 " 使用前須知事項 " ( 畫面顏色顯示不正確。 , 若 "Theme (主題)" 設定為 "Original (原始設定)",背景顏色會 於每月的第一天自動改變...
- Page 259 , 請參閱 " 無聲或音質低劣 " 的說明 ( 無法提高音量。 , 確認 AVLS(Automatic Volume Limiter System: 自動音量限制系統) 功能是否關閉。AVLS (Automatic Volume Limiter System:自動音 量限制系統)功能開啟時,會限制耳機的最高音量 ( 音質低劣。 , 若在出現震動或是靠近電視機等具有強力電磁波之物體的場所使用 本主機,聲音可能會失真且增加背景雜音。請嘗試前往其他場所使 用。 UMD™ 主機無法辨認 UMD™。 , 確認是否已正確插入 UMD™ (標籤面朝向主機後方) 。請嘗試取出 UMD™ 並重新插入。 , 確認 UMD™ 的記錄面是否乾淨。若出現污痕,請使用乾淨軟布輕柔擦 拭...
- Page 260 主機無法辨識 Memory Stick Duo™。 , 主機可能無法辨識利用電腦進行格式化的 Memory Stick Duo™。 在將 重要檔案拷貝至您的電腦後, 請使用主機替此片 Memory Stick Duo™ 重新格式化。詳細請參閱 "Format Memory Stick™(Memory Stick™ 格式化)" ( , 確認是否已正確插入Memory Stick Duo™。 請嘗試取出Memory Stick Duo™ 並重新插入。 , 確認 Memory Stick Duo™ 連接端子是否乾淨。 若出現污痕, 將無法正 確讀取資料,請使用乾淨軟布輕柔擦拭。 主機無法保存或載入資料。 , 確認...
- Page 261 音樂 無法播放音樂。 , 有播放期限或播放次數限制的音軌可能無法在本主機上播放。 , 播放 ATRAC3plus™ 資料時,必須使用與著作權保護功能相容的軟件 將資料傳送至 Memory Stick Duo™ ( 無法播放其他群組的音軌。 , 確認 Group Mode (群組模式)功能是否已經關閉。若開啟此功能, 將只能播放一個群組內的音軌。 主機無法辨識音樂資料。 , 確認音樂資料是否被正確地保存於 Memory Stick Duo™ 的資料夾中 ( 第 202 頁) 。 , 音樂資料的檔案格式與主機不相容時,便無法正確辨識。 ( 第 251 頁) 。 無法刪除 Memory Stick Duo™ 的群組。 , 若該群組含有非音樂的資料,便無法刪除該群組。...
- Page 262 無法刪除 Memory Stick Duo™ 的資料夾。 , 若該群組含有非圖像的資料,便無法刪除該群組。 網路 無法建立連線。 , 確認主機左側的無線 LAN 按鈕是否已經開啟 ( , 將 WLAN Power Save (無線區域網路省電功能)模式設定為 Off (關 閉) ( 第 228 頁) ,讓主機以最大電力進行連線通訊。 , 主機與基地台或主機與其他玩家之間的距離太遠。 , 確認網路連線設定( 帶的使用說明書或透過您的網路服務商,建立正確的網路連線設定。 , 您可能會因基地台的設定問題而需要輸入主機的 MAC 位址 ( 第 224 頁) 。 , 當透過...
- Page 263 其他問題 主機或交流電轉換器很熱。 , 使用時主機或交流電轉換器可能會變熱。並非故障。 已打開主機電源卻無法操作。 , 確認主機是否設定為 hold (固定)模式。若是的話,請向上滑動 POWER (電源)/HOLD (固定)按鈕以解除 hold (固定)模式 ( 第 166 頁) 。 , 嘗試向上滑動 POWER (電源)/HOLD (固定)按鈕並按住不動,直到 POWER (電源)指示燈熄滅,主機完全關閉後再打開主機。 無法正確操作主機。 , 靜電或其他類似情況可能影響主機操作。請取出電池組與交流電轉 換器,約等待 30 秒鐘後重新打開主機。 按下按鈕時,沒有發出按鍵音。 , 確認 Key Tone (按鍵音)功能是否已經開啟 ( 日期與時間被重新設定。 , 若電池沒有充電且電力耗盡,或是更換了電池組,主機的日期與時間...
-
Page 264: 維修責任
維修責任 請參考記載了各地區特定維修責任之相關資訊的附帶文件。 維修責任... - Page 268 © 2005 Sony Computer Entertainment Inc. All rights reserved. Printed in Japan...