Table of Contents
Advertisement
Advertisement
Chapters
Table of Contents

Related Manuals for Cisco CMX 3375


Summary of Contents for Cisco CMX 3375
- Page 1 Cisco 3375 Appliance for Cisco Connected Mobile Experiences Installation Guide First Published: 2019-01-04 Americas Headquarters Cisco Systems, Inc. 170 West Tasman Drive San Jose, CA 95134-1706 http://www.cisco.com Tel: 408 526-4000 800 553-NETS (6387) Fax: 408 527-0883...
- Page 2 Any use of actual IP addresses or phone numbers in illustrative content is unintentional and coincidental. Cisco and the Cisco logo are trademarks or registered trademarks of Cisco and/or its affiliates in the U.S. and other countries. To view a list of Cisco trademarks, go to this URL: www.cisco.com trademarks.
- Page 3 This topic shows the external features of the Cisco 3375 Appliance for Cisco Connected Mobile Experiences. Cisco CMX 3375 appliance (SFF Drives) Front Panel Features The following figure shows the front panel features of the small form-factor drive versions of the Cisco CMX 3375 appliance.
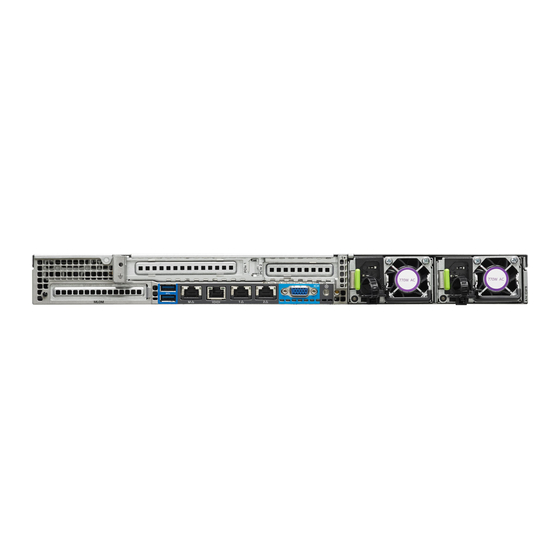
- Page 4 VGA, one DB-9 serial, and two USB connectors) Power supply status LED Cisco CMX 3375 appliance Rear Panel Features The rear panel features are the same for all versions of the Cisco CMX 3375 appliance. For definitions of LED states, see Rear-Panel LEDs, on page...
- Page 5 Serial port (RJ-45 connector) Status LEDs and Buttons This section describes the location and meaning of LEDs and buttons and includes the following topics: Front-Panel LEDs Figure 3: Front Panel LEDs Cisco 3375 Appliance for Cisco Connected Mobile Experiences Installation Guide...
- Page 6 • Green—The server is in main power mode. Power is supplied to all server components. Unit identification • Off—The unit identification function is not in use. • Blue, blinking—The unit identification function is activated. Cisco 3375 Appliance for Cisco Connected Mobile Experiences Installation Guide...
- Page 7 • Green—The server is operating at normal temperature. • Amber, steady—One or more temperature sensors breached the critical threshold. • Amber, blinking—One or more temperature sensors breached the non-recoverable threshold. Cisco 3375 Appliance for Cisco Connected Mobile Experiences Installation Guide...
- Page 8 • Green—Link is active. • Green, blinking—Traffic is present on the active link. Rear unit identification • Off—The unit identification function is not in use. • Blue, blinking—The unit identification function is activated. Cisco 3375 Appliance for Cisco Connected Mobile Experiences Installation Guide...
- Page 9 (for example, over-current, over-voltage, or over-temperature failure). Internal Diagnostic LEDs The Cisco CMX 3375 appliance has internal fault LEDs for CPUs, DIMMs, and fan modules. Figure 5: Internal Diagnostic LED Locations Cisco 3375 Appliance for Cisco Connected Mobile Experiences Installation Guide...
- Page 10 There is the danger of explosion if the battery is replaced incorrectly. Replace the battery only with the same or equivalent type recommended by the manufacturer. Dispose of used batteries according to the manufacturer’s instructions. Statement 1015 Cisco 3375 Appliance for Cisco Connected Mobile Experiences Installation Guide...
- Page 11 Serviceable Component Locations This topic shows the locations of the field-replaceable components and service-related items. The view in the following figure shows the Cisco CMX 3375 appliance with the top cover removed. Cisco 3375 Appliance for Cisco Connected Mobile Experiences Installation Guide...
- Page 12 Overview Serviceable Component Locations Figure 6: Cisco CMX 3375 appliance, Serviceable Component Locations Front-loading drive bays 1–10 support SAS/SATA Power supplies (hot-swappable when redundant as drives. 1+1) Cooling fan modules (seven, hot-swappable) Trusted platform module (TPM) socket on motherboard (not visible in this view)
- Page 13 Overview Serviceable Component Locations Internal USB 3.0 port on motherboard Micro-SD card socket on PCIe riser 1 RTC battery, vertical socket Cisco 3375 Appliance for Cisco Connected Mobile Experiences Installation Guide...
- Page 14 Overview Serviceable Component Locations Cisco 3375 Appliance for Cisco Connected Mobile Experiences Installation Guide...
-
Page 15: Table Of Contents
C H A P T E R Installation and Initial Configuration This chapter describes how to initially install and configure your Cisco 3375 Appliance for Cisco Connected Mobile Experiences. This chapter contains these sections: • Rack Warnings, on page 13 •... -
Page 16: Unpacking And Inspecting The Cisco Cmx 3375
To unpack the Cisco CMX 3375 appliance, follow these steps. Before you begin When handling internal Cisco CMX 3375 appliance components, wear an ESD strap and handle modules by the carrier edges only. Step 1 Remove the Cisco CMX 3375 appliance from its cardboard container and save all packaging material. - Page 17 No additional spacing between the servers is required when you mount the units using rail kits. Cisco 3375 Appliance for Cisco Connected Mobile Experiences Installation Guide...
- Page 18 Caution Avoid uninterruptible power supply (UPS) types that use ferroresonant technology. These UPS types can become unstable with systems such as the Cisco UCS, which can have substantial current draw fluctuations from fluctuating data traffic patterns. When you are installing a server, use the following guidelines: •...
-
Page 19: Installing The Cisco Cmx 3375 In A Rack
• The total length of the server including the CMA is 35.2 inches (894 mm). Installing the Cisco CMX 3375 in a Rack This section describes how to install the server in a rack using the rack kits that are sold by Cisco. Warning To prevent bodily injury when mounting or servicing this unit in a rack, you must take special precautions to ensure that the system remains stable. - Page 20 Slide the inner-rail release clip toward the rear on both inner rails, and then continue pushing the server into the rack until its front slam-latches engage with the rack posts. Cisco 3375 Appliance for Cisco Connected Mobile Experiences Installation Guide...
- Page 21 With the server pushed fully into the rack, slide the CMA tab of the CMA arm that is farthest from the server onto the end of the stationary slide rail that is attached to the rack post. Slide the tab over the end of the rail until it clicks and locks. Cisco 3375 Appliance for Cisco Connected Mobile Experiences Installation Guide...
- Page 22 Pivot the tab that is at the end of the width-adjustment slider. Depress and hold the metal button on the outside of the tab and pivot the tab 180 degrees so that it points toward the rear of the server. Cisco 3375 Appliance for Cisco Connected Mobile Experiences Installation Guide...
-
Page 23: Initial Setup
Metal button on outside of tab Initial Setup Note This section describes how to power on the Cisco CMX 3375 appliance, assign an IP address, and connect to server management when using the device in standalone mode. Server Default Settings The Cisco CMX 3375 appliance is shipped with these default settings: •... - Page 24 Connect a USB keyboard and VGA monitor to the server using one of the following methods: • Connect an optional KVM cable (Cisco PID N20-BKVM) to the KVM connector on the front panel. Connect your USB keyboard and VGA monitor to the KVM cable.
- Page 25 Allow your preconfigured DHCP server to assign an IP address to the server node. Step 4 Use the assigned IP address to access and log in to the Cisco IMC for the server node. Consult with your DHCP server administrator to determine the IP address.
- Page 26 In this NIC mode, DHCP replies are returned to both the shared LOM ports and the Cisco card ports. If the system determines that the Cisco card connection is not getting its IP address from a Cisco UCS Manager system because the server is in standalone mode, further DHCP requests from the Cisco card are disabled.
- Page 27 • None (default)—The Ethernet ports operate independently and do not fail over if there is a problem. This setting can be used only with the Dedicated NIC mode. • Active-standby—If an active Ethernet port fails, traffic fails over to a standby port. Shared LOM and Cisco Card modes can each use either Active-standby or Active-active settings.
-
Page 28: Nic Modes
What to do next Use a browser and the IP address of the Cisco IMC to connect to the Cisco IMC management interface. The IP address is based upon the settings that you made (either a static address or the address assigned by your DHCP server). - Page 29 Click Map CD/DVD and select image from your local folder. Step 16 In the KVM, use the Power option to power on the Cisco CMX 3375 Appliance. Step 17 After the appliance is rebooted, press F6 to enter Boot Menu.
-
Page 30: Updating The Bios And Cisco Imc Firmware
Step 20 Click Proceed with install. Wait for 20 to 30 minutes for copying CMX file. The system is rebooted after the file is copied. The system is loaded with Centos 7. Cisco CMX welcome window is displayed. Updating the BIOS and Cisco IMC Firmware... -
Page 31: Serial Over Lan
SOL is enabled by default. The convention is to use the KVM console and/or the CIMC console with SOL to access the console of the Cisco CMX 3375 appliance. If you choose to use the physical serial cable connection on the appliance (either the RJ-45 serial connector on the rear or the DB-9 connection via the KVM cable on the front), the terminal output might not display correctly. -
Page 32: Smart Access Usb
• The front-panel KVM connector has been designed to switch the USB port between Host OS and BMC. • Smart Access USB can be enabled or disabled using any of the BMC user interfaces. For example, you can use the Cisco IMC Configuration Utility that is accessed by pressing F8 when prompted during bootup. - Page 33 • Disabled: the front-panel USB device is connected to the host. • In a case where no management network is available to connect remotely to Cisco IMC, a Device Firmware Update (DFU) shell over serial cable can be used to generate and download technical support files to the USB device that is attached to front panel USB port.
- Page 34 Installation and Initial Configuration Smart Access USB Cisco 3375 Appliance for Cisco Connected Mobile Experiences Installation Guide...
- Page 35 Preparing For Cisco CMX 3375 appliance Component Installation, on page 35 Replacing Power Supplies The Cisco CMX 3375 appliance can have one or two power supplies. When two power supplies are installed they are redundant as 1+1. Cisco Cisco CMX 3375 appliance ships with two power supplies. A replacement power supply can be obtained from Cisco to replace a failed power supply.
- Page 36 Caution After a Cisco CMX 3375 appliance is shut down to standby power, electric current is still present in the server. To completely remove power as directed in some service procedures, you must disconnect all power cords from all power supplies in the Cisco CMX 3375 appliance.
- Page 37 Maintaining the Cisco 3375 Appliance for Cisco Connected Mobile Experiences Preparing For Cisco CMX 3375 appliance Component Installation PreparingForCiscoCMX3375applianceComponentInstallation This section includes information and tasks that help prepare the Cisco CMX 3375 appliance for component installation. Required Equipment For Service Procedures The following tools and equipment are used to perform the procedures in this chapter: •...
- Page 38 Maintaining the Cisco 3375 Appliance for Cisco Connected Mobile Experiences Serial Number Location Figure 14: Removing the Top Cover Top cover Locking cover latch Serial number label location Serial Number Location The serial number for the server is printed on a label on the top of the server, near the front. See...
- Page 39 Maintaining the Cisco 3375 Appliance for Cisco Connected Mobile Experiences Hot Swap vs Hot Plug • SAS/SATA hard drives • SAS/SATA solid state drives • Cooling fan modules • Power supplies (when redundant as 1+1) • Hot-plug replacement—You must take the component offline before removing it for the following component: •...
- Page 40 Maintaining the Cisco 3375 Appliance for Cisco Connected Mobile Experiences Hot Swap vs Hot Plug Cisco 3375 Appliance for Cisco Connected Mobile Experiences Installation Guide...
- Page 41 Server with slide rail: 31.0 in (787.4 mm) Weight Maximum: 37.5 lb. (17.0 Kg) Minimum: 29.0 lb. (13.2 Kg) Environmental Specifications The following table lists the environmental requirements and specifications for the Cisco CMX 3375. Cisco 3375 Appliance for Cisco Connected Mobile Experiences Installation Guide...
- Page 42 The power specifications for the supported power supply options are listed in the following sections. 770 W AC Power Supply This section lists the specifications for each 770 W AC power supply (Cisco part number UCSC-PSU1-770W). Table 5: 770 W AC Specifications...
- Page 43 Climate Savers Platinum Efficiency (80Plus Platinum certified) Form factor RSP2 Input connector IEC320 C14 1050 W AC Power Supply This section lists the specifications for each 1050 W AC power supply (Cisco part number UCSC-PSU1-1050W). Table 6: 1050 W AC Specifications Description Specification AC Input Voltage Nominal range: 100–120 VAC, 200–240 VAC...
- Page 44 Climate Savers Platinum Efficiency (80Plus Platinum certified) Form factor RSP2 Input connector IEC320 C14 1600 W AC Power Supply This section lists the specifications for each 1600 W AC power supply (Cisco part number UCSC-PSU1-1600W). Table 7: 1600 W AC Specifications Description Specification AC Input Voltage Nominal range: 200–240 VAC...
- Page 45 Length (Feet) (Meters) CAB-48DC-40A-8AWG 11.7 DC power cord, -48 VDC, 40 A, 8 AWG Three-socket Mini-Fit connector to three-wire CAB-C13-C14-AC AC power cord, 10 A; C13 to C14, recessed receptacle Cisco 3375 Appliance for Cisco Connected Mobile Experiences Installation Guide...
- Page 46 AC cabinet jumper power cord, 250 V, 10 A, C13 to C14 CAB-9K10A-AU AC power cord, 250 V, 10 A, 3112 plug, Australia CAB-N5K6A-NA AC power cord, 200/240 V, 6 A, North America Cisco 3375 Appliance for Cisco Connected Mobile Experiences Installation Guide...
- Page 47 AC power cord, NEMA L6-20 to C13 connectors CAB-9K10A-IT AC power cord, 250 V, 10 A, CEI 23-16/VII plug Italy R2XX-DMYMPWRCORD No power cord; PID option for ordering server with no power cord Cisco 3375 Appliance for Cisco Connected Mobile Experiences Installation Guide...
- Page 48 Technical Specifications Technical Specifications Cisco 3375 Appliance for Cisco Connected Mobile Experiences Installation Guide...
-
Page 49: Warning Definition
Use the statement number provided at the end of each warning to its translation in the translated safety warnings that accompanied this device. Statement 1071 SAVE THESE INSTRUCTIONS Cisco 3375 Appliance for Cisco Connected Mobile Experiences Installation Guide... - Page 50 å forhindre ulykker. Bruk nummeret i slutten av hver advarsel for å fin oversettelsen i de oversatte sikkerhetsadvarslene som fulgte med denne enheten. TA VARE PÅ DISSE INSTRUKSJONENE Cisco 3375 Appliance for Cisco Connected Mobile Experiences Installation Guide...
- Page 51 Använd det nummer som finns i slutet av varje varning för at dess översättning i de översatta säkerhetsvarningar som medföljer denna anordning. SPARA DESSA ANVISNINGAR Cisco 3375 Appliance for Cisco Connected Mobile Experiences Installation Guide...
-
Page 52: More Than One Power Supply
Puede que esta unidad tenga más de una conexión para fuentes de alimentación. Para cortar por comp desconectarse todas las conexiones. Varning! Denna enhet har eventuellt mer än en strömförsörjningsanslutning. Alla anslutningar måste tas bort fö Cisco 3375 Appliance for Cisco Connected Mobile Experiences Installation Guide... -
Page 53: Installation Instructions
Lue asennusohjeet ennen järjestelmän yhdistämistä virtalähteeseen. Attention Avant de brancher le système sur la source d'alimentation, consulter les directives d'installation. Warnung Vor dem Anschließen des Systems an die Stromquelle die Installationsanweisungen lesen. Cisco 3375 Appliance for Cisco Connected Mobile Experiences Installation Guide... - Page 54 Leia as instruções de instalação antes de ligar o sistema à fonte de energia. ¡Advertencia! Lea las instrucciones de instalación antes de conectar el sistema a la red de alimentación. Varning! Läs installationsanvisningarna innan du kopplar systemet till strömförsörjningsenheten. Cisco 3375 Appliance for Cisco Connected Mobile Experiences Installation Guide...
-
Page 55: Ground Conductor Warning
Este equipamento deve ser aterrado. Nunca anule o fio terra nem opere o equipamento sem um aterram adequadamente instalado. Em caso de dúvida com relação ao sistema de aterramento disponível, ent contato com os serviços locais de inspeção elétrica ou um eletricista qualificado. Cisco 3375 Appliance for Cisco Connected Mobile Experiences Installation Guide... - Page 56 Denna utrustning måste jordas. Koppla aldrig från jordledningen och använd aldrig utrustningen utan e Varning! på lämpligt sätt installerad jordledning. Om det föreligger osäkerhet huruvida lämplig jordning finns ska elektrisk besiktningsauktoritet eller elektriker kontaktas. Cisco 3375 Appliance for Cisco Connected Mobile Experiences Installation Guide...
-
Page 57: Chassis Warning For Rack-Mounting And Servicing
• Si cette unité est montée dans un casier partiellement rempli, charger le casier de bas en haut en l'élément le plus lourd dans le bas. • Si le casier est équipé de dispositifs stabilisateurs, installer les stabilisateurs avant de monter réparer l'unité en casier. Cisco 3375 Appliance for Cisco Connected Mobile Experiences Installation Guide... - Page 58 • Ao montar esta unidade numa estante parcialmente ocupada, coloque os itens mais pesados na pa inferior da estante, arrumando-os de baixo para cima. • Se a estante possuir um dispositivo de estabilização, instale-o antes de montar ou reparar a unida Cisco 3375 Appliance for Cisco Connected Mobile Experiences Installation Guide...
- Page 59 • Om denna enhet installeras på en delvis fylld ställning skall ställningen fyllas nedifrån och up de tyngsta enheterna längst ned på ställningen. • Om ställningen är försedd med stabiliseringsdon skall dessa monteras fast innan enheten inst eller underhålls på ställningen. Cisco 3375 Appliance for Cisco Connected Mobile Experiences Installation Guide...
- Page 60 • Ved montering af denne enhed i et delvist fyldt rack, skal enhederne installeres fra bunden og op med den tungeste enhed nederst. • Hvis racket leveres med stabiliseringsenheder, skal disse installeres for enheden monteres eller servi i racket. Cisco 3375 Appliance for Cisco Connected Mobile Experiences Installation Guide...
- Page 61 Safety Considerations Safety Considerations Cisco 3375 Appliance for Cisco Connected Mobile Experiences Installation Guide...
- Page 62 Safety Considerations Safety Considerations Cisco 3375 Appliance for Cisco Connected Mobile Experiences Installation Guide...
- Page 63 Safety Considerations Safety Considerations Cisco 3375 Appliance for Cisco Connected Mobile Experiences Installation Guide...
- Page 64 Safety Considerations Safety Considerations Cisco 3375 Appliance for Cisco Connected Mobile Experiences Installation Guide...
-
Page 65: Equipment Installation Warning
Aviso Apenas pessoal treinado e qualificado deve ser autorizado a instalar, substituir ou fazer a revisão d equipamento. ¡Advertencia! Solamente el personal calificado debe instalar, reemplazar o utilizar este equipo. Cisco 3375 Appliance for Cisco Connected Mobile Experiences Installation Guide... - Page 66 Aviso Somente uma equipe treinada e qualificada tem permissão para instalar, substituir ou dar manutenção este equipamento. Advarsel Kun uddannede personer må installere, udskifte komponenter i eller servicere dette udstyr. Cisco 3375 Appliance for Cisco Connected Mobile Experiences Installation Guide...
-
Page 67: Battery Handling
Pericolo di esplosione se la batteria non è installata correttamente. Sostituire solo con una di tipo u o equivalente, consigliata dal produttore. Eliminare le batterie usate secondo le istruzioni del produ Cisco 3375 Appliance for Cisco Connected Mobile Experiences Installation Guide... - Page 68 Explosionsfara vid felaktigt batteribyte. Ersätt endast batteriet med samma batterityp som rekommender Varning! av tillverkaren eller motsvarande. Följ tillverkarens anvisningar vid kassering av använda batterier. Cisco 3375 Appliance for Cisco Connected Mobile Experiences Installation Guide...
-
Page 69: Product Disposal
O descarte definitivo deste produto deve estar de acordo com todas as leis e regulamentações naci Advarsel Endelig bortskaffelse af dette produkt skal ske i henhold til gældende love og regler. Cisco 3375 Appliance for Cisco Connected Mobile Experiences Installation Guide... - Page 70 Safety Considerations Safety Considerations Cisco 3375 Appliance for Cisco Connected Mobile Experiences Installation Guide...
-
Page 71: Power Cable And Ac Adapter
Safety Considerations Power Cable and AC Adapter Power Cable and AC Adapter Statement 371 Cisco 3375 Appliance for Cisco Connected Mobile Experiences Installation Guide... - Page 72 Safety Considerations Power Cable and AC Adapter Cisco 3375 Appliance for Cisco Connected Mobile Experiences Installation Guide...
- Page 73 This declaration is only valid for configurations (combinations of software, firmware and hardware) provided and/or supported by Cisco Systems. The use software or firmware not supported/provided by Cisco Systems may result that the equipment is no longer compliant with the regulatory requirements.
- Page 74 Regulatory Information Regulatory Information Cisco 3375 Appliance for Cisco Connected Mobile Experiences Installation Guide...