GE PM880 User Manual
Portable hydrometer
Hide thumbs
Also See for PM880:
- Specifications (4 pages) ,
- User manual (193 pages) ,
- Operations & installation manual (249 pages)

Related Manuals for GE PM880


Summary of Contents for GE PM880
- Page 1 Measurement & Control Solutions Moisture Model PM880 Portable Hygrometer User’s Manual 910-247 Rev. F May 2011...
- Page 3 Measurement & Control Solutions Model PM880 Portable Hygrometer User’s Manual 910-247 Rev. F May 2011 www.ge-mcs.com ©2011 General Electric Company. All rights reserved. Technical content subject to change without notice.
- Page 4 [no content intended for this page...
- Page 5 If you do, serious injury can result. WARNING! Make sure that power to the auxiliary equipment is turned OFF and locked out before you perform maintenance procedures on the equipment. Model PM880 Portable Hygrometer User’s Manual...
- Page 6 Environmental Compliance Waste Electrical and Electronic Equipment (WEEE) Directive GE Measurement & Control Solutions is an active participant in Europe’s Waste Electrical and Electronic Equipment (WEEE) take-back initiative, directive 2002/96/EC. The equipment that you bought has required the extraction and use of natural resources for its production.
-
Page 7: Table Of Contents
2.7 Shutting Down the Sample System ........27 Model PM880 Portable Hygrometer User’s Manual... - Page 8 Contents Chapter 3. Using the PM880 Screen 3.1 Screen Components ..........30 3.2 Setting Up the Screen to Display Measurements.
- Page 9 4.11Using Sleep Mode........... . . 72 4.11.1 Placing the PM880 in Sleep Mode ....... 72 4.11.2 Resuming Operation .
- Page 10 6.7 Sorting Files in the Site/Drive/Log Manager ......108 viii Model PM880 Portable Hygrometer User’s Manual...
- Page 11 Chapter 7. Using the PM880 with a PC and Printer 7.1 Setting Up PM880 IR Communications ....... . 110 7.1.1 Using the Add Hardware Wizard .
- Page 12 8.1 Checking the PM880 Memory Status........132...
- Page 13 9.1 The PM880 Hygrometer ........
- Page 14 Contents [no content intended for this page] Model PM880 Portable Hygrometer User’s Manual...
-
Page 15: Chapter 1. Getting Started
Chapter 1. Getting Started Chapter 1. Getting Started The GE PM880 is a versatile, battery-powered portable hygrometer that is designed for spot sampling moisture measurements. Although the PM880 offers many options, it requires only battery charging and minimal setup to begin taking measurements. -
Page 16: Charging The Battery Pack
The PM880 is powered by a rechargeable NiMH battery pack. When you receive the PM880, you will need to fully charge the pack. The pack must be charged for 4-5 hours, until the amber LED on the charger goes out, to receive the maximum charge. -
Page 17: Configuring The Battery Charger
Chapter 1. Getting Started 1.1.2 Configuring the Battery Charger The PM880 battery charger has a switchable voltage input of 115 to 230 VAC. Make sure the voltage selector is in the correct position before plugging it in. The battery charger is intended for indoor use only. -
Page 18: Charging The Battery Pack
When you receive your unit, you should completely charge the battery pack before using it for the first time. Remove the pack from the charger and reinstall it in the PM880. Refer to Checking the Battery Status on page 133 for details on monitoring the battery. -
Page 19: Powering On And Off
1.2.1 Powering On To turn the PM880 on, press the red button in the upper-right-hand corner of the keypad. Immediately upon powerup the PM880 displays a series of messages and performs various checks. The screen then appears similar to the one shown in Figure 1. -
Page 20: Powering Off
Chapter 1. Getting Started 1.2.2 Powering Off To turn the PM880 off, press the red key for 3 seconds. The screen now appears similar to Figure 2. Press to shut down the PM880. [F1] Figure 2: Shutdown Menu Model PM880 Portable Hygrometer User’s Manual... -
Page 21: Entering Data Using The Keypad
1.4 Entering Setup Data For immediate operation, the PM880 requires only a moisture probe and its corresponding calibration data. You should enter data for each site where you plan to make a measurement. Once entered, you can save it into a file that can be recalled at the measurement site. -
Page 22: Selecting Probe Type
Use the arrow key to scroll to Program and press [ENTER] Use the arrow key to scroll to Probe and press . The screen [ENTER] appears similar to Figure 3. Figure 3: Probe Window Model PM880 Portable Hygrometer User’s Manual... - Page 23 If you have an MIS probe that was sent back to the factory for calibration without the electronics module, you need to enter calibration data as described in Entering Calibration Data on page 10. Model PM880 Portable Hygrometer User’s Manual...
-
Page 24: Entering Calibration Data
Be sure you have the Calibration Data Sheets that are supplied with each GE probe. Each Calibration Data Sheet consists of a list of data points that you will need to enter or verify, and lists its corresponding probe serial number. - Page 25 Use the arrow keys to scroll to the suffix box and press to open [ENTER] the drop-down list. Use the arrow keys to scroll to the desired suffix and press [ENTER] Press (OK) to exit. [F3] Model PM880 Portable Hygrometer User’s Manual...
- Page 26 Moisture Image Series (MIS) probes store all calibration data in their electronics module, and upload it into the PM880 memory when needed. Note: It is not necessary to enter calibration data for the Moisture Image Series (MIS) probe unless you send it back to the factory for calibration without its electronics module.
- Page 27 If the probe has a pressure transducer, proceed to step 3 in Entering Pressure Calibration Data on page 14. • If the probe does not have a pressure transducer, press (OK). [F3] Proceed to Displaying Measurements on page 15. Model PM880 Portable Hygrometer User’s Manual...
- Page 28 (metric). The supplied Calibration Data Sheets list these values in psig. If you want to change the system units, refer to Selecting English or Metric Units on page 46. Figure 6: Calibration Pressure Window Model PM880 Portable Hygrometer User’s Manual...
-
Page 29: Displaying Measurements
(OK) and proceed to Displaying Measurements. [F3] 1.5 Displaying Measurements The PM880 can display one to four measurement parameters simultaneously. There are two parts for displaying measurements: selecting the number of measurements and then selecting the type of measurements. See Figure 9 on page 19 for a menu map. -
Page 30: Selecting The Types Of Measurements
Use the arrow keys to select the desired measurement unit (or diagnostic parameter). Note: (No Unit) to display a measurement with no units. Press [F3] Press (OK). [F3] Repeat this section for displaying other measurements. Model PM880 Portable Hygrometer User’s Manual... -
Page 31: Saving Data In A Site File
Use the arrow key to scroll to File and press [ENTER] 1.6.2 Entering a Site Name Use the arrow keys to scroll to New and press . The screen [ENTER] appears similar to Figure 8. Figure 8: New Site Name Entry Window Model PM880 Portable Hygrometer User’s Manual... - Page 32 Press (Yes) if you do want to use it as a template. [F3] Note: If you are saving a new file as a template, the PM880 will ask if you want to Save Current Site, press (No) or (Yes). [F2]...
- Page 33 Span FP Name Span kPa Pressure Constant Note: Press [F2] (Cancel) to cancel the entries and return to Menu. Press [F3] (OK) to confirm the entries and return to Menu. Figure 9: Startup Menu Model PM880 Portable Hygrometer User’s Manual...
- Page 34 Chapter 1. Getting Started [no content intended for this page] Model PM880 Portable Hygrometer User’s Manual...
-
Page 35: Chapter 2. Taking Measurements
Chapter 2. Taking Measurements Chapter 2. Taking Measurements The PM880 hygrometer is part of a measurement system that includes the electronics, cable, probe and optional sample system. Once the electronics are properly programmed, you must connect the sample system and probes to begin taking measurements. -
Page 36: Installing A Moisture Probe
Leave the shield in place for maximum protection. Figure 10: Probe Fitting Location Hand-tighten the probe in a clockwise direction, then tighten it an additional 1/8 turn with a wrench. Model PM880 Portable Hygrometer User’s Manual... -
Page 37: Connecting The Sample System To The Process
5 to 15 feet (1.5 to 4.5 m). A male NPT process connection is provided. Sample Inlet Figure 11: The Sample System and the PM880 Model PM880 Portable Hygrometer User’s Manual... -
Page 38: Making Probe Connections
Probe Input Figure 12: Connection Locations WARNING! TO ENSURE THE SAFE OPERATION OF THE PM880, YOU MUST INSTALL AND OPERATE IT AS DESCRIBED IN THIS MANUAL. IN ADDITION, BE SURE TO FOLLOW ALL APPLICABLE SAFETY CODES AND REGULATIONS FOR INSTALLING ELECTRICAL EQUIPMENT IN YOUR AREA. -
Page 39: Recalling A Site File
Use the arrow key to scroll to Open and press [ENTER] The PM880 asks you to confirm, press (Yes). [F3] Press (Exit). [F3] Press . The PM880 displays the selected site file in the [MENU] upper-left corner of the screen. Model PM880 Portable Hygrometer User’s Manual... -
Page 40: Operating The Sample System
Open the inlet valve fully. Be sure the flow out of the venting tubes remains the same as in step 4. To prevent physical damage, do not subject the probe to excessive flow. Turn on the PM880. Figure 13: Sample System Valve Locations Model PM880 Portable Hygrometer User’s Manual... -
Page 41: Conducting A Leak Test
Completely close all three sample system valves. Remove the sample system from the process, while keeping all valves fully closed to avoid moisture contamination from the ambient air. Model PM880 Portable Hygrometer User’s Manual... - Page 42 Chapter 2. Taking Measurements [no content intended for this page Model PM880 Portable Hygrometer User’s Manual...
- Page 43 Chapter 3. Using the PM880 Screen Chapter 3. Using the PM880 Screen Use the sections that follow to setup and make adjustments to the PM880 screen. This chapter discusses the following: • Screen Components - page 30 • Setting Up the Screen to Display Measurements - page 32 •...
-
Page 44: Chapter 3. Using The Pm880 Screen
Chapter 3. Using the PM880 Screen 3.1 Screen Components The PM880 screen displays various information (see Figure 14). The top line of the screen is the status bar that displays the current site, time, date and battery status during normal operation. However, the status bar changes to a menu bar during programming. - Page 45 Chapter 3. Using the PM880 Screen 3.1 Screen Components (cont.) Table 1: Icons in the System Tray Icon Function Meaning IR data transfer in progress. IR Transfer Indicates the meter encountered an error in Alert operation. Indicates a log is pending (no marks) or running (marks).
-
Page 46: Setting Up The Screen To Display Measurements
(dewpoint, temperature, etc.) and the format (numeric, line or bar graph). In addition, the PM880 offers various options for displaying data numerically and graphically. This section consists of the following: •... -
Page 47: Selecting The Types Of Measurements
Chapter 3. Using the PM880 Screen 3.2.2 Selecting the Types of Measurements Press to move the pointer to the window you want to change and [SEL] press [ENTER] Use the arrow keys to scroll to Measurement and press [ENTER] . The screen appears similar to Figure 15. -
Page 48: Selecting Numeric, Line Or Bar Graph Format
[ENTER] Use the arrow keys to select the desired format and press [ENTER] The PM880 displays the desired format and returns to taking measurements. 3.2.4 Setting Up the Numeric Format Press to move the pointer to the window you want to change and... - Page 49 Repeat steps 3 and 4 for Decimal Places or proceed to the next step to exit. You can select from 0 to 4 places. Press (OK). The PM880 displays the new format and resumes [F3] taking measurements. Model PM880 Portable Hygrometer User’s Manual...
-
Page 50: Adjusting The Line/Bar Graph Scale
Chapter 3. Using the PM880 Screen 3.2.5 Adjusting the Line/Bar Graph Scale The scale of the line and bar graph can be adjusted at any time. You can also alter the graph to display details as follows: Press to move the pointer to the window you want to change and... -
Page 51: Creating Function Key Shortcuts
The PM880 displays the new format and returns to taking measurements. 3.3 Creating Function Key Shortcuts The three function keys at the bottom of the PM880 screen can be customized to provide shortcuts to the most commonly used functions. For example, the F1 key can be assigned to go directly to the Log Manager. -
Page 52: Assigning/Re-Assigning A Function Key
Press (YES). [F3] The PM880 returns to taking measurements. The newly assigned function appears above the assigned function key. 3.3.1b Method 2: Using the Program Menus Use the keypad to go to the function that you want to assign to the function key. -
Page 53: Clearing A Function Key
3.4 Using the Backlight The PM880 has a backlight that helps in viewing data. Since the backlight uses more energy, the PM880 has a backlight timer that can be set to automatically turn the backlight off after a specified time, in order to conserve battery life. -
Page 54: Setting The Backlight Timer
Chapter 3. Using the PM880 Screen 3.4.2 Setting the Backlight Timer If the menu is not active, press [MENU] Use the arrow key to scroll to Meter and press [ENTER] Use the arrow key to scroll to Backlight and press... -
Page 55: Adjusting The Contrast
Chapter 3. Using the PM880 Screen 3.5 Adjusting the Contrast To adjust the screen contrast: If the menu is not active, press [MENU] Use the arrow key to scroll to Meter and press [ENTER] Use the arrow key to scroll to Contrast and press . -
Page 56: Taking A Bitmap Screen Capture - Snapshot
To File - to send the snapshot to a file. Note: In order to send a screen capture to a printer, the PM880 must be properly configured to IR transfer. Refer to Setting Up the PM880 IR Communications on page 110. - Page 57 3.6 Using Bitmap Screen Capture - Snapshot (cont.) If you selected: • To Printer - the PM880 indicates it is looking for a receiving printer and then transmits the file. Note: If the sensor cannot locate a printer, a window appears indicating that it cannot find a device.
- Page 58 Chapter 3. Using the PM880 Screen [no content intended for this page] Model PM880 Portable Hygrometer User’s Manual...
- Page 59 Chapter 4. Using Special Features Chapter 4. Using Special Features The PM880 has a variety of other features to make operation even more convenient. Below are some of the features available. For other features related to testing and service functions, refer to Chapter 8, Maintenance and Troubleshooting.
-
Page 60: Chapter 4. Using Special Features
Chapter 4. Using Special Features 4.1 Selecting English or Metric Units The PM880 enables you to select either English or Metric for global measurement units. The selected units become the default settings for every measurement with the metric/English option. To select measurement units:... -
Page 61: Changing Date And Time Appearance
Use the arrow key to scroll to Meter and press [ENTER] Use the arrow key to scroll to Locale and press . A screen [ENTER] similar to Figure 19 appears. Figure 19: Locale Tab Model PM880 Portable Hygrometer User’s Manual... -
Page 62: Selecting The Separator
Use the arrow keys to scroll to the desired format and press [ENTER] Repeat steps 1 and 2 for the time format. Press (OK) and then press [F3] [MENU] The PM880 returns to taking measurements. The new date and time formats are displayed. Model PM880 Portable Hygrometer User’s Manual... -
Page 63: Adding A Message To A Site File
Repeat this procedure until you have created the desired site message. When you have finished, press (OK). [F3] New site information is displayed when the site is selected in Site Manager. Press (Exit). [F3] Model PM880 Portable Hygrometer User’s Manual... -
Page 64: Setting A Probe Calibration Reminder
Use the arrow key to scroll to Calibrate and press [ENTER] Use the arrow keys to scroll to the Probe ID tab and press [ENTER] screen similar to Figure 20 appears. Figure 20: Probe ID Window Model PM880 Portable Hygrometer User’s Manual... -
Page 65: Entering Probe Information
[ENTER] prompt asks you to select a time period for the next probe calibration. The PM880 will display a calibration reminder for the probe based on the last calibration date. GE recommends recalibrating a probe a minimum of once a year. -
Page 66: Using Automatic Calibration (Autocal)
The PM880 automatically calibrates the moisture and pressure measurement circuitry (AutoCal) at a user-selected interval. Autocal compensates for any drift in the electronics. GE recommends setting the AutoCal interval to 8 hours. Set a smaller AutoCal interval more frequently if the meter is exposed to extreme temperatures or weather conditions. - Page 67 See the example below. EXAMPLE: The PM880 establishes a fixed schedule, beginning at midnight, using the interval specified to determine the times of subsequent AutoCals. If you enter an 8 hour time interval, AutoCal will occur 3 times per day (1 day = 1440 minutes/480 minutes = 3).
-
Page 68: Entering Constants And User Functions
Chapter 4. Using Special Features 4.7 Entering Constants and User Functions The PM880 enables you to enter two types of constants, a user constant and a saturation constant, as well as user-defined functions and tables to manipulate data. A user constant is a fixed value that is used to multiply the moisture ppm ... -
Page 69: Entering A User Constant
Next, do one of the following: • Use the arrow keys to move to another text box and enter additional data. • To exit and return to taking measurements, press (OK) and then [F3] [MENU] Model PM880 Portable Hygrometer User’s Manual... -
Page 70: Entering A Saturation Constant
Chapter 4. Using Special Features 4.8.1 Entering a Saturation Constant The PM880 requires a saturation constant in order to calculate ppm non-aqueous liquids. If you do not know the saturation constants of the process liquid sample, contact the factory. To enter a saturation constant (Cs), you must enter 1 to 8 data points to represent a curve of Cs (values) versus temperature. - Page 71 • Use the arrow keys to scroll to another tab and program additional data (if available, depending on probe type). • To exit and return to taking measurements, press (OK) and then [F3] [MENU] Model PM880 Portable Hygrometer User’s Manual...
-
Page 72: Entering User Functions
Use the arrow key to scroll to Program and press [ENTER] Use the arrow key to scroll to User Functions and press [ENTER] screen similar to Figure 24 appears. Figure 24: User Functions Window Model PM880 Portable Hygrometer User’s Manual... - Page 73 [SEL] label for the function. Repeat this procedure until you have created the desired units symbol for the function of up to thirty-two characters. When you have finished, press [F3] (OK). Model PM880 Portable Hygrometer User’s Manual...
- Page 74 [ENTER] the drop-down menu. Use the arrow keys to scroll to the desired value (0-4) and press . This value refers to the number of digits to the right of the [ENTER] decimal point. Model PM880 Portable Hygrometer User’s Manual...
- Page 75 MODE in the middle of the third row. The Select Measurement window appears. Select the desired measurements, press , select the desired units and press [SEL] (OK). [F3] Figure 26: Function Creation Window Model PM880 Portable Hygrometer User’s Manual...
-
Page 76: Setting Up User Tables
Userfunction and then the units you entered above. 4.8.3 Setting Up User Tables To support user-defined functions, the PM880 can hold up to 6 tables of non-linear or empirical data. Users can enter up to 21 X-Y pairs in each table. - Page 77 Use the arrow key to scroll to Meter and press [ENTER] Use the arrow key to scroll to User Tables and press [ENTER] screen similar to Figure 27 appears. Figure 27: User Tables Window Model PM880 Portable Hygrometer User’s Manual...
- Page 78 When you have finished, press (OK). [F3] Note: It is not necessary to enter the “#Data Points” or “Max Points” text boxes. The meter automatically enters this data. Model PM880 Portable Hygrometer User’s Manual...
- Page 79 3 and 4 until you have entered the values for each data point. When you have completed entering values, press (OK). [F3] To confirm the table and return taking measurements, press (OK) [F3] and then press [MENU] Model PM880 Portable Hygrometer User’s Manual...
-
Page 80: Using Computer Enhanced Response
[MENU] Use the arrow key to scroll to Program and press [ENTER] Use the arrow key to scroll to System and press . A screen [ENTER] similar to Figure 29 on page 67 appears. Model PM880 Portable Hygrometer User’s Manual... - Page 81 . You can choose from the following: [ENTER] • NORM - no computer enhanced response • CER - enable computer enhanced response To return to taking measurements, press (OK) and then press [F3] [MENU] Model PM880 Portable Hygrometer User’s Manual...
-
Page 82: Response Time Procedure
To effectively utilize CER, the following procedure should be followed: Connect the moisture probe cable to the moisture probe. Turn on the PM880 Hygrometer and activate CER per the instructions in the previous section. Expose the moisture probe to the ambient air for approximately ten (10) minutes. - Page 83 The PM880 will display the actual dewpoint temperature during the initial dry-down. The display will indicate a bold “E” in the system tray which means the PM880 is in CER mode. After 2 to 5 minutes, the PM880 will perform its initial predicted calculation of the equilibrium dewpoint temperature.
-
Page 84: Entering Reference Data
The references are factory calibration values. These values can be found on the label located inside the battery compartment. If instructed by GE to change these values, use the following steps. If the menu is not active, press [MENU]... - Page 85 To exit and return to taking measurements, press and then [F3] [MENU] • If you need to change values, use the arrow keys to move to the other tab and return to step 5 above. Model PM880 Portable Hygrometer User’s Manual...
-
Page 86: Using Sleep Mode
PM880 in Sleep Mode. [F2] Figure 31: Shutdown Menu 4.11.2 Resuming Operation Tap the red power key. The PM880 powers on, performs an AutoCal and returns to exactly where you left it. Model PM880 Portable Hygrometer User’s Manual... -
Page 87: Displaying Meter Information
(Next) to list additional data such as the boot program, [F2] instrument program, FPGA (timing) program, language, help version, serial number and PCI number. Press (Exit) and then press [F3] [MENU] The PM880 returns to taking measurements. Model PM880 Portable Hygrometer User’s Manual... -
Page 88: Changing The Display Language
Chapter 4. Using Special Features 4.13 Changing the Display Language The PM880 user program is available in several languages. To change the language: Note: The PM880 defaults to US English. However, one or more alternate languages can be installed at any time. Consult your GE representative or www.ge-mcs.com for available languages. -
Page 89: Using On-Line Help
Chapter 4. Using Special Features 4.14 Using On-Line Help The PM880 offers on-line help screens that contain descriptions and instructions for various topics. You can access on-line help at any time by pressing the [?] key. The on-line help screen that appears depends on what the meter is doing at the time the [?] key is pushed. - Page 90 Chapter 4. Using Special Features [no content intended for this page] Model PM880 Portable Hygrometer User’s Manual...
-
Page 91: Chapter 5. Logging Data
Chapter 5. Logging Data Chapter 5. Logging Data Data logging is one of the PM880’s most powerful and flexible features. The meter enables you to choose up to 12 measurements to log. Logs can run one at a time or simultaneously. Error and circular logs are also available. -
Page 92: Setting Up A New Log
You can also create a new log by scrolling to Log Manager, press , scroll to File, press , press , scroll to [ENTER] [MENU] [ENTER] New and press [ENTER] Figure 34: New Log Window Model PM880 Portable Hygrometer User’s Manual... -
Page 93: Entering A Log Name
Repeat this procedure until you have created the desired log name of up to eight characters. When you have finished, press (OK). A screen similar to Figure 35 [F3] appears. Figure 35: General Log Format Window Model PM880 Portable Hygrometer User’s Manual... -
Page 94: Selecting General Log Settings
Use the arrow keys to move to the Measurements tab and press . A screen similar to Figure 36 appears. [ENTER] Figure 36: Log Measurements Window Model PM880 Portable Hygrometer User’s Manual... -
Page 95: Selecting A Measurement To Log
If you created the log from within the Log Manager, the meter returns to the Log Manager, press (Exit) and then press [F3] [MENU] The PM880 returns to taking measurements. A Pencil icon appears in the bottom right-hand side of the screen. Model PM880 Portable Hygrometer User’s Manual... -
Page 96: Pausing A Log
Chapter 5. Logging Data 5.2 Pausing a Log The PM880 has two commands to pause logs: Pause and Pause All Logs. The PM880 can only pause logs that are currently running. Note: The PM880 also has an End command that enables you to stop the log permanently. -
Page 97: Starting Or Restarting A Log
Use the arrow key to scroll to Log and press [ENTER] Use the arrow key to scroll to Start or Start All Logs and press [ENTER] The PM880 returns to the Log Manager, which displays the selected log as Running or Pending. Next, do one of the following: •... -
Page 98: Ending A Log
Use the arrow key to scroll to Log and press [ENTER] Use the arrow key to scroll to End or End All Logs and press [ENTER] The PM880 returns to the Log Manager, which displays the selected log as Finished. Next, do one of the following: •... -
Page 99: Viewing All Logs
Use the arrow keys to scroll to Log and press [ENTER] Use the arrow keys to scroll to View All Sites and press [ENTER] To return to taking measurements, press (Exit) and then press [F3] [MENU] Model PM880 Portable Hygrometer User’s Manual... -
Page 100: Viewing Log Setup Details
Chapter 5. Logging Data 5.6 Viewing Log Setup Details The PM880 enables you to view more than the log details shown in Log Manager. The Details command enables you to see the log status, date and time, length, interval, types of measurements logged and service information. - Page 101 To view the details of another log, press and return to Selecting [ESC] a Log on page 86. • To exit and return to taking measurements, press (Exit) and then [F3] press [MENU] Figure 38: Log Details Model PM880 Portable Hygrometer User’s Manual...
-
Page 102: Displaying Logged Data
Chapter 5. Logging Data 5.7 Displaying Logged Data The PM880 enables you to view logged data in a graph or spreadsheet format. Graphs and spreadsheets are set up in the Log Manager. Use the steps below to access the Log Manager and view logged data. - Page 103 The screen displays the range when zoomed. See Figure 39. • To exit and return to taking measurements, press (Exit) twice and [F3] then press [MENU] Displays range when zoomed Figure 39: Log Graph Display Window Model PM880 Portable Hygrometer User’s Manual...
- Page 104 To view logs using the spreadsheet format, press (Exit), then [F3] press [MENU] and proceed to Using the Spreadsheet Format on page 92. • To exit and return to taking measurements, press (Exit) twice and [F3] then press [MENU] Model PM880 Portable Hygrometer User’s Manual...
- Page 105 To view logs using the spreadsheet format, press (Exit), then [F3] press and proceed to Using the Spreadsheet Format on [MENU] page 92. • To exit and return to taking measurements, press (Exit) twice and [F3] then press [MENU] Model PM880 Portable Hygrometer User’s Manual...
-
Page 106: Using The Spreadsheet Format
[MENU] Use the arrow key to scroll to View and press [ENTER] Use the arrow key to scroll to Spreadsheet and press [ENTER] screen similar to Figure 40 appears. Figure 40: Log Spreadsheet Window Model PM880 Portable Hygrometer User’s Manual... - Page 107 When you have finished, press (OK) to exit and view the [F3] spreadsheet. The PM880 displays the data nearest the time entered. Next, do one of the following: • To return to the Log Manager and view another log, press...
- Page 108 Chapter 5. Logging Data [no content intended for this page] Model PM880 Portable Hygrometer User’s Manual...
-
Page 109: Chapter 6. Managing Files
The Site and Log Managers have additional commands for printing and all the Managers have the ability to transfer files to and from a PC. For more details on these functions refer to Chapter 7, Using the PM880 with a PC and Printer. -
Page 110: Saving A New Site File
[ENTER] 6.1.0b Entering a Site Name Use the arrow key to scroll to New and press . The screen [ENTER] appears similar to Figure 41. Figure 41: Name Entry Window for a New Site Model PM880 Portable Hygrometer User’s Manual... - Page 111 (OK). [F3] The PM880 prompt asks you if you want to save the site as a template. Saving the site file as a template is useful when you need to create multiple sites with similar data. At the prompt, do one of the following: •...
-
Page 112: Recalling A Site File
Use the arrow key to scroll to Open and press [ENTER] The PM880 asks you to confirm. Press (Yes). [F3] Press (Exit). [F3] Press . The PM880 displays the new site file in the upper-left [MENU] corner of the screen. Model PM880 Portable Hygrometer User’s Manual... -
Page 113: Saving A Site File
[ENTER] The PM880 prompts you to save the current site. Press , (Yes). [F3] Press . The PM880 displays the current site file in the upper-left [MENU] corner of the screen. 6.3.0b Using the Site Manager If the menu is not active, press... -
Page 114: Renaming A Site Or Log File
• a log file, refer to page 102. 6.4.1 Renaming a Site File The PM880 offers two ways to rename files. In the Site Manager you can use the following commands: • Save As to create a copy of the file with a different name •... - Page 115 When you have finished, press (OK). [F3] Do one of the following: • If you selected Save As, the PM880 prompts you to save the current site, press (Yes). [F3] • If you selected Rename, the PM880 renames the file and returns to the Site Manager.
-
Page 116: Renaming A Log File
When you have finished, press (OK). [F3] The PM880 renames the file and returns to the Log Manager. Next, do one of the following: • If desired, repeat steps 1 through 7 above for another file. •... -
Page 117: Copying A Log
If you try to copy a log that is associated with a site file that is not currently running, the Clone Selected Log command will be grayed out. Use a different log for cloning. Model PM880 Portable Hygrometer User’s Manual... - Page 118 Use the arrow keys to scroll to the desired letter or number and press . Press (Delete) to delete unwanted characters. [ENTER] [F1] Repeat this procedure until you have created the desired site name of up to eight characters. When you have finished, press (OK). [F3] Model PM880 Portable Hygrometer User’s Manual...
- Page 119 Use the arrow keys to move back to the General tab and then move to the Measurements tab and press . A screen similar to [ENTER] Figure 43 appears. Figure 43: Log Measurements Window Model PM880 Portable Hygrometer User’s Manual...
- Page 120 Repeat steps 1 through 3 for up to 12 different parameters. When you have finished, press (Activate) to start the log. The [F3] PM880 returns to the Log Manager. The log will begin at the specified date and time. Next, do one of the following: •...
-
Page 121: Deleting All Types Of Files
Chapter 6. Managing Files 6.6 Deleting All Types of Files Use the steps below to delete unwanted files from the PM880 memory: Note: If the site file you want to delete is currently active, you must recall another site before you can delete it. -
Page 122: Sorting Files In The Site/Drive/Log Manager
Next, do one of the following: • To exit, press [F3] (Exit) and then press [MENU] to leave the Manager and return to taking measurements. • Return to performing the desired task(s) in the Manager. Model PM880 Portable Hygrometer User’s Manual... -
Page 123: Chapter 7. Using The Pm880 With A Pc And Printer
Chapter 7. Using the PM880 with a PC and Printer Chapter 7. Using the PM880 with a PC and Printer The PM880 has the ability to transfer files to and from a PC. Both the Site Manager and Drive Manager have a transfer command that allows you to select a file and beam it to and from the PC and the PM880. -
Page 124: Setting Up Pm880 Ir Communications
The PM880 is already setup for IrDA (Infrared Data Association) infrared communications. Most PCs and devices use the IrDA protocol and the PM880 should not need to be reconfigured. If necessary, the PM880 can also be configured for IR232 communications. -
Page 125: Using The Add Hardware Wizard
Chapter 7. Using the PM880 with a PC and Printer 7.1.1 Using the Add Hardware Wizard Note: The following figures represent the Windows 2000 screens. The Windows XP process is similar. For Windows 2000: Right-click on My Computer, or use the Control panel to get the System Properties. - Page 126 Chapter 7. Using the PM880 with a PC and Printer 7.1.1 Using the Add Hardware Wizard (cont.) Figure 46: Welcome Screen Click Next. On the next screen, choose “Add/Troubleshoot a device” and click Next. Figure 47: Choose a Hardware Task Screen...
- Page 127 Chapter 7. Using the PM880 with a PC and Printer 7.1.1 Using the Add Hardware Wizard (cont.) Windows will search, but will not find anything. Allow the search to complete. Figure 48: New Hardware Detection Screen When the search finishes, you will see the dialog screen as in Figure 49.
- Page 128 Chapter 7. Using the PM880 with a PC and Printer 7.1.1 Using the Add Hardware Wizard (cont.) On the next screen, choose “No, I want to select the hardware from a list,” and click Next. Figure 50: Find New Hardware Screen Select Infrared Devices from the list, and click Next.
- Page 129 Chapter 7. Using the PM880 with a PC and Printer 7.1.1 Using the Add Hardware Wizard (cont.) Select ACTiSYS and IR-220L+ Serial Infrared Device, and click Next. Figure 52: Select Infrared Device Screen Windows supplies the appropriate driver, so click Next.
- Page 130 Place the IR adapter in front of the PM880. You should hear a "bong" and the following message will pop up: Figure 55: Another Available Computer Message At this point, you can transfer files from the PM880 to the PC using its Site Manager/Log Manager/Drive Manager or by using PanaView. Note: The previous figures represent the Windows 2000 screens.
-
Page 131: Using Panaview
After that, discovery of the PM880 should be automatic: Figure 56: PanaView Meter Browser 7.1.2 Using Panaview GE offers PanaView software that enables you to perform many PM880 functions using your computer. With PanaView software (version 1.4.6 or greater), the communication connection is made automatically using IrOBEX (IR Object Exchange). - Page 132 Chapter 7. Using the PM880 with a PC and Printer Use these steps if you need to change the PM880 IR set up: 7.1.2a Accessing the Meter Menu If the menu is not active, press [MENU] Use the arrow key to scroll to Meter and press...
-
Page 133: Transferring And Printing Files Key
Files (.bmp) 7.3 Printing a Site or Log File The PM880 can send site files, log files and snapshots (screen captures) to a printer. This section describes the steps for printing site and log files. To print a snapshot, refer to Taking a Bitmap Screen Capture (Snapshot) on page 42. -
Page 134: Printing A Site File
[MENU] Use the arrow key to scroll to Site and press [ENTER] Make sure the IR beam on the PM880 has clear access to the IR sensor on the printer. Use the arrow key to scroll to Print and press [ENTER] The PM880 indicates that it is searching for a receiving printer. -
Page 135: Printing A Log File
Chapter 7. Using the PM880 with a PC and Printer 7.3.2 Printing a Log File 7.3.2a Accessing the Log Manager If the menu is not active, press [MENU] Use the arrow key to scroll to Logging and press [ENTER] Use the arrow key to scroll to Log Manager and press [ENTER] 7.3.2b... - Page 136 End Time 13:53:41 PM 2003/03/01 Figure 58: Enter Time Window Make sure the IR beam on the PM880 has clear access to the IR sensor on the printer and press (OK). [F3] The PM880 indicates that it is searching for a receiving printer and then sends the file.
-
Page 137: Printing Reports
Figure 59 appears. Figure 59: Reports Window Use the arrow keys to select the desired report. Make sure the IR beam on the PM880 has clear access to the IR sensor on the printer. Press (Print) to print out the desired reports. -
Page 138: Transferring A File To A Pc
You can use the Site Manager, Drive Manager or the Log Manager to transfer files to your PC. The Site Manager enables you to transfer site files only; the Drive Manager enables you to transfer any file in the PM880; and, the Log Manager enables you to transfer log files only. - Page 139 • For Drive or Log Manager - File and press [ENTER] Make sure the IR beam on the PM880 has clear access to the IR sensor on the PC. Use the arrow key to scroll to Transfer and press [ENTER] The PM880 establishes communications with your PC and uploads the selected file.
- Page 140 Chapter 7. Using the PM880 with a PC and Printer 7.5 Transferring a File To a PC (cont.) 7.5.0a Locating and Viewing the Transferred File Your PC stores the transferred file in a default location. The location depends on the PC’s operating system: •...
-
Page 141: Transferring A File From A Pc
Chapter 7. Using the PM880 with a PC and Printer 7.6 Transferring a File from a PC The PM880 enables you to transfer site (.sit) and meter (.met) files from your PC to the meter. If you rename another type of file with one of these extensions and transfer it, it will be transferred, but will not function if you open it. -
Page 142: Using Windows Nt 4.0
® Open the QuickBeam software. Make sure the IR beam on the PM880 has clear access to the IR sensor on the PC. In the Quickbeam window, click on Send. Click on Files or Files on Clipboard and scroll to the desired file. -
Page 143: Using Windows 95/98
7.6.4 Using Windows 2000 To activate infrared communications on your PC, line up the IR beam on the PM880 with the PC’s IR sensor. A window appears indicating IR communications is activated. Click on the Infrared icon in the System Tray - . - Page 144 Chapter 7. Using the PM880 with a PC and Printer [no content intended for this page] Model PM880 Portable Hygrometer User’s Manual...
-
Page 145: Chapter 8. Maintenance And Troubleshooting
Chapter 8. Maintenance and Troubleshooting Chapter 8. Maintenance and Troubleshooting The PM880 is designed to be maintenance and trouble free. However, because of process conditions and other factors, minor problems may occur. The PM880 provides commands to monitor and check its various components. -
Page 146: Checking The Pm880 Memory Status
Chapter 8. Maintenance and Troubleshooting 8.1 Checking the PM880 Memory Status The PM880 stores all types of files in its memory. Each type of Manager enables you to monitor the size of a file and the remaining amount of memory. Use the following steps to check the memory status: 8.1.0a... -
Page 147: Checking The Battery Status
Chapter 8. Maintenance and Troubleshooting 8.2 Checking the Battery Status The PM880 provides two ways to monitor the battery status: displaying a battery icon while taking measurements and using the Battery command. Refer to the appropriate section that follows for more details. -
Page 148: Using The Battery Command
Use the arrow key to scroll to Meter and press [ENTER] Use the arrow key to scroll to Battery and press . A screen [ENTER] similar to Figure 62 appears. Press (Exit) to return to taking measurements. [F3] Figure 62: Battery Charger Window Model PM880 Portable Hygrometer User’s Manual... -
Page 149: Testing The Screen
Press any key. The screen should redraw with the same checkerboard pattern. Make sure the screen redraws properly. Keep pressing keys to change the screen. The PM880 will sequence through a number of dark and light screens before returning to taking measurements. -
Page 150: Testing The Keypad
If the box does not darken or if the key does not appear on the screen, contact the factory. Press and then to return to taking measurements. If any [F3] [MENU] key does not appear on the screen, contact the factory. Model PM880 Portable Hygrometer User’s Manual... -
Page 151: Testing The Watchdog Timer Circuit
Chapter 8. Maintenance and Troubleshooting 8.5 Testing the Watchdog Timer Circuit The PM880 includes a watchdog timer circuit. If a software error causes the meter to stop responding, this circuit automatically resets the meter. If the menu is not active, press... -
Page 152: Resetting To Factory Default Settings
To reset the meter: Transfer or print all sites and logs. Refer to Chapter 7, Using the PM880 with a PC and Printer. ALL SETTINGS IN THE DEFAULT SITE WILL BE RESET. -
Page 153: Viewing Or Changing Security Settings
The program asks for confirmation: “Are you SURE?” Press (Yes). [F3] The PM880 replaces the default site file and the global meter settings with the factory default settings. When the meter returns to taking measurements, it displays data using the default site. -
Page 154: Setting The Security Passcodes
Next, do one of the following: • To change remote access settings, refer step 4 in Setting Remote Access Security on page 141. • To exit and return to taking measurements, press (OK) and then [F3] [MENU] Model PM880 Portable Hygrometer User’s Manual... -
Page 155: Setting Remote Access Security
Chapter 8. Maintenance and Troubleshooting 8.7.2 Setting Remote Access Security The PM880 enables you to set remote access security for each security level. Remote access consists of allowing the PM880 to communicate with PanaLink (GE software), receive files from a PC using IrDA, and transmit files to a PC using IrDA. - Page 156 [ENTER] open the drop-down menu. Scroll to the desired level and press [ENTER] The PM880 may ask you to enter a passcode depending on the level you choose. Enter the passcode and press [ENTER] Note: You can change the remote access security settings for the Service Level;...
-
Page 157: Updating Pm880 Software
Chapter 8. Maintenance and Troubleshooting 8.8 Updating PM880 Software As discussed in Chapter 7, Using the PM880 with a PC or Printer, the PM880 uses an IR transceiver to transfer files. The IR function can also be used to upgrade the meter’s user program. The software upgrade includes the bootloader and instrument software, and the meter and Help string files. - Page 158 This standard transfers files at a slower rate, but can still be used to upgrade the meter’s user program. GE recommends updating software using the IrOBEX standard; however, the IrCOMM standard is available for users who have problems with IrOBEX.
-
Page 159: Updating Software Using Irobex
The meter asks for confirmation. Press (OK) to continue with the [F3] update. After the PM880 reboots, the meter will ask you a series of questions. Use the appropriate function key to respond, then refer to the next section. Model PM880 Portable Hygrometer User’s Manual... - Page 160 Be sure the infrared sensor on the meter has a clear path to the infrared adapter on the PC. Select Send To Infrared Recipient or Nearby Computer (or QuickBeam if QuickBeam has been installed) The computer will display a window showing the status of the file upload. Model PM880 Portable Hygrometer User’s Manual...
-
Page 161: Updating Software Using Ircomm
The meter asks for confirmation. Press (OK) to continue with the [F3] update. After the PM880 reboots, the meter will ask you a series of questions. Use the appropriate function key to respond, then refer to the next section. Model PM880 Portable Hygrometer User’s Manual... - Page 162 PC. Return to the PC Hyperterminal program. In the Hyperterminal window, pull down the Transfer menu and click Send File. A window opens similar to Figure 71. Figure 71: Transfer Menu Send File Window Model PM880 Portable Hygrometer User’s Manual...
- Page 163 From the Protocol drop-down menu, select Xmodem. Click Send. For a successful transfer, the PC window appears similar to Figure 72, while the PM880 screen displays the program ID, size, load address and a count of blocks being loaded. Figure 72: File Transmission Window...
-
Page 164: Removing/Replacing The Batteries
Lift the battery pack out of the unit. See Figure 73. Insert the new battery pack. Replace the four screws on the back panel. Battery Location (behind panel) Figure 73: NiMH Battery Location Model PM880 Portable Hygrometer User’s Manual... -
Page 165: Recharging The Batteries
WARNING! HAZARDOUS AREAS. HOWEVER, IT MUST BE CHARGED IN GENERAL-PURPOSE AREAS ONLY. Remove the four thumb screws on the back panel of the PM880 that secure the pack. Lift the pack out of the unit. Model PM880 Portable Hygrometer User’s Manual... -
Page 166: Configuring The Battery Charger
Chapter 8. Maintenance and Troubleshooting 8.10.2 Configuring the Battery Charger The PM880 battery charger has a switchable voltage input of 115 to 230 VAC. Before you plug the pack into the charger you must make sure the voltage selector is in the correct position. -
Page 167: Charging The Battery Pack
When you receive your unit, you should charge the battery pack completely before using it for the first time. Remove the pack from the charger and reinstall it in the PM880. Refer to Checking the Battery Status on page 133 for details on monitoring the battery. -
Page 168: Error And Screen Messages
Chapter 8. Maintenance and Troubleshooting 8.11 Error and Screen Messages The PM880 has a series of error messages that display on the screen when the error occurs. The error messages are only general descriptions of the possible problems. The PM880 also has several screen messages that appear during operation and setup. - Page 169 AutoCal, or a probe failure is interfering with AutoCal. Err 25: The MIS Probe has not The PM880 will try to send data; No Data responded, or a calculation is not wait for next update. yet complete.
- Page 170 This screen appears when trying Press (OK) to cancel all MIS probe. to write to a disconnected MIS writes. The PM880 will read from probe. the next connected MIS probe. During the “No Link”condition, the Hygro and Pressure tabs in the Calibrate menu are disabled.
-
Page 171: Common Problems
Chapter 8. Maintenance and Troubleshooting 8.12 Common Problems If the PM880 measurement readings seem strange, or they do not make sense, there may be a problem with the probe or a component of the process system. Table 6 contains some of the most common measurement problems. - Page 172 Maintenance in Application of the Hygrometer. Then reinstall the sensor. If the low reading persists, return the probe to the factory for evaluation. Improper cable connection. Check the cable connections to both the probe and the PM880. Model PM880 Portable Hygrometer User’s Manual...
- Page 173 Clean the sensor and the sensor shield as non-conductive particles described in Aluminum Oxide Probe (refer to Application of the Maintenance in Application of the Hygrometer) Hygrometer. Then reinstall the sensor. Symptom: Exception screen. Unrecoverable software Contact the factory. error. Model PM880 Portable Hygrometer User’s Manual...
-
Page 174: Replacing And Recalibrating The Moisture Probes
Contact a GE applications engineer for the recommended calibration frequency for your application. Note: You can program the PM880 to remind you when it is time to send the probes back for recalibration. Refer to Setting a Probe Calibration Reminder on page 50. -
Page 175: Recalibrating The Pressure Sensors
Use the arrow key to scroll to Program and press [ENTER] Use the arrow key to scroll to Calibration and press [ENTER] Proceed to Entering Pressure Calibration Data on page 14 to complete entering data. Model PM880 Portable Hygrometer User’s Manual... - Page 176 Chapter 8. Maintenance and Troubleshooting [no content intended for this page] Model PM880 Portable Hygrometer User’s Manual...
-
Page 177: Chapter 9. Features And Specifications
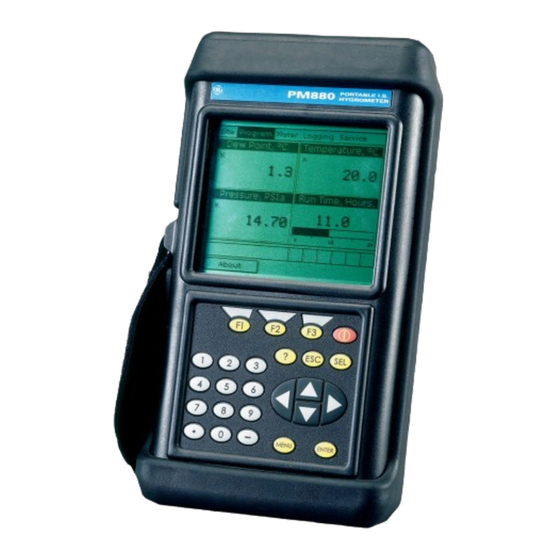
The following section discusses each part of this system and lists specifications. 9.1 The PM880 Hygrometer The center of the measurement system is the PM880 hygrometer. The front of the meter has a Liquid Crystal Display, a membrane keypad and menu keys. See Figure 74. -
Page 178: Probes
Chapter 9. Features and Specifications 9.1 The PM880 Hygrometer (cont.) The top of the PM880 (shown in Figure 75) includes an input for connecting moisture probes. An internal infrared transceiver enables communication between the meter and other IR devices, particularly the IR ®... -
Page 179: M Series And Tf Series Moisture Probes
(TF-9 probes do not have a shield). Other types of shields are available. See Figure 76. If the optional temperature thermistor or pressure transducer is not used, the user can enter fixed values for temperature and pressure into the PM880 memory. M Series TF Series Figure 76: M &... -
Page 180: Moisture Image Series Probe
The M and the TF Series probes, when operated with a BASEEFA- approved PM880, are intrinsically safe and designed to meet the requirements of IEC/CENELEC zone 0 areas. The M and TF Series probes measure moisture content in a standard range from –110°C to 20°C (–166°F to 68°F) dew/frost point temperature and... - Page 181 The Moisture Image Series probes, when operated with an ATEX certified PM880, are intrinsically safe and can be used in zone 0 areas. The Moisture Image Series probes measure moisture content in a standard range from –110°C to 20°C (–166°F to 68°F) dew/frost point temperature and optionally from –110°C to 60°C (–166°F to 140°F).
-
Page 182: Cabling
The M and the TF Series probes are connected to the analyzer with a special GE shielded cable. Probes can be located up to 600 meters (2,000 feet) from the PM880 (consult the factory for distances up to 1,200 meters). To measure pressure with a TF probe, the maximum cable length is approximately 152 meters (500 feet). -
Page 183: Operational
Portuguese, Russian, Castilian Spanish, Latin-American Spanish and Swedish. Display Units • Moisture: DP temperature, ppm , ppm , %RH, lb/MMSCF and others. • Temperature: °F, °C and °K • Pressure: psig, bar, kPa (gauge), kg/cm (gauge) and others Model PM880 Portable Hygrometer User’s Manual... -
Page 184: Electronics
Chapter 9. Features and Specifications 9.6 Electronics Internal Batteries Rechargeable. PM880 batteries can be installed or removed in hazardous areas. Batteries must be recharged in general-purpose areas only. Battery Life 15 to 24 hours depending on probe type (battery life reduced when operating below 0 Battery Charger •... - Page 185 Cl I, Div 1, Gr A, B, C, D, Type 6 Battery Charger: Class 2 Battery Charger Input: 115 VAC, 150 mA or 230 VAC, 74 mA, 50/60 Hz Output: 7.5 VDC, 690 mA, 5.2 W European Compliance Complies with EMC Directive 2004/108/EC Model PM880 Portable Hygrometer User’s Manual...
-
Page 186: Moisture Measurement
Compatible with all GE aluminum-oxide moisture probes: M Series, TF Series and Moisture Image Series. Each probe type requires a different type of I/O cable. Calibration GE moisture sensors are computer calibrated to NIST-traceable moisture concentrations. 9.8 Dew/Frost Point Temperature Overall Range Capability •... -
Page 187: Temperature Measurement
Chapter 9. Features and Specifications 9.9 Temperature Measurement Optional thermistor is available for all GE moisture probes. Range –30°C to 70°C (–22 to 158 Accuracy ±0.5°C at –30°C 9.10 Pressure Measurement Optional pressure sensor is available for TF Series and Moisture Image... -
Page 188: Sample System
Printer dimensions: 6.3 6.5 2.3 in. (160 164 59 mm). Weight: 13 oz (370 g). Print width: 4 in. (104 mm). • PC Interface Software - PanaView™ Graphical User Interface. Model PM880 Portable Hygrometer User’s Manual... -
Page 189: Appendix A. Measurement Considerations
There are a variety of environmental and installation factors that can affect measurements. These factors should be discussed with a GE applications engineer or field sales person by the time you receive the PM880. However, if you decide to add additional measurement sites, this section contains some basic guidelines for selecting a measurement site and constructing a sample system. -
Page 190: Moisture/Temperature Probe Considerations
Observing these few simple precautions will result in a long and useful probe life. GE recommends that probe calibration be checked routinely, at 12-month intervals, or as recommended by our applications engineers for your particular application. - Page 191 It will also perform well under gas flow conditions as high as 10,000 cm/sec and liquid flow conditions to 10 cm/sec. Refer to Application of the Hygrometer, for maximum flow rates in gases and liquids. Model PM880 Portable Hygrometer User’s Manual...
- Page 192 Corrosive Materials Avoid all materials that are corrosive or otherwise damaging to aluminum or aluminum oxide. These include strongly acidic or basic materials and primary amines. Model PM880 Portable Hygrometer User’s Manual...
-
Page 193: Sample System Guidelines
The application requirements determine the design of the sample system. GE applications engineers will make recommendations based on the following general guidelines: •... - Page 194 Appendix A. Measurement Considerations A.3 Sample System Guidelines (cont.) Sample Cell Sample Sample Outlet Inlet Vent Figure 79: Typical Moisture Sample System Note: The actual sample system design is dependent on the application requirements. Model PM880 Portable Hygrometer User’s Manual...
- Page 195 Appendix B. Menu Maps Appendix B. Menu Maps This chapter includes menu maps of the PM880 program. Refer to the following: • The Site Menu - page 183 • The Program Menu - page 184 • The Meter Menu - page 185 •...
- Page 196 Appendix B. Menu Maps [no content intended for this page] Model PM880 Portable Hygrometer User’s Manual...
-
Page 197: Appendix B. Menu Maps
P re ss [F 3 ] (O K ) to co n firm th e e n trie s a n d re tu rn to M e n u . Figure 80: Site Menu Model PM880 Portable Hygrometer User’s Manual... - Page 198 P re ss [F 3 ] (O K ) to co n firm the e n trie s a n d return to M e nu. E q u a tio n Figure 81: Program Menu Model PM880 Portable Hygrometer User’s Manual...
- Page 199 Y Y Y Y /M M M M /D D D D /M M T im e F o rm at D ata B its 1 2 H ou r 2 4 H our Figure 82: Meter Menu Model PM880 Portable Hygrometer User’s Manual...
- Page 200 P re ss [F 3 ] (O K ) to co n firm th e en trie s a n d re turn to M e n u. S ta n da rd E rror S ta rt E n d In te rva l M e asu re m en t Figure 83: Logging Menu Model PM880 Portable Hygrometer User’s Manual...
- Page 201 P ress [F 2] (C a nce l) to cancel the entries and return to M enu. P ress [F 3] (O K ) to confirm the en tries and return to M enu. Figure 84: Service Menu Model PM880 Portable Hygrometer User’s Manual...
- Page 202 Appendix B. Menu Maps [no content intended for this page] Model PM880 Portable Hygrometer User’s Manual...
- Page 203 Recalibrating Pressure Sensors ........161 Replacing and Recalibrating Moisture Probes ..... . 160 Model PM880 Portable Hygrometer User’s Manual...
- Page 204 Displaying Details ..........86, 87 Model PM880 Portable Hygrometer User’s Manual...
- Page 205 Hyperterminal, for Software Update ....... . . 147 Model PM880 Portable Hygrometer User’s Manual...
- Page 206 Logging Menu Map ..........186 Model PM880 Portable Hygrometer User’s Manual...
- Page 207 Turning On and Off ..........5 Model PM880 Portable Hygrometer User’s Manual...
- Page 208 Return Policy ........... . 202 Model PM880 Portable Hygrometer User’s Manual...
- Page 209 Shortcuts, Function Key, Configuring ........37 Model PM880 Portable Hygrometer User’s Manual...
- Page 210 Symbols ............31 Model PM880 Portable Hygrometer User’s Manual...
- Page 211 Wizard, Add Hardware ..........111 Model PM880 Portable Hygrometer User’s Manual...
- Page 212 Index [no content intended for this page] Model PM880 Portable Hygrometer User’s Manual...
- Page 213 Warranty Warranty Each instrument manufactured by GE Sensing is warranted to be free from defects in material and workmanship. Liability under this warranty is limited to restoring the instrument to normal operation or replacing the instrument, at the sole discretion of GE Sensing. Fuses and batteries are specifically excluded from any liability.
- Page 214 AUTHORIZATION NUMBER (RAN), and shipping instructions for the return of the instrument to a service center will be provided. If GE Sensing instructs you to send your instrument to a service center, it must be shipped prepaid to the authorized repair station indicated in the shipping instructions.
- Page 215 Billerica, MA 01821-4111 U.S.A. as the manufacturer, declare under our sole responsibility that the product Model PM880 Portable Hygrometer to which this document relates, in accordance with the provisions of ATEX Directive 94/9/EC Annex II, meets the following specifications: II 1 G EEx ia IIC T3 (-20°C to +50°C)
- Page 216 • EN 50284: 1999 • II 1 G EEx ia IIC T4: PM880: Baseefa02ATEX0191 (Baseefa, Buxton, Derbyshire, UK - NoBo 1180) MMS35IS: ISSeP01ATEX035X (ISSeP, B7340 Colfontaine, Belgium - NoBo 492) • EN 61326-1: 2006, Class A, Table A.1, Portable Equipment...
- Page 218 Customer Support Centers U.S.A. The Boston Center 1100 Technology Park Drive Billerica, MA 01821 U.S.A. Tel: 800 833 9438 (toll-free) 978 437 1000 E-mail: sensing@ge.com Ireland Sensing House Shannon Free Zone East Shannon, County Clare Ireland Tel: +35 361 470291 E-mail: gesensingsnnservices@ge.com An ISO 9001:2008 Certified Company www.ge-mcs.com/en/about-us/quality.html...