
Related Manuals for Makita XSL05


Summary of Contents for Makita XSL05
- Page 1 INSTRUCTION MANUAL MANUAL DE INSTRUCCIONES Cordless Compound Miter Saw Sierra de Inglete Inalámbrica XSL05 IMPORTANT: Read Before Using. IMPORTANTE: Lea antes de usar.
-
Page 2: Specifications
ENGLISH (Original instructions) SPECIFICATIONS Model: XSL05 Blade diameter 165 mm (6-1/2") Hole (arbor) diameter 15.88mm (5/8") Max. miter angle Left 52°, Right 52° Max. bevel angle Left 45° (46° when using release lever), Right 45° (46° when using release lever) - Page 3 When operating a power tool outdoors, use an Do not use the power tool if the switch does extension cord suitable for outdoor use. Use of not turn it on and off. Any power tool that cannot a cord suitable for outdoor use reduces the risk of be controlled with the switch is dangerous and electric shock.
-
Page 4: Safety Instructions For Mitre Saws
Do not expose a BATTERY pack or tool to fire Do not reach behind the fence with either hand or excessive temperature. Exposure to fire or closer than 100 mm from either side of the saw temperature above 130 °C may cause explosion. blade, to remove wood scraps, or for any other reason while the blade is spinning. The proxim- Follow all charging instructions and do not ity of the spinning saw blade to your hand may not... - Page 5 16. If the workpiece or blade becomes jammed, Make sure that the turn base is properly turn the mitre saw off. Wait for all moving secured so it will not move during operation. parts to stop and disconnect the plug from Use the holes in the base to fasten the saw to a the power source and/or remove the battery stable work platform or bench.
- Page 6 Use of non-genuine Makita batteries, or batteries that have been altered, may result in the battery bursting battery cartridge causing fires, personal injury and damage. It will also void the Makita warranty for the Makita tool and Before using battery cartridge, read all instruc- charger. tions and cautionary markings on (1) battery...
-
Page 7: Parts Description
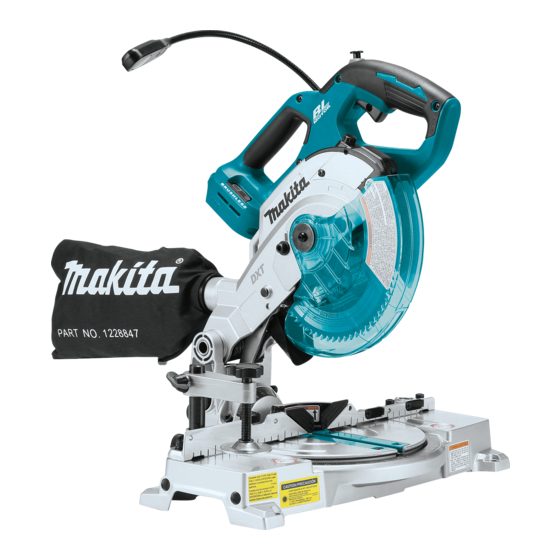
PARTS DESCRIPTION Lock-off button Switch trigger Handle Blade case Blade Blade guard Sub-fence Small sub-fence Base Turn base Guide fence Vertical vice Dust bag Dust nozzle Center cover 7 ENGLISH... -
Page 8: Installation
Lamp Battery cartridge Hex wrench Release lever Lever (for bevel angle Kerf board Lower limit adjusting bolt Lamp switch adjustment) Laser switch INSTALLATION Bench mounting WARNING: Ensure that the tool does not move on the supporting surface. Movement of the miter saw on the supporting surface while cutting may result in loss of control and serious personal injury. -
Page 9: Functional Description
Tool / battery protection system FUNCTIONAL DESCRIPTION The tool is equipped with a tool/battery protection sys- tem. This system automatically cuts off power to the motor to extend tool and battery life. The tool will auto- WARNING: matically stop during operation if the tool or battery is Always be sure that the tool is placed under one of the following conditions: switched off and the battery cartridge is removed before adjusting or checking the functions on Overload protection the tool. - Page 10 When you pull the switch trigger, the battery indicator NOTE: Depending on the conditions of use and the indicates the remaining battery capacity. ambient temperature, the indication may differ slightly from the actual capacity. Battery indicator status Remaining battery Automatic speed change function capacity Blinking 50% to 100%...
-
Page 11: Blade Guard
WARNING: Do not remove spring holding removed guard may result in serious personal injury. blade guard. If guard becomes damaged in course of time or UV light exposure, contact a Makita ser- CAUTION: Always maintain the blade guard vice center for replacement. DO NOT DEFEAT OR in good condition for safe operation. Stop the REMOVE GUARD. - Page 12 ► 1 . Guide fence ► 1 . Saw blade 2. Blade teeth 3. Kerf board 4. Left bevel cut 5. Straight cut Rotate the blade by hand while holding the handle all the way down to be sure that the blade does not Tighten the screws (do not tighten firmly).
-
Page 13: Adjusting The Bevel Angle
Loosen the fixing screw counterclockwise. Adjust the angle of the turn base. Use the pointer and the miter scale as a guide. Tighten the fixing screw clockwise firmly. CAUTION: After changing the miter angle, always secure the turn base by tightening the fixing screw firmly. NOTICE: When turning the turn base, be sure to raise the handle fully. Adjusting the bevel angle ► 1 . - Page 14 ► 1 . Release button ► 1 . Lever 2. Release lever Turn the lever upward firmly to secure the saw CAUTION: After changing the bevel angle, head. always secure the saw head by turning the lever upward firmly. Adjusting the lever position NOTICE: When tilting the saw blade, be sure the If the lever does not provide full tightening in course of handle is fully raised.
- Page 15 Do not cover the light with clothes, carton, cardboard or similar objects while it is repair may result in unintentional operation and seri- lighted, which can cause a fire or an ignition. ous personal injury. Return tool to a Makita service center for proper repairs BEFORE further usage. CAUTION: Do not look in the light or see the WARNING: source of light directly.
-
Page 16: Electric Brake
This tool is equipped with an electric blade brake. If the tool consistently fails to quickly stop the blade after the switch trigger is released, have the tool serviced at a Makita service center. CAUTION: The blade brake system is not a substitute for the blade guard. Never use tool without a functioning blade guard. An unguarded... - Page 17 CAUTION: Use only the Makita hex wrench provided to install or remove the blade. Failure to do so may result in overtightening or insufficient tightening of the hex socket bolt. This could cause an injury.
-
Page 18: Securing Workpiece
► 1 . Saw blade 2. Arrow Install the outer flange and hex socket bolt, and then use the hex wrench to tighten the hex socket bolt Securing workpiece (left-handed) of the spindle securely counterclockwise while pressing the shaft lock. Return the blade guard and center cover to its WARNING: It is extremely important to always original position. Then tighten the hex socket bolt of the... -
Page 19: Operation
OPERATION WARNING: Make sure the blade is not con- tacting the workpiece, etc. before the switch is turned on. Turning the tool on with the blade in contact with the workpiece may result in kickback and serious personal injury. WARNING: After a cutting operation, do not raise the blade until it has come to a complete stop. The raising of a coasting blade may result in serious personal injury and damage to the workpiece. -
Page 20: Bevel Cut
Bevel cut Compound cutting Compound cutting is the process in which a bevel WARNING: After setting the blade for a bevel angle is made at the same time in which a miter angle cut, before operating the tool ensure that the saw is being cut on a workpiece. -
Page 21: Maintenance
Centers, always using Makita replacement parts. Remove the battery cartridge. Adjusting the cutting angle Secure the blade at 0° bevel angle and the turn base at the full right miter angle position. -
Page 22: Bevel Angle
► 1 . Guide fence 2. Hex socket bolt ► 1 . Screw 2. Miter scale 3. Pointer Bevel angle 0° bevel angle Lower the handle fully and lock it in the lowered position by pushing in the stopper pin. Loosen the lever at the rear of the tool. - Page 23 ► 1 . Screw 2. Pointer 3. Bevel scale NOTICE: Have the tool repaired by a Makita authorized service center for any failure on the 45° bevel angle laser unit.
- Page 24 Adjusting the laser line on the right side of the blade ► 1 . Vise Install the battery cartridge to the tool and turn on the laser switch. Loosen the adjusting screw. To move the laser line away from the blade, turn the range adjustment screws counterclockwise. To move the laser line close to the blade, turn the range adjustment screw clockwise. Adjusting the laser line on the left side of the blade ► 1 . Range adjustment screw 2.
-
Page 25: After Use
Should any trouble develop during this one year period, return the COMPLETE tool, freight prepaid, to one of Makita’s Factory or Authorized Service Centers. If inspection shows the trouble is caused by defective workmanship or material, Makita will repair (or at our option, replace) without charge. ► 1 . Lens This Warranty does not apply where: • repairs have been made or attempted by others:... -
Page 26: Especificaciones
ESPAÑOL (Instrucciones originales) ESPECIFICACIONES Modelo: XSL05 Diámetro del disco 165 mm (6-1/2″) Diámetro del orificio (eje) 15,88 mm (5/8") Ángulo de inglete máximo Izquierda 52°, Derecha 52° Ángulo de bisel máximo Izquierdo a 45° (a46° al usar la palanca de liberación), Derecho a 45° (a46° al usar la palanca de liberación) Velocidad sin carga (r.p.m.) - Page 27 Seguridad eléctrica Retire cualquier llave de ajuste o llave de apriete antes de encender la herramienta. Una Las clavijas de conexión de las herramientas llave de ajuste o llave de apriete que haya sido eléctricas deberán encajar perfectamente en la dejada puesta en una parte giratoria de la herra- toma de corriente. No modifique nunca la clavija mienta eléctrica puede ocasionar alguna lesión.
- Page 28 Mantenga las herramientas de corte limpias Servicio y filosas. Si recibe un mantenimiento adecuado Haga que una persona calificada repare la y tiene los bordes afilados, es probable que la herramienta eléctrica utilizando sólo piezas de herramienta se atasque menos y sea más fácil repuesto idénticas. Esto asegura que se man- controlarla.
- Page 29 No acerque las manos por detrás de la guía a 13. La pieza de corte no debe atascarse ni ser más de 100 mm de distancia de ambos lados presionada en ninguna forma contra el disco del disco de la sierra para extraer restos de de la sierra que está...
- Page 30 19. Utilice los accesorios recomendados en este No utilice la sierra sin los protectores pues- tos. Verifique que el protector del disco cierre manual. El uso de accesorios inapropiados debidamente antes de cada uso. No utilice la tales como discos abrasivos podría ocasionar sierra si el protector del disco no se mueve lesiones.
- Page 31 Antes de utilizar el cartucho de batería, lea lidará la garantía de Makita para la herramienta y el todas las instrucciones e indicaciones de cargador Makita. precaución en el (1) el cargador de batería, (2) la batería, y (3) el producto con el que se utiliza...
-
Page 32: Descripción De Las Piezas
DESCRIPCIÓN DE LAS PIEZAS Botón de desbloqueo Gatillo interruptor Empuñadura Caja del disco Disco Protector del disco Guía auxiliar Guía auxiliar pequeña Base Base giratoria Guía lateral Prensa vertical Bolsa recolectora de Boquilla para polvo Cubierta central polvo 32 ESPAÑOL... -
Page 33: Instalación
Lámpara Cartucho de batería Llave hexagonal Palanca de liberación Palanca (para ajustar el Panel de corte Perno de ajuste del Interruptor de la lámpara ángulo de bisel) límite inferior Interruptor para el láser INSTALACIÓN Montaje en un banco de trabajo ADVERTENCIA: Asegúrese de que la herra- mienta no se mueva sobre la superficie de apoyo. -
Page 34: Descripción Del Funcionamiento
Sistema de protección para la DESCRIPCIÓN DEL herramienta/batería FUNCIONAMIENTO La herramienta está equipada con un sistema de pro- tección de la herramienta/batería. Este sistema corta ADVERTENCIA: Asegúrese siempre de que en forma automática el suministro de energía al motor la herramienta esté apagada y el cartucho de para prolongar la vida útil de la herramienta y la batería. - Page 35 Oprima el botón de verificación en el cartucho de la Indicación de capacidad restante de batería para que indique la capacidad restante de la la batería batería. Las luces indicadoras se iluminarán por algu- nos segundos. Luces indicadoras Capacidad restante Iluminadas Apagadas Parpadeando 75% a 100% 50% a 75% 25% a 50% 0% a 25% ► 1 .
- Page 36 Makita para solicitar un repuesto. NO INHABILITE NI RETIRE EL PROTECTOR. Posicionamiento del panel de corte...
- Page 37 AVISO: Tras ajustar el ángulo de bisel, asegure que los paneles de corte queden ajustados correctamente. El ajuste correcto de los paneles de corte ayudará a ofrecer un apoyo adecuado de la pieza de trabajo minimizando su desplazamiento. Manteniendo la máxima capacidad de corte Esta herramienta está ajustada de fábrica para ofrecer la máxima capacidad de corte para un disco de sierra de 165 mm (6-1/2").
- Page 38 ADVERTENCIA: Tras la colocación de un disco nuevo y con el cartucho de la batería reti- rado, asegúrese siempre de que el disco no haga contacto con ninguna pieza de la base inferior al bajar la empuñadura por completo. Si un disco hace contacto con la base, puede producirse un retroceso brusco ocasionando lesiones personales graves.
- Page 39 Ajuste del ángulo de bisel PRECAUCIÓN: Después de cambiar el ángulo de bisel, asegure siempre la cabeza de la Para ajustar el ángulo de bisel, gire hacia abajo la sierra girando la palanca firmemente hacia arriba. palanca en la parte trasera de la herramienta. AVISO: Cuando incline el disco de la sierra, asegúrese de que la empuñadura esté...
- Page 40 (0) del interruptor. una activación no intencional la cual puede causar graves lesiones personales. Regrese la herramienta al centro de servicio Makita para las reparaciones apropiadas ANTES de continuar su utilización. ADVERTENCIA: NUNCA inhabilite el botón de desbloqueo manteniéndolo presionado con cinta adhesiva o mediante otro método.
- Page 41 ► 1 . Lámpara 2. Interruptor de la lámpara ► 1 . Tornillo de ajuste Afloje el tornillo de ajuste girándolo en sentido NOTA: Utilice un paño seco para quitar la suciedad inverso al de las manecillas del reloj. de la lente de la lámpara. Tenga cuidado de no rayar la lente de la lámpara ya que la iluminación podría Con el tornillo de ajuste aflojado, deslice el tornillo disminuir. de ajuste a la derecha o la izquierda tan lejos como llegue. NOTA: Asegúrese de desactivar el interruptor ya que Apriete el tornillo de ajuste firmemente en la posi- el activarlo consume la potencia de la batería.
-
Page 42: Montaje
Freno eléctrico PRECAUCIÓN: Use solamente la llave hexa- gonal Makita proporcionada para instalar o retirar La herramienta está equipada con un freno eléctrico el disco. El no hacerlo puede ocasionar que el perno para el disco. Si la herramienta falla constantemente... - Page 43 ► 1 . Disco de la sierra 2. Flecha Instale la brida exterior y el perno de cabeza hexagonal, y luego use la llave hexagonal para apretar el perno de cabeza hexagonal (a mano izquierda) del eje fijamente en sentido inverso al de las manecillas del reloj mientras presiona el eje de bloqueo. Regrese el protector del disco y la cubierta cen- tral a su posición original.
- Page 44 Prensa vertical ADVERTENCIA: Asegure la pieza de trabajo firmemente contra la base giratoria y la guía late- ral con la prensa durante todas las operaciones. De lo contrario, la pieza podría moverse durante la operación de corte causando daños al disco, y ser lanzada provocando la pérdida de control y lesiones personales graves.
-
Page 45: Operación
Las piezas de trabajo de hasta 46 mm (1-13/16") de alto y 92 mm (3-5/8") de ancho pueden ser cortadas de la siguiente manera. Asegure la pieza de trabajo con la prensa. Encienda la herramienta sin que el disco haga contacto alguno y espere a que éste adquiera velocidad completa antes de bajar la empuñadura. Luego baje lentamente la empuñadura a la posi- ción completamente hacia abajo para realizar el corte en la pieza de trabajo. Una vez finalizado el corte, apague la herramienta y espere hasta que el disco se haya detenido por completo antes de regresar el disco a su posición ► 1 . -
Page 46: Corte Compuesto
Afloje la palanca e incline el disco de la sierra para Cuando asegure extrusiones de aluminio, utilice blo- ajustar el ángulo de bisel (consulte la sección “Ajuste ques espaciadores o piezas de desecho tal como se del ángulo de bisel” descrita anteriormente). Asegúrese muestra en la figura para evitar la deformación del de volver a ajustar con firmeza la palanca para fijar bien aluminio. Utilice un lubricante de corte cuando corte el ángulo de bisel seleccionado. la extrusión de aluminio para evitar la acumulación de material de aluminio en el disco. -
Page 47: Ajuste Del Ángulo De Corte
Nunca use gasolina, bencina, diluyente (tíner), alcohol o sustancias similares. Puede que esto ocasione grietas o descoloramiento. Para mantener la SEGURIDAD y FIABILIDAD del pro- ducto, las reparaciones, y cualquier otra tarea de man- tenimiento o ajuste deberán ser realizadas en centros de servicio autorizados o de fábrica Makita, empleando siempre repuestos Makita. 47 ESPAÑOL... - Page 48 Ángulo de bisel Ángulo de bisel de 0° Baje completamente la empuñadura y trábela en la posición inferior empujando la clavija de retención. Suelte la palanca que se encuentra en la parte trasera de la herramienta. Gire el perno de ajuste del ángulo de bisel de 0° del lado derecho de la cabeza de la sierra dos o tres revoluciones en sentido inverso al de las manecillas del reloj para inclinar el disco hacia la derecha.
- Page 49 AVISO: Lleve la herramienta a reparar a un cen- Asegúrese de que el marcador en el brazo indi- tro de servicio autorizado de Makita en caso de que 45° en la escala de bisel. Si el marcador no indica haber alguna falla en la unidad láser. 45°, gire el perno de ajuste del ángulo de bisel de 45°...
- Page 50 Ajuste de la línea de láser del lado derecho del disco ► 1 . Prensa Instale el cartucho de batería en la herramienta y active el interruptor para el láser. Afloje el tornillo de ajuste. Para dirigir la línea de láser lejos del disco, gire los tornillos de ajuste de rango en sentido inverso al de las manecillas del reloj. Para dirigir la línea de láser cerca del disco, gire el tornillo de ajuste de rango en el sentido de las manecillas del reloj.
-
Page 51: Accesorios Opcionales
Makita. Si la inspección ► 1 . Lente muestra que el problema ha sido a causa de un defecto de mano de obra o material, Makita hará la reparación AVISO: (o a su discreción, el reemplazo) sin ningún cargo. - Page 52 Para reducir la exposición a estos productos químicos: trabaje en un área bien ventilada y póngase el equipo de seguridad indicado, tal como las máscaras contra polvo que están especialmente diseñadas para filtrar partículas microscópicas. Makita Corporation 3-11-8, Sumiyoshi-cho, Anjo, Aichi 446-8502 Japan 885605-942...