Bosch Solution 2000 Installation Manual
Hide thumbs
Also See for Solution 2000:
- User manual (31 pages) ,
- Programming (12 pages) ,
- Quick start manual (4 pages)
Table of Contents
Advertisement
Quick Links
Advertisement
Table of Contents

Related Manuals for Bosch Solution 2000


Summary of Contents for Bosch Solution 2000
- Page 1 Control Panel Solution 2000 / 3000 Installation Guide...
-
Page 3: Table Of Contents
Control Panel Table of Contents | en Table of contents Introduction About documentation Bosch Security Systems, Inc. product manufacturing dates System Overview Product Matrix Configuration and Parts 2.2.1 Control panel capacities 2.2.2 Parts list 2.2.3 Order separately Installation workflow Accessories Codepads 4.1.1... - Page 4 Arm the System in STAY Mode 1 7.4.3 Arm the System in STAY Mode 2 7.4.4 Horn Speaker Test 7.4.5 Bell Test 7.4.6 Strobe Test 7.4.7 Turning Day Alarm On and Off 2017.10 | 03 | F.01U.298.026 Installation Guide Bosch Security Systems, Inc.
- Page 5 A-Link Plus Options 11.21 Domestic Dialing 11.21.1 Domestic Dialing Funtion 11.21.2 Setting Up and Programming Domestic Reporting 11.22 Reporting Formats 11.22.1 Contact ID Format 11.22.2 SIA Format 11.22.3 System Reporting List Bosch Security Systems, Inc. Installation Guide 2017.10 | 03 | F.01U.298.026...
- Page 6 15.7.2 Walk Test Report 15.7.3 Bypass Report 15.7.4 Trouble Report 15.7.5 Sensor Watch Report 15.7.6 Alarm Restore Code 15.7.7 RF Receiver Trouble Report 15.7.8 RF Receiver Trouble Restore Report 2017.10 | 03 | F.01U.298.026 Installation Guide Bosch Security Systems, Inc.
- Page 7 System Options 4 18.5 System Option 5 18.6 Consumer Options 1 18.7 Consumer Options 2 18.8 Consumer Options 3 Partitioning 19.1 Programming 19.1.1 Partitioning Options 1 19.1.2 Partitioning Options 2 Bosch Security Systems, Inc. Installation Guide 2017.10 | 03 | F.01U.298.026...
- Page 8 | Table of Contents Control Panel 19.2 Partition Allocations 19.2.1 Zone Area Assignments 19.2.2 Codepad assignment 19.2.3 User code area assignments Text Information 2017.10 | 03 | F.01U.298.026 Installation Guide Bosch Security Systems, Inc.
-
Page 9: Introduction
Bosch Security Systems, Inc. product manufacturing dates Use the serial number located on the product label and refer to the Bosch Security Systems, Inc. website at http://www.boschsecurity.com/datecodes/. The following image shows an example of a product label and highlights where to find the manufacturing date within the serial number. - Page 10 | Introduction Control Panel 2017.10 | 03 | F.01U.298.026 Installation Guide Bosch Security Systems, Inc.
-
Page 11: System Overview
Number of areas/partitions Number of on-board outputs Number of codepads Number of B308 Octo-output modules Number of B426 IP communicators Number of B442 or B450 GPRS communicators Number of WE800EV2 receivers Bosch Security Systems, Inc. Installation Guide 2017.10 | 03 | F.01U.298.026... -
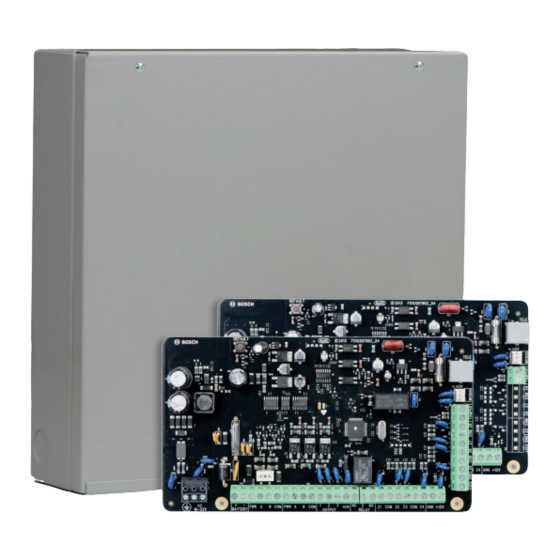
Page 12: Parts List
Parts list Control panels ship assembled from the factory with the following parts: Literature – Control Panels (Solution 2000 / Solution 3000 ) Quick Reference Guide – Control Panels (Solution 2000 / Solution 3000 ) User Guide HW pack –... -
Page 13: Installation Workflow
Before installing and operating the control panel, read these instructions. Failure to follow these procedures may cause the device not to function properly. Bosch Security Systems Inc. is not responsible for any devices that are improperly installed, tested, or maintained. -
Page 14: Accessories
| Accessories Control Panel Accessories Bosch Security Systems, Inc. manufactures a number of accessories that can be used in conjunction with the control panel. These devices enhance certain features to make the system extremely flexible. Some sections include basic installation instructions. For detailed installation instructions, refer to the Installation Guide that came packaged with the device. - Page 15 If multiple codepads reside on the same system, each codepad must have a unique address. The Solution 2000/3000 control panels support up to 4 codepads, addresses 01-04. DIP switch address settings greater than 4 prevent the codepad from processing messages received on the SDI2 bus and the option bus.
-
Page 16: Installer Menu
Press [470 #] to enter Exit Time address to program. To program Exit Time using the IUI-SOL-ICON Enter the Installer Code followed by [#] key, then press [470 #] to enter Exit Time address to program. 2017.10 | 03 | F.01U.298.026 Installation Guide Bosch Security Systems, Inc. -
Page 17: Control Panel
Digit 3 for codepad duress alarm [498.2] Siren and strobe output in STAY [498.3] Speaker beep volume [491] Country code [112] Domestic Dail Fail To Report [110.1] System option 2 [110.2] Installer Arm/Disarm Function Bosch Security Systems, Inc. Installation Guide 2017.10 | 03 | F.01U.298.026... -
Page 18: We800Ev2 Receiver
Install the module Remove the small knockout in the Solution 2000/3000 control panel for the antenna and insert the supplied rubber grommet. Install the WE800EV2 PCB in the control panel with the top of the PCB in the slot provided at the top of the case and secure with the provided screw at the bottom of the PCB. -
Page 19: Hct-4 Keyfob
RADION receiver B810 The B810 is a wireless receiver that connects RADION wireless peripherals such as the motion detectors, keyfobs, panic buttons, repeaters, and more, to supported Bosch control panels using the SDI2 Bus connection. For more information, refer to the installation and operation manuals for this product. -
Page 20: Radion Repeater
Notice! Remove all power (AC and battery) before making any connections. Failure to do so might result in personal injury and/or equipment damage. Wire to the control panel 2017.10 | 03 | F.01U.298.026 Installation Guide Bosch Security Systems, Inc. -
Page 21: B426/B426-M Conettix Ethernet Communication Modules
It is capable as a stand-alone path or it can be used in conjunction with another communication technology. For Fire Monitoring applications, the B426 meets UL864 and NFPA72 standards for Single Communication Technology with approved Bosch control panels. 4.10 B450/B450-M Conettix Plug-in Communicator Interfaces... -
Page 22: A-Link Plus Software
4.11 A-Link Plus Software You can program or control the Solution 2000/3000 control panels remotely using A-Link plus Software. This software allows you to change your customer’s control panel without leaving your office, which improves customer service and saves your time and money. For locations where a control panel is installed hundreds of kilometers from your office, the Upload/ Download feature is invaluable. -
Page 23: Remote Security Control
Android and Apple iOS devices. Downloading the installation files: Go to the Bosch website (au.boschsecurity.com). Click on the Products tab and select Intrusion Alarm Systems. On the right side of the page, under Online Tools, click the Remote Access Profile Builder link. -
Page 24: Tf008 Plug Pack (Tf008-B)
Copy the control panel memory to the DLA. – Copy the DLA data to the control panel memory. – Control panel firmware upgrade. A-Link Plus controls the control panel remotely via DLA. 2017.10 | 03 | F.01U.298.026 Installation Guide Bosch Security Systems, Inc. -
Page 25: Configuration
Programming Mode. Two beeps sound and the STAY and AWAY indicators flash on the codepad to indicate you entered Installer’s Programming Mode. The codepad displays the data stored in Location 000. Bosch Security Systems, Inc. Installation Guide 2017.10 | 03 | F.01U.298.026... -
Page 26: Command 960 - Save And Exit From Installer's Programming Mode
| Configuration Control Panel Connect the direct link adapter to the Bosch SDI2 Bus pins at the bottom of the control panel printed circuit board. Enter [9 5 9 #]. Two beeps sound after a successful test of the direct link adapter. A long beep indicates that the direct link adapter data is corrupt and must be erased to clear the corrupt data. -
Page 27: Command 963 - Copy Iui-Sol-Adapter Data To The Control Panel
Installer’s Programming Mode. The codepad displays the data stored in Location 000. Connect the direct link adapter to the Bosch SDI2 Bus pins at the bottom of the control panel printed circuit board. Enter [9 6 3 #]. Two beeps sound after the direct link adapter’s data is successfully copied to the control panel. -
Page 28: Command 966 - Enable/Disable The Automatic Stepping Of Locations
Enter the Installer Code (the default is 1234) and press [#] to enter Installer’s Programming Mode. If you are using the codepad, the STAY and AWAY indicators flash to indicate you entered Installer’s Programming Mode. 2017.10 | 03 | F.01U.298.026 Installation Guide Bosch Security Systems, Inc. -
Page 29: Disable Factory Defaults
Enter 15 for Location 900 to restrict the ability to restore the control panel to its default settings and to require the Installer Code for future control panel programming. If the Installer Code is unknown, you must restore the control panel to your Bosch distributor for exchange. A nominal fee applies for this service. - Page 30 The control panel default factory settings are restored. Notice! Do not connect the DLA to control panel when restore the default control panel settings using the DEFAULT button, otherwise the control panel will start firmware upgrading. 2017.10 | 03 | F.01U.298.026 Installation Guide Bosch Security Systems, Inc.
-
Page 31: System Operations
AWAY Mode to disable detection devices that activate the sirens, strobe, and bell outputs. If there was an alarm prior to disarming the system from AWAY Mode, a zone indicator flashes, indicating a previous alarm in that zone. Bosch Security Systems, Inc. Installation Guide 2017.10 | 03 | F.01U.298.026... -
Page 32: Arming The System In Stay Mode
For example, if a window is open when Exit Time expires, the window does not become an active part of the system until it is closed. Opening the window after Exit Time expires causes an alarm. Forced Arming 2017.10 | 03 | F.01U.298.026 Installation Guide Bosch Security Systems, Inc. -
Page 33: Disarming The System From Stay Mode 1
Mode expires or the system is disarmed. If the alarm is not reset before Entry Guard Time for STAY Mode expires, the strobe, bell, and siren outputs are activated into alarm. Notice! Single button arming from STAY Mode 2 reports as User Code 00. Bosch Security Systems, Inc. Installation Guide 2017.10 | 03 | F.01U.298.026... -
Page 34: Disarming The System From Stay Mode 2
Alarm (refer to Consumer Options 3, page 143). Codepad panic alarm An audible codepad Panic Alarm activates when a user presses either [1] and [3] or [STAY] and [AWAY] simultaneously. 2017.10 | 03 | F.01U.298.026 Installation Guide Bosch Security Systems, Inc. -
Page 35: Codepad Fire Alarm
Enter the number of the zone to be isolated and press [STAY]. The indicator for the zone flashes. 24-Hour zones are automatically isolated as soon as you press [STAY]. All other Burglary Zones are automatically isolated only after the system is armed. Bosch Security Systems, Inc. Installation Guide 2017.10 | 03 | F.01U.298.026... -
Page 36: Code To Isolate
If the AC MAINS supply fails, the MAINS indicator flashes until the AC MAINS supply is restored. Press [AWAY] once to acknowledge the fault and stop the codepad from beeping once every minute. 2017.10 | 03 | F.01U.298.026 Installation Guide Bosch Security Systems, Inc. -
Page 37: Fault Descriptions
The system FAULT indicator lights when any of the faults listed in the table System FAULT Indicators below occurs. In Fault Analysis Mode, press [1] to determine the fault that occurred. Bosch Security Systems, Inc. Installation Guide 2017.10 | 03 | F.01U.298.026... - Page 38 This fault registers when the system detects a low capacity backup battery. The system automatically performs a battery test every 4 hours and every time you arm the system. Date and time This fault registers when the system is powered down. 2017.10 | 03 | F.01U.298.026 Installation Guide Bosch Security Systems, Inc.
-
Page 39: Inquire Cloud Status
When the control panel is connected to the cloud module B4xx-M, go to menu 721 Network Module to select B4xx-M and set it to enable. Inquire the cloud status to check connection status to the cloud service and to view the module UID. Bosch Security Systems, Inc. Installation Guide 2017.10 | 03 | F.01U.298.026... - Page 40 How to view the cloud status and UID Enter your Installer Code or User Code, followed by [#]. Press [1][2][3], the cloud status is shown. Press [#], the UID is shown. Press [-] to exit. 2017.10 | 03 | F.01U.298.026 Installation Guide Bosch Security Systems, Inc.
-
Page 41: System Functions
Add or Delete RF Wireless Devices Notice! The Solution 2000 control panel does not support wireless devices. The Solution 3000 control panel can accept up to 16 wireless devices on the system. It is possible to enroll wireless PIRs, reed switches, and smoke detectors to the control panel. This control panel supports the following RF sensors: –... -
Page 42: Add/Delete Rf Repeater
7.1.2 Add/Delete RF Repeater Notice! Solution 2000 does not support RF repeaters. For Solution 3000 , set RF receiver as RADION Receiver B810. Add RF Repeater Enter the Installer Code, followed by [0] and the [#] key (for example, [12340#]). -
Page 43: Add/Delete Rf Keyfob
Enter the Master Code, followed by [1] and the [#] key. Enter the WE800EV2 keyfob number (301 to 332) you want to delete, followed by the [#] key. Press the [*] key to delete the WE800EV2 Keyfob. Bosch Security Systems, Inc. Installation Guide 2017.10 | 03 | F.01U.298.026... - Page 44 Control Panel Add RADION Keyfob Notice! Solution 2000 does not support RADION keyfobs. Set RF receiver as RADION Receiver B810 (Value 1 in Location 395). Enter the Master Code, followed by [1] and the [#] key (for example, [25801#]). Enter the RADION keyfob number (301 to 332) you want to add (301 = keyfob 1, 302 = keyfob2, etc.), followed by the [#] key.
-
Page 45: Set The Number Of Days Until The First Test Report
Repeat steps 1 - 4 to program another phone number. Digit Required Number to Program Digit Required Number to Program 4-sec Pause Terminator Table 7.1: Domestic Dialing Telephone Digits Bosch Security Systems, Inc. Installation Guide 2017.10 | 03 | F.01U.298.026... -
Page 46: Change Telco Arm/Disarm Sequence
This option allows you to automatically disable the call forward sequence when you disarm the system. Digit Required Number to Program Digit Required Number to Program 4-sec Pause Terminator Table 7.2: Dialing Digits 2017.10 | 03 | F.01U.298.026 Installation Guide Bosch Security Systems, Inc. -
Page 47: Setting Stay Mode 2 Bypass Zones
To arm the system in STAY Mode 2, press and hold [0] until two beeps sound. Refer to Arming the system from STAY Mode 2, page 33 for more information. Bosch Security Systems, Inc. Installation Guide 2017.10 | 03 | F.01U.298.026... -
Page 48: Turning Report Monitor Mode On And Off
To turn Report Monitor Mode on: Enter the Installer Code and press [6][AWAY]. Three beeps sound. Zone indicators turn on to indicate report events for receiver 1 and 2. 2017.10 | 03 | F.01U.298.026 Installation Guide Bosch Security Systems, Inc. -
Page 49: Walk Test Mode
Event System armed in AWAY Mode Alarm in Zone 3 Alarm in Zone 4 System disarmed System armed in STAY Mode The alarm memory plays back in this order: Bosch Security Systems, Inc. Installation Guide 2017.10 | 03 | F.01U.298.026... -
Page 50: Away/Stay 1 Arm/Disarm
To disarm the system from STAY Mode 1: Enter the Installer Code and press [9][STAY]. Two beeps sound and the STAY indicator is extinguished. The system is now disarmed. 2017.10 | 03 | F.01U.298.026 Installation Guide Bosch Security Systems, Inc. -
Page 51: Master Code Functions
Enter your Master Code and press [0][AWAY]. Two beeps sound and both areas are armed or disarmed from AWAY Mode. 7.2.2 Arm or Disarm Single Area This Master Code function allows to arm or disarm single area with any codepad. Bosch Security Systems, Inc. Installation Guide 2017.10 | 03 | F.01U.298.026... -
Page 52: Changing And Deleting User Codes
Press [STAY] to delete the User Code. Two beeps sound and the STAY and AWAY indicators are extinguished. Repeat this procedure to delete other User Codes. Example To delete User Code number 3, enter: [2 5 8 0 1][AWAY][3][AWAY][STAY] 2017.10 | 03 | F.01U.298.026 Installation Guide Bosch Security Systems, Inc. -
Page 53: Adding Remote Radio User Codes
Enter the WE800EV2 keyfob number (301 to 332) you want to delete, followed by the [#] button. Press the [*] button to delete the WE800EV2 Keyfob. To Delete a RADION Keyfob Enter your Master Code, followed by [1] and the [#] button. Bosch Security Systems, Inc. Installation Guide 2017.10 | 03 | F.01U.298.026... -
Page 54: Change Domestic Phone Numbers
AWAY indicators flash. Enter the number of the output (1 to 20) and press [STAY]. Two beeps sound and the output turns off. Repeat Step2 to turn off another output. 2017.10 | 03 | F.01U.298.026 Installation Guide Bosch Security Systems, Inc. -
Page 55: Setting The Date And Time
This User Code function operates only with partitioned systems and allows User Codes allocated to both Area 1 and Area 2 to arm or disarm both areas at the same time. Bosch Security Systems, Inc. Installation Guide 2017.10 | 03 | F.01U.298.026... -
Page 56: Arm Or Disarm Single Area
If an alarm occurred or entry warning was activated, a valid User Code is required to disarm the system. For more information, refer to Setting STAY Mode 2 Bypass Zones, page 47. Notice! STAY Mode 2 does not work on a partitioned control panel system. 2017.10 | 03 | F.01U.298.026 Installation Guide Bosch Security Systems, Inc. -
Page 57: Horn Speaker Test
The remote computer must be running the A-Link Software and must be set to Waiting for an Incoming Call. If no callback telephone number is programmed, holding down [6] has no effect. See also – Call Back Telephone Number, page 75 Bosch Security Systems, Inc. Installation Guide 2017.10 | 03 | F.01U.298.026... -
Page 58: Reset Latching Outputs
Send Test Report Holding down [9] until two beeps sound transmits a Test Report (Contact ID Event Code 602) to test the reporting capabilities of the system without activating the sirens. 2017.10 | 03 | F.01U.298.026 Installation Guide Bosch Security Systems, Inc. -
Page 59: Rf Keyfob Operations
Refer to User Code Priority, page 89 for more information. Before a keyfob can operate the control panel, you must teach the keyfob’s radio code to the control panel. Bosch Security Systems, Inc. Installation Guide 2017.10 | 03 | F.01U.298.026... -
Page 60: Remote Arming By Telephone
Ring Count, page 75. Notice! Using this method with a partitioned control panel arms both areas in AWAY Mode. Arming individual areas is not available with this method. 2017.10 | 03 | F.01U.298.026 Installation Guide Bosch Security Systems, Inc. -
Page 61: A-Link Plus Application
When you call the control panel from a remote location using the computer, the control panel does not call back the remote computer to establish a link. To program method two: Bosch Security Systems, Inc. Installation Guide 2017.10 | 03 | F.01U.298.026... -
Page 62: Remote Connection With Callback Verification
To program the network connection with IP: Connect a B426 or B426-M network module to the control panel using the SDI2 bus. 2017.10 | 03 | F.01U.298.026 Installation Guide Bosch Security Systems, Inc. -
Page 63: Direct Connection
Option 3 is selected). From the A-Link Plus Customer Information tab, instead of full control panel IP address for the B426, enter the domain name, for example: Test123.BOSCH.com, and enter the full control panel port number for the module. -
Page 64: Configuring For Email
Press [#] to save changes. Step 2: Connect module to the control panel. Power off the control panel. Connect the factory defaulted B426/B426-M to the control panel. Power on the control panel. 2017.10 | 03 | F.01U.298.026 Installation Guide Bosch Security Systems, Inc. - Page 65 Enter real port number in the Control Panel Port field. From the B426 network modules, you can find the real port number, such as 7700. Open the Control Panel Configuration tab. Select Solution 2000 or Solution 3000 according to your control panel type.
-
Page 66: Configure Through
Enter “5” to select Reset To Factory Default. At the message “Are you sure (Y to default, N to exit)”, input “Y” to confirm. The interface returns to the main menu. 2017.10 | 03 | F.01U.298.026 Installation Guide Bosch Security Systems, Inc. - Page 67 Module 2 # -> Mail Mail server port Information Partial mail server user test@163.com Sent Items name (example) Mail server password ****** Password of Sent Items Security options Encrypted Bosch Security Systems, Inc. Installation Guide 2017.10 | 03 | F.01U.298.026...
-
Page 68: Communication Information
How to program the numbers, keys, and functions for a telephone number, refer to below table. Digit Required Number to Program Digit Required Number to Program 4-sec Pause Terminator Table 11.1: Dialing Digits 2017.10 | 03 | F.01U.298.026 Installation Guide Bosch Security Systems, Inc. -
Page 69: Primary Telephone Number For Receivers
Transmission Format – Receiver 3 1450 5 = Conettix IP 6 = SIA Fast Transmission Format – Receiver 4 1490 7 = SIA Slow 8 = CSVIP 9 = Email Bosch Security Systems, Inc. Installation Guide 2017.10 | 03 | F.01U.298.026... -
Page 70: Subscriber Id Number For Receivers
Email is select as transmission format. Program IP items with A-Link Plus Software or Alphanumeric codepad Select Comm -> Receiver Config -> Transmit Format, select CSVIP for Receiver 1 or Receiver 2. 2017.10 | 03 | F.01U.298.026 Installation Guide Bosch Security Systems, Inc. -
Page 71: Conettix Items For Receivers
Heart Beat Time – Receiver 1403 - 1404 1 – 9 = 1 – 99 min. ACK Wait Time – Receiver 2 1405 - 1406 0 – 9 = 0 – 99 sec. Bosch Security Systems, Inc. Installation Guide 2017.10 | 03 | F.01U.298.026... -
Page 72: External Network Modules
When the value is 2, the corresponding network module is enabled, and the control panel will configure the relevant parameters to network module. When the value is 3, cloud module B4xx-M is selected, and Cloud Connection can be set disabled or enabled. 2017.10 | 03 | F.01U.298.026 Installation Guide Bosch Security Systems, Inc. -
Page 73: Network Module Cloud Connection
1 = China Value 0 is also for Singapore. 11.12 Telco Arming Sequence Item Location Option Default Telco Arming Sequence 0113 - 0142 15 = Telephone termination (Call Forward On) Bosch Security Systems, Inc. Installation Guide 2017.10 | 03 | F.01U.298.026... -
Page 74: Telco Disarming Sequence
To disable call forward (no answer) after disarming the system from AWAY Mode, program: [12 6 1 12 15 15 15 15 15 15 15 15 15 15 15] 2017.10 | 03 | F.01U.298.026 Installation Guide Bosch Security Systems, Inc. -
Page 75: Call Back Telephone Number
If you do not wait the 8 sec, the control panel does not answer the call. To enable Answering Machine Bypass only when the system is armed, select Option 4 in Location 177. Bosch Security Systems, Inc. Installation Guide 2017.10 | 03 | F.01U.298.026... -
Page 76: Telephone Line Fail Options
Lockout Telephone Line Fail Alarm option (2) in Location 179. Notice! If you program 7 in this location, the horn speaker, bell, strobe, and outputs are all activated when the system is armed or disarmed. 2017.10 | 03 | F.01U.298.026 Installation Guide Bosch Security Systems, Inc. -
Page 77: Communication Options 1
An Arm or Disarm Report does not report again until the system registers another alarm. For a partitioned control panel, an Arm/Disarm Report is sent only for the area in which the alarm occurred. Bosch Security Systems, Inc. Installation Guide 2017.10 | 03 | F.01U.298.026... -
Page 78: Communication Options 3
Swinger Shutdown Count for Siren, in which you can program the number of times a zone can sound an alarm during an arming cycle. Use Location 176 to program the telephone line fault options, refer to Telephone Line Fail Options, page 76. 2017.10 | 03 | F.01U.298.026 Installation Guide Bosch Security Systems, Inc. -
Page 79: A-Link Plus Options
The transmission sequence is repeated until the control panel receives an acknowledgment tone during the (3 sec about) pause . The control panel Bosch Security Systems, Inc. Installation Guide 2017.10 | 03 | F.01U.298.026... -
Page 80: Setting Up And Programming Domestic Reporting
If using a text codepad, the programmed number and new entered number are displayed. After the last digit of the telephone number, press [AWAY] to exit from this mode. 2017.10 | 03 | F.01U.298.026 Installation Guide Bosch Security Systems, Inc. -
Page 81: Reporting Formats
1 – New event or disarming 3 – New restore or arming Event Code (comprised of three hex digits) Group Number or Area Number (comprised of two hex digits) Bosch Security Systems, Inc. Installation Guide 2017.10 | 03 | F.01U.298.026... -
Page 82: Sia Format
24Hr Medical Z$$ Alarm 24HrMedicalZoneAlarmRestor 3100 Zone 1 - 8 / 16 24Hr Medical Z$$ Alarm Restore 24HrPanicZoneAlarm 1120 Zone 1 - 8 / 16 24Hr Panic Z$$ Alarm 2017.10 | 03 | F.01U.298.026 Installation Guide Bosch Security Systems, Inc. - Page 83 Zone 1 - 8 / 16 24Hr Panic Z$$ UnBypass 24HrHoldUpZoneBypass 1572 Zone 1 - 8 / 16 24Hr Hold-Up Z$$ Bypass 24HrHoldUpZoneUnBypass 3572 Zone 1 - 8 / 16 24Hr Hold-Up Z$$ UnBypass Bosch Security Systems, Inc. Installation Guide 2017.10 | 03 | F.01U.298.026...
- Page 84 Schedule Area$ AWAY Arm AutoStay1Arm 3403 Schedule Area$ STAY1 Arm RemoteDisarm 1407 A-Link Area$ Disarm RemoteAwayArm 3407 Telephone/A-Link Area$ AWAY Arm (Telephone) ; 998(A-Link) RemoteStay1Arm 3441 A-Link Area$ STAY1 Arm 2017.10 | 03 | F.01U.298.026 Installation Guide Bosch Security Systems, Inc.
- Page 85 EXOutputTamper 1341 851 - 852 Ex. Output $$ Tamper EXOutputTamperRestore 3341 851 - 852 Ex. Output $$ Tamper Restore PowerFail 1301 AC Power Fail PowerRestore 3301 AC Power Restore Bosch Security Systems, Inc. Installation Guide 2017.10 | 03 | F.01U.298.026...
- Page 86 ExInput $$ Missing Restore B228 Tamper 1341 ExInput $$ Tamper B228 Tamper Restore 3341 ExInput $$ Tamper Restore Note: "$" in the string will be replaced by matched number. 2017.10 | 03 | F.01U.298.026 Installation Guide Bosch Security Systems, Inc.
-
Page 87: Access
0215 - 0218 0219 User #08 0220 0224 0221 - 0223 User #09 0225 - 0228 0229 User #10 0230 - 0233 0234 User #11 0235 - 0238 0239 Bosch Security Systems, Inc. Installation Guide 2017.10 | 03 | F.01U.298.026... - Page 88 Arm Only and Arm Reports Arm/Disarm and Code Required to Isolate Arm/Disarm and Arm/Disarm Reports and Code Required to Isolate Master Code and Arm/Disarm Master Code and Arm/Disarm and Arm/Disarm Reports 2017.10 | 03 | F.01U.298.026 Installation Guide Bosch Security Systems, Inc.
-
Page 89: User Code Priority
The user can arm and disarm the system. An Arming Report is sent only after a previous code with the ability to send a Disarming Report disarms the system. Arm Only Bosch Security Systems, Inc. Installation Guide 2017.10 | 03 | F.01U.298.026... - Page 90 Turn outputs on and off Set the date and time Walk Test Mode Event Memory Recall Mode 9989 System reset Table 12.2: Master Code Functions See also – Master Code Functions, page 51 2017.10 | 03 | F.01U.298.026 Installation Guide Bosch Security Systems, Inc.
-
Page 91: Zone Information
Types, page 123. To turn Day Alarm on: Press and hold [4] until three beeps sound. To turn Day Alarm off: Press and hold [4] until two beeps sound. Bosch Security Systems, Inc. Installation Guide 2017.10 | 03 | F.01U.298.026... -
Page 92: Eol Resistor Value
For No EOL, it is short as normal status and it is unsealed when the system activates an alarm. Connections for EOL Resistors 2017.10 | 03 | F.01U.298.026 Installation Guide Bosch Security Systems, Inc. -
Page 93: Zone Programming
Control Panel Zone Information | en Zone 1 Zone 1 Zone 1 Zone 5 (Solution 2000) Zone 9 (Solution 3000) Zone 1 (3K3 EOL) (6K8 EOL) Zone 5 (Solution 2000) Zone 9 (Solution 3000) TAMPER (6K8 EOL) TAMPER Zone 1... - Page 94 Zone Pulse Count Zone Pulse Count Time Zone Options 1 Zone Options 2 Zone Report Options Zone #05 (Default = Instant) Zone Type Zone Pulse Count Zone Pulse Count Time 2017.10 | 03 | F.01U.298.026 Installation Guide Bosch Security Systems, Inc.
- Page 95 Zone #09 (Default = Not used) Zone Type Zone Pulse Count Zone Pulse Count Time Zone Options 1 Zone Options 2 Zone Report Options Zone #10 (Default = Not used) Bosch Security Systems, Inc. Installation Guide 2017.10 | 03 | F.01U.298.026...
- Page 96 Zone Pulse Count Time Zone Options 1 Zone Options 2 Zone Report Options Zone #14 (Default = Not used) Zone Type Zone Pulse Count Zone Pulse Count Time Zone Options 1 2017.10 | 03 | F.01U.298.026 Installation Guide Bosch Security Systems, Inc.
-
Page 97: Zone Types
Zone Options 2 Zone Report Options The Solution 2000 control panel supports up to 8 zones. The Solution 3000 control panel supports up to 16 zones. Zone 9-16 can only be used in Solution 3000 control panels when the EOL Resistor Value is set as 14 or 15. - Page 98 A Panic Report is transmitted to the base station receiver. A 24-Hour Panic Zone does not send a Restore Report until the zone is restored. 2017.10 | 03 | F.01U.298.026 Installation Guide Bosch Security Systems, Inc.
-
Page 99: Zone Pulse Count
10 sec. A 24- Hour Fire Zone programmed with a pulse count activates an alarm when it is continuously unsealed for 30 sec. Zone Pulse Count Handover Zone pulse count handover operates only with Zone Pulse Count Time options 8 to 15. Bosch Security Systems, Inc. Installation Guide 2017.10 | 03 | F.01U.298.026... -
Page 100: Zone Pulse Count Time
1 – Lockout Siren and Lockout Report Lockout refers to certain activations per arming cycle (that is, a zone programmed for Lockout can activate the sirens or communication module for certain times as programmed). 2017.10 | 03 | F.01U.298.026 Installation Guide Bosch Security Systems, Inc. -
Page 101: Zone Options 2
Calculate this value by adding the option bit numbers together. Option Description Isolate in STAY Mode 1 Zone Isolation Allowed Forced Arming Allowed Zone Restore Report Bosch Security Systems, Inc. Installation Guide 2017.10 | 03 | F.01U.298.026... -
Page 102: Zone Report Options
Report to Receiver 3 Report to Receiver 4 Report to Receiver 1,2,3,4 Report to Receiver 1 (2,3,4 backup) Report to Receiver 1 (2 backup) and Receiver 3 (4 backup) 2017.10 | 03 | F.01U.298.026 Installation Guide Bosch Security Systems, Inc. -
Page 103: Keyswitch Zone Options
9 – Momentary Arm in AWAY Mode The system is armed in AWAY Mode when using the momentary keyswitch input. Disarming the system is not permitted from the Keyswitch Zone. Bosch Security Systems, Inc. Installation Guide 2017.10 | 03 | F.01U.298.026... -
Page 104: Zone Source
Zone Source for zone 1 to 16 are stored in Location 0754 to 0769. For Solution 2000, only Onboard zone is available. For Solution 3000, select Option 0 or 1 for Zone 1 - 8; select Option 0, or 1, or 2 for Zone 9 -... -
Page 105: Swinger Shutdown Count For Report
If Zone 1 reactivates the report, the Swinger Shutdown Count is incremented to 2. If Zone 1 reactivates the report three more times, the Swinger Shutdown Count is 5. Bosch Security Systems, Inc. Installation Guide 2017.10 | 03 | F.01U.298.026... -
Page 106: Stay Mode 2 Automatically Bypass Zones
6 = Report to Receiver 1 (2,3,4 backup) 7 = Report to Receiver 1 (2 backup) and Receiver 3 (4 backup) This location is set by default to report only to Receiver 1. 2017.10 | 03 | F.01U.298.026 Installation Guide Bosch Security Systems, Inc. -
Page 107: Rf Information
This parameter is only for Solution 3000 . It configures the anti-jamming sensitivity on the RADION receiver. The RADION receiver will continually monitor the jamming status of every system transmitter to ensure reliable system communications. Bosch Security Systems, Inc. Installation Guide 2017.10 | 03 | F.01U.298.026... -
Page 108: Rf Receiver
0 = Not used 1 = Use RADION receiver B810 2 = Use WE800EV2 Solution 2000 control panel does not support RADION receiver. Solution 3000 control panel supports both RADION and WE800EV2 receivers, but only one receiver can be used in one system. -
Page 109: Rf Keyfob Rfid
1868 RF Zone #06 1870 - 1877 1878 RF Zone #07 1880 - 1887 1888 RF Zone #08 1890 - 1897 1898 RF Zone #09 1900 - 1907 1908 Bosch Security Systems, Inc. Installation Guide 2017.10 | 03 | F.01U.298.026... -
Page 110: Rf Reapter Rfid
Repeater #03 2000 - 2007 Repeater #04 2010 - 2017 Repeater #05 2020 - 2027 Repeater #06 2030 - 2037 Repeater #07 2040 - 2047 Repeater #08 2050 - 2057 2017.10 | 03 | F.01U.298.026 Installation Guide Bosch Security Systems, Inc. -
Page 111: System Reporting Information
Location 424 sets the number of incorrect code attempts that causes an alarm. When the number of incorrect code attempts equals the number programmed in this location, the system performs these actions: Bosch Security Systems, Inc. Installation Guide 2017.10 | 03 | F.01U.298.026... -
Page 112: System Status Reporting Options
If you want to send Test Reports once every seven days at 11:35 PM (23:35), program Locations 428 to 431 as [2 3 3 5] and location 434 as [7]. 2017.10 | 03 | F.01U.298.026 Installation Guide Bosch Security Systems, Inc. -
Page 113: Test Reporting Options
(whichever happens first). A 24- Hour Zone sends a restore signal only when it is resealed. A 24-Hour Panic Zone Trouble is reported as Contact ID Event Code 375. Bosch Security Systems, Inc. Installation Guide 2017.10 | 03 | F.01U.298.026... -
Page 114: Sensor Watch Report
To enable Arm/Disarm Reports in STAY Mode: Select Option 2 in Location 178. To enable Arm/Disarm Reports only after a previous alarm, select Option 1 in Location 178 (refer to Communication Options 2, page 77. 2017.10 | 03 | F.01U.298.026 Installation Guide Bosch Security Systems, Inc. -
Page 115: Codepad Duress Report
A System Trouble Restore Report (Contact ID Event Code 312) is sent when the AUX power supply is reset. The system reports the event approximately 10 sec after power supply is reset. Bosch Security Systems, Inc. Installation Guide 2017.10 | 03 | F.01U.298.026... -
Page 116: Ac Fail Report
A Low Battery Restore Report is sent if the backup battery is restored the next time the system is armed, or when the next Dynamic Battery Test reports the battery test is OK when the system’s battery voltage rises to 12 VDC. 2017.10 | 03 | F.01U.298.026 Installation Guide Bosch Security Systems, Inc. -
Page 117: Programmable Outputs
Time Base Multiplier 0452 Time Base Multiplier 0458 Time Base Multiplier 0453 Time Base Multiplier 0459 Codepad Buzzer (Default = Entry/Exit Warning and Day Alarm) Event Code 0460 Event Code 0461 Bosch Security Systems, Inc. Installation Guide 2017.10 | 03 | F.01U.298.026... - Page 118 | Programmable Outputs Control Panel Item Location Default Item Location Default Polarity 0462 Time Base 0463 Time Base Multiplier 0464 Time Base Multiplier 0465 2017.10 | 03 | F.01U.298.026 Installation Guide Bosch Security Systems, Inc.
- Page 119 Event Code 0689 Polarity 0684 Polarity 0690 Time Base 0685 Time Base 0691 Time Base Multiplier 0686 Time Base Multiplier 0692 Time Base Multiplier 0687 Time Base Multiplier 0693 Bosch Security Systems, Inc. Installation Guide 2017.10 | 03 | F.01U.298.026...
- Page 120 Location Default Item Location Default B228 Output 1 B228 Output 2 Output Mode 0770 Output Mode 0771 Event Code 0742 Event Code 0748 Event Code 0743 Event Code 0749 2017.10 | 03 | F.01U.298.026 Installation Guide Bosch Security Systems, Inc.
- Page 121 3 14 = Mimic zone 10 2 14 = Radio control output 2- not in AWAY 3 15 = Mimic zone 11 Mode 2 15 = Communications fail after 3 attempts Bosch Security Systems, Inc. Installation Guide 2017.10 | 03 | F.01U.298.026...
- Page 122 When you program the output polarity as one shot, the time base is multiplied by the time base multiplier. (For example, if the time base = 2 and the multiplier = 05, the output operates for 5 sec.) 2017.10 | 03 | F.01U.298.026 Installation Guide Bosch Security Systems, Inc.
-
Page 123: B228 Output Mode
This output operates when the system is armed in AWAY Mode. The output is reset when the system is disarmed. If the system is partitioned, this output operates when either area is armed in AWAY Mode. 0,5 Auto Arm Pre-Arming Alert Time Bosch Security Systems, Inc. Installation Guide 2017.10 | 03 | F.01U.298.026... - Page 124 You can turn Day Alarm on and off by holding down [4] or selected from the menu on KP. 0,14 Day Alarm Resetting 2017.10 | 03 | F.01U.298.026 Installation Guide Bosch Security Systems, Inc.
- Page 125 This output operates when a user activates a Codepad Medical Alarm by pressing [7] and [9] at the same time on the remote codepad. This output is reset when a valid User Code is entered at the remote codepad. Bosch Security Systems, Inc. Installation Guide 2017.10 | 03 | F.01U.298.026...
- Page 126 This output operates when a 24-Hour Fire Zone or codepad fire alarm is activated. The output is reset when a valid User Code is entered or when Siren Run Time expires. 2,6 Fire Alarm Latching 2017.10 | 03 | F.01U.298.026 Installation Guide Bosch Security Systems, Inc.
- Page 127 ON. The output is reset when this button is toggled OFF manually or automatically toggled off when the ON time expires if output polarity is from 3 to 6 or from 10 to 13. 2,12 Radio Control Output 2 Bosch Security Systems, Inc. Installation Guide 2017.10 | 03 | F.01U.298.026...
- Page 128 3,5 Mimic Zone 1 3,6 Mimic Zone 2 3,7 Mimic Zone 3 3,8 Mimic Zone 4 3,9 Mimic Zone 5 3,10 Mimic Zone 6 3,11 Mimic Zone 7 3,12 Mimic Zone 8 2017.10 | 03 | F.01U.298.026 Installation Guide Bosch Security Systems, Inc.
- Page 129 These two outputs operate when their corresponding area are armed in AWAY Mode or STAY Mode 1 or STAY Mode 2. The output is reset when the corresponding area is disarmed. Example Bosch Security Systems, Inc. Installation Guide 2017.10 | 03 | F.01U.298.026...
-
Page 130: Output Polarity
This polarity is normally open circuit and switches to 0 V when the event occurs. The output switches back to open circuit when the event is restored. Time parameters do not apply to this polarity. 2 – Normally Open, Pulsing Low 2017.10 | 03 | F.01U.298.026 Installation Guide Bosch Security Systems, Inc. - Page 131 This one-shot polarity is normally 0 V and switches to open circuit when the event occurs. The output switches back to 0 V when the one-shot time expires or when the event returns to normal. 13 – Normally Low, One-Shot Open with Alarm Bosch Security Systems, Inc. Installation Guide 2017.10 | 03 | F.01U.298.026...
-
Page 132: Output Timing
Multiplier: 0 5 The On time is calculated by multiplying the time base setting (1 sec) by the multiplier value (05) (for example, 1 x 05 = 5 sec). 2017.10 | 03 | F.01U.298.026 Installation Guide Bosch Security Systems, Inc. - Page 133 1 to 99 sec 1 sec ±1 sec 1 to 99 min 1 min ±1 min 1 to 99 hr 1 hr ± 1 hr Table 16.4: One-Shot Time Settings Bosch Security Systems, Inc. Installation Guide 2017.10 | 03 | F.01U.298.026...
-
Page 134: System Event Timers
Exit Time is near. The remote codepad always sounds one short beep at the end of Exit Time when arming in STAY Mode1 or STAY Mode 2. 2017.10 | 03 | F.01U.298.026 Installation Guide Bosch Security Systems, Inc. -
Page 135: Entry Guard Time For Stay Mode
(Contact ID Event Code 391) if it is not activated while disarmed within 3 days. This feature is useful, for example, when someone places objects in the view of a motion detector, which prevents the detector from picking up movement. Bosch Security Systems, Inc. Installation Guide 2017.10 | 03 | F.01U.298.026... -
Page 136: Codepad Lockout Time
If you want a programmable output to operate during the Auto Arming Pre-Alert Time, use Output Event Type 0,5 Auto Arm Pre-Arming Alert Time. See also – Auto Arming Time, page 137 2017.10 | 03 | F.01U.298.026 Installation Guide Bosch Security Systems, Inc. -
Page 137: Auto Arming Time
Item Location Option Default Speaker Beep Volume 0491 0 = No Beeps 15 = Loudest Beeps This location allows you to adjust the speaker volume for remote radio operation. Bosch Security Systems, Inc. Installation Guide 2017.10 | 03 | F.01U.298.026... -
Page 138: System And Consumer Options
Location Option Default System Options 1 0492 1 = Bosch Security Systems smart lockout allowed 2 = Warning device fault monitor 4 = Strobe indication for radio arm/disarm 8 = Assign button 4 on keyfob to operate STAY Mode 1 1 –... -
Page 139: System Options 3
If this option is not selected, the MAINS indicator flashes and an AC Loss signal (Contact ID Event Code 301) is transmitted to the base station receiver after the AC MAINS power is disconnected continuously for 2 min. Bosch Security Systems, Inc. Installation Guide 2017.10 | 03 | F.01U.298.026... -
Page 140: System Options
AC MAINS are reconnected after the system is powered down. If this option is not selected, the system is always powered up armed in AWAY Mode. 2 – Arm/Disarm Tracking on Power Up 2017.10 | 03 | F.01U.298.026 Installation Guide Bosch Security Systems, Inc. -
Page 141: System Option 5
4 – Auto Arm in STAY Mode 1 Select this option if automatic arming in STAY Mode1 is preferred to automatic arming in AWAY Mode. Bosch Security Systems, Inc. Installation Guide 2017.10 | 03 | F.01U.298.026... -
Page 142: Consumer Options 2
– Arm the System in AWAY Mode, page 56 – Arm the System in STAY Mode 1, page 56 – Arm the System in STAY Mode 2, page 56 2017.10 | 03 | F.01U.298.026 Installation Guide Bosch Security Systems, Inc. -
Page 143: Consumer Options 3
This option allows Tamper Alarms, when Option 15 is programmed in Location 266 (refer to EOL Resistor Value, page 92), or Tamper Alarms on RF wireless devices to be silent when activated. Bosch Security Systems, Inc. Installation Guide 2017.10 | 03 | F.01U.298.026... -
Page 144: Partitioning
Option Default Partitioning Options 2 0501 1 = Reserved 2 = User codes allowed to arm/disarm both areas at same time (Code [0][#]) 4 = Reserved 8 = Reserved 2017.10 | 03 | F.01U.298.026 Installation Guide Bosch Security Systems, Inc. - Page 145 0504 Zone 4 Area 0505 Zone 5 Area 0506 Zone 6 Area 0507 Zone 7 Area 0508 Zone 8 Area 0509 Zone 9 Area 0510 Zone 10 Area 0511 Bosch Security Systems, Inc. Installation Guide 2017.10 | 03 | F.01U.298.026...
- Page 146 0542 User Code 10 0543 User Code 11 0544 User Code 12 0545 User Code 13 0546 User Code 14 0547 User Code 15 0548 User Code 16 0549 2017.10 | 03 | F.01U.298.026 Installation Guide Bosch Security Systems, Inc.
- Page 147 User codes and RF user codes can share the same user code numbers. When the RF user codes is activated, the user codes allocated to the same numbers can also be used. See also – User Codes, page 87 – RF Keyfob RFID, page 109 Bosch Security Systems, Inc. Installation Guide 2017.10 | 03 | F.01U.298.026...
- Page 148 2535 as home message. And you can edit up to 12 alphanumeric for per zone name and user name from location 2536 to 3687. Notice! Instead of TEXT codepad, edit text via A-Link Plus is more convenient. 2017.10 | 03 | F.01U.298.026 Installation Guide Bosch Security Systems, Inc.