Advertisement
Available languages
Available languages
Quick Links
Advertisement

Related Manuals for Breville Smoking Gun Pro CSM700


Summary of Contents for Breville Smoking Gun Pro CSM700
- Page 1 Smoking Gun ‰ Instruction Book - CSM700...
- Page 2 RECOMMENDS top during operation. Ensure that the surface is SAFETY FIRST level, clean and free At Breville | PolyScience we of water. are very safety conscious. • Do not place any part We design and manufacture of the Smoking Gun ®...
- Page 3 • Keep the product clean. Breville|PolyScience Follow the care and Service Center. cleaning instructions • Do not attempt to burn provided in this book. anything other than •...
- Page 4 • Use only in a well • Always empty ash and ventilated area; the burnt material into a burning of wood chips/ non-flammable receptacle. dust, dried herbs, cooking • Exercise proper care when spices, and/or tea igniting the smoking leaves may result in the materials;...
- Page 5 • Never operate the CALIFORNIA Smoking Gun PROPOSITION 65: ® without the stainless (Applicable to California steel mesh filter in place; residents only). burning/glowing embers Combustion of wood or may enter the barrel charcoal products may damaging the unit or contain chemicals known be ejected through the to the State of California to...
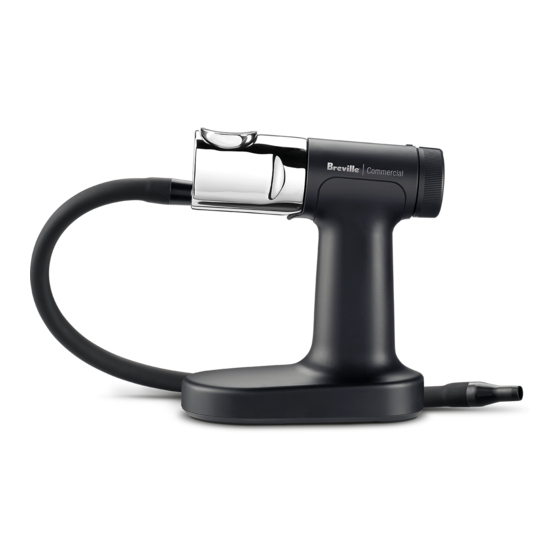
- Page 6 Components A. Variable speed & on/off dial G. Barrel Variable speed for ignition and slow burn. H. Removable metal fan B. Hex key I. Removable O-ring C. Set screw J. Robust housing D. Removable mesh filter Integrated base provides stable secure Push out with finger to replace.
- Page 7 Assembly WARNING • Remove batteries before removing barrel. • Never operate unit when barrel is removed. CLICK • Keep fan away from face and avoid contact with fingers. 1. Align the two lugs on the rear face of the barrel with the two recesses on the inner edge of the front face of the housing and 5.
- Page 8 3. Use a handheld lighter or match to apply a flame to the top surface of the wood chips. Functions Move the flame around to ignite the entire exposed surface. For best results make sure the burning area is evenly distributed or centered.
- Page 9 Tips • To provide smoke flavor and aroma for • Continuous smoking with the Smoking Gun ® meats, fish, fruits, or vegetables after cooking, Pro is NOT required. simply place the food in a covered casserole, • Ensure the unit has had sufficient time to cool stockpot, Dutch oven, or other covered dish/ before reloading and operating additional pan and inject smoke under the lid.
- Page 10 Care & Cleaning 1. Before cleaning, make sure the unit is completely cooled down and power dial is positioned to off position. Remove the batteries. 2. Remove the burn chamber from the barrel. Invert the burn chamber and tap on a solid surface to remove any remaining wood chips or ash.
- Page 11 No.20 US Sieve Size [Ø25.4mm (1 inch), • Do not immerse the housing in liquid. stainless steel 304]. • Do not operate the unit without the barrel Visit Breville.com and polyscienceculinary.com in place. to order more mesh filters. • Resin may stain hands, handle parts with caution.
- Page 12 Smoking Gun ‰ Manuel d'instructions - CSM700...
- Page 13 IMPORTANTES Table des MESURES DE matières SÉCURITÉ 13 Breville | PolyScience vous recommande la sécurité avant tout LISEZ TOUTES LES 17 Composants INSTRUCTIONS AVANT 18 Assemblage USAGE ET CONSERVEZ- 19 Fonctions LES À TITRE DE 20 Trucs RÉFÉRENCE. 21 Entretien & nettoyage 22 Guide de dépannage...
- Page 14 • Gardez l'appareil propre. • Il est recommandé de Suivez les consignes vérifier régulièrement d'entretien et nettoyage l'appareil. fournies dans ce manuel. • Tout entretien autre que le nettoyage doit se faire dans un centre de service autorisé Breville|PolyScience.
- Page 15 • Ne tentez d'allumer • Le baril métallique et la aucune autre substance chambre à combustion que de petits copeaux ou du Smoking Gun ® sciures de bois, herbes deviennent très chauds séchées, épices ou feuilles lors de l'utilisation. de thé dans la chambre à Laissez l'appareil refroidir combustion.
- Page 16 • Utilisez toujours • Le fait de retirer ou une allumette ou un désassembler les pièces briquet pour allumer du Smoking Gun ® les matériaux dans le autres que la chambre Smoking Gun Pro; à combustion, le filtre ® N'UTILISEZ PAS de à...
- Page 17 Composants A. Interrupteur & cadran à vitesse variable F. Boyau en silicone Vitesse variable pour démarrer et fumer G. Baril lentement. H. Ventilateur métallique amovible B. Clé hexagonale I. Joint torique amovible C. Vis de réglage J. Boîtier robuste D. Filtre à mailles amovible Base intégrée pour plateforme stable et Une pression du doigt le remet en place.
- Page 18 Assemblage CLICK AVERTISSEMENT • Retirez les piles avant d'enlever le baril. • Ne faites jamais fonctionner l'appareil si le baril a été retiré. 5. Récupérez le boyau de silicone avec les • Gardez la figure éloignée du ventilateur et 2 raccords rigides, insérez l'embout de évitez d'y toucher avec les doigts.
- Page 19 CADRAN DE COMMANDE AVERTISSEMENT • N'utilisez pas de torche de cuisine ou de briquet au butane. • Maintenez la flamme du briquet le temps qu'il faut pour démarrer l'allumage, mais sans plus. Une chaleur excessive peut endommager l'appareil. 4. Dès que vous verrez la flamme sortir du •...
- Page 20 • Ne placez pas le boyau directement dans les aliments; placez-le juste au-dessus. Trucs • Un usage continu du Smoking Gun Pro n'est ® PAS recommandé. • Assurez-vous que l'appareil a suffisamment • Pour donner une saveur de fumée à vos refroidi avant de le remplir à...
- Page 21 2. Assemblez la petite vis de réglage dans le Entretien & petit orifice sur le côté du ventilateur. nettoyage 1. Avant le nettoyage, assurez-vous que l'appareil est parfaitement refroidi et que le cadran est en position d'arrêt (OFF). Retirez les piles. 2.
- Page 22 M3 x 6mm SS303 • La résine peut tacher les mains; manipulez les pièces avec précaution. Spécifications de la clé hexagonale: 1,5mm AF Visitez Breville.com et polyscienceculinary.com pour commander des filtres supplémentaires. Guide de dépannage PROBLÈME POSSIBLE SOLUTION FACILE •...
- Page 24 Breville is a registered trademark of Breville Pty. Ltd. A.B.N. 98 000 092 928. Copyright Breville Pty. Ltd. 2016. Due to continued product improvement, the products illustrated/photographed in this booklet may vary slightly from the actual product. CSM700PSSONUC1 A16...