Philips DreamStation Go User Manual
Cpap device
Hide thumbs
Also See for DreamStation Go:
- Instructions for use manual (24 pages) ,
- Faqs (3 pages) ,
- Basic setup (2 pages)
Table of Contents
Advertisement
Advertisement
Table of Contents

Related Manuals for Philips DreamStation Go


Summary of Contents for Philips DreamStation Go
- Page 1 DreamStation Go Auto CPAP CPAP User manual...
-
Page 2: Table Of Contents
Table of contents 1. Safety Information .................. 1 Intended use ..........................1 Warnings ............................ 1 Cautions ............................ 4 Contraindications ........................6 Safety Symbols Glossary ...................... 6 2. System Overview .................. 10 System Contents ........................10 Accessories ..........................10 System Diagram ........................11 3. Therapy Device ..................12 Where to Place Your Device .................... - Page 3 microSD card Device Pop-Up Messages ................32 7. Battery Pack ..................33 Indicators and Buttons on the Battery Pack ..............33 Preparing the Battery Pack for First Use and Recharging .........35 Attaching the Battery Pack to the Device ..............35 Disconnecting the Battery Pack ..................37 8.
-
Page 4: Safety Information
Several accessories are available to make your Obstructive Sleep Apnea (OSA) treatment with the DreamStation Go system as convenient and comfortable as possible. To ensure that you receive the safe, effective therapy prescribed for you, use only Philips Respironics accessories. - Page 5 This device is activated when the power cord is connected. Use only power cords supplied by Philips Respironics for this device. Use of power cords not supplied by Philips Respironics may cause overheating or damage to the device.
- Page 6 Do not connect the device to an unregulated or high pressure oxygen source. When using oxygen with this system, a Philips Respironics pressure valve must be placed in-line with the patient circuit between the device and the oxygen source. The pressure valve helps to prevent the back flow of oxygen from the patient circuit into the device when the unit is off.
-
Page 7: Cautions
Maintenance for damage or signs of wear. Discontinue use and replace if damaged. Repairs and adjustments must be performed by Philips Respironics- authorized service personnel only. Unauthorized service could cause injury, invalidate the warranty, or result in costly device damage. - Page 8 Do not operate the device outside of the operating temperature range shown in the Specifications section later in this manual. Filters A properly installed, undamaged Philips Respironics reusable filter or disposable, fine filter is required for proper operation. Clogged inlet filters may cause high operating temperatures that may affect device performance.
-
Page 9: Contraindications
1. Safety Information Contraindications When assessing the relative risks and benefits of using this equipment, the clinician should understand that this device can deliver pressures up to 20 cm H O. In the event of certain fault conditions, a maximum pressure of 40 cm H O is possible. - Page 10 1. Safety Information Symbol Title and Meaning Reference Li Ion Battery Bluetooth® symbol Indicates the device has Bluetooth capabilities. IP22 Drip proof equipment Protection against ingress of solid foreign objects ≥ 12.5 mm diameter. Protection against ingress of water with harmful effects dripping (15°...
- Page 11 1. Safety Information Symbol Title and Meaning Reference Do not disassemble. For indoor use only IEC 60878 Equipment is designed primarily for indoor use. IEC 60417-5957 Manufacturer IEC 60878 Indicates the medical device manufacturer. ISO 7000-3082 Symbol 5.1.1, ISO 15223- Date of manufacture IEC 60878 Indicates the date when the medical device was...
- Page 12 1. Safety Information ISO 7000:2014, Graphical symbols for use on equipment – Registered symbols ISO 7010:2011+A1:2012+A2:2012+A3:2012+A4:2013+A5:2014+A6:2014, Graphical symbols -- Safety colours and safety signs -- Registered safety signs (not currently FDA recognized) EN 15986:2011, Symbols for medical devices containing phthalates (not currently FDA recognized) ISO 15223-1:2012, Medical devices—Symbols to be used with medical devices labels - General requirements...
-
Page 13: System Overview
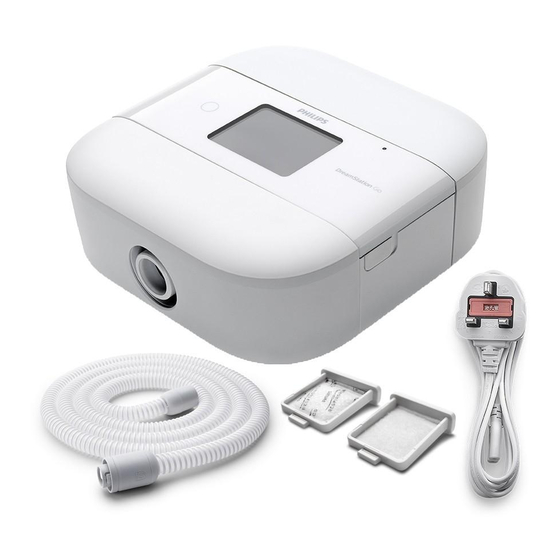
2. System Overview The DreamStation Go CPAP is a Continuous Positive Airway Pressure therapy device designed for the treatment of Obstructive Sleep Apnea (OSA). Your supplier will choose the appropriate pressure settings for you. Several accessories are also available for use with your device. Contact your supplier to purchase any accessories not included with your system. -
Page 14: System Diagram
2. System Overview System Diagram The figure above illustrates some of the device features, described in the following table. Feature Description Starts and stops the airflow for therapy. Therapy on/off button Display Touchscreen This is the User Interface for the therapy device. Detects room light levels and adjusts brightness of Ambient Light Sensor the display screen. -
Page 15: Therapy Device
3. Therapy Device Where to Place Your Device Place the device on a firm, flat surface somewhere within easy reach of where you will use it. The device should sit at a level lower than your sleeping position. Make sure the device is away from any heating or cooling equipment (e.g., forced air vents, radiators, air conditioners). -
Page 16: Starting The Device
3. Therapy Device Starting the Device 1. Ensure power is supplied to the device. Tap anywhere on the display screen to wake up the device. Feature Therapy on/off button Display Touchscreen 2. Put on your mask assembly. Refer to the instructions supplied with the mask. 3. -
Page 17: Navigating The Device Screens
3. Therapy Device Navigating the Device Screens The User Interface (UI) on this device allows you to adjust the device settings and view information about your therapy. The UI consists of the display screen and the touch panel. Swipe left or right on the touch panel to scroll through the menu options on the display screen. -
Page 18: Therapy On Menu Navigation Settings
3. Therapy Device Therapy On Menu Navigation Settings While the device is delivering therapy, you can adjust or view the following settings. # Feature Description Therapy pressure Displays the current delivered pressure. Ramp Feature The device is equipped with an optional ramp feature that your supplier can enable or disable. -
Page 19: Therapy Off Menu Navigation Settings
3. Therapy Device Therapy Off Menu Navigation Settings From the Home screen, you can scroll between the following four options: Battery My Info My Comfort My Device My Support This menu is visible when the battery pack is connected. See Chapter 7, Battery Battery Pack for details. -
Page 20: My Comfort
Mask type This setting allows you to adjust the level of air pressure relief based on the specific Philips Respironics mask. Each Philips Respironics mask may have a “System One” resistance control setting. Contact your supplier if you cannot find this resistance... -
Page 21: My Device
Tube type This setting allows you to select the correct tubing type that you are using with the device. You can choose (12) for the Philips Respironics 12 tubing type, (15) for the Philips Respironics 15 tubing type, or (22) for the Philips Respironics 22 tubing type. -
Page 22: My Support
3. Therapy Device My Support When you select My Support, you will be able to view the following screens. You cannot change settings in the support menu. These screens are only for reference. Your supplier may periodically ask you for this information. If any of the below options are not visible, your supplier did not enable those options. -
Page 23: Check Mask Fit
3. Therapy Device Check Mask Fit The optional Check Mask Fit feature can be enabled or disabled by your supplier. This feature allows you to check the fit of your mask prior to starting therapy. 1. Put on your mask assembly. Refer to your mask instructions if needed. 2. -
Page 24: Pairing Therapy Device To Bluetooth®-Enabled Mobile Device
3. Therapy Device Pairing Therapy Device to Bluetooth -enabled Mobile Device ® Your device may have Bluetooth wireless technology, which is one method by which you can transfer your therapy device’s data to DreamMapper. DreamMapper is a mobile and web-based system designed to help you enhance your sleep therapy experience. Notes •... -
Page 25: Device Pop-Up Messages
3. Therapy Device Device Pop-Up Messages Device pop-ups are messages that show up on the user interface screen. Additional pop- up messages are contained in each chapter. The following summary table summarizes the messages: Condition Icon Description Possible Action Cause Time Prompts to set the Set the time on the... - Page 26 3. Therapy Device Condition Icon Description Possible Action Cause Bluetooth LE Prompts to accept or If you selected Yes Passkey decline pairing to a to accept pairing, Bluetooth compatible the Bluetooth LE device before Passkey will display a displaying the pairing passkey on the screen.
- Page 27 3. Therapy Device Condition Icon Description Possible Action Cause Busy Displayed when the No action needed. device is temporarily inaccessible due to data communication. Software Prompts to update the Choose between Upgrade device for software “Yes”/”No” when changes. asked to upgrade the software.
-
Page 28: Tubing
4. Tubing Tubing Types There are three different types of tubing that you may use with your DreamStation Go therapy device. You must select the tube type on your device. 12 tubing type 15 tubing type 22 tubing type The 12 tubing type will have a “12” identified on the tubing cuff (as shown in the image above). -
Page 29: Changing Your Tube Type
4. Tubing Follow these steps to connect tubing to your device: 1. Insert the 12, 15 or 22 tubing type cuff into the air outlet port on your therapy device. 2. Connect the tubing to your mask. For proper placement and positioning, refer to the instructions that came with your mask. -
Page 30: Cleaning The Tubing
4. Tubing Cleaning the Tubing Clean the tubing before first use and daily. 1. Disconnect the flexible tubing from the device. 2. Gently wash the tubing in a solution of warm water and a mild detergent. 3. Rinse thoroughly. 4. Air dry. Inspect the tubing for damage or wear. Discard and replace as necessary. Tubing Device Pop-Up Messages Device pop-ups are messages that show up on the user interface screen. -
Page 31: Filter
The disposable, fine filter is sold separately. The disposable, fine filter contains Philips Respironics branding in the media (shown in the image above). DO NOT rinse the disposable, fine filter. -
Page 32: Installing Or Replacing The Filter
5. Filter Installing or Replacing the Filter One of the filters must be in place at all times to operate the device. If a filter is not already installed in the device, you must at least install the reusable filter before using your device. -
Page 33: Accessories
Using the USB Port and the Micro USB Port The DreamStation Go device comes with a USB port and a micro USB port. The USB port may be used to charge your mobile devices. The micro USB port may be used by your supplier to extract therapy data. -
Page 34: Using The Microsd Card
6. Accessories Using the microSD Card The DreamStation Go system may come with a microSD card inserted in the microSD card slot on the side of the device to record information for your supplier. Your supplier may ask you to periodically remove the microSD card and send it to them for evaluation. -
Page 35: Microsd Card Device Pop-Up Messages
6. Accessories microSD Card Device Pop-Up Messages Device pop-ups are messages that show up on the user interface screen. Condition Icon Description Possible Cause Action Data Activity: microSD card read/ No action needed. Do not write underway. Message will clear remove when the microSD microSD card... -
Page 36: Battery Pack
7. Battery Pack Indicators and Buttons on the Battery Pack Feature Push Button LED Display AC Power Inlet • Push Button - The push button is located on the LED display of the battery pack. • LED Display - The battery pack uses one green LED light to indicate the battery pack charge status when the battery pack is charging while not connected to the therapy device (standalone charging). - Page 37 7. Battery Pack • Battery Pack Charge Indicator During Therapy - The display touchscreen shows the current battery pack charge status in the lower right hand corner when the pack is connected and therapy is active (shown below). A fully charged battery pack is indicated by four charge bars.
-
Page 38: Preparing The Battery Pack For First Use And Recharging
2. Plug the end of the AC power cord into the battery pack. 3. Plug the AC power cord into an AC outlet. The battery pack will begin to charge au- tomatically. 4. Once the battery pack is fully charged, it is ready for use with the DreamStation Go therapy device. Notes •... - Page 39 7. Battery Pack 2. Remove the battery pack end cap on the therapy device. 3. Slide the battery pack onto the device where the end cap was. Make sure the bat- tery pack latches onto the therapy device. 4. Attach the AC power cord to the battery pack and then to the AC outlet. To use the battery pack in standalone mode, follow these steps: 1.
-
Page 40: Disconnecting The Battery Pack
7. Battery Pack Notes • The first time you charge your battery pack, it must be fully charged in accordance with the Preparing the Battery Pack for First Use and Recharging section. After the first charge is complete, the battery pack will charge while connected in UPS mode. -
Page 41: Care And Maintenance
8. Care and Maintenance Caring for the Therapy Device or Battery Pack Every two weeks of use, inspect your device or battery pack to see if it needs care. 1. To avoid electrical shock, make sure that the device and battery pack are discon- nected from all outlets and power sources. - Page 42 8. Care and Maintenance Notes • Only Philips Respironics supplied filters should be used as replacement filters. • Replace the disposable, fine filter if it is damaged or has accumulated debris.
-
Page 43: Troubleshooting
9. Troubleshooting Tips and Tricks Your device is equipped with a self-diagnostic tool called Performance Check. This tool can evaluate your device for certain errors. It also allows you to share diagnostic information with your supplier. Use Performance Check when directed by your supplier. The table below lists some of the problems you may experience with your device and possible solutions to those problems. - Page 44 The airflow The tubing type Make sure the tubing type setting (12, 15 pressure feels too setting may be or 22) matches the tubing that you are high or too low. incorrect. using (Philips Respironics 12, 15 or 22 tubing type).
-
Page 45: Contacting Customer Service
Should you experience trouble with this equipment or require assistance setting up, using, or maintaining the device or accessories, please contact your supplier. If you need to contact Philips Respironics directly, call the Philips Respironics Customer Service department at 1-724-387-4000 or 1-800-345-6443. You can also use the following address: Respironics, Inc. -
Page 46: Additional Notes
10. Additional Notes Traveling with the System When traveling, the optional case is for carry-on luggage only. The optional case will not protect the system if it is put through checked baggage. For your convenience at security stations, there is a note on the bottom of the device stating that it is medical equipment and is suitable for airline use. -
Page 47: Additional Notices
Notices: • The Bluetooth® word mark and logos are registered trademarks owned by Bluetooth SIG, Inc. and any use of such marks by Philips Respironics is under license. Other trademarks and trade names are those of their respective owners. • The DreamStation Go Therapy Device transmits data between the therapy device and a mobile device, but it does not store any of your personal data. -
Page 48: Specifications
Device: Approximately 854 g (1.88 lb.) Battery Pack: Approximately 696 g (1.53 lb.) Service life The expected service life of the DreamStation Go therapy device is 5 years. The expected service life of the battery pack is 3 years. Standards compliance This device is designed to conform to the following standards: •... - Page 49 10. Additional Notes IEC 60601-1 classification Type of Protection Against Electric Class II Equipment/Internally Powered Shock Degree of Protection Against Type BF Applied Part Electric Shock Degree of Protection against Device: Drip Proof, IP22 Ingress of Water First characteristic numeral - 2 - Protection against ingress of solid foreign objects ≥...
- Page 50 10. Additional Notes Radio Specifications Operating Frequency Range 2402 - 2480 MHz Maximum Output Power 4.0 dBm Modulation GFSK, P/4 DQPSK, 8DQPSK Intake port filters Reusable Filter 100% Polyester 88% Efficient @ 7-10 micron size Fine Filter Blended Synthetic Fiber 95% Efficient @ 0.5-0.7 micron size Declared dual-number noise emissions values (in accordance with ISO 4871)
-
Page 51: Disposal
Pressure and Flow Accuracy The DreamStation Go Therapy Device is designed to perform within the pressure and flowrate accuracies specified in the user manual. If you suspect that the pressure and/or flow rate accuracy is affected by EMC interference remove power and relocate the device to another area. - Page 52 10. Additional Notes missions omplianCE lECTromagnETiC nvironmEnT uidanCE The device uses RF energy only for its internal RF emissions function. Therefore, its RF emissions are very Group 1 CISPR 11 low and are not likely to cause any interference in nearby electronic equipment. RF emissions Class B CISPR 11...
- Page 53 10. Additional Notes iEC 60601 T mmuniTy omplianCE lECTromagnETiC nvironmEnT EvEl EvEl uidanCE Voltage <5% U (>95% dip <5% U (>95% Mains power quality should dips, short in U ) for dip in U ) for be that of a typical home or interruptions and 0.5 cycle at 0.5 cycle at...
- Page 54 10. Additional Notes Immunity Test IEC 60601 Test Compliance Level Electromagnetic Level Environment - Guidance Conducted RF 3 Vrms 3 Vrms Portable and mobile RF IEC 61000-4-6 150 kHz to 80 MHz 150 kHz to 80 communications equipment should be used no closer Radiated RF 6 Vrms to any part of the device,...
-
Page 55: Limited Warranty
Limited Warranty Respironics, Inc., a Philips company, warrants that the system shall be free from defects of workmanship and materials and will perform in accordance with the product specifications for a period of two (2) years from the date of sale by Respironics, Inc. to the dealer. - Page 56 1128239 1128239 R02 AD 2/28/2017 EN-DOM...