Table of Contents
Advertisement
Quick Links
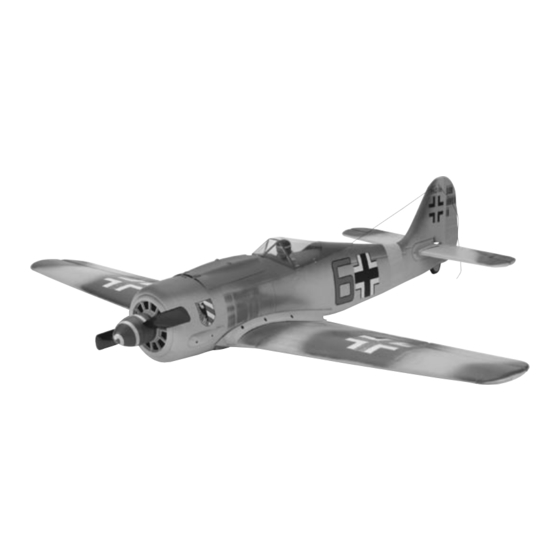
Focke-Wulf 190 RTF
Envergure : 1000mm
Longueur : 850mm
Poids avec batterie : 760 g
Moteur : 480 avec réducteur
Variateur de vitesse : Module FET proportionnel et récepteur
Radio FM : 3 voies proportionnelles
Batterie : Ni-MH 9 éléments 10.8V 1000mAh
Chargeur : A courant variable avec détection de pic
Spannweite: 1000mm
Länge: 850mm
Gewicht mit Akku: 760 g
Antrieb: MB480 mit Getriebe
Regler: elektronischer Flugregler/Empfänger
Sender: FM 3 Kanal proportional Sender
Akku: 9 Zellen 10.8V 1000mAh Ni-MH Akku
Lader: Variabler 12V Delta Peak Lader
Apertura alare: 1000mm
Lunghezza: 850mm
Peso con la batteria: 760 g
Motore: "480" con riduttore
Regolatore elettronico: proporzionale FET con ricevente incorporata
Radio FM: 3 canali proporzionali
Batteria: 9 celle da 10.8 V 1000 mAh Ni-MH
Caricabatteria: Peak CC a rateo variabile
Envergadura del ala: 1000mm
Longitud total: 850mm
Peso con batería: 760 g
Motor: clase 480 con reductora
Control de velocidad: ESC/receptor proporcional FET potencia
Radio FM: 3 canales proporcionales
Pila: 10.8V 1000mAh Ni-MH
Cargador: DC, Peak
Charge-and-Fly
Instruction Manual
Manual de instrucciones
Park Flyer
™
Mode d'emploi
Bedienungsanleitung
Manuale d'istruzioni
Wingspan: 1000mm
Overall Length: 850mm
Weight with battery: 760 g
Motor: 480 Power with gearbox
Speed Control: FET proportional ESC/receiver
FM Radio: 3 proportional channels
Batteries: 9-cell 10.8V 1000mAh Ni-MH
Charger: Variable rate DC peak detect (1.8A)
Advertisement
Table of Contents

Related Manuals for PARKZONE Focke-Wulf 190 RTF


Summary of Contents for PARKZONE Focke-Wulf 190 RTF
-
Page 1: Instruction Manual
Focke-Wulf 190 RTF Instruction Manual Mode d’emploi Bedienungsanleitung Manuale d’istruzioni Manual de instrucciones Envergure : 1000mm Longueur : 850mm Poids avec batterie : 760 g Moteur : 480 avec réducteur Variateur de vitesse : Module FET proportionnel et récepteur Radio FM : 3 voies proportionnelles Batterie : Ni-MH 9 éléments 10.8V 1000mAh... - Page 2 Everyone at ParkZone is committed to giving experienced pilot to have an easier time transitioning to flying with you the most enjoyable flight experience you can have.
- Page 3 Change Flight Control. El ordenador de abordo esta programado con dos modos de vuelo, dando le la oportunidad de seleccionar el modo Su FW-190 RTF de ParkZone, incluye todo lo necesario en la caja para de vuelo mas confortable para Ud. El modo standart limita el recorrido que Ud.
- Page 4 Step 1 Setting Up the Transmitter 1. Insert 8 new “AA” batteries (supplied) into the transmitter, observing proper polarity. 2. Turn the switch on and check to make sure the LED is illuminated, which indicates that the batteries have been installed correctly.
-
Page 5: Charging The Aircraft Battery
“re-peak” the battery before you fly. WARNING! You cannot charge the optional Li-Po battery packs with the ParkZone variable rate DC Peak charger included with this kit. You must use a Li-Po specific battery charger. Failure to follow this warning could result in a fire. -
Page 6: Schritt 2. Laden Des Flugakkus
“ricaricare al massimo” la batteria prima del volo ripetendo la procedura di carica. ATTENZIONE: Non si possono caricare le batterie Li-Po opzionali con il caricabatterie ParkZone DC Peak incluso in questa scatola. È neccessario usare un caricabatterie specifico per le Li-Po. Ignorando questo avviso è... - Page 7 “restablecer el pico” de la batería antes de iniciar el vuelo. ADVERTENCIA: Con el cargador de pico de CC ParkZone incluido con este kit no puede cargar grupos de baterías de Li-Po opcionales. Debe utilizar un cargador de baterías de Li-Po específico. Si no sigue esta advertencia, puede producirse un incendio.
-
Page 8: Attaching The Wing
Step 3 Attaching the Wing In order to attach the wing of your Focke-Wulf 190, please follow these simple instructions: 1. Locate the included wing screws (in clear plastic bag). 2. Plug in aileron servo lead from wing into aileron extension. - Page 9 Step 4 4. Make sure that the throttle slider is all the way down, Attaching the Horizontal Stabilizer and Rudder in the “off” position. Turn on the transmitter and plug in 1. Locate horizontal stab. the flight battery. Make sure the trim levers and control 2.
- Page 10 Informazioni sul Centro di Gravità Il Centro di Gravità del ParkZone FW-190 è situato a 146 mm dal bordo di uscita dell’ala verso l’avanti. In quella zona si possono notare due linee che simulano i pannelli ed il baricentro si trova tra quelle due linee. Questo vale sia per la batteria standard a 9 celle Ni-MH sia per la batteria 3S LiPo.
-
Page 11: Making Trim Adjustments To The Horizontal Stabilizer
Step 5 Making Trim Adjustments to the Horizontal Stabilizer 1. Turn on the transmitter. 2. Place a fully charged battery into the battery compartment in the fuselage and attach the connector lead coming from the plane to the lead from the battery. 3. -
Page 12: Motor Test
Querrudertrimm Velcro straps around the battery, and replace the Trim dell’alettone battery cap. Control de compensación del alerón 5. Your ParkZone FW-190 has a built-in throttle-arming ® feature that must sense the throttle slider in the “off” Throttle position before it will spin the propeller. Advance the throttle forward and the propeller should spin at a high speed. - Page 13 4. Asegure la batería dentro de la cavidad del fuselaje y coloque de nuevo la tapa de la batería. 5. El FW-190 de ParkZone tiene una función de armado del acelerador incorporada que necesita “ver” el mando deslizante del acelerador en la ®...
-
Page 14: Control Test
Step 7 Control Test Warning: Keep everything clear of the propeller before starting the control test in the event that you accidentally turn on the motor. 1. Be certain that the throttle slider is in the “off” position and that both trim levers are centered. 2. - Page 15 Deutsch Schritt 7. Reichweitentest WARNUNG: Bitte halten Sie sich von der Luftschraube fern, bevor Sie den Funktionstest durchführen für den Fall, dass der Motor versehentlich anläuft. 1. Stellen Sie sicher, dass der Gasschieber auf Off und beide Trimmhebel mittig stehen. 2.
-
Page 16: Making Adjustments To The Ailerons
Step 8 Making Adjustments to the Ailerons Warning: Keep everything clear of the propeller before adjusting the ailerons in the event that you accidentally turn on the motor. You may find some adjustment is needed to properly trim the ailerons. The ailerons are properly trimmed when each aileron is level with the stationary wing surface. - Page 17 Deutsch Schritt 8. Einstellen der Querruder WARNUNG: Bitte halten Sie sich von der Luftschraube fern, bevor Sie den Querrudertest durchführen für den Fall, dass der Motor verseh- entlich anläuft.. Es könnte erforderlich sein, Einstellungen an den Querrudern vorzunehmen. Die Querruder sind dann richtig getrimmt, wenn sie mit der Tragfläche exakt fluchten.
- Page 18 VENT VIENTO • A large, open grassy field is required to fly your Volare in questo spazio (sopra vento rispetto al pilota) WIND ParkZone Focke-Wulf 190. Your FW-190 can achieve Vuele en esta zona (contra el viento del piloto) ®...
-
Page 19: Optimal Flying Conditions
Step 10 Optimal Flying Conditions You want to fly! However, you need to make sure that you fly in the conditions that will allow you to have the best success. This is when there is little to no wind (less than or near 13 km/h). -
Page 20: Range Test
Step 11 Range Test You will need two people to perform the range test— one to hold the plane and the other to give the transmitter input. Schritten Warning: The person holding the plane should hold it passi in such a way that the propeller does not come into pasos contact with any part of his or her clothing or body. - Page 21 Italiano Passo 11. Prova della Portata Per fare questa prova servono due persone: una per tenere la trasmittente ed una per il modello. Attenzione! La persona che tiene il modello dovrebbe tenerlo in modo che l’elica non urti le parti del corpo o si impigli nei vestiti. 1.
-
Page 22: First Flights
Die 3-Kanal-Steuerung wurde für erfahrene Modellpiloten entwickelt und ist nicht für Anfänger gedacht. Wenn Sie die Zone 2 HobbyZone Flug- ® zeuge problemlos steuern können, dann werden Sie mit der ParkZone P-51D Mustang auch keine Probleme haben. Wenn Sie allerdings mit der ®... - Page 23 ® pilotos que vuelen por primera vez el FW-190 de ParkZone deben solicitar ayuda a un piloto con experiencia en radiocontrol hasta que el tercer canal adicional, el control de cabeceo, se domine completamente. Si no tiene experiencia con el control de alerones, será de mucha ayuda recurrir a un experimentado piloto para su primer vuelo.
-
Page 24: Mode Change Flight Control System
Step 13 Mode Change Flight Control System Your FW-190 comes with the ability to change flight modes as you gain more experience and become more Transmitter Decal familiar with it. There are two modes, selectable from the Autocollant sur émetteur Sender-Aufkleber transmitter, from which you can choose: Decalcomania del trasmettitore... - Page 25 Note: Your ParkZone FW-190 is designed to support a 3s Li-Po battery. Jumper 2 (V-Tail/Standard Tail) We recommend the Thunder Power 2100mAh pack (THP21003SPL).
- Page 26 (aggiunti/tolti) che permettono di cambiare le caratteristiche rispetto alla configurazione standard. E’ anche possibile riutiliz- zare il radiocomando per comandare un altro modello ParkZone o un altro modello elettrico. grazie alla flessibilità del modulo riucevente/regolatore. Jumper 1- Mixer del comando di Profondità e del Direzionale: Puoi installare questo jumper per usufruire del software che miscela il timone di profondità...
- Page 27 (quitarse/ ponerse) lo que le permite realizar cambios (si lo desea) en la configuración de serie que lleva su FW-190. También puede reutilizar el sistema de radio incluido en otro avión eléctrico de ParkZone o similar si lo desea, gracias a la adaptabilidad del receptor /ESC incluido.
- Page 28 Schritt 15. Handstart Ihrer FW-190 Ihre ParkZone FW-190 wird im Handstart gestartet. Bitte folgen Sie diesen Anweisungen: 1. Stellen Sie sicher, dass der Akku vollständig geladen ist. Wenn das Laden Ihres Flugakkus länger als 12 Stunden her ist, sollten Sie diesen noch einmal an den Delta Peak Lader hängen, um den Akku zu toppen.
- Page 29 Paso 15. Lanzamiento manual del FW-190 Su FW-190 de ParkZone tendrá que lanzarse manualmente. Para hacerlo, siga estas instrucciones: 1. Compruebe que la batería del avión esté totalmente cargada. Si han transcurrido mas de 12 horas desde que ha cargado totalmente sus baterias de Ni-MH, deberá...
- Page 30 Step 16 Flying Helpful Hints for Flight: 1. After launching, your FW-190 will climb at full throttle. Keep the throttle full on until you have reached an altitude of at least 15 meters. At the same time, make sure that you continue to keep the airplane flying directly into the wind.
- Page 31 Italiano Passo 16. Il Volo Suggerimenti utili per il volo: 1. Dopo il decollo il FW-190 cabrerà a tutto motore. Dai tutto gas fino a che il modello ha raggiunto circa 15 metri. Contemporaneamente cerca di mantenere il modello con il muso puntato contro vento. 2.
-
Page 32: Throttle Adjustment
Step 17 Throttle Adjustment 1. Climb to a minimum altitude of 15 to 20 meters at full throttle. 2. To achieve and maintain a level “cruising” altitude, reduce the power by moving the throttle slider down to approximately 70% of full on. - Page 33 Step 18 Using Elevator Your ParkZone FW-190 is equipped with a third channel for elevator (pitch control). Pulling back on the stick provides up elevator. Pull- ® ing too far back on the elevator to climb too quickly will cause the airplane to enter a stall (make the nose of the plane come down). To avoid crashing from a stall, always maintain enough altitude to recover.
- Page 34 Step 19 Landing Your FW-190 When you begin to notice that your FW-190 no longer climbs well under full power (normally after approximately 10–12 minutes), the battery is getting low and it is time to land. Bring in your aircraft directly into the wind and toward the desired landing spot.
- Page 35 Italiano Passo 19. Atterraggio del FW-190 Quando si inizia a notare che il FW-190 non sale più bene a tutta potenza (normalmente dopo circa 10–12 minuti), significa che la batteria si sta scaricando e che è ora di atterrare. Fai scendere il FW-190 direttamente controvento verso il punto di atterraggio desiderato. (Riduci gradualmente il “gas”...
- Page 36 Step 20 Other Helpful Information Repairing Minor Damage Aerobatic Flight If you happen to crash, and part of the tail or wing breaks, you Your FW-190 comes out of the box with the controls set for can repair the damage by using packing tape to cover the miss- softer responses and with the clevis attached to the outer holes ing pieces.
- Page 37 Italiano Passo 20. Altre Informazioni Utili. Volo acrobatico Al momento di estrarlo dalla scatola, il FW-190 ha i comandi impostati per risposte più dolci ed ha i rinvii fissati ai fori esterni delle superfici di controllo. Tuttavia, una volta che ti sei abituato alle caratteristiche di volo e desideri eseguire manovre più acrobatiche, puoi modificare l’escursione permessa spostando ai fori interni delle squadrette di comando.
-
Page 38: Warnings And Safety
Warnings and Safety 1. Read and follow this manual completely, observing all battery on a heat-resistant surface. Do not lay it on car- instructions and safety directions. Otherwise, serious pet or upholstery while charging. If you are using a Li-Po injury and damage can occur. -
Page 39: Advertencias Y Seguridad
Deutsch Sicherheithinweise 1. Lesen Sie diese Bedienungsanleitung vollständig durch und sehen Sie sich das Video an. Befolgen Sie alle Sicherheitshinweise. Ansonsten besteht Verlet- zungsgefahr. Handeln Sie nach dem Grundsatz: Sicherheit zu erst. 2. Halten Sie die Luftschraube von allen Körperteilen fern, selbst wenn er sich nicht bewegt. Er könnte aus Versehen anlaufen und zu erheblichen Verletzun- gen führen. -
Page 40: Success Tips
Success Tips 1. Don’t fly in winds over 15 km/h! If you are an inexperi- 5. Don’t attempt to fly or do maneuvers beyond your flying enced pilot, this is especially important. abilities. Seek the assistance of an experienced pilot 2. -
Page 41: Consejos Útiles
Italiano Consigli Importanti 1. Non volare con un vento superiore ai 15 km/h! Questo è molto importante se non si ha molta esperienza. 2. Se non si è mai fatto volare un modello col comando di profondità farsi aiutre da un modellista più esperto durante i primi voli. Piloti senza esperienza con radio a 3 canali non dovrebbero mai volare senza la presenza di un pilota esperto che li aiuti. -
Page 42: Troubleshooting
Troubleshooting PROBLEM POSSIBLE CAUSE SOLUTION Unit does not operate 1. Transmitter batteries are depleted or installed incorrectly. This is 1. Check polarity installation or replace with fresh indicated by a dim or unlit LED on transmitter or the low battery alarm “AA”... - Page 43 Italiano – Ricerca dei guasti PROBLEMA CAUSA POSSIBILE SOLUZIONE L’unità non funziona 1. Se le pile “AA” della trasmittente sono esaurite o installate non 1. Controllare la polarità delle pile o sostituirle con nuove pile correttamente il LED si illumina debolmente o rimane spento di tipo “AA”...
-
Page 44: Conditions De Garantie
Horizon Hobby, Inc. is only responsible for product 1. Unplug the battery from the airplane. once it arrives and is accepted at our facility. Most 2. Pack the complete ParkZone FW-190 (all components carriers require optional insurance to cover damage or ®... - Page 45 Modelimport es únicamente 1. Desenchufe la batería del avión. responsable del producto una vez llega y es aceptado en sus instalaciones. 2. Empaquete el Focke-Wulf 190 de ParkZone completo (todos La mayoría de los transportistas requieren un seguro opcional para cubrir ®...
-
Page 46: Replacement Parts
DESCRIPTION: PKZ1005 Propeller: P-51D, FW-190 PKZ1027 10.8V 1000mAh Ni-MH Battery: P-51D, 3D, FW-190 PKZ1130 Mini Servo (5W) with Arms: ParkZone PKZ1131 Gear Set with Accessories (5W Servo) PKZ1132 Servo Arm Assortment (3W & 5W) PKZ1241 Tx: CH1, 26.995: F27/B, SloV, DECN, P-51D, FW-190 PKZ1242 Tx: CH2, 27.045: F27/B, SloV, DECN, P-51D, FW-190... -
Page 47: Pièces Détachées
Rx (SR-327LT) CH4, 27.145 : P-51D, F27B, FW-190 PKZ1555 Rx (SR-327LT) CH5, 27.195 : P-51D, F27B, FW-190 PKZ1556 Rx (SR-327LT) CH6, 27.255 : P-51D, F27B, FW-190 PKZ1600 Focke-Wulf 190 RTF Electrique PKZ1602 Décoration : FW-190 PKZ1603 Pilote peint : FW-190 PKZ1607 Cône d’hélice : FW-190... - Page 48 Empfänger Kanal 3, 27.095: P-51D, F27B, FW-190 PKZ1554 Empfänger Kanal 4, 27.145: P-51D, F27B, FW-190 PKZ1555 Empfänger Kanal 5, 27.195: P-51D, F27B, FW-190 PKZ1556 Empfänger Kanal 6, 27.255: P-51D, F27B, FW-190 PKZ1600 Focke-Wulf 190 RTF PKZ1602 Dekor: FW-190 PKZ1603 Pilot: FW-190 PKZ1607 Spinner: FW-190 PKZ1608...
-
Page 49: Parti Di Ricambio
Parti di ricambio Mantenete in efficienza il vostro ParkZone FW-190! Le parti di ricambio si possono acuistare presso il vostro negozio di ® fiducia o direttamente da www.scorpio.it Vi consigliamo di consultare sempre per primo il vostro rivenditore che è anche in grado di darvi preziosi consigli. - Page 50 Rx(SR-327LT): CH4, 27.145: P51, F27B, FW-190 PKZ1555 Rx(SR-327LT): CH5, 27.195: P51, F27B, FW-190 PKZ1556 Rx(SR-327LT): CH6, 27.255: P51, F27B, FW-190 PKZ1600 Focke-Wulf 190 RTF Electrico PKZ1602 Lámina de calcomanías: FW-190 PKZ1603 Piloto pintado: FW-190 PKZ1607 Cono de la hélice: FW-190...
- Page 51 8 secondes. Votre adversaire sera limité à un vol plané pendant cette période. Vous pouvez également installer le Module de Largage (HBZ6023) ou celui de vol de nuit (HBZ3510) sur votre Focke-Wulf 190. Visiter le site ParkZone.com pour de nouveaux modules X-Port.
- Page 52 ® sito per altre novità in arrivo. Ci sono molti altri modelli ParkZone che vanno da modelli in scala di aerei da turismo a quelli da caccia ed anche modelli che possono essere fatti volare sia indoor che outdoor. Siamo sempre alla ricerca di nuovi modelli che possano soddisfare le vostre esigenze.
- Page 56 Sono distribuiti in esclusiva per l’Italia da: Scorpio.s.r.l. CP 750 38100 Trento ©2005 Horizon Hobby, Inc. www.ParkZone.com Visitate www.scorpio.it per maggiori informazioni sui prodotti ParkZone: troverete altri aerei, scafi ed auto! Los productos ParkZone están distribuidos en por: ® Modelimport c/Primavera 48 Pol. Ind. Las Monjas...