Accu-Chek Performa Owner's Booklet
Hide thumbs
Also See for Performa:
- Quick start manual ,
- Owner's booklet (228 pages) ,
- User manual (180 pages)
Table of Contents
Advertisement
Quick Links
50705_05853397002_COVER.indb 1
BLOOD GLUCOSE METER / 血糖機
Owner's Booklet
使用者手冊
Roche USA – 50705
V6/1 – 05853397002 – Schwarz –
Proofprint Number 213
Roche USA – 50705
V6/2 – 05853397002 – Cyan –
Proofprint Number 213
Roche USA – 50705
V6/3 – 05853397002 – Magenta –
Proofprint Number 213
Roche USA – 50705
V6/4 – 05853397002 – Yellow –
Proofprint Number 213
Roche USA – 50705
V6/5 – 05853397002 – PMS 181 –
Proofprint Number 213
Roche USA – 50705
V6/6 – 05853397002 – PMS Cool Gray 4 –
Proofprint Number 213
4/24/12 8:31 AM
Advertisement
Chapters
Table of Contents

Related Manuals for Accu-Chek Performa


Summary of Contents for Accu-Chek Performa
- Page 1 Roche USA – 50705 V6/1 – 05853397002 – Schwarz – Proofprint Number 213 Roche USA – 50705 V6/2 – 05853397002 – Cyan – Proofprint Number 213 Roche USA – 50705 V6/3 – 05853397002 – Magenta – BLOOD GLUCOSE METER / 血糖機 Proofprint Number 213 Roche USA –...
- Page 2 50705_05853397002_COVER.indb 2 4/24/12 8:31 AM...
- Page 3 V4/1 – 05853397002 – Schwarz – Whether the Accu-Chek Performa meter is your first blood glucose meter or you have used a meter for some time, please read this booklet carefully before you use your new meter. To use it correctly and dependably, Roche USA –...
- Page 4 Testing (AST) section of this booklet for approved alternative sites and associated limitations. The Accu-Chek Performa meter with the Accu-Chek Performa test strips provide a complete test system that is meant for in vitro diagnostic use by healthcare professionals in clinical settings and by people with diabetes at home. The system is not for use in diagnosis or screening of diabetes mellitus.
- Page 5 WArning Any object coming into contact with human blood is a potential source of infection (see: Clinical and Laboratory Standards Institute: Protection of Laboratory Workers from Occupationally Acquired Infections; Approved Guideline – Third Edition; CLSI document M29-A3, 2005). Why regular Blood glucose Testing is important Testing your blood glucose regularly can make a big difference in how you manage your diabetes every day.
- Page 6 50705_05853397002_EN.indb 4 4/24/12 8:32 AM...
-
Page 7: Table Of Contents
Contents Chapter 1: Understanding Your new System ...................7 The Accu-Chek Performa Meter ........................7 Preparing the Meter for a Test ......................... 9 Adjusting the Time and Date for First Time Use .....................11 Using the Accu-Chek Performa System ......................14 Chapter 2: Testing Your Blood glucose ....................15 Performing a Blood Glucose Test ........................15... - Page 8 Chapter 5: Maintenance and Troubleshooting ..................53 Meter Maintenance ............................53 Changing the Battery .............................54 Cleaning the Meter ............................55 Display and Error Messages ..........................56 Chapter 6: Technical information ......................63 Product Limitations ............................63 Specifications ..............................63 Product Safety Information ..........................65 Discarding the Meter .............................66 Explanation of Symbols ..........................67 Guarantee ..............................68 Additional Supplies ............................68...
-
Page 9: Chapter 1: Understanding Your New System
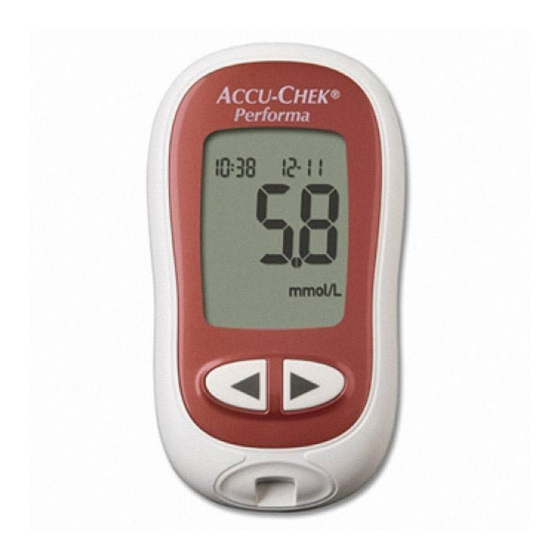
Chapter 1: Understanding Your new System The Accu-Chek Performa Meter infrared (ir) Window Power/Set Button Transfers data from the meter Turns the meter on or off to a computer or PDA. and sets options. Code Chip Slot Display Insert code chip here. - Page 10 The code chips that come with Accu-Chek Performa test strips are changing from white to black. Once you receive a black code chip, insert it into the meter. You do not need to change the black code chip again, even if new test strip boxes contain different colored code chips or different code numbers.
-
Page 11: Preparing The Meter For A Test
The code chips that come with Accu-Chek Performa test strips are changing from white to black. Once you receive a black code chip, insert it into the meter. You do not need to change the black code chip again, even if new test strip boxes contain different colored code chips or different code numbers. - Page 12 noTE • If you see code and a flashing - - - on the display, insert a code chip into the meter. • Do not force the code chip into the meter. There is only one correct way to insert the code chip. •...
-
Page 13: Adjusting The Time And Date For First Time Use
Adjusting the Time and Date for First Time Use The meter is preset with the time and date which may need to be adjusted to the local time zone. It is important to set the correct time and date in the meter to use the meter memory or to transfer results to a computer. - Page 14 decrease increase 4. Press and release 5. Press and release to set the 6. Repeat steps 4 and 5 to adjust adjust the minutes. minutes. and set the day, month, and year. 50705_05853397002_EN.indb 12 4/24/12 8:32 AM...
- Page 15 7. Press and hold until the flashing test strip symbol appears on the display. The time and date are now set. noTE • After you change the battery, the meter automatically prompts a time and date confirmation when it is turned on.
-
Page 16: Using The Accu-Chek Performa System
The code chips that come with Accu-Chek Performa test strips are changing from white to black. Once you receive a black code chip, insert it into the meter. You do not need to change the black code chip again, even if new test strip boxes contain different colored code chips or different code numbers. -
Page 17: Chapter 2: Testing Your Blood Glucose
Chapter 2: Testing Your Blood glucose Performing a Blood glucose Test noTE • Set up the meter before you perform your first blood glucose test. • Blood samples taken from the palm are equivalent to blood samples taken from the fingertip. For detailed information on how to obtain blood from the palm, refer to the Alternative Site Testing (AST) section, steps 4 and 5. - Page 18 You need the meter, a test strip, a lancing device, and a lancet. 1. Wash and dry your hands. 4. Insert the test strip into the 5. Perform a fingerstick with the meter in the direction of the lancing device. arrows.
- Page 19 6. Gently squeeze your finger to 7. Touch the blood drop to the 8. The test result appears on assist the flow of blood. front edge of the yellow the display. Leave the test window of the test strip. Do strip in the meter to mark This helps you get a blood not put blood on top of the...
-
Page 20: Marking Blood Glucose Results
Marking Blood glucose results You can mark a test result with an asterisk ( ) to indicate a special event such as exercise or an AST result. When you review the test results in memory, the can help you remember what was different about the test result. -
Page 21: Alternative Site Testing (Ast)
Alternative Site Testing (AST) You have the option of obtaining a blood sample from other sites on your body besides the fingertip. Alternative sites include the palm, forearm, upper arm, thigh, and calf. The two palm testing sites are the fleshy areas under the thumb (thenar) and under the little finger (hypothenar). - Page 22 WArning • Do not change your therapy because of just one blood glucose result. • NEVER ignore symptoms of low or high blood glucose. • If your blood glucose result does not match how you feel, perform a fingertip or palm test to confirm your test result.
- Page 23 You need the meter, a test strip, a lancing device designed for AST, and a lancet. 1. Prepare the lancing device. 3. Insert the test strip into the 4. Press the lancing device firmly meter in the direction of the against a fleshy area on the arrows.
- Page 24 noTE • If the blood drop is too small, reapply pressure to get a sufficient blood drop. • After a successful test, the meter turns off 5 seconds after the test strip is removed. 5. Trigger the lancing device 6. Touch the blood drop to the 7.
-
Page 25: Unusual Blood Glucose Results
Unusual Blood glucose results If your blood glucose result does not match how you feel, check this list to help solve the problem. Troubleshooting Checks Action 1. Check if the test strips were expired. Discard the test strips if they are past the use by date. -
Page 26: Symptoms Of Low Or High Blood Glucose
6. Check if the meter and test strips are working Perform a control test. See Chapter 4, Performing a properly. Control Test, for instructions. 7. If you are still unsure of the problem … Contact Roche. Symptoms of Low or High Blood glucose Being aware of the symptoms of low or high blood glucose can help you understand your test results and decide what to do if they seem unusual. -
Page 27: Chapter 3: Meter Memory, Setup, And Data Transfer
Chapter 3: Meter Memory, Setup, and Data Transfer Memory Storing Blood glucose and Control results The meter automatically stores up to 500 blood glucose results with the time and date of the test result. You can review them at any time. Test results are stored from the newest to the oldest. It is very important to set the correct time and date in the meter. - Page 28 noTE • The memory is not lost when the battery is replaced; however, confirm that the time and date are still correct (see Chapter 3, Setting the Time and Date). • Once 500 blood glucose or 20 control results are in memory, adding a new result causes the oldest one to be deleted.
-
Page 29: Viewing Blood Glucose Results
Viewing Blood glucose results With the meter on or off, press and release to enter memory. The most recent test result appears on the display. • To view previous test results in order, press . • To view the 7, 14, or 30 day averages, press . 50705_05853397002_EN.indb 27 4/24/12 8:32 AM... -
Page 30: Meter Setup
Meter Setup Using the Set-Up Mode The following features can be customized as required. Time and date Set the time and date. Beeper Select on or oFF. Test reminders Select on or oFF. If you select on, choose 1 to 4 times a day for a test reminder. -
Page 31: Setting The Time And Date
Setting the Time and Date decrease increase 1. Press and release to turn 2. Press and hold until set-up 3. Press and release the meter on. appears on the display. decrease or increase the hour. The flashing test strip symbol The hour flashes. - Page 32 4. Press and release to set 5. Repeat steps 3 and 4 to adjust 6. To set up more options, press the hour. and set the minutes, day, and release . To exit, press month, and year. and hold until the flashing The minutes flash.
-
Page 33: Setting The Beeper On Or Off
Setting the Beeper on or off The meter has the beeper preset to on. Setting the beeper to oFF does not affect test results. The beeper is helpful because it prompts you: • to apply blood or control solution to the test strip. •... - Page 34 1. Press and release to turn 2. Press and hold until set-up 3. Press and release the meter on. appears on the display. repeatedly until the flashing beeper symbol and on or oFF The flashing test strip symbol appear on the display. appears on the display.
- Page 35 4. Press and release to switch between on 5. To set up more options, press and release . To and oFF. exit, press and hold until the flashing test strip symbol appears on the display. 50705_05853397002_EN.indb 33 4/24/12 8:32 AM...
-
Page 36: Setting Test Reminders
Setting Test reminders A test reminder: • beeps at the same time each day to remind you to perform a test. • beeps every 2 minutes up to 3 times. • turns off by inserting a test strip or pressing any button. •... - Page 37 noTE • If a test was performed within 30 minutes of a test reminder, the test reminder does not occur. • If the meter is on at the test reminder time, the test reminder does not occur. • Exposure to cold conditions may disable test reminders until the meter is turned on. •...
- Page 38 When setting the time for a test reminder, the bell symbol and set-up remain on the display. 1. Press and release to turn 2. Press and hold until set-up 3. Press and release the meter on. appears on the display. repeatedly until the bell symbol, oFF, and the flashing The flashing test strip symbol...
- Page 39 4. Press and release 5. Press and release to set 6. Press and release switch between on and oFF. your choice. adjust the hour. If you select on, the hour flashes. A-1 and the bell 7. Press and release to set symbol remain on the display.
- Page 40 8. Press and release 9. Press and release to set the 10. To adjust and set additional select 00, 15, 30, or minutes. test reminders, follow steps 45 minutes. These are the 4–9. To exit, press and hold The bell symbol, oFF, and the only choices.
-
Page 41: Setting The Hypoglycemic (Hypo) Alert
Setting the Hypoglycemic (Hypo) Alert The hypo alert can be set to a level between 60 and 80 mg/dL or 3.3 and 4.4 mmol/L to let you know when your blood glucose is possibly too low. WArning This function is not a substitute for hypoglycemia training by your healthcare professional. Consumers: Before you set the hypo alert, talk to your healthcare professional to help you decide what blood glucose level is your hypoglycemic level. - Page 42 1. Press and release to turn 2. Press and hold until set-up 3. Press and release the meter on. appears on the display. repeatedly until oFF and the flashing appear on the The flashing test strip symbol display. appears on the display. 50705_05853397002_EN.indb 40 4/24/12 8:32 AM...
- Page 43 4. Press and release to switch between on 5. Press and release to set your choice. and oFF. If you select on, flashes. The display shows 70 mg/dL or 3.9 mmol/L. 50705_05853397002_EN.indb 41 4/24/12 8:32 AM...
- Page 44 6. Press and release to adjust the level. 8. Press and hold until the flashing test strip symbol appears on the display. The set-up mode is complete. To turn the meter 7. Press and release to set the level. off, press and release . 50705_05853397002_EN.indb 42 4/24/12 8:32 AM...
-
Page 45: Transferring Your Results To A Computer Or Pda
Transferring Your results to a Computer or PDA You can transfer your stored results to a computer to track, identify patterns, and print. Transferring Data Directly to a Computer or PDA Using Specialized Software and infrared Cable WArning Individual patient results cannot be identified, so transferring data from meters used for multiple-patient testing is NOT recommended. - Page 46 5. Locate the infrared (IR) window on the top of the meter. infrared (ir) window 6. Locate the IR window on either the infrared cable (computer) or PDA. 7. Put the meter on a flat surface and point the 2 IR windows toward each other. They should be 3–10 cm apart.
-
Page 47: Chapter 4: Control Testing
Chapter 4: Control Testing Why Perform Control Tests Performing a control test lets you know the meter and test strips are working properly. You should perform a control test when: • you open a new test strip box. • you left the test strip container open. •... -
Page 48: About The Control Solutions
• Do not use control solution that is past the use by date. • Refer to the control solution package insert for control solution storage conditions. • The meter automatically recognizes the Accu-Chek Performa control solution. • The control results are not displayed in memory. -
Page 49: Performing A Control Test
Performing a Control Test You need the meter, a test strip, and control solution Level 1, Level 2, or both. The control level is printed on the bottle label. 1. Check the use by date on the 2. Insert the test strip into the 3. - Page 50 4. Put the meter on a flat surface, such as a table. 5. Remove the bottle cap. Wipe the tip of the bottle with a tissue. 50705_05853397002_EN.indb 48 4/24/12 8:32 AM...
- Page 51 6. Squeeze the bottle until a tiny drop forms at 7. Wipe the tip of the bottle with a tissue. Cap the the tip. Touch the drop to the front edge of bottle tightly. the yellow window of the test strip. Do not put control solution on top of the test strip.
- Page 52 9. Press and release to set the control level in the meter. 10. Remove and discard the used test strip. oK and the control result alternate on the display if the control result is in range. Err and the control result alternate on the display if the control result is not in range.
-
Page 53: Understanding Out-Of-Range Control Results
Understanding out-of-range Control results If the control result is out of range, check this list to help solve the problem. Troubleshooting Checks Action 1. Check if the test strips or control solutions were Discard the test strips or control solutions if either is expired. - Page 54 6. Check if you followed the directions. See Chapter 4, Control Testing, and repeat the control test. Contact Roche if you still have problems. 7. Check if you chose the correct control solution If you chose the wrong control solution level, you level, either 1 or 2, when you performed the can still compare the control result to the range control test.
-
Page 55: Chapter 5: Maintenance And Troubleshooting
Chapter 5: Maintenance and Troubleshooting Meter Maintenance The meter needs little or no maintenance with normal use. It automatically tests its own systems every time you turn it on and lets you know if something is wrong (see Chapter 5, Display and Error Messages). If you drop the meter or think it is not giving accurate results, contact Roche. -
Page 56: Changing The Battery
Changing the Battery 1. Open the battery door on the 2. Remove the old battery. back of the meter by pushing the tab in the direction of the 3. Insert the new battery with the (+) side facing up. arrow and pulling the door up. 4. -
Page 57: Cleaning The Meter
Cleaning the Meter Make sure to keep the meter free of dust. If you need to clean or disinfect it, follow these guidelines carefully to help you get the best performance possible. Do not • Make sure the meter is off •... -
Page 58: Display And Error Messages
Display and Error Messages WArning Never make therapy decisions based on an error message. Contact Roche if you have any concerns. The meter will not turn on or the The meter is in set-up mode, waiting display is blank. for you to change or confirm settings. •... - Page 59 Blood glucose may be lower than the The meter is ready for a drop of measuring range of the system (see blood or control solution. Chapter 2, Unusual Blood Glucose Results). The test result was marked. Blood glucose may be higher than the measuring range of the system (see Chapter 2, Unusual Blood Glucose Results).
- Page 60 This message may appear when Blood glucose is below the defined using a white code chip in the meter. hypoglycemia (low blood glucose) It means the test strips expire at level. the end of the current month. At the end of the month, discard the code chip and any remaining test strips.
- Page 61 The code chip is incorrect. Turn the meter off and insert a new code chip. Your blood glucose may be extremely high or a meter or a test strip error has occurred. • If your test result matches how you feel, contact your healthcare professional immediately. •...
- Page 62 Not enough blood or control solution Blood or control solution was applied was drawn into the test strip for to the test strip before the flashing measurement or was applied after drop symbol appeared on the display. the test had started. Discard the test Discard the test strip and repeat the strip and repeat the test.
- Page 63 The temperature is above or below The time and date settings may the proper range for the system. be incorrect. Make sure the time Refer to the test strip package insert and date are correct and adjust, if for system operating conditions. necessary.
- Page 64 noTE • Contact Roche if a display or error message reappears. • Contact Roche if any other error message appears. 50705_05853397002_EN.indb 62 4/24/12 8:32 AM...
-
Page 65: Chapter 6: Technical Information
Chapter 6: Technical information Product Limitations Read the literature packaged with the test strips and control solutions for the latest information on product specifications and limitations. Specifications Blood volume Refer to the test strip package insert. Sample type Refer to the test strip package insert. Test time Refer to the test strip package insert. - Page 66 Approx. 62 g (with battery) Construction Hand-held Protection class Meter type The Accu-Chek Performa meter is suitable for continuous operation. Control solution storage conditions Refer to the control solution package insert. Electromagnetic Compatibility This meter meets the electromagnetic immunity requirements as per EN ISO 15197 Annex A. The chosen basis for electrostatic discharge immunity testing was basic standard IEC 61000-4-2.
-
Page 67: Product Safety Information
Performance Analysis Refer to the test strip package insert. Test Principle Refer to the test strip package insert. Product Safety information WArning • Choking hazard. Small parts. Keep away from children under the age of 3 years. • Strong electromagnetic fields may interfere with the proper operation of the meter. Do not use the meter close to sources of strong electromagnetic radiation. -
Page 68: Discarding The Meter
Discarding the Meter WArning • During blood glucose testing, the meter itself may come into contact with blood. Used meters therefore carry a risk of infection. Before discarding the meter, remove the battery or batteries. Discard used meters according to the regulations applicable in your country. Contact the local council and authority for information about correct disposal. -
Page 69: Explanation Of Symbols
Explanation of Symbols These symbols may appear on the packaging, on the type plate, and in the instructions for the Accu-Chek Performa meter. Consult instructions for use Caution, refer to safety-related notes in the instructions for use accompanying this product. -
Page 70: Guarantee
The statutory provisions on rights in consumer goods sales in the country of purchase shall apply. Additional Supplies Test Strips Accu-Chek Performa test strips Control Solutions Accu-Chek Performa control solutions 50705_05853397002_EN.indb 68 4/24/12 8:32 AM... -
Page 71: Information For Healthcare Professionals
information for Healthcare Professionals WArning Healthcare Professionals: Follow the infection control procedures appropriate for your facility. Refer to the test strip package insert for additional healthcare professional information. Sample Handling Always wear gloves when handling blood-contaminated items. Always adhere to the recognized procedures for handling objects that are potentially contaminated with human material. - Page 72 recommending Alternative Site Testing to Patients Decisions about whether to recommend Alternative Site Testing (AST) should take into account the motivation and knowledge level of the patient and his or her ability to understand the considerations relative to diabetes and AST. If you are considering recommending AST for your patients, you need to understand that there is a potential for a significant difference between fingertip or palm test results and test results obtained from the forearm, upper arm, thigh, or calf.
-
Page 73: Index
index control solution, 46 alternative site testing, 19, 21, 70 control solution bottle, 8 control test, 45 battery, 8 out-of-range control results, 51 battery door, 7 performing, 47 battery type, 54 changing, 54 data transfer, 43 beeper, 31 display, 7 blood glucose results display messages, 56 marking, 18... - Page 74 63 set-up mode, 28 supplies, 68 symbols, 67 symptoms low or high blood glucose, 24 technical specifications, 63 test reminders, 34 test strip Accu-Chek Performa, 8, 14 test strip container, 8 test strip slot, 7 50705_05853397002_EN.indb 72 4/24/12 8:32 AM...
- Page 75 V4/1 – 05853397002 – Schwarz – 羅氏優勝血糖機組 台灣核准品名: 卓越血糖機 香港核准品名: Roche USA – 50705 V4/2 – 05853397002 – Cyan – 不論Accu-Chek Performa(羅氏優勝/卓越)血糖機是您的第一台血糖機,或您曾經使用過其他 的血糖機,使用新的血糖機之前,都請您務必仔細閱讀本手冊。為了能正確操作本血糖機, 您必須瞭解血糖機的操作方式、顯示幕及所有個別的特殊功能。 Roche USA – 50705 V4/3 – 05853397002 – Magenta – 如有任何問題,請與羅氏糖尿病照護部門/客戶服務部聯繫。聯絡資訊請見本手冊封底。 Roche USA – 50705 V4/4 – 05853397002 – Yellow –...
- Page 76 Accu-Chek Performa System(羅氏優勝/卓越)血糖機系統 Accu-Chek Performa(羅氏優勝/卓越)血糖機設計為搭配Accu-Chek Performa(羅氏優勝/卓越) 試紙使用,適用於定量檢測新鮮靜脈血、動脈血、新生兒血和微血管全血中的血糖,作為有 效的血糖監控之用。檢測用的微血管檢體樣本可採自指尖和被准許的其它部位(例如 前臂)。請參閱本手冊「其它部位採血檢測法(AST)」一節,以瞭解准許的其它部位和相 關限制。Accu-Chek Performa(羅氏優勝/卓越)血糖機配合Accu-Chek Performa(羅氏優勝/卓 越)血糖試紙提供完整的檢測系統,供醫護專業人員於臨床環境下或糖尿病患者於家居環境 中,進行體外診斷檢測。本系統並不適用於診斷或篩檢各類型糖尿病之用。專業醫護人員採 集血樣和準備工作,請參閱試紙包裝盒內的仿單/説明書。 僅可搭配Accu-Chek Performa(羅氏優勝/卓越)試紙和品管/質控液使用。 適用於血糖自我檢測 本系統配備(有些物品可能需要另購)包括: • Accu-Chek Performa(羅氏優勝/卓越)血糖機(含電池) • Accu-Chek Performa(羅氏優勝/卓越)試紙和密碼晶片/密碼牌 • Accu-Chek Performa(羅氏優勝/卓越)品管/質控液 50705_05853397002_ZHT.indb 2 4/24/12 8:33 AM...
- Page 77 警告 任何曾與人類血液接觸的物體,都會是潛在的感染源(請參閱:Clinical and Laboratory Standards Institute:Protection of Laboratory Workers from Occupationally Acquired Infections; Approved Guideline – Third Edition; CLSI document M29-A3, 2005)。 為什麼定期檢測血糖很重要 若能定期檢測您的血糖,對您每天的糖尿病管理將能發揮顯著的功效。我們已將檢測血糖的 方法儘可能簡化。 關於新血糖機的重要資訊 本血糖機出廠時已設定好時間與日期。使用前請將時間改為您的當區時間。 如果您已依照手冊中的步驟進行檢測,但發現自己似乎有與檢測值不符合的症狀,或是有任 何疑問,都請與專業醫護人員聯絡。 50705_05853397002_ZHT.indb 3 4/24/12 8:33 AM...
- Page 78 50705_05853397002_ZHT.indb 4 4/24/12 8:33 AM...
- Page 79 目錄 第1章:瞭解您的新血糖機 ........................7 Accu-Chek Performa(羅氏優勝/卓越)血糖機 ..................7 檢測前準備血糖機 ............................9 首次使用調整設定時間與日期 .........................11 使用Accu-Chek Performa(羅氏優勝/卓越)血糖機系統 ..............14 第2章:檢測您的血糖..........................15 執行血糖檢測 ..............................15 標記血糖檢測值 ............................18 其他部位採血檢測法(AST) ........................19 不正常的血糖檢測值 ...........................23 低血糖或高血糖的症狀 ..........................24 第3章:血糖機記憶功能、設定和資料傳輸..................25 記憶功能 ................................25 檢視血糖檢測值 ............................27 血糖機設定 ..............................28 設定時間與日期 ............................29 設定嗶聲「On」(開啟)或「Off」(關閉) ..................31 設定檢測提醒閙鈴功能 ..........................34 設定血糖過低...
- Page 80 第5章:維護與疑難排解 ........................53 血糖機維護 ..............................53 更換電池 ................................54 清潔血糖機 ..............................55 顯示幕訊息與錯誤訊息 ..........................56 第6章:技術資訊 ............................ 63 產品限制 ................................63 規格 .................................63 產品安全性資訊 ............................65 血糖機廢棄處理 ............................66 符號說明 ................................67 保固/保養 ...............................68 其他耗材 ................................68 專業醫護人員注意事項 ..........................69 索引 ................................71 50705_05853397002_ZHT.indb 6 4/24/12 8:33 AM...
-
Page 81: 第1章:瞭解您的新血糖機
第1章:瞭解您的新血糖機 Accu-Chek Performa(羅氏優勝/卓越)血糖機 紅外線(IR)傳輸埠 電源/設定鍵 用來從血糖機傳輸資料到 開啟或關閉血糖機及 電腦或PDA。 設定選項。 密碼晶片/密碼牌槽 顯示幕 於此處插入密碼晶片/ 顯示幕—顯示檢測 密碼牌。 值、訊息和儲存在記 憶裡的檢測值。 電池蓋 依箭頭方向推一下電 右箭頭鍵和左箭頭鍵 池蓋上的凸起部分即 按壓以便輸入記憶項 可翻開電池蓋。 目、調整設定,並用 來捲動瀏覽檢測值。 試紙槽 在此插入試紙。 50705_05853397002_ZHT.indb 7 4/24/12 8:33 AM... - Page 82 金屬端(電極) 將試紙的金屬端插入血 糖機。 黃色反應區 黃色反應區—用此處碰觸 血滴或品管/質控液。 試紙 試紙瓶 品管/質控液瓶 紅外線(IR)傳 輸埠 電池 密碼晶片/密 碼牌 將新電池「+」面朝上, 電源/設定鍵 (範例) 放入電池盒內。 俯視圖 備註 Accu-Chek Performa(羅氏優勝/卓越)血糖試紙隨附的密碼晶片/密碼牌已從白色改為黑色。 首次拿到黑色密碼晶片/密碼牌時,請將其插入血糖機。使用黑色密碼晶片/密碼牌之後,您 無須再次改換密碼晶片/密碼牌,即使新的試紙盒裡有其它不同顏色的密碼晶片/密碼牌或不 同的密碼。 50705_05853397002_ZHT.indb 8 4/24/12 8:33 AM...
-
Page 83: 檢測前準備血糖機
檢測前準備血糖機 備註 Accu-Chek Performa(羅氏優勝/卓越)血糖試紙隨附的密碼晶片/密碼牌已從白色改為黑色。 首次拿到黑色密碼晶片/密碼牌時,請將其插入血糖機。使用黑色密碼晶片/密碼牌之後,您 無須再次改換密碼晶片/密碼牌,即使新的試紙盒裡有其它不同顏色的密碼晶片/密碼牌或不 同的密碼。 1. 確定血糖機為關機狀態。 2. 把血糖機翻轉至背面。 3. 移除並丟棄白色密碼晶片/ 密碼牌(如果血糖機上有 白色密碼晶片/密碼牌)。 50705_05853397002_ZHT.indb 9 4/24/12 8:33 AM... - Page 84 備註 • 看到顯示幕上顯示code(密碼)並閃爍- - -時,請將密碼晶片/密碼牌插入血糖機。 • 請勿強力將密碼晶片/密碼牌壓入血糖機。正確插入密碼晶片/密碼牌的方式只有一種。 • 讓密碼晶片/密碼牌留在血糖機裡,除非您要使用另一盒新的試紙。使用黑色密碼晶片/ 密碼牌之後,您無須再次改換密碼晶片/密碼牌。 4. 翻轉新的密碼晶片/密碼牌,使其密碼朝向 外側。將密碼晶片/密碼牌插入密碼晶片/ 密碼牌槽,直到卡入定位為止。 50705_05853397002_ZHT.indb 10 4/24/12 8:33 AM...
-
Page 85: 首次使用調整設定時間與日期
首次使用調整設定時間與日期 血糖機已預先設定時間和日期,可能需要更改為當地時區。若要使用血糖機的記憶功能或將 檢測值下載至電腦,正確設定血糖機的時間與日期非常重要。 減少 增加 1. 按下又放開 (電源/設定 2. 按下又放開 或 以減少 3. 按下又放開 以完成設定 鍵)以開啟血糖機。 或增加「小時」。按下並 「小時」。 按住 或 不放,以快速 時間和日期會顯示在顯示 隨後「分鐘」開始閃爍。 捲動數值。 幕上,小時和set-up(設 定)開始閃爍。如果顯示 的時間和日期正確,按下 並按住 以跳出設定。 50705_05853397002_ZHT.indb 11 4/24/12 8:33 AM... - Page 86 減少 增加 4. 按下又放開 或 即可調 5. 按下又放開 以完成設定 6. 調整和設定日、月和年, 整分鐘。 「分鐘」。 步驟與上述步驟4和5同。 50705_05853397002_ZHT.indb 12 4/24/12 8:33 AM...
- Page 87 7. 按下並按住 直到顯示幕上出現閃爍的試 紙符號為止。 現在已完成設定時間和日期。 備註 • 更換電池並開機後,血糖機會提醒您確認血糖機的時間和日期設定。 • 請參閱第3章「血糖機設定」以在血糖機上設定更多選項。 50705_05853397002_ZHT.indb 13 4/24/12 8:33 AM...
-
Page 88: 使用Accu-Chek Performa(羅氏優勝/卓越)血糖機系統
使用Accu-Chek Performa(羅氏優勝/卓越)血糖機系統 • 只能使用Accu-Chek Performa(羅氏優勝/卓越)血糖試紙。 • 試紙從試紙瓶取出後,應立即使用。 • 試紙插入血糖機前,請勿將血液或品管/質控液滴在試紙上。 • 每次取出試紙後,應立即蓋緊試紙瓶蓋,以免試紙受潮。 • 請將未用過的試紙保存在原包裝試紙瓶中,並密閉瓶蓋。 • 檢查試紙瓶上的有效期限。請勿使用過期試紙。 • 請將試紙瓶與血糖機存放在乾燥涼爽之處,例如臥室。 • 請參閱試紙包裝內仿單/説明書上的存放條件和系統操作條件。 警告 請勿將試紙存放在高溫和潮濕的地方(如浴室或廚房)!高温和潮濕會損壞試紙。 備註 Accu-Chek Performa(羅氏優勝/卓越)血糖試紙隨附的密碼晶片/密碼牌已從白色改為黑 色。首次拿到黑色密碼晶片/密碼牌時,請將其插入血糖機。使用黑色密碼晶片/密碼牌之 後,您無須再次改換密碼晶片/密碼牌,即使新的試紙盒裡有其它不同顏色的密碼晶片/密 碼牌或不同的密碼。 50705_05853397002_ZHT.indb 14 4/24/12 8:33 AM... -
Page 89: 第2章:檢測您的血糖
第2章:檢測您的血糖 執行血糖檢測 備註 • 執行首次血糖檢測前,請設定血糖機。 • 從手掌採集的血樣與從指尖採集的血樣具有同等效用。有關從手掌採集血樣的詳情,請 參閱「其他部位採血檢測法」(AST) 章節,步驟4和5。 50705_05853397002_ZHT.indb 15 4/24/12 8:33 AM... - Page 90 用品準備:血糖機、一片試紙、採血筆及採血針。 1. 洗淨並擦乾您的雙手。 4. 依箭頭方向將試紙插入血 5. 以採血筆扎一下手指。 糖機。 血糖機會自動開機。顯示 2. 準備採血筆。 幕上會出現試紙符號和閃 爍的血滴符號。 3. 檢查試紙瓶上的有效期 限。請勿使用過期的試 紙。 50705_05853397002_ZHT.indb 16 4/24/12 8:33 AM...
- Page 91 或 6. 輕輕擠壓指尖,使血液容 7. 將血滴碰觸試紙黃色反應 8. 檢測值會顯示在顯示幕 易流出。 區前緣。請勿將血滴放在 上。讓試紙留在血糖機 試紙上方。 內,以標記一個特殊的事 使其凝聚成血滴。 件(見下一章節的「標記 看到 閃爍時,表示試紙 血糖檢測值」)。若不需 已經吸入足夠的血液。 標記,則移除並丟棄用過 的試紙。 備註 檢測成功後,血糖機會在試紙移除後5秒內自動關閉。 50705_05853397002_ZHT.indb 17 4/24/12 8:33 AM...
-
Page 92: 標記血糖檢測值
標記血糖檢測值 您可使用星號( )標記來標記一個特殊的事件,例如運動後或其他部位採血檢測法(AST) 的檢測值。當您審閱儲存在記憶中的檢測值時, 可以幫助您記起該次檢測和其他檢測值不同 的原因。 以下說明如何標記檢測值: 1. 執行血糖檢測。 血糖檢測值會顯示在顯示幕上。 2. 讓試紙留在血糖機內。按下 or 一次。 顯示幕右下角會出現 。 3. 移除並丟棄用過的試紙。 此檢測值已標記。 或 檢測值標記 檢測值標記 50705_05853397002_ZHT.indb 18 4/24/12 8:33 AM... -
Page 93: 其他部位採血檢測法(Ast
其他部位採血檢測法(AST) 您可選擇指尖以外身體其他部位採取血樣。其他 部位可為手掌、前臂、上臂、大腿或小腿肚。手 掌的兩個採血部位是在拇指和小指下,多肉的「 拇指球」和「小指球」掌丘上。從指尖和手掌採 集的血樣皆可隨時用來檢測血糖。但從前臂、上 臂、大腿或小腿肚等其他部位所採集的血樣,有 些時候並不適合檢測血糖之用(見下一章節)。 這是因為指尖或手掌血液中的血糖濃度變化,較 前臂、上臂、大腿或小腿肚等其他部位血液中的 血糖濃度變化更快。這種差異可能導致您錯誤的 治療判斷,而產生不良的健康影響。從其它部位 採取血樣進行檢測之前,請先閱讀下一節。 允許的其他部位採血檢測法 重要 進行其它部位採血檢測法之前,請諮詢您的專業醫護人員。 50705_05853397002_ZHT.indb 19 4/24/12 8:33 AM... - Page 94 警告 • 請勿只因一次的檢測值而改變您的糖尿病治療方式。 • 切勿忽視任何低血糖或高血糖症狀。 • 如果您的血糖檢測值與自己感覺的症狀不符,請採取指尖或手掌的血樣進行檢測以確認 結果。如果指尖或手掌血樣檢測的結果仍與您的感覺不符,請聯絡您的專業醫護人員。 可從前臂、上臂、大腿或小腿肚採血進行檢測的情況為: • 直接在飯前。 • 空腹時。 不可從前臂、上臂、大腿或小腿肚採血進行檢測的情況為: • 飯後2小時內,此時血糖值可能會快速升高。 • 注射胰島素追加量2小時內,此時血糖值可能會快速降低。 • 運動後。 • 生病時。 • 如果您認為自己的血糖極低時。 • 如果您經常不能覺察到自己的血糖過低時。 50705_05853397002_ZHT.indb 20 4/24/12 8:33 AM...
- Page 95 用品準備:血糖機、一片試紙、其他採血部位(AST)專用的採血筆和採血針。 1. 準備採血筆。 3. 依箭頭方向將試紙插入血 4. 將採血筆緊緊壓到其它部 糖機。 位的多肉區域上。以緩慢 的按壓動作,上下按壓採 血糖機會自動開機。顯示 2. 檢查試紙瓶上的有效期 血筆,使血液容易流出。 幕上會出現試紙符號和閃 限。請勿使用過期的試 爍的血滴符號。 紙。 50705_05853397002_ZHT.indb 21 4/24/12 8:33 AM...
- Page 96 備註 • 如果血滴太小,請再對採血部位按壓,以取得足夠的血液。 • 檢測成功後,血糖機會在試紙移除後5秒內自動關閉。 或 5. 維持採血部位平穩壓力的 6. 將血滴碰觸試紙黃色反應 7. 檢測值會顯示在顯示幕 同時按壓採血筆。使用採 區前緣。請勿將血滴放在 上。讓試紙留在血糖機 血筆對採血部位施壓,使 試紙上方。 內,以標記一個特殊的事 血液容易流出。 件(見「標記血糖檢測 看到 閃爍時,表示試紙 值」)。若不需標記,則 已經吸入足夠的血液。 移除並丟棄用過的試紙。 50705_05853397002_ZHT.indb 22 4/24/12 8:33 AM...
-
Page 97: 不正常的血糖檢測值
不正常的血糖檢測值 如果您的血糖檢測值不符合您自己的感覺,檢查以下項目將有助於解決問題。 排解疑難檢索 行動 1. 檢查試紙的有效期限。 過期試紙請丟棄。使用未過期的試紙再次檢 測。 2. 檢查試紙瓶蓋是否總是密蓋。 如果您認為試紙瓶已有一段時間沒有密閉, 請更換別的試紙再次進行血糖檢測。 3. 檢查試紙是否從試紙瓶中取出後立即使 使用新的試紙再次檢測。 用。 4. 檢查試紙原先是否存放在涼爽、乾燥環境 使用適當存放的試紙再次檢測。 下。 5. 檢查您是否按照操作流程進行檢測。 請見第2章「檢測您的血糖」並再次進行血糖 檢測。如果您還有疑問,請聯絡羅氏糖尿病 照護部門/客戶服務部。 6. 檢查血糖機和試紙功能是否正常。 執行品管/質控檢測。相關說明,請見第4章 「執行品管/質控檢測」。 7. 如果您仍不確定問題… 聯絡羅氏糖尿病照護部門/客戶服務部。 50705_05853397002_ZHT.indb 23 4/24/12 8:33 AM... -
Page 98: 低血糖或高血糖的症狀
低血糖或高血糖的症狀 知道低血糖或高血糖的症狀有助於您瞭解檢測值,以及在這些異常狀況發生時決定如何處 理。 低血糖(血糖過低)的症狀包括:焦慮、顫抖、出汗、頭痛、飢餓感、暈眩感、膚色蒼白、 心情突然改變或易怒、疲倦、注意力難集中、遲鈍笨拙、心悸及/或茫然困惑。 高血糖(血糖過高)的症狀包括:口渴增加、頻尿、視力模糊、昏昏欲睡及/或不明原因體重 下降。 警告 如果您有上述任何一種症狀,請從您的指尖或手掌採血檢測血糖。如果血糖檢測值顯示為 「LO」(低)或「HI」(高),請立即與您的專業醫護人員聯繫。 50705_05853397002_ZHT.indb 24 4/24/12 8:33 AM... -
Page 99: 第3章:血糖機記憶功能、設定和資料傳輸
第3章:血糖機記憶功能、設定和資料傳輸 記憶功能 儲存血糖檢測和品管/質控檢測值 血糖機自動儲存最多500個帶有檢測時間和日期的血糖檢測值。您可隨時檢視儲存的檢測值。 顯示幕會出現你最近的檢測值。正確設定血糖機的時間與日期是非常重要的。正確的時間與 日期設定有助於您和您的糖尿病照護團隊正確解讀血糖檢測值。參閲下頁的備註。 50705_05853397002_ZHT.indb 25 4/24/12 8:33 AM... - Page 100 備註 • 更換電池時已記憶的檢測值不會遺失,但於更換電池後,請確認時間與日期是正確的 (見第3章「設定時間和日期」)。 • 儲存500個血糖檢測值或20個品管/質控檢測值後,如新增一個檢測值,則最早的一個檢 測值會被刪除。 • 按下並按住 或 ,可更快速捲動檢測值。 • 記憶功能會儲存最多至20個品管/質控檢測值,但不能在血糖機上檢視。若要檢視品管/質 控檢測值,必須先將其傳輸到相容的軟體應用程式上。請聯絡羅氏查詢產品供應情況。 • 品管/質控檢測值不包含在7天、14天、及30天的平均檢測值中。 警告 請勿根據記憶中單次的個別檢測值而改變您的糖尿病治療方式。根據記憶中的檢測值改變 治療方式之前,請諮詢您的專業醫療人員。 50705_05853397002_ZHT.indb 26 4/24/12 8:33 AM...
-
Page 101: 檢視血糖檢測值
檢視血糖檢測值 無論血糖機開機或關機,按壓又放開 或 即可進入記憶功能。最近的檢測值會出現在顯示幕 上。 • 按下 即可依序檢視先前的檢測值。 • 按 即可查閱7天、14天或30天的平均檢測值。 或 或 50705_05853397002_ZHT.indb 27 4/24/12 8:33 AM... -
Page 102: 血糖機設定
血糖機設定 使用設定模式 以下功能需要時可自訂。 時間與日期 設定時間與日期。 嗶聲 選擇「On」(開啟)或「OFF」。 檢測提醒閙鈴功能 選擇「On」(開啟)或「OFF」。如果選擇On,請選 擇一天一到四次嗶聲檢測提醒閙鈴時間。 血糖過低警示 選擇「On」(開啟)或「OFF」。如果選擇「On」, 請選擇要執行血糖過低警示的血糖濃度值。 以下是設定模式中每一個按鍵執行的功能一覽表。 進入設定模式 開啟血糖機。按下並按住 直到顯示幕上出現 「set-up」(設定)為止。 隨時離開設定模式 按下並按住 直到顯示幕上出現閃爍的試紙符號為 止。 設定選擇的功能 按下又放開 。 或 調整設定 按下又放開 或 。 50705_05853397002_ZHT.indb 28 4/24/12 8:33 AM... -
Page 103: 設定時間與日期
設定時間與日期 減少 增加 1. 按下又放開 (電源/設定 2. 按下並按住 直到顯示幕 3. 按下又放開 或 以減少 鍵)以開啟血糖機。 上出現「set-up」(設定) 或增加「小時」。 和年, 為止。 步驟與上述步驟 顯示幕上出現閃爍的試紙 符號。 接著「小時」會閃爍。 50705_05853397002_ZHT.indb 29 4/24/12 8:33 AM... - Page 104 4. 按下又放開 以完成設定 5. 調整和設定分鐘、日、月 6. 按下又放開 即可設定其 「小時」。 和年,步驟與上述步 它選項。按下並按住 直 3和4同。 到顯示幕上出現閃爍的試 隨後「分鐘」開始閃爍。 紙符號為止,即可離開設 定模式。 50705_05853397002_ZHT.indb 30 4/24/12 8:33 AM...
-
Page 105: 設定嗶聲「On」(開啟)或「Off」(關閉
設定嗶聲「On」(開啟)或「Off」(關閉) 血糖機的嗶聲預設值為On。將嗶聲設定為「OFF」不會影響檢測值。 嗶聲可提醒您: • 將血液或品管/質控液碰觸到試紙上。 • 已有足夠的血液或品管/質控液碰觸到試紙。 • 已完成血糖或品管/質控檢測。 • 已按下按鍵。 • 何時進行檢測(在已設定檢測提醒閙鈴功能)。 • 如果在血糖或品管/質控檢測時發生錯誤(即使嗶聲設定為「OFF」,血糖機仍會發出嗶聲 提醒您發生錯誤)。 50705_05853397002_ZHT.indb 31 4/24/12 8:33 AM... - Page 106 1. 按下又放開 (電源/設定 2. 按下並按住 直到顯示幕 3. 按下又放開 數次,直到 鍵)以開啟血糖機。 上出現「set-up」(設定) 顯示幕上出現閃爍嗶聲 為止。 符號和「On」或「OFF」 顯示幕上出現閃爍的試紙 為止。 符號。 50705_05853397002_ZHT.indb 32 4/24/12 8:33 AM...
- Page 107 4. 按下又放開 或 即可在「On」和 5. 按下又放開 即可設定其它選項。按下並 「OFF」之間切換。 按住 直到顯示幕上出現閃爍的試紙符號 為止,即可離開設定模式。 50705_05853397002_ZHT.indb 33 4/24/12 8:33 AM...
-
Page 108: 設定檢測提醒閙鈴功能
設定檢測提醒閙鈴功能 檢測提醒閙鈴功能: • 每天在同一時間發出嗶聲提醒您進行檢測。 • 每2分鐘發出一次嗶聲,最多發出3次。 • 插入一支試紙或按下任何按鍵即可關閉嗶聲。 • 預設值為「OFF」(關閉)。為了使用這個功能,您必須將鬧鈴設定為「ON」(開啟)。 您可設定每天4個檢測提醒閙鈴。您可依據您的需求調整檢測提醒閙鈴時間。以下是檢測提醒 的符號和預設的時間。 檢測提醒閙鈴1 8:00 檢測提醒閙鈴2 12:00 檢測提醒閙鈴3 18:00 檢測提醒閙鈴4 22:00 50705_05853397002_ZHT.indb 34 4/24/12 8:33 AM... - Page 109 備註 • 若在檢測提醒閙鈴前30分鐘內進行檢測,則不會再發出嗶聲提醒。 • 若在檢測提醒閙鈴時間到時血糖機已開機,則不會再發出嗶聲提醒。 • 血糖機暴露在極冷的環境下可能會使檢測提醒功能停止,直到血糖機開機後功能才會恢 復。 • 若有一檢測提醒閙鈴在設定模式中被設為「OFF」,則其後的檢測提醒也會被設為 「OFF」。例如,如果您設定了A-1但關閉了 A-2,則A-3和A-4會自動設為「OFF」。 50705_05853397002_ZHT.indb 35 4/24/12 8:33 AM...
- Page 110 在設定檢測提醒閙鈴的時間時,鬧鈴符號和「set-up」會停留在顯示幕上。 1. 按下又放開 (電源/設定 2. 按下並按住 直到顯示幕 3. 按下又放開 數次,直到 鍵)以開啟血糖機。 上出現「set-up」(設定) 顯示幕上出現鬧鈴符號、 為止。 「OFF」和閃爍的「A-1」 顯示幕上出現閃爍的試紙 為止。 符號。 50705_05853397002_ZHT.indb 36 4/24/12 8:33 AM...
- Page 111 4. 按下又放開 或 即可在 5. 按下又放開 以設定您的 6. 按下又放開 或 即可調 「On」和「OFF」之間 選擇。 整「小時」。 切換。 若選擇「On」,則 「小時」會閃爍。 7. 按下又放開 以完成設定 「A-1」和鬧鈴符號仍在 「小時」。 顯示幕上。 隨後「分鐘」開始閃爍。 50705_05853397002_ZHT.indb 37 4/24/12 8:33 AM...
- Page 112 8. 按下又放開 或 即可選 9. 按下又放開 以完成設定 10. 調整和設定其它檢測提 擇00、15、30或45分鐘。 「分鐘」。 醒,請遵循步驟4到9。按 只可選擇這些分鐘。 下並按住 直到顯示幕上 鬧鈴符號、「OFF」和閃 出現閃爍的試紙符號為 爍的「A-2」出現在顯示 止,即可離開設定模式。 幕上。 50705_05853397002_ZHT.indb 38 4/24/12 8:33 AM...
-
Page 113: 設定血糖過低 (Hypo) 警示
設定血糖過低(Hypo)警示 血糖過低警示可設定在60和80 mg/dL或3.3和4.4 mmol/L之間,讓您知道您的血糖濃度可能過 低。 警告 此功能不可取代專業醫護人員為您提供的低血糖訓練。 使用者:設定血糖過低警示之前,請先諮詢專業醫護人員,以協助您判定何種血糖濃度是自 己的血糖過低濃度。 專業醫護人員:低血糖濃度可能人人不同。因此,建議在專業醫療場所,應關閉血糖過低警 示功能。 50705_05853397002_ZHT.indb 39 4/24/12 8:33 AM... - Page 114 1. 按下又放開 (電源/設定 2. 按下並按住 直到顯示幕 3. 按下又放開 數次,直到 鍵)以開啟血糖機。 上出現「set-up」(設定) 顯示幕上出現「OFF」和 為止。 閃爍的 為止。 顯示幕上出現閃爍的試紙 符號。 50705_05853397002_ZHT.indb 40 4/24/12 8:33 AM...
- Page 115 或 4. 按下又放開 或 即可在「On」和 5. 按下又放開 以設定您的選擇。 「OFF」之間切換。 若選擇「On」,則 會閃爍。顯示幕上顯 示 70 mg/dL 或 3.9 mmol/L。 50705_05853397002_ZHT.indb 41 4/24/12 8:33 AM...
- Page 116 或 6. 按下又放開 或 即可調整血糖濃度。 8. 按下並按住 直到顯示幕上出現閃爍的試 紙符號為止。 設定模式於此完成。按下又放開 即可關 7. 按下又放開 即可設定血糖濃度。 閉血糖機。 50705_05853397002_ZHT.indb 42 4/24/12 8:33 AM...
-
Page 117: 傳輸您的檢測值到電腦上或Pda
傳輸您的檢測值到電腦上或PDA。 您可將儲存的檢測值傳輸到電腦,以便追蹤、判斷血糖濃度週期及列印。 使用專用軟體和紅外線接收器(需另外購買)直接傳輸資料到電腦或PDA 警告 由於無法辨別個別病患的檢測值,因此不建議傳輸多位病患所共用的同一血糖機的資料。 1. 依照使用說明安裝所需的軟體。 2. 為了傳輸檢測值到電腦,請依照使用說明連接紅外線接收器(需另外購買)。 3. 執行軟體程式,依照如何傳輸資料的相關說明進行操 作。確定軟體已準備好接收血糖機的資料。 4. 血糖機在關機狀態下,同時按下並按住 和 ,直到顯 示幕上交替閃爍兩個箭頭。 50705_05853397002_ZHT.indb 43 4/24/12 8:33 AM... - Page 118 5. 找到血糖機頂端的紅外線(IR)傳輸埠。 紅外線(IR)傳輸埠 6. 找到紅外線纜線(電腦)或PDA的IR傳輸埠。 7. 將血糖機放在平坦處,並對齊兩者的IR傳輸埠。兩者距離應為3到 10公分。 8. 傳輸資料時,請勿移動紅外線接收器(電腦),PDA或血糖機。 9. 遵照軟體上的提示操作。 資料傳輸完成後,軟體程式會自動將血糖機關機。 備註 • 如果未能順利傳輸資料,請再試一次。如果您還有疑問,請聯絡羅氏糖尿病照護部門/客 戶服務部。 • 為了能發揮資料傳輸功能的最大效用,您必須正確設定時間與日期。 50705_05853397002_ZHT.indb 44 4/24/12 8:33 AM...
-
Page 119: 第4章:品管/質控檢測
第4章:品管/質控檢測 為什麼要執行品管/質控檢測 執行品管/質控檢測可讓您瞭解血糖機與試紙的功能是否正常。您應在下列情況發生時執行品 管/質控檢測: • 開啟一盒新試紙。 • 試紙瓶開啟後沒有關上。 • 您想檢查血糖機與試紙的性能。 • 試紙存放在極端的温度或濕度環境下。 • 血糖機摔到地上。 • 您的血糖檢測值與您認為的結果不符 • 您想檢查自己的血糖檢測是否正確。 50705_05853397002_ZHT.indb 45 4/24/12 8:33 AM... -
Page 120: 關於品管/質控液
關於品管/質控液 • 僅可使用Accu-Chek Performa(羅氏優勝/卓越)品管/質控液。 • 使用後請蓋緊品管/質控液瓶子。 • 在品管/質控液瓶身標籤上記錄打開品管/質控液瓶的日期。品管/質控液可以在開瓶日期後3 個月內,或是瓶子標籤上的有效期限內(以先到者為準)使用。 • 請勿使用過期品管/質控液。 • 請參閱品管/質控液仿單/説明書上有關品管/質控液的存放條件。註:如需執行品管/質控檢 測,台灣用戶請與羅氏糖尿病照護部門或洽全省羅氏特約經銷商聯繫,香港用戶請致電客 戶服務部訂購。 • 您的血糖機會自動辨識Accu-Chek Performa(羅氏優勝/卓越)品管/質控液。 • 品管/質控液的檢測值不會顯示在記憶功能中。 • 品管/質控液會沾染紡織品。請使用肥皂與清水清洗。 50705_05853397002_ZHT.indb 46 4/24/12 8:33 AM... -
Page 121: 執行品管/質控檢測
執行品管/質控檢測 用品準備:血糖機、一片試紙、品管/質控液control 1 及/或control 2。瓶子標籤上會註明品管/ 質控液編號。 或 1. 檢查試紙瓶上的有效期 2. 依箭頭方向將試紙插入血 3. 選擇要使用的品管/質控檢 限。請勿使用過期的試 糖機。 測。檢測後您須輸入品管/ 紙。 質控液編號(1或2)。 血糖機會自動開機。顯示 幕上會出現試紙符號和閃 爍的血滴符號。 50705_05853397002_ZHT.indb 47 4/24/12 8:33 AM... - Page 122 4. 將血糖機放在平坦的表面上,如桌子上。 5. 移除瓶蓋。用面紙擦拭瓶口。 50705_05853397002_ZHT.indb 48 4/24/12 8:33 AM...
- Page 123 或 6. 擠壓瓶子,直到品管/質控液在瓶口形成一 7. 用面紙擦拭瓶口。然後蓋緊蓋子。 小滴為止。讓小滴碰觸試紙黃色反應區的 前緣。請勿將品管/質控液滴在試紙上方。 看到 閃爍時,表示試紙已經吸入足夠的 8. 顯示幕上會出現檢測值、品管/質控液符號 品管/質控液。 及閃爍的L。請先不要取出試紙。按一下 可標記為品管/質控液 1。 再按一下 可標 記為品管/質控液 2。 50705_05853397002_ZHT.indb 49 4/24/12 8:33 AM...
- Page 124 或 或 9. 按下又放開 以在血糖機上完成設定品管/質控編號 10. 移除並丟棄用過的試紙。 (1或2)。 如果檢測值在可接受範圍之內,則顯示幕上會交替顯示 OK和品管/質控檢測值。如果檢測值超出可接受範圍,則 顯示幕上會交替顯示「Err」和品管/質控檢測值。 備註 • 試紙瓶標籤上印有品管/質控液1和2的可接受範圍。品管/質控液的檢測值若在試紙瓶上 列示的標準範圍內,表示試紙與血糖機的功能正常。 • 檢測成功後,血糖機會在試紙移除後5秒內自動關閉。 50705_05853397002_ZHT.indb 50 4/24/12 8:33 AM...
-
Page 125: 瞭解超出範圍的品管/質控檢測值
瞭解超出範圍的品管/質控檢測值 如果品管/質控檢測值超出可接受範圍,可執行下列動作解決問題: 排解疑難檢索 行動 1. 檢查試紙或品管/質控液是否過期。 其中任何一樣過期,請將其丟棄。如果品管/ 質控液開封超過3個月以上,請將其丟棄。使 用未過期的試紙和未過期的品管/質控液,再 進行一次品管/質控檢測。 2. 檢查使用品管/質控液之前和之後,是否 用面紙擦拭瓶口。使用新的試紙與新的一小 皆已用面紙擦拭瓶口處。 滴品管/質控液,再進行一次品管/質控檢測。 3. 檢查試紙瓶蓋與品管/質控瓶蓋是否一直 更換試紙或品管/質控液,如果您覺得試紙或 保持在蓋緊狀態。 品管/質控液瓶已打開一段時間。 4. 檢查試紙是否從試紙瓶中取出後立即使 使用新的試紙與新的一小滴品管/質控液,再 用。 進行一次品管/質控檢測。 5. 檢查試紙與品管/質控液是否存放在涼爽 使用正確存放的試紙和品管/質控液,再進行 乾燥的環境中。 一次品管/質控檢測。 6. 檢查您是否遵守了檢測步驟。 請參閱第4章「品管/質控檢測」,然後再次 檢測。如果您還有疑問,請聯絡羅氏糖尿病 照護部門/客戶服務部。 50705_05853397002_ZHT.indb 51 4/24/12 8:33 AM... - Page 126 7. 檢查在執行品管/質控檢測時,是否選擇 如果選擇了錯誤的品管/質控液,您仍可將檢 正確的品管/質控液(品管/質控液1或品 測值與試紙瓶上列示的範圍進行比對。 管/質控液2)。 8. 如果您仍不確定問題… 聯絡羅氏糖尿病照護部門/客戶服務部。 50705_05853397002_ZHT.indb 52 4/24/12 8:33 AM...
-
Page 127: 第5章:維護與疑難排解
第5章:維護與疑難排解 血糖機維護 在正常使用血糖機的情形下,血糖機不太需要維護或甚至不需要維護。每次開機時,血糖機 都會自動檢查系統的功能是否正常,如有異常,血糖機會告知您(見第5章「顯示幕訊息與錯 誤訊息」)。 如果您將血糖機掉在地上,或您認為檢測值不正確,請與羅氏糖尿病照護部門/客戶服務部聯 繫。 若要確定顯示幕功能是否正常,請先將血糖機關機,然後按壓並按住 ,查看整個顯示幕的 影像。所有的影像段落都必須清晰可見,如同下圖所示。若非如此,請與羅氏糖尿病照護部 門/客戶服務部聯繫。 或 50705_05853397002_ZHT.indb 53 4/24/12 8:33 AM... -
Page 128: 更換電池
更換電池 1. 依照箭頭方向推一下電池 2. 取出舊電池。 蓋上凸起的部分,將蓋子 向上拉,打開血糖機背後 3. 將新電池「+」面朝上,放入電池盒內。 的電池蓋。 4. 放回電池蓋,咯嗒一聲將它關緊。 備註 • 血糖機使用一顆3伏特的鈕扣型鋰電池,型號為CR2032。許多商店都有此類型電池可 購。備妥備用電池是明智之舉。 • 確定安裝電池時,電池的「+」面朝上。 • 更換電池並開機後,血糖機會提醒您確認血糖機的時間和日期設定。 • 記憶功能會保留所有的檢測值。 50705_05853397002_ZHT.indb 54 4/24/12 8:33 AM... -
Page 129: 清潔血糖機
清潔血糖機 確定血糖機不受灰塵影響。如果有需要清潔或消毒血糖機,請仔細遵守以下指導原則,如此 有助於維持血糖機的最佳效果。 請 請勿 • 確定血糖機在關機狀態下 • 讓任何液體進入血糖機的插槽內 • 使用下列的任一種清潔溶劑濕潤軟布,然 • 直接對血糖機噴灑清潔溶劑 後輕輕地以微濕的軟布擦拭血糖機表面 • 將血糖機放入液體中 (擰出任何多餘液體): • 70 %異丙醇(isopropyl alcohol) • 以水稀釋的中性洗碗精 • 當天稀釋的10 %家用漂白水(漂白劑 與清水比例1:9) 50705_05853397002_ZHT.indb 55 4/24/12 8:33 AM... -
Page 130: 顯示幕訊息與錯誤訊息
顯示幕訊息與錯誤訊息 警告 絕對不要根據錯誤的訊息做出治療決定。如有任何疑慮,請聯絡羅氏糖尿病照護部門/客戶 服務部。 如果血糖機無法開機,或是螢 血糖機處於設定模式,正等候您變 更或確認設定。 幕顯示空白,表示: • 電池沒電。請插入新電池。 • 顯示幕受損。聯絡羅氏糖尿 病照護部門/客戶服務部。 • 血糖機損壞。聯絡羅氏糖尿 病照護部門/客戶服務部。 • 極端的環境温度。請將血糖 機移往温度較正常的地方。 血糖機已準備好讓您插入試紙。 電池電力不足,請儘快更換電池。 50705_05853397002_ZHT.indb 56 4/24/12 8:33 AM... - Page 131 血糖濃度可能低於系統可檢測的範 血糖機已準備好接受一滴血液或品 管/質控液。 圍(見第2章「不正常的血糖檢測 值」)。 此檢測值已標記。 血糖濃度可能高於系統可檢測的範 圍(見第2章「不正常的血糖檢測 值」)。 或 50705_05853397002_ZHT.indb 57 4/24/12 8:33 AM...
- Page 132 血糖低於設定的血糖濃度過低提 若使用白色密碼晶片/密碼牌,有可 能顯示這則訊息。這表示這些試紙 醒值。 將於本月底過期。月底時請丟棄密 碼晶片/密碼牌及任何剩餘的試紙。 插入一個從新的且尚未過期的試紙 盒拿出的新密碼晶片/密碼牌。確認 血糖機的時間、日期正確。 或 試紙可能已經受損,或是密碼晶片/ 未更換血糖機的晶片/密碼牌,或未 密碼牌不正確。移除試紙再重新插 插入密碼晶片/密碼牌。將血糖機關 入。如果還出現同樣錯誤訊息,先 機後更換密碼晶片/密碼牌。 關閉血糖機,再插入一個新的密碼 晶片/密碼牌。 50705_05853397002_ZHT.indb 58 4/24/12 8:33 AM...
- Page 133 密碼晶片/密碼牌不正確。關閉血糖機並插入新的密碼晶片/密碼牌。 您的血糖可能非常高或已經發生血糖機或試紙錯誤。 • 如果檢測值證實了您的感覺,請立即聯絡專業醫護人員。 • 如果檢測值與您的自己感覺不符,請再次檢測血糖並參閱第2章「不正常的血糖檢測 值」。 • 如果在血糖檢測時仍出現E-3符號,您的血糖可能非常高且超過系統的讀取範圍。 請立即聯絡專業醫護人員。 • 如果第二次檢測值不符合您自己的感覺,請用品管/質控液和一支新的試紙進行品 管/質控檢測。 • 如果品管/質控檢測值在可接受的範圍內,檢視檢測步驟是否正確並再使用新的 試紙重新進行血糖檢測。 • 如果品管/質控檢測值沒有在可接受的範圍內,參考第4章「瞭解超出範圍的品 管/質控檢測值」。 50705_05853397002_ZHT.indb 59 4/24/12 8:33 AM...
- Page 134 試紙吸血量或吸入品管/質控液量不 血滴符號閃爍前,就已將血液或品 足,或在開始檢測後才滴入血液。 管/質控液滴到了試紙上。請更換一 請更換一片新試紙並重新檢測。 片新試紙並重新檢測。 若使用白色密碼晶片/密碼牌,會顯 電子故障,或偶爾也可能出現用過 示這則訊息。這表示密碼晶片/密碼 的試紙被取出後又重新放入的情 牌來自於過期批號的試紙。關閉血 況。關閉血糖機再重新打開或將電 糖機並插入新的密碼晶片/密碼牌。 池拆下20秒後再重新裝上。再執行 確認血糖機的時間、日期正確。 血糖檢測或品管/質控檢測。 50705_05853397002_ZHT.indb 60 4/24/12 8:33 AM...
- Page 135 溫度低於或高於合適的檢測溫度。 時間與日期設定可能不正確。若有 參考試紙包裝內仿單/説明書上的系 需要,請檢查時間與日期是否正 統操作條件。移到適當操作條件的 確,必要時請修改。 環境,等5分鐘過後再重新進行血糖 或品管/質控檢測。請勿刻意將血糖 機加熱或降溫。 電池量幾乎耗盡。請立即更換電 池。 50705_05853397002_ZHT.indb 61 4/24/12 8:33 AM...
- Page 136 備註 • 如有顯示幕訊息或錯誤訊息一再出現,請聯絡羅氏糖尿病照護部門/客戶服務部。 • 如有其它錯誤訊息出現,請聯絡羅氏糖尿病照護部門/客戶服務部。 50705_05853397002_ZHT.indb 62 4/24/12 8:33 AM...
-
Page 137: 第6章:技術資訊
第6章:技術資訊 產品限制 請閱讀試紙及品管/質控液包裝隨附仿單/説明書,以取得產品規格與限制的最新資訊。 規格 血量 請參閱試紙包裝隨附仿單/説明書。 檢體類型 請參閱試紙包裝隨附仿單/説明書。 檢測時間 請參閱試紙包裝隨附仿單/説明書。 檢測範圍 請參閱試紙包裝隨附仿單/説明書。 試紙存放環境 請參閱試紙包裝隨附仿單/説明書。 血糖機存放環境 温度:-25至70 °C 系統操作環境 請參閱試紙包裝隨附仿單/説明書。 操作環境相對濕度範圍 請參閱試紙包裝隨附仿單/説明書。 記憶容量 500個血糖檢測值和20個品管/質控檢測值,含時間與日 期 自動關機 2分鐘 電源供應 一個3伏特的鋰電池(鈕釦型電池類型CR2032) 顯示螢幕 液晶螢幕(LCD) 50705_05853397002_ZHT.indb 63 4/24/12 8:33 AM... - Page 138 尺寸 93 Î 52 Î 22 mm(長寬高) 重量 約62公克(含電池) 結構 攜帶式 觸電防護等級 血糖機類型 Accu-Chek Performa(羅氏優勝/卓越)血糖機適宜長時 間持續操作。 品管/質控液存放環境 請參閱品管/質控液包裝隨附仿單/説明書。 電磁相容性 本血糖機符合ISO 15197附件A要求的電磁抗擾性標準,其所選的靜電放電抗擾度試驗基準為 IEC 61000-4-2基本標準。此外,本血糖機也符合EN 61326所要求的電磁輻射標準,因此電磁輻 射極低。本血糖機使用時,預期不會對其他電子驅動設備造成干擾。 50705_05853397002_ZHT.indb 64 4/24/12 8:33 AM...
-
Page 139: 產品安全性資訊
性能分析 請參閱試紙包裝隨附仿單/説明書。 檢測原理 請參閱試紙包裝隨附仿單/説明書。 產品安全性資訊 警告 • 小物品,有窒息危險。請保存於3歲以下孩童接觸不到的地方。 • 電磁場若過於強大,會干擾血糖機的正確運作。請勿在接近電磁輻射強烈的地方使用本 血糖機。 • 為了避免產生靜電放電,請勿在非常乾燥的環境中使用本血糖機,特別是在有人工合成 材料的環境中。 50705_05853397002_ZHT.indb 65 4/24/12 8:33 AM... -
Page 140: 血糖機廢棄處理
血糖機廢棄處理 警告 • 在血糖檢測期間,血糖機本身可能接觸到血液。因此,使用過的血糖機具有傳染疾病的 風險。廢棄處理血糖機之前,請移除所有的電池。請依據當地法令廢棄處理血糖機。有 關廢棄處理規定的資訊,請向當地相關機構查詢。 • 血糖機不在歐盟2002/96/EC指令『電氣電子設備報廢指令(WEEE)』的規範範圍內。 • 請依據當地環境法規廢棄處理用過的電池。 50705_05853397002_ZHT.indb 66 4/24/12 8:33 AM... -
Page 141: 符號說明
符號說明 下列符號可能出現在包裝、設備名牌以及Accu-Chek Performa(羅氏優勝/卓越)血糖機操作說 明上。 使用時請參閱使用者手冊 請注意,務必參閱本產品隨附的使用者手冊裡有關安全方面的備註說明。 溫度限制(保存於) 製造商 料號 體外診斷醫療器材 本產品符合歐盟體外診斷用醫療裝置指令98/79/EC的規定。 3伏特鈕扣型電池型號CR2032 50705_05853397002_ZHT.indb 67 4/24/12 8:33 AM... -
Page 142: 保固/保養
保固/保養 適用購買地國家法定的消費產品銷售保證條款。 其他耗材 下列耗材和配件請聯絡羅氏特約經銷商。 試紙 Accu-Chek Performa(羅氏優勝/卓越)試紙 品管/質控液 Accu-Chek Performa(羅氏優勝/卓越)品管/質控液 50705_05853397002_ZHT.indb 68 4/24/12 8:33 AM... -
Page 143: 專業醫護人員注意事項
專業醫護人員注意事項 警告 專業醫護人員:請依照貴機構的疾病感染控制程序進行作業。其它專業醫療人員資訊,請 參閱試紙仿單/説明書。 檢體處理 處理受到血液污染的物品時,務必穿戴手套。請務必遵循處理可能受到人體物質污染物品的 一般程序。請按照您所在實驗室或醫療機構的衛生和安全規定操作。請依據貴機構政策準備 好採集選擇血樣的部位。 其它有關可接受的樣本類型、抗凝血劑以及處理方面的指示資訊,請參閱試紙包裝隨附仿單/ 説明書。 50705_05853397002_ZHT.indb 69 4/24/12 8:33 AM... - Page 144 向病患建議其它部位採血法(AST) 決定是否建議患者採用其它部位採血法(AST)時,應考慮患者的動機與知識水準,以及對 糖尿病與AST相關注意事項的理解能力。如果您考慮建議患者使用AST,您必須瞭解,從指尖 或手掌採血與從前臂、上臂、大腿或小腿肚採血檢測,其血糖濃度可能會有顯著的不同。微 血管中與全身血液流通的不同部位上的血糖濃度會有差異,這是導致採集不同部位血樣檢測 值會有差異的原因。這些生理效應因人而異,甚至在同一個人身上也會因單一個人的行為與 相對產生之生理狀況不同而有所不同。 從我們對罹患糖尿病的成人使用其它部位採血法的研究發現,大多數人指尖或手掌血液中血 糖濃度的變化比其他採血部位(AST)血液中血糖濃度的變化更快。*這在血糖濃度急遽上升 或下降時特別明顯。如果您的病患一向根據指尖或手掌血液的檢測值做醫療判斷,則在從前 臂、上臂、大腿或小腿肚採血檢測採血時應考慮,所取得的結果讀數是否受到血糖濃度變化 延遲(即遲滯時間)的影響。 *內部存檔資料 50705_05853397002_ZHT.indb 70 4/24/12 8:33 AM...
- Page 145 索引 按鍵 高血糖, 24 箭頭鍵, 7 電源/設定按鍵, 7, 8 耗材, 68 紅外線(IR)傳輸埠, 7, 8 嗶聲, 31 標記血糖檢測值, 18 技術規格, 63 記憶功能,血糖機, 25 產品規格, 63 檢測提醒閙鈴, 34 產品限制, 63 密碼晶片/密碼牌, 8, 9 錯誤訊息, 58 密碼晶片/密碼牌槽, 7 低血糖, 24 品管/質控檢測, 45 電池, 8 執行, 47 更換, 54 超出範圍的品管/質控檢測值, 51...
- Page 146 設定模式, 28 顯示幕, 7 時間與日期, 29 顯示幕訊息, 56 調整,首次使用, 11 血糖過低, 24 試紙 血糖過低警示, 39 Accu-Chek Performa(羅氏優勝/卓越), 8, 血糖過高, 24 血糖,檢測, 15 試紙槽, 7 血糖機 試紙瓶, 8 廢棄處理, 66 清潔, 55 維護,血糖機, 53 血糖檢測值 不正常的血糖檢測值, 23 標記, 18 檢視, 27 有效期限, 14, 46...
- Page 147 Enquiry hotline: +852-2485 7512 (office hours) www.accu-chek.com.hk Roche Diagnostics NZ Ltd 15 Rakino Way PO Box 62089 Mt Wellington, Auckland 1641 New Zealand Accu-Chek Enquiry Line: 0800 80 22 99 www.accu-chek.co.nz LAST UPDATE: 2011-10 最近更新日期: 2011-10 50705_05853397002_COVER.indb 1 4/24/12 8:31 AM...
- Page 148 Roche Diagnostics GmbH Sandhofer Strasse 116 68305 Mannheim, Germany www.accu-chek.com ACCU-CHEK and ACCU-CHEK PERFORMA are trademarks of Roche. ©2012 Roche Diagnostics 05853397002-1011 50705_05853397002_COVER.indb 2 4/24/12 8:31 AM...