Bluetti EB3A - Portable Power Station Manual
- User manual (16 pages) ,
- User manual (47 pages) ,
- User manual (16 pages)
Advertisement
Before You Begin
The information contained herein is subject to change without notice.
- The user manual contains instructions and notes on the operation and use of this unit.
- BLUETTI recommends that you use genuine accessories from BLUETTI.
- BLUETTI shall not be responsible for any damage or expense that might result from the use of parts other than genuine parts from the BLUETTI.
- For your safety and benefit, please read carefully before using and keep it handy for future reference.
Instructions
Please read this guide for important safety information about your device. Failure to follow these guidelines for proper set up, use, and care for your device may cause damage to this unit and injury to yourself or others.
SAVE THESE INSTRUCTIONS!
General Safety
- Always operate or store the unit in accordance with specified temperature range.
- DO NOT expose the unit to fire, liquids, sweat, dirt or other contaminants, as that may cause the battery to explode or leak flammable liquid or gas.
- DO NOT store the unit with hazardous materials including flammables, explosives, radioactive materials, etc.
- DO NOT place the unit on an unstable or tilted surface.
- Make sure the place where you are using the unit is well ventilated and spacious.
- Keep away from children and pets.
- Check if the connectors of all connection cables are locked before use.
- DO NOT use the unit while driving.
- DO NOT modify, attempt to insert foreign objects into the battery, or immerse or expose it to water or other liquids. Batteries may explode if damaged.
- Battery fluid is corrosive and may be toxic. If a battery leaks, keep the leaked fluid from touching your skin, eyes, clothes, or other surfaces. Immediately flush the affected areas with water, or seek medical help.
- DO NOT ignore those warning signs on components or products made by manufacturers.
- DO NOT dismantle, cut, crush, puncture, or otherwise damage the unit in any way.
- DO NOT insert foreign objects into the fan, vents, ports, or other openings.
- NEVER use a damaged battery or component. Improper use or misuse of damaged batteries may cause damage to your device or injury to yourself as a result of battery fluid leakage, fire, overheating, or explosion.
- Use approved battery and accessories ONLY. Improper use, or use of unapproved or incompatible batteries or components may result in a risk of fire, explosion, or other hazards, and may invalidate any approval or warranty.
- Turn off the unit IMMEDIATELY in case of malfunction.
- Use dry powder fire extinguisher in case of fire.
- DO NOT attempt to modify, replace the internal battery or any other component of the unit by anyone other than qualified personnel. If necessary, take it to an authorized service center as incorrect reassembly may result in a risk of fire or electric shock.
SAVE THESE INSTRUCTIONS!
Maintenance
- When not using the unit for extended periods of time, power off the unit and disconnect the AC adapter from the outlet.
- Charge the unit to 80% SOC every 3-6 months for long-term storage.
- When the battery capacity drops to 20%, charge the EB3A to extend battery lifespan and do NOT power devices with 400W and above.
- Clean the unit with a dry cloth gently and carefully.
Handling and Storage
- Use mechanical assistance as needed (e.g. trolleys and adjustable height workbenches).
- DO NOT stack anything on top of the unit either in storage or in use.
- Recommended storage temperature: 14-113°F/-10-45oC.
What's In The Box
Standard Packaging

* Below accessories are not included in standard packaging and can be purchased at https://www.bluettipower.com/.

* Solar Charging Cable: 59in/150cm, 16AWG, MC4 to DC7909.
AC Charging Cable: 71in/180cm.
Car Charging Cable: 28in/72cm, 16AWG, Cigarette Lighter Port to DC7909.
USB-C to USB-C Cable: 59in/150cm, 16AWG.
Note: Package details are subject to change without prior notice.
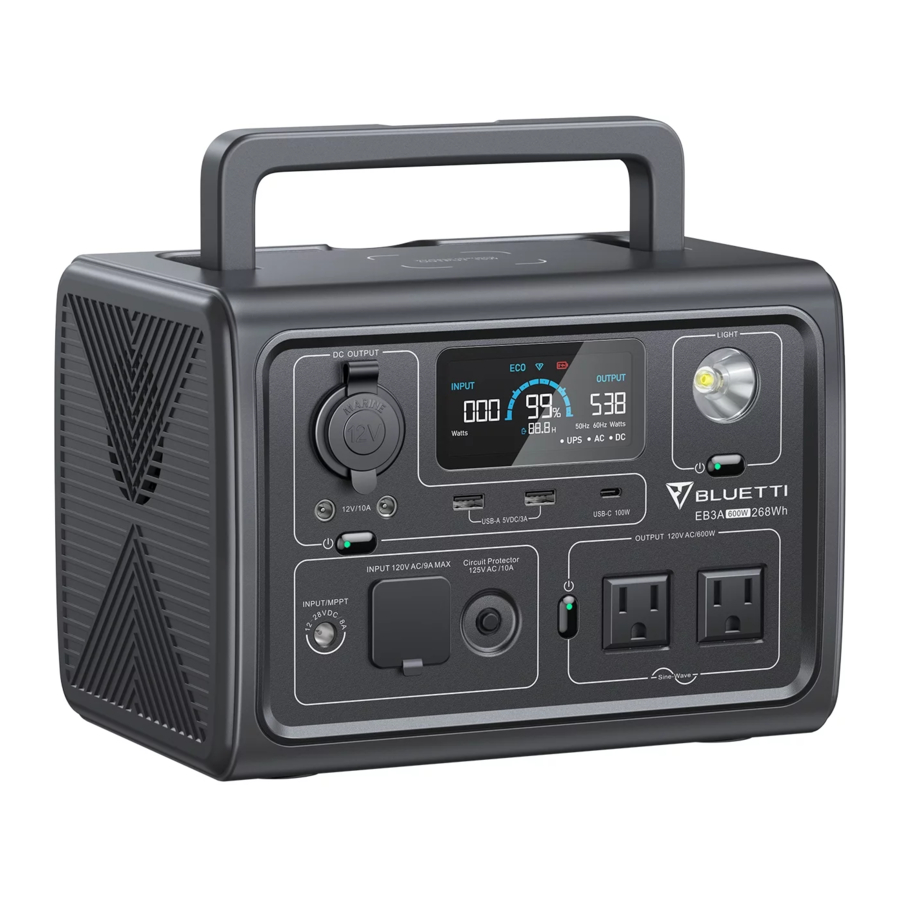
Product Overview
Diagram

- Cigarette Lighter Port
- DC5521 Port
- DC Power Button
- DC Input Port
- AC Input Port
- AC Circuit Breaker*
- Wireless Charging Pad
- LCD Screen
- LED Lamp
- LED Lamp Button
- USB-C Port
- USB-A Port
- AC Output Port
- AC Power Button
* A circuit breaker is an electrical safety switch designed to protect your unit from damage caused by overcurrent or short circuit. When the AC current exceeds 10A, it will trip automatically. Press it once to reset the unit after these symptoms cleared.
Specifications

Operation
LCD Screen

- ECO Mode
- Turbo Charging
- Low-battery Alert
- Input Power
- Output Power
- Battery Capacity
- AC Frequency
- Temperature Anomaly Alert
- Short-circuit Alert
- Overload Alert
- Remaining Time Indicator*
- UPS Indicator
- AC Indicator
- DC Indicator
* This indicator tells the remaining charge/discharge time.
Powering On/Off
Powering on: Press and hold the AC/DC Power Button for 1s to start up corresponding output.
| Green light(on the button) | ON |
| LCD Display | ON |
Note: Please turn on the DC power to enable the wireless charging.
Press any button, the LCD screen will stay on for 60 seconds.
Powering off: Press and hold power buttons to shut down corresponding output.
| Green light(on the button) | OFF |
| LCD Display | OFF |
Note: Press and hold any button for at least 3s, the unit will be off.
Standard Mode
Setting Mode: When the AC power is off and LCD screen is on, press and hold AC and DC power buttons simultaneously for 2s. The AC frequency indicator will flash.
Press and hold AC and DC power buttons simultaneously to exist 'Setting Mode'.
Note: If the unit has been idle for 1 minute under 'Setting Mode', it will automatically exit 'Setting Mode' and the setting changes will not be saved.
ECO Mode: Under 'Setting Mode', press the DC power button to turn it on/off.
Note: When on this mode, the AC/DC output will automatically turn off after 4-hour low (≤10W for AC, ≤1W for DC) or no load to save power.
Power Lifting Mode: Enable in BLUETTI App.
Note: When on this mode, both output voltage and current can be adjusted to a higher level for running high-powered heating devices like space heaters and electric irons.
Do NOT use this unit to run an air conditioner or washing machine.
UPS
UPS Bypass Mode: Connect the EB3A with the AC power and the 'UPS' will be on display. Then turn on the AC output.
When on this mode, the AC power will directly support the loads on AC output ports and charge the EB3A.
Note: Max. output power: 600W.
The AC inverter is disabled under UPS Bypass Mode.
The unit won't enter this mode unless connecting with AC power AND turning on the AC output.

Setting
AC Frequency1: Under 'Setting Mode', press the AC power button to switch.
1 AC Frequency: The number of alternating cycles per second in an AC sine wave. The utility frequency in US is generally 60Hz.
BLUETTI APP
Download BLUETTI App from Google Play or App Store.


EB3A only supports Bluetooth connection. Once connected, EB3A can be accessed and controlled on phone or other smart devices. For more details, please refer to BLUETTI APP INSTRUCTIONS.
Charging
AC Charging
Simply plug the EB3A into the standard wall outlet and start charging.

Note: EB3A supports Standard(268W)/Turbo/Silent charging modes. Turbo/Silent mode can be enabled on BLUETTI App.
PV Charging
Connect the solar panels (in series or parallel) to EB3A via the solar charging cable.

 ONLY use solar panels with compatible voltage.
Note: Please make sure your solar panels comply with:
OCV2: 12-28V, Input Current: 8.5A Max., Input Power: 200W Max.
2 OCV: Open circuit voltage. The maximum voltage that the solar panel can produce with no load on it.
Car Charging
Connect the EB3A directly to the vehicle plug-in cigarette lighter port via the car charging cable.

Cigarette lighter MUST be fully inserted into the lighter port of the machine.
Generator Charging
Connect the EB3A with the generator via the AC charging cable.

Note: Please select the generator with compliant and stable voltage.
Discharging

268.8Wh × DoD × η ÷ (load power) = charging time (estimated)
Note: DoD refers to the Depth of Discharge, η is the local inverter efficiency. DoD=80-90%, η=90%.
DoD may vary depending on ambient-operating temperature and discharge rate.
Load power and charging time are measured in Watt and Hour.
FAQs (Frequently Asked Questions)
Q: How do I know whether my devices will work well with this product?
A: Please evaluate the total constant load of your appliances. If it doesn't exceed the Max. output power of EB3A, you can use this power station to charge.
Q: Can I use third-party solar panels to charge this product?
A: Yes, you can. As long as the specs of solar panels you're using fall in below range:
OCV: 12-28V
Input Current: 8.5A Max.
Input Power: 200W Max.
With the same power connector (MC4 or Anderson)
Q: How can I turn on the UPS Bypass Mode and what does it mean?
A: Connect the EB3A with the AC power and the 'UPS' will be on display. Then turn on the AC output. When on this mode, the AC power will directly support the loads on AC output ports and charge the EB3A.
Q: Is there a button to turn on/off the wireless charging?
A: Yes. Press the DC Power Button to enable the wireless charging.
Q: Can it charge and discharge at the same time?
A: Yes. It supports pass-through charging. EB3A comes with the premium LiFePO4 battery and proprietary Battery Management System to ensure that it can charge and discharge at the same time.
Technical Support
Should you require any further assistance, please do not hesitate to contact BLUETTI service team.

BLUETTI POWER INC
Web: https://www.bluettipower.com/
Tel: 833-988-3663 / 702-463-4792
Mail: service@bluettipower.com
Add: 6185 S Valley View Blvd Ste D. Las Vegas, NV 89118.

Documents / Resources
References
Download manual
Here you can download full pdf version of manual, it may contain additional safety instructions, warranty information, FCC rules, etc.
Advertisement
Thank you! Your question has been received!


Need Assistance?
Do you have a question about the EB3A that isn't answered in the manual? Leave your question here.