
Related Manuals for Automatic Technology Axess Pro Series 1101


Summary of Contents for Automatic Technology Axess Pro Series 1101
- Page 1 Axess Pro Series 1101 ® Commercial Overhead Garage Door Opener Featuring TrioCode Technology ™ Doc # 160034_01 Part # 13384 Released 05/03/14...
- Page 2 Automatic Technology (Australia) Pty Ltd to the extent that such may be lawfully excluded hereby expressly disclaims all conditions or warranties, statutory or otherwise which may be implied by laws as conditions or warranties of purchase of an Automatic Technology (Australia) Pty Ltd industrial roller shutter opener.
-
Page 3: Table Of Contents
Warranty and Exclusion of Liability 10.3 Returning To Main Screen 11. Remotely Coding Transmitters 11.1 Selecting The Function To Be Coded 11.2 Activate Remote Code Set Mode 11.3 Removing the Battery From the Transmitter Owner Installation Instructions Axess Pro Series 1101... -
Page 4: Important Safety Instructions
• If the power supply cord is damaged, it must be replaced by an Automatic Technology service agent or suitably qualified person. • Electrical wiring must be compliance with the local building an electrical codes. - Page 5 • done. Security • Make sure the door is fully closed before leaving the driveway. Entanglement in • Keep hands and loose clothing clear of door and opener at all times. moving door Owner Installation Instructions Axess Pro Series 1101...
-
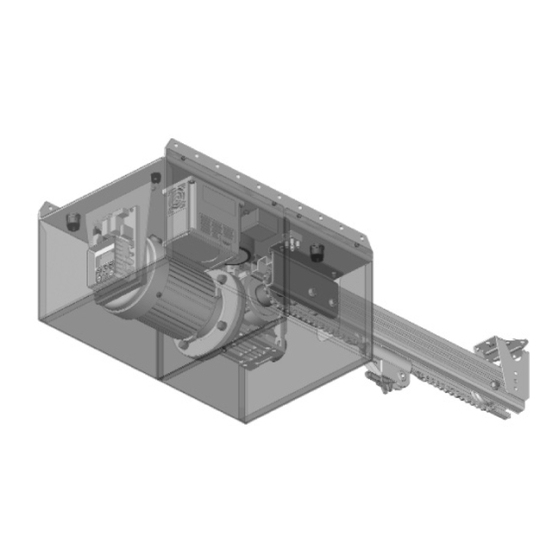
Page 6: Controller Input And Outputs
Console Up/Open Button Console SET Button Console Next Button Antenna Connector Console Display Motor Speed Control Connector Programmer Interface Connector 3 Ampere 240 Volt Fuse Motor Control Connector 24V AC Power Supply Input Terminal Axess Pro Series 1101 Owner Installation Instructions... -
Page 7: Set Up Requirements
62551 HEX SERRATION FLANGE NUT M8 10148 HEX HEAD SCREW M8 X 16 10120 SPRING WASHER 10950 AXESS PRO TRACK KIT AXESS PRO TRACK KIT 4M 92510 AXESS PRO TRACK KIT 5.85M 92511 Owner Installation Instructions Axess Pro Series 1101... -
Page 8: Pre-Installation Requirements
Secure the track to drive unit with the four (4) M8 x 16 Hex Head screws g. Tighten the chain and lock it with lock nuts. h. Connect the front cover to the drive unit. Axess Pro Series 1101 Owner Installation Instructions... -
Page 9: Installation
& straight arms. If installing on a door with bad wave action, lengthening the arm even further will assist the door operation by reducing the wave action. Fig 5.4 Fig 5.5 Trolley Owner Installation Instructions Axess Pro Series 1101... -
Page 10: Safety Beam Installation
Repeat steps a and b to assemble the Safety Beam receiver. Locate the Safety Beam in a strategic location in the doorway. Automatic Technology recommends that the sensor is placed 100mm above the floor level and as close as possible to the shutter opening. -
Page 11: Powering Up The Axess ® 1101
NOTE: By selecting the model number, the controller will be loaded with the correct settings for motor encoder and speed ramping. f. Press OPEN or CLOSE until “Select Axess® MODEL 1101” is displayed. g. Press SET to continue. Owner Installation Instructions Axess Pro Series 1101... -
Page 12: Setting Limits
When the setup is complete, the MAIN SCREEN will be displayed with the door shown to be OPEN. The door can now be used. NOTE: Do not press transmitter during limit adjustment process. Axess Pro Series 1101 Owner Installation Instructions... -
Page 13: Safety Obstruction Force Test
(2) times (depending on the position of the door and the power up condition). d. A single beep will be heard once the process is complete and setup complete message will be displayed. Owner Installation Instructions Axess Pro Series 1101... -
Page 14: Coding Transmitter
The “Code Transmitter” menu will now be shown. Press EXIT to [ No Name ] return to the MAIN SCREEN and test the transmitter. OSC OFF OFF OFF Fig 10.5 PRESS PRESS [ No Name ] OSC OFF OFF OFF Fig 10.6 PRESS Axess Pro Series 1101 Owner Installation Instructions... -
Page 15: Remotely Coding Transmitters
Light Status Battery Status battery down Fig 11.4 Solid through the side opening Flashing Requires replacement to release battery No light Requires replacement Fig 11.5 REPLACE BATTERY WITH CR2032 ONLY Owner Installation Instructions Axess Pro Series 1101... -
Page 16: Setting Pedestrian Position
12.3 Error Displays During the above procedure many error checks are performed. If an error is detected, a message will be displayed indicating the error. Ped’n Access Press <--> to Access Menus Fig 12.3 Axess Pro Series 1101 Owner Installation Instructions... -
Page 17: Auto-Close Mode
Safety Beam input must be activated again before the countdown will start. As with the other Safety Beam modes, the STP input will abort countdown and the OPN and SWP inputs will restart the countdown if the door is OPEN. Owner Installation Instructions Axess Pro Series 1101... -
Page 18: Accessories Installation
Press OPEN to increase or CLOSE to decrease the time. e. Press SET to save the new time. f. Press the EXIT button two times to exit. Fig 14.2 g. Test the light operation. Axess Pro Series 1101 Owner Installation Instructions... -
Page 19: Specifications
Hopping code No. of code combinations Over 100 billion random codes Code generation Non linear encryption algorithm Transmitter battery CR2032 Drive unit weight 23kg PLEASE NOTE: Specifications are subject to change without notice. Owner Installation Instructions Axess Pro Series 1101... -
Page 20: Troubleshooting
Safety Beam is obstructed. Remove obstruction from path of Safety Beams. Door obstructed when closing. Remove obstruction. Auto-Close time not set. Set Auto-Close times (Section 13.3). Auto-Close mode not set Set Auto-Close mode. (Section 13.2) Axess Pro Series 1101 Owner Installation Instructions... -
Page 21: Maintenance
Service Record Record any maintenance in the following table to assist in any warranty service. Date Service by Signature Invoice No. Amount Owner Installation Instructions Axess Pro Series 1101... -
Page 22: Appendix
ON BEFORE OPEN CYCLE LIGHT TIME 25.5 14.2 Minimum time light is activated for prior to opening ON BEFORE CLOSE CYCLE LIGHT TIME 25.5 14.2 Minimum time light is activated for prior to closing Axess Pro Series 1101 Owner Installation Instructions... - Page 23 Selects operating polarity of OPN input STP INPUT N/C OPERATION 7.10 Appendix C Selects operating polarity of STP input OPN INPUT 2nd P.E OPERATION 7.11 Appendix C Selects OPN input as 2nd P.E input Owner Installation Instructions Axess Pro Series 1101...
- Page 24 INSTALL DATA Appendix D Menu 9 - Memory Tools CLR CONTROL Appendix E CLR TRANSMITTERS (TX’ERS) Appendix E Menu 10 - Setup Travel SETUP LIMITS 10.1 REPROFILE TRAVEL 10.2 SET PEDESTRIAN 10.3 12.1 Axess Pro Series 1101 Owner Installation Instructions...
-
Page 25: B - Viewing & Editing Parameters
SCREEN. Fig B.2 Saves new value and exits back to View Decrease Mode Displays “Load value Default?” screen, giving option of Exits back to View Mode loading default value with no changes made Owner Installation Instructions Axess Pro Series 1101... -
Page 26: C - Control Board Adjustments
This parameter enables activity report outputs. Contact Automatic Technology for more details. Menu 7.5 Activity Report ID This parameter sets the ID of the controller that is sent with the activity report. Contact Automatic Technology for more details. Menu 7.6 Vacation Mode Vacation Mode blocks all but one designated remote control transmitter from activating the Axess Pro Series 3100. - Page 27 The STP input is normally configured for N/O operation. This parameter allows its operation to be changed to N/C. Menu 7.11 OPN INPUT 2nd P.E Operation The open input can be configured to use a second normally open P.E input. Owner Installation Instructions Axess Pro Series 1101...
-
Page 28: D - Diagnostic Tools
When finished viewing the events, press EXIT. Menu 8.4 Memory Usage This tool displays the number of transmitter store locations used and the number free. Close Complete EVENT# 64 Fig D.5 Axess Pro Series 1101 Owner Installation Instructions... -
Page 29: E - Memory Tools
PRESS time, auto-close times etc. It will also clear the travel limits. Menu 9.2 Clear Transmitters (Tx’ers) This option will clear the transmitter storage memory. Owner Installation Instructions Axess Pro Series 1101... -
Page 30: F - Transmitter Editing
Repeat step b. (Fig. F.5). e. Press SET to record changes PRESS The second line of the display shows a list of available characters with the current value indicated at the cursor position. Axess Pro Series 1101 Owner Installation Instructions... -
Page 31: G - Transmitter Management
2 & 3 of the BASIC CODE TRANSMITTER PROCEDURE for each transmitter to be coded. Coding is terminated by pressing the EXIT button. Exiting The List To exit the transmitter list, simply press EXIT to return to the Code menu. Owner Installation Instructions Axess Pro Series 1101... -
Page 32: Warranty And Exclusion Of Liability
Warranty and Exclusion of Liability e. theft, fire, flood, rain, water, lightning, storms or any other acts 1. This Warranty is given by Automatic Technology (Australia) Pty Ltd (ABN of God; 11 007 125 368) (ATA). 6-8 Fiveways Boulevard, Keysborough 3173, 1300 f.
Need help?
Do you have a question about the Axess Pro Series 1101 and is the answer not in the manual?
Questions and answers