
Related Manuals for Automatic Technology HiRO GDO-12


Summary of Contents for Automatic Technology HiRO GDO-12
- Page 1 GDO-12 High Rolling Door Opener Installation Manual Doc # 160421_00 Released 01/04/20...
- Page 2 © September 2018 Automatic Technology (Australia) Pty Ltd. All rights reserved. No part of this document may be reproduced without prior permission. In an ongoing commitment to product quality we reserve the right to change specification without notice. E&OE.
-
Page 3: Table Of Contents
Technology Australia Pty Ltd hereby further expressly excludes all or any liability for any injury, damage, cost, expense or claim whatsoever suffered by any person as a result whether directly or indirectly from failure to install the Automatic Technology Australia Pty Ltd Garage Door Opener in accordance with these... -
Page 4: Safety Information
GDO-12 HIRO Installation Manual 1. Safety Information Please read these important safety rules WARNING! These safety alert symbols indicate personal safety property damage instruction exists. READ THESE INSTRUCTIONS CAREFULLY. • To reduce the risk of injury to persons – Use this operator only with a rolling door. -
Page 5: Specifications
GDO-12 HIRO Installation Manual 2. Specifications Technical Specifications GDO-12V1 Rated voltage range 230V - 240V a.c Rated frequency 50Hz / 60Hz Rated power input 150W Rated operating time: 6 min Rated operating temperature C to +55 Rated load 500N Maximum turns of door drum: 6 turns of the drum wheel Max door weight: 270kg *... -
Page 6: Set Up Requirements
GDO-12 HIRO Installation Manual 3. Set Up Requirements REGISTRATION CARD Fig 3.1 3.1 Kit Contents ITEM DESCRIPTION GDO-12 POWER DRIVE UNIT INTERNAL GEAR ADAPTER (FORKS) HEX SERRATION HEAD SCREW M6 X 20 4 BUTTON TRANSMITTERS 4 BUTTON WALL TRANSMITTER LOCKING BAR COVERS GUIDE PACK VR12 SCREW-EYE PLASTIC WALL PLUG 6.9 X 25 (1”) -
Page 7: Pre-Installation Requirements
GDO-12 HIRO Installation Manual 4. Pre-Installation Requirements IMPORTANT SAFETY INSTRUCTIONS FOR INSTALLATION Warning: Incorrect installation can lead to severe injury. Follow ALL installation instructions. NOTE: Planetary chain equipment must be removed from the door prior to installation of GDO-12V1 HiRo™. 4.1 Door Operation The door must be in good operating condition. -
Page 8: Opener Safety & Security
GDO-12 HIRO Installation Manual 5. Opener Safety & Security 5.1 The Door CAN NOT be used by the opener when: MANUAL RELEASE a. There is a locking device installed. b. There is a power failure. 5.2 The Door CAN be used when: WARNING! When operating the manual a. -
Page 9: Door Preparation
GDO-12 HIRO Installation Manual 6.1 Door Preparation 6.1.1 Preparation a. Check the door’s operation: The door must travel smoothly and be easy to operate by hand. ii. Adjust any tight or twisted guides. iii. Clean the guides if there is any oil or wax present using a suitable white spirit. The only lubricant suitable for use on door guides is silicon spray. -
Page 10: Fitting The Opener
GDO-12 HIRO Installation Manual 6.3 Fitting the Opener 6.3.1 Mounting The Opener a. Check the drive gear rotates freely, by pulling the string handle down (there will be a click) to disengage opener. Then move the forks from side to side by hand Fig 6.3 b. -
Page 11: Setting Limits
GDO-12 HIRO Installation Manual 6.5 Setting Limits 6.5.1 Set the Limit Positions and adjust drive speed: The Limit Positions can vary due to site conditions, such as uneven ground. When setting the Close limit, ensure the position is when the door makes first contact with the ground. Alternatively for the Open limit the position should be at the height of the garage opening. -
Page 12: Safety Obstruction Force Test
GDO-12 HIRO Installation Manual 6.6 Safety Obstruction Force Test WARNING! Take care when testing or adjusting the WARNING! If the door fails these tests, put Safety Obstruction Force. Excessive force may cause the opener into manual mode, only operate SERIOUS PERSONAL INJURY and/or PROPERTY the door by hand and call for service. -
Page 13: Coding Transmitter
GDO-12 HIRO Installation Manual 6.7 Coding Transmitter 6.7.1 Transmitter Button to Operate Door The GDO-12 HiRo can store up to sixty four (64) transmitters in its memory. a. Press the MODE button to highlight the CODE LED. b. Press OPEN or CLOSE buton until BLUE CLOSE, RED STOP/ SET and GREEN OPEN LEDs are on. -
Page 14: Operation Instructions
GDO-12 HIRO Installation Manual 7. Operation Instructions IMPORTANT SAFETY INSTRUCTIONS WARNING! TO REDUCE THE RISK OF SEVERE INJURY OR DEATH: (1) READ AND FOLLOW ALL INSTALLATION INSTRUCTIONS. (2) NEVER LET CHILDREN OPERATE OR PLAY WITH DOOR CONTROLS. KEEP THE REMOTE CONTROL AWAY FROM CHILDREN. -
Page 15: How To Use Your Opener
When batteries reach the end of their usual life in accordance with Australian Battery Recycling Initiative please follow the next simple steps for protecting the environment. Refer to the Automatic Technology website for information on where to recycle batteries in Australia. -
Page 16: User Operating Controls
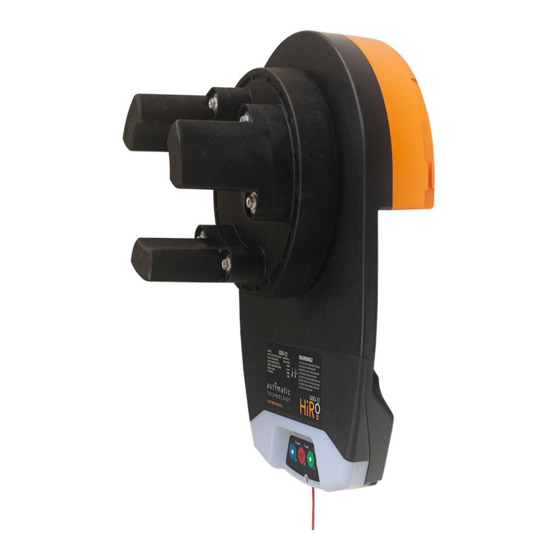
GDO-12 HIRO Installation Manual 7.2 User Operating Controls Button Function 1. BLUE DOWN ARROW Close Button 2. RED STOP/SET Stop / Set Button 3. GREEN UP ARROW Open Button 4. MODE Mode Selection Button 7.3 Door Status Indicators Door Status Indicators OPEN LED (green) CLOSE LED (blue) STOP (red) -
Page 17: Troubleshooting Guide
GDO-12 HIRO Installation Manual 8. Troubleshooting Guide Symptom Possible cause Remedy The opener does not work Garage door in poor condition e.g. Check the door’s operation (Section 9) from the transmitter springs may be broken Plug a device of similar voltage (e.g. a The opener does not have power hairdryer) into the power point and check that it is OK... -
Page 18: After Installation Care
GDO-12 HIRO Installation Manual 9. After Installation Care 9.1 Service Checklist Preventative servicing of your garage door and opener, is WARNING! Failure to maintain your your just as important as servicing your car. Much like the engine garage door voids the warranty on your of your car, your garage door is made up of numerous garage door opener. -
Page 19: Battery Replacement
When batteries reach the end of their usual life in accordance with Australian Battery Recycling Initiative please follow the next simple steps for protecting the environment. Refer to the Automatic Technology website for information on where to recycle batteries in Australia. -
Page 20: Appendix
GDO-12 HIRO Installation Manual 10. Appendix A - Adjustment Mode Parameters Adjustment Mode Adjustments can be made to functions such as Light times, Auto Close functions etc. The below table shows the parameters that can be altered. a. Press and release the MODE button until the Spanner LED (Adjustment Mode) is highlighted. b. -
Page 21: C - Led Status
GDO-12 HIRO Installation Manual Appendix C - LED Status Operation indicators The below table displays the status of the opener when LEDs are activated. LED Indicators Status CODE LED Flickers with transmitter activity or indicating transmitter may not be coded to the opener. -
Page 22: D - Setting Limits Via Transmitter
GDO-12 HIRO Installation Manual Appendix D - Setting Limits via Transmitter The GDO-12 HiRo™ has the ability to set travel limits using a transmitter, allowing free movement around the garage to better Button 1 Button 2 assess the desired limit positions. In order to use a transmitter, (Inch Open) (Set) it must first have at least one of its buttons coded to the door... -
Page 23: E - Additional Transmitter Functions
GDO-12 HIRO Installation Manual Appendix E - Additional Transmitter Functions E.1 Transmitter Button to the Courtesy Light The transmitter can be programmed to operate the courtesy light Operate Light on the opener independently of the door moving. Door a. Press the MODE button to highlight the CODE LED if not already highlighted. - Page 24 GDO-12 HIRO Installation Manual Automatic Technology office location Head Office 6-8 Fiveways Blvd, Keysborough 3073 Phone (03) 9791 2000 Prefixed trademarks are the property of Automatic Technology (Australia) Pty Ltd ABN 11 007 125 368. © 2020 Automatic Technology Australia Pty Ltd. ata-aust.com.au...
Need help?
Do you have a question about the HiRO GDO-12 and is the answer not in the manual?
Questions and answers