
Related Manuals for Hyco Powerflow


Summary of Contents for Hyco Powerflow
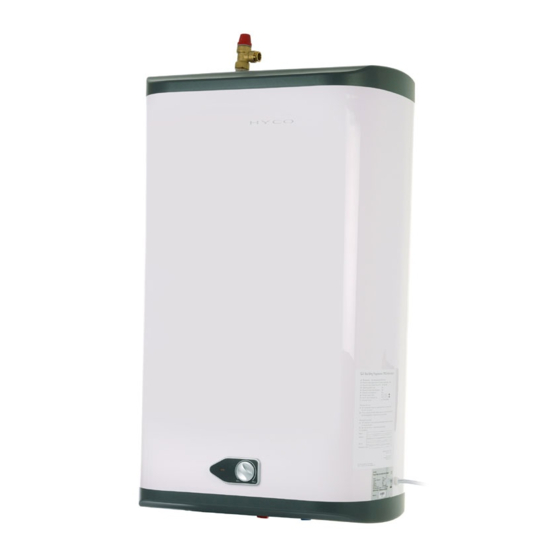
- Page 1 Product Instruction Manual owerflow Unvented water heater 30, 50 and 90 litres v15.6/5...
-
Page 2: Important Safety Points
Thank you for purchasing a Powerflow series unvented electric water heater. The Powerflow is suitable for hand washing and dishwashing where a number of hot water outlets are required such as kitchens, schools, restaurants, washrooms and offices. The Powerflow is the ideal solution for light industrial, commercial and light domestic hot water requirements. -
Page 3: Wall Mounting
See schematic Diagram 1 for the correct relative positions of the components. Diagram 1 Temperature and Pressure Relief Valve Diagram 1 Temperature and Pressure Relief Valve POWERFLOW POWERFLOW Pressure Balanced Expansion (Expansion) Cold Water Vessel... - Page 4 Plumbing connections Connect ALL the plumbing valves in the sequence shown in diagram 1. The cold water inlet to the heater is marked BLUE and the hot water outlet is marked RED. Observe flow direction arrows on supplied valves. • The drain valve must be fitted close to the COLD inlet to allow drain down if necessary. •...
-
Page 5: Electrical Connections
Visually re-confirm all plumbing and electrical connections are sound. • Open a hot water tap and turn on mains water supply to the Powerflow heater. • Allow unit to fill and leave tap running for a short time to flush out the pipework and purge any air from the system before closing the hot tap and checking the system for any leaks. -
Page 6: Operation
Ensure the discharge pipe can cope with this flow rate continuously. Release the Temperature and Pressure relief valve. The flow should stop completely. Open the expansion relief valve and likewise check that water flows freely through the discharge pipe, that the discharge pipe can cope with the flow rate and that the water flow ceases when the valve is released. -
Page 7: Thermal Cut-Out Reset
All maintainable electrical components are located under a plastic cover that is next to the inlet and outlet pipes and held in position with two small screws. Remove screws and lower cover to provide access to components. See diagram below for electrical parts identification. If replacing electrical parts take particular attention to ensure that the earthing connections (green/yellow) to the element flange and thermostat housing are sound. -
Page 8: Expansion Vessel
Anode & tank inspection • It is possible to view the tank by removing the element to gain access. It is advisable the tank is inspected at regular intervals for signs of corrosion. • There is a magnesium anode fitted to most models of the Power flow. •... -
Page 9: Specifications
7 Bar 90 degrees°C Minimum recommended pressure 0.8 bar Immersion heater specification Hyco PFEL30 EN60335 x 1 Weight empty (kg) Weight full (kg) Heat up time (from 13°C to 60°C) in minutes Reheat time (70% contents to 60°C) in minutes 16.5... - Page 10 Element ange - Remove to access anode...
-
Page 11: Troubleshooting
7. Troubleshooting Symptom Likely Fault(s) Remedy Water not heating Thermal cut-out needs re-setting Reset as section 11. Element failure Replace. Thermostat failure Replace. Thermal cut-out failure Replace. Electrical supply failure Check supply is present. Water too hot Thermostat set too high Reduce setting. - Page 12 In order to underline the duty to dispose of this equipment separately, the product is marked with a crossed out dustbin. Hyco Manufacturing Ltd Normandy Court Express Way...
Need help?
Do you have a question about the Powerflow and is the answer not in the manual?
Questions and answers