Table of Contents
Advertisement
Quick Links
Register at www.Toro.com.
Original Instructions (EN)
Workman
®
Vehicle
Model No. 07266TC—Serial No. 315000001 and Up
Model No. 07273—Serial No. 315000001 and Up
Model No. 07273TC—Serial No. 315000001 and Up
Model No. 07279—Serial No. 315000001 and Up
Form No. 3389-273 Rev A
MD and MDX Utility
G014966
*3389-273* A
Advertisement
Table of Contents

Related Manuals for Toro Workman MD


Summary of Contents for Toro Workman MD
- Page 1 MD and MDX Utility Vehicle Model No. 07266TC—Serial No. 315000001 and Up Model No. 07273—Serial No. 315000001 and Up Model No. 07273TC—Serial No. 315000001 and Up Model No. 07279—Serial No. 315000001 and Up G014966 *3389-273* A Register at www.Toro.com. Original Instructions (EN)
- Page 2 This product complies with all relevant European directives. Whenever you need service, genuine Toro parts, or additional For details, please see the separate product specific information, contact an Authorized Service Dealer or Toro Declaration of Conformity (DOC) sheet. Customer Service and have the model and serial numbers of your product ready.
-
Page 3: Table Of Contents
Contents Electrical System Maintenance ........35 Servicing the Battery..........35 Replacing the Fuses ..........36 Safety ................4 Maintaining the Headlights ........36 Safe Operating Practices........... 4 Drive System Maintenance .........38 Before Operating ............ 4 Maintaining the Tires ..........38 Supervisor’s Responsibilities ........5 Adjusting the Front Wheel Toe-in and Safe Handling of Fuels .......... -
Page 4: Safety
Use only an approved nonmetal, portable fuel container. available by sending complete model and serial number Static electric discharge can ignite fuel vapors in a fuel to: The Toro® Company, 8111 Lyndale Avenue South, container that is not grounded. Remove the fuel container Minneapolis, Minnesota 55420. -
Page 5: Supervisor's Responsibilities
Supervisor’s Responsibilities – Sit on operator’s seat and ensure that the parking brake is engaged. • Make sure operators are thoroughly trained and familiar – Keep your foot on the brake. with the Operator’s Manual and all labels on the vehicle. –... - Page 6 Operating on Hills – Always watch out for and avoid low overhangs such as tree limbs, door jambs, over head walkways, etc. Make sure there is enough room over head to easily WARNING clear the machine and your head. Operating the machine on a hill may cause tipping –...
-
Page 7: Maintenance
The maximum engine speed is 3650 rpm. To • When operating with a heavy load in the cargo box, ensure safety and accuracy, have an Authorized Toro reduce your speed and allow for sufficient braking Distributor check the maximum engine speed with a distance. -
Page 8: Models 07266Tc And 07279
• To be sure of optimum performance and safety, always Sound Power purchase genuine Toro replacement parts and accessories. Replacement parts and accessories made by other This unit has a guaranteed sound power level of 96 dBA, manufacturers could be dangerous. Altering this machine which includes an Uncertainty Value (K) of 1 dBA. -
Page 9: Safety And Instructional Decals
Safety and Instructional Decals Safety decals and instructions are easily visible to the operator and are located near any area of potential danger. Replace any decal that is damaged or lost. 117-5001 1. Warning—read the Operator's Manual. 7. Horn 2. Collision hazard—do not operate the vehicle on public streets, 8. - Page 10 112-3325 99-7345 1. Read the Operator's 4. Headlights, 15A Manual for fuse 1. Warning—read the Operator's Manual. information. 2. Hot surface/burn hazard—stay a safe distance from the 2. Lift/gate, 30A 5. Machine fuse, 20A hot surface. 3. Horn/power point, 10A 3.
-
Page 11: Setup
Setup Loose Parts Use the chart below to verify that all parts have been shipped. Procedure Description Qty. Install the steering wheel (Models Steering wheel 07266TC and 07273TC). Check the fluid levels and tire air – No parts required pressure. Operator's Manual Engine owner's manual Parts Catalog... -
Page 12: Checking The Fluid Levels And Tire Air Pressure
• 6. Align the lock tabs of the center cover to the openings Fill out the registration card. in the steering wheel and press the cover into the wheel • Complete the Predelivery Inspection Form. until the locks tabs snap into place (Figure •... -
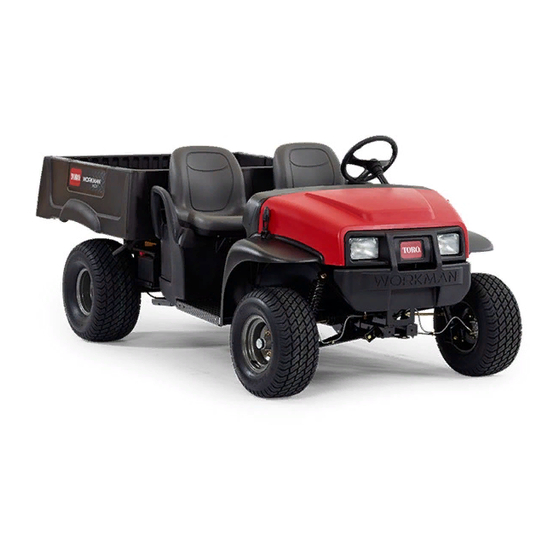
Page 13: Product Overview
Product Overview Figure 4 1. Hood latch 3. Cargo box 5. Gear shift selector 7. Cargo box lever 2. Parking brake handle 4. Towing tongue 6. Fuel cap Controls Accelerator Pedal Use the accelerator pedal (Figure 5) to vary ground speed of the machine. -
Page 14: Light Switch
Choke Control The choke control is located below and to the right of the operator's seat. Use the choke to help start a cold engine by pulling the choke control outward (Figure 6). After the engine starts, adjust the choke to keep the engine running smoothly. -
Page 15: Fuel Gauge
On/Off Switch Passenger Hand Holds The On/Off switch (Figure 7), is used to run and stop the The passenger hand holds are located on the right side of the engine, and has two positions: On and Off. Rotate the key dash panel and at the outside of each seat (Figure clockwise to the On position to run the engine to operate... -
Page 16: Specifications
25 cm (10 inch) inside Attachments/Accessories A selection of Toro approved attachments and accessories is available for use with the machine to enhance and expand its capabilities. Contact your Authorized Service Dealer or Distributor or go to www.Toro.com for a list of all approved... -
Page 17: Operation
Operation Note: Determine the left and right sides of the machine from the normal operating position. Think Safety First Please carefully read all of the safety instructions and decals in the safety section. Knowing this information could help you or bystanders avoid injury. Operating the Cargo Box g014860 Raising the Cargo Box... -
Page 18: Preforming Pre-Starting Checks
Opening the Tailgate 1. Ensure that the cargo box is down and latched. 2. Lift up on the finger pulls at the back panel of the tail gate (Figure 11). Figure 12 3. Use a short, shaking motion to rotate the tailgate back and forth several times (Figure 12). -
Page 19: Checking The Brake Fluid Level
Note: Shut off the engine and allow all moving parts to stop before checking for oil leaks, loose parts, and other wear and damage. If any of the above items are not correct, notify your mechanic or check with your supervisor before taking the machine out for the day. - Page 20 2. Raise the cargo box; refer to Raising the Cargo Box (page 17). 3. Use a rag to clean around the fill spout (Figure 16) so that dirt cannot fall into the spout and damage the engine. Figure 17 1. Move the machine to a level surface. 2.
-
Page 21: Checking The Tire Air Pressure
Checking the Tire Air Pressure DANGER In certain conditions, fuel is extremely flammable Service Interval: Before each use or daily and highly explosive. A fire or explosion from fuel Tire Air Pressure Range: 55 to 103 kPa (8 to 22psi) can burn you and others and can damage property. -
Page 22: Starting The Engine
Stopping the Machine Important: When stopping the machine on an incline, use the service brakes to stop the machine and set the parking brake to hold the machine in place. Using the accelerator to stall the machine on the hill can damage the machine. -
Page 23: Loading The Cargo Box
Loading the Cargo Box down hill, when suddenly changing speed or stopping, or when driving over tough surfaces. Use the following guidelines when loading the cargo box and The capacity of the cargo box is 0.37 m (13 ft ). The amount operating the machine: (volume) of material that can be placed in the box without •... -
Page 24: Transporting The Machine
Contact your Authorized Toro Distributor for details. Remove the seats or make sure that the seats are securely fastened to the coupling in the seat shroud. -
Page 25: Maintenance
Maintenance Note: Looking for an Electrical Schematic for your machine? Download a free copy of the schematic by visiting www.Toro.com and searching for your machine from the Manuals link on the home page. Note: Determine the left and right sides of the machine from the normal operating position. -
Page 26: Daily Maintenance Checklist
Daily Maintenance Checklist Duplicate this page for routine use. Maintenance Check Item For the week of: Mon. Tues. Wed. Thurs. Fri. Sat. Sun. Check brake and parking brake operation. Check gear shift/neutral operation. Check fuel level. Check engine oil level. Check transaxle oil level. -
Page 27: Premaintenance Procedures
Premaintenance Procedures Maintaining the Machine under Special Operating Conditions If the machine is subjected to any of the conditions listed Figure 23 below, maintenance should be performed twice as frequently. 1. Front lifting point • Desert operation • Cold climate operation (below 10° C [50° F]) •... -
Page 28: Lubrication
Closing the Hood Lubrication 1. Gently lower the hood onto the chassis. Greasing the Machine 2. Secure the hood by aligning the rubber latches onto the latch anchors at each side of the hood (Figure 25). Service Interval: Every 100 hours/Yearly (whichever comes first)—Grease the bearings and bushings. -
Page 29: Engine Maintenance
Engine Maintenance Servicing the Air Filter Service Interval: Every 100 hours Replace the air filter element sooner if it dirty or damaged. After the first 200 hours Note: Service the air cleaner more frequently (every few hours) if operating conditions are extremely dusty or sandy. Checking the Air Filter Figure 29 1. -
Page 30: Servicing The Engine Oil
Servicing the Engine Oil 3. Insert the air-filter element into air-filter housing (Figure 29). Service Interval: After the first 25 hours Note: Ensure that the filter is sealed properly by Every 100 hours (Change the oil twice as often during applying pressure to the outer rim of the filter when special operating conditions;... - Page 31 12. Connect the battery, and lower the cargo box; refer to Connecting the Battery (page 36) Lowering the Cargo Box (page 17). Changing the Oil (Models 07273 and 07273TC) Oil Type: Detergent oil (API service SL or higher) Crankcase Capacity: 1.4 L (1.5 qt) when the filter is changed Viscosity: See the table below Figure 31 1.
-
Page 32: Servicing The Spark Plug
Note: Allow the oil to completely drain from the 4. Thread the new filter onto the filter adapter until the engine. gasket contacts the mounting plate, then tighten the filter an additional 1/2 to 3/4 turn further (Figure 34). 7. Install the drain plug and seal and torque the drain plug to 17.6 N-m (13 ft-lb). -
Page 33: Fuel System Maintenance
Fuel System Maintenance Inspecting Fuel Lines and Connections Service Interval: Every 400 hours/Yearly (whichever comes first) Inspect the fuel lines, fittings, and clamps for signs of leaking, Figure 36 deterioration, damage, or loose connections. 1. Center electrode insulator 3. Air gap (not to scale) Note: Repair any damaged or leaking fuel system component 2. -
Page 34: Servicing The Carbon Canister
Servicing the Carbon Canister Checking the Air Filter for the Carbon Canister Service Interval: After the first 50 hours Every 200 hours Check the opening at the bottom of the air filter for the carbon canister to ensure that it is clean and free of debris and obstructions (Figure 38). -
Page 35: Electrical System Maintenance
Electrical System WARNING Maintenance Battery terminals or metal tools could short against metal vehicle components, causing sparks. Sparks can cause the battery gasses to explode, resulting Servicing the Battery in personal injury. • When removing or installing the battery, do not Battery voltage: 12 volt with 300 cold cranking amps at -18°... -
Page 36: Replacing The Fuses
Installing the Battery Replacing the Fuses 1. Align the battery to the battery tray of the machine There are 3 fuses in the electrical system. They are located (Figure 40). beneath the dash on the driver's side (Figure 41). Note: Ensure that the positive and negative posts of Auxillary (Open) 30 A the battery are aligned as shown in... - Page 37 2. Open the hood; refer to Closing the Hood (page 28). CAUTION 3. Disconnect the electrical connector for the harness Any surface contamination can damage the from the connector of the lamp assembly (Figure 43). headlight bulb and leading to its failure or explosion creating a serious safety hazard.
-
Page 38: Drive System Maintenance
Important: You will need to obtain tool number TORO 6010 from your Toro Distributor to perform this procedure. The toe-in should be 0 to 6 mm (0 to 1/4 inch) and the camber should be 0+1/2 degree, i.e., the bottom of the wheel rims angled in 2.3 mm (0.09 inch) more than the top, with the... - Page 39 Complete the measurement on both front tires before adjusting. Complete the following procedure for each tire that needs adjusting: 3. Using tool TORO 6010, rotate the collar on the shock absorber to change the length of the spring (Figure 45).
-
Page 40: Checking The Transaxle Oil Level
Changing the Transaxle Oil Service Interval: Every 800 hours/Yearly (whichever comes first) Oil Type: SAE 10W30 (API service SJ or higher) Oil Capacity: 1.4 L (1.5 qt) 1. Position the vehicle on a level surface, set the parking Figure 47 brake, rotate the On/Off switch to the Off position, and remove the key. -
Page 41: Checking And Adjusting Neutral
Figure 50 1. Oil fill 8. Install and tighten the fill plug and gasket into the fill-plug hole of the transmission (Figure 49). Figure 51 9. Start the engine and operate the machine. 1. Neutral bracket 2. Locknuts 10. Check the oil level and add more oil if the level is below the threads of the fill-plug hole (Figure 49). -
Page 42: Maintaining The Primary-Drive Clutch
Maintaining the Primary-Drive Cooling System Clutch Maintenance Service Interval: Every 400 hours/Yearly (whichever comes first) Cleaning the Engine Cooling Areas CAUTION The dust in the clutch will become airborne and Service Interval: Every 100 hours Clean the cooling system could damage your eyes or you could inhale it twice as often during special operating causing breathing difficulties. -
Page 43: Brake Maintenance
Brake Maintenance Belt Maintenance Servicing the Drive Belt Inspecting the Brakes Service Interval: Every 100 hours Checking the Drive Belt Brakes are a critical safety component of the machine. As Service Interval: After the first 8 hours with all safety components, they should be closely inspected at Every 200 hours regular intervals to ensure optimum performance and safety. -
Page 44: Adjusting The Starter-Generator Belt
Chassis Maintenance 7. Lower the cargo box; refer to Lowering the Cargo Box (page 17). Adjusting the Cargo-Box Adjusting the Latches Starter-Generator Belt If the cargo-box latch is out of adjustment, the cargo box Service Interval: After the first 8 hours vibrates up and down as you drive the vehicle. -
Page 45: Cleaning
Cleaning Storage 1. Position the machine on a level surface, set the parking Washing the Machine brake, rotate the On/Off switch to the Off position, and remove the key. The machine should be washed as needed. Use water alone 2. Clean the dirt and grime from the entire machine, or with a mild detergent. - Page 46 10. With the spark plugs removed from the engine, pour 2 tablespoons of engine oil into the spark plug hole. 11. Use the electric starter to crank the engine and distribute the oil inside the cylinder. 12. Install the spark plug(s) and tighten it to recommended torque;...
- Page 47 The Way Toro Uses Information Toro may use your personal information to process warranty claims, to contact you in the event of a product recall and for any other purpose which we tell you about. Toro may share your information with Toro's affiliates, dealers or other business partners in connection with any of these activities. We will not sell your personal information to any other company.
- Page 48 Countries Other than the United States or Canada Customers who have purchased Toro products exported from the United States or Canada should contact their Toro Distributor (Dealer) to obtain guarantee policies for your country, province, or state. If for any reason you are dissatisfied with your Distributor's service or have difficulty obtaining guarantee information, contact the Toro importer.