Table of Contents
Advertisement
Quick Links
Advertisement
Table of Contents

Related Manuals for Zanussi ZCK18307XA


Summary of Contents for Zanussi ZCK18307XA
- Page 1 User & Installation Manual Cooker ZCK18307XA ZCK98307XA...
-
Page 2: Table Of Contents
• Once the packaging has been removed heater. from the outer surfaces and the various • Do not touch any electrical appliance if inner parts, thoroughly check that the hands or feet are wet or damp. appliance is in perfect condition. If you have www.zanussi.com... - Page 3 All repairs or adjustments must be carried www.zanussi.com...
-
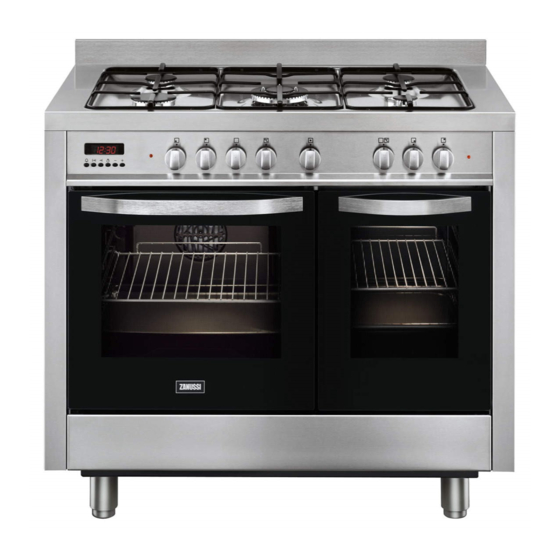
Page 4: Product Description
The oven walls are fitted with various runners = “Full on” position (fig. 1) on which the following accessories = “Reduced rate” position can be placed (fig.2). Supply and quantities vary from model to model: • oven shelf • drip tray or drip pan fig.3 www.zanussi.com... -
Page 5: Electronic Programmer
Manual operation mode = Grill heating element and fan on Setting time backwards Setting time forward The digital display (N) always shows the time and can display cooking and end of cooking time or the minute counter time by pressing www.zanussi.com... - Page 6 AUTO and symbol will turn on) and then the end of cooking time (the symbol will turn off) as described previously. The symbol will turn on again when baking in the oven starts. At the end of cooking time the www.zanussi.com...
-
Page 7: Operation
Add more water during grilling to compensate for evaporation. After using the appliance ensure that all the controls are in the off position. How to use the multifunction oven Left oven cavity Defrosting at room temperature fig.1 www.zanussi.com... -
Page 8: Traditional Cooking
If pre-heating is adjust the thermostat knob to the desired recommended wait till the thermostat yellow temperature, then place your food inside the warning light turns off before placing foods oven. inside the oven. Both the bottom and top www.zanussi.com... - Page 9 Always decorate it with cream, jam, confectioner’s pour a little water in the drip pan. It will cream, etc.. prevent grease and sauces from burning avoiding burnt smells and smoke. Add more www.zanussi.com...
- Page 10 Victoria sponge 40-45 CAKES Angel cake Fruit cake Chocolate cake The values given in the tables (temperatures habits. This table gives cooking times on only and cooking times) are approximate and may one shelf. vary according to each person’s cooking www.zanussi.com...
- Page 11 (placing the shelves on the 2nd and 4th habits. This table gives cooking times on position) cooking time will be about 5 to 10 minutes longer. www.zanussi.com...
-
Page 12: Grilling Table
One of the features of our cookers is that the inner oven door glass can be easily removed Structure for cleaning without the aid of specialized All the cooker parts (in enamelled or painted metal, steel, or glass) should be cleaned www.zanussi.com... - Page 13 • Once the hinge is free, pull the door Fig. 7 forwards tilting it slightly upwards to free sector. • To reassemble proceed in the reverse order, paying attention to the correct position of sectors. www.zanussi.com...
- Page 14 2 hours on the maximum thermostat position. Wait for the oven to cool down and then go over it again with a damp sponge. If you are unable to remove all the substances, repeat the above procedure. Fig. 11 www.zanussi.com...
-
Page 15: What To Do If
• This appliance is not connected to a flue • The walls adjacent to and surrounding the for discharge of the combustion products; appliances must be able to withstand an therefore, it must be connected in compliance temperature of 95°C. with the above mentioned installation rules. www.zanussi.com... -
Page 16: Positioning The Cooker
5 AIR INLET MIN. SECT. 100 cm fig. 1 Location and aeration Gas cookers must always discharge the fig. 4 products of combustion and the moisture www.zanussi.com... - Page 17 This cooker is designed to be installed Ensure that the main connection pipe with an appliance flexible connection. does not exert any strain on the cooker Connection is made to the RC 1/2 (1/2’’ www.zanussi.com...
- Page 18 • For connecting do not use, adapters or Attention! On its route, the hose must shunts as they could cause false contacts not touch any parts where the over resulting in hazardous overheating. temperature is than 95°C. When connecting directly to the mains: www.zanussi.com...
- Page 19 www.zanussi.com...
- Page 20 After having replaced the injectors, it will be necessary to proceed with burner adjustment as explained in the previous paragraphs. The technician must replace any seals after the adjustments have been made. Fig. 12 Fig. 11 www.zanussi.com...
- Page 21 • If you have to change the power cable (see the cross section on table in the “Technical information” section), always keep the earth wire longer than the phase wires and, in addition, Fig. 14 www.zanussi.com...
-
Page 22: Technical Information
1/100 mm GPL 30 1600 3800 Ultrarapid Natural gas 20 135-K 1600 3800 GPL 30 3000 Rapid Natural gas 20 117-Y 3000 GPL 30 1800 Semi-rapide Natural gas 20 98-Z 1800 GPL 30 1000 Auxiliary Natural gas 20 75-X 1000 www.zanussi.com... -
Page 23: Environment Concerns
It must therefore be delivered to a waste recycling centre specifically for electric and electronic equipment or returned to www.zanussi.com... - Page 24 www.zanussi.com/shop...